
Listen, I don’t know about you, but when the big game is on or company drops by unexpectedly, I need an appetizer that screams *flavor* but whispers *effortless*. Forget fiddling with deep fryers; we are baking our way to crispy perfection today! These bacon-wrapped, cheesy delights—we lovingly call them Jalapeno Mummies—are my go-to because they look impressive but honestly take minutes to assemble. I just adore recipes that look a little spooky or dramatic but deliver pure, smoky, cheesy satisfaction. Trust me, these disappear faster than you can say ‘game day victory.’
Why You Will Love These Jalapeno Mummies
When I’m looking for something that’s guaranteed to vanish from the platter, these are the ones I turn to. They tick every single box for a stress-free, crowd-pleasing snack. I know you’ll get hooked just as fast as my family did!
- They are baked, not fried, which means way less cleanup in my kitchen.
- The texture is the perfect trio: crunchy bacon, creamy cheese filling, and a slight kick from the pepper.
- They look fun! Seriously, they’re festive enough for Halloween but awesome for any casual gathering.
- You can get the stuffing done ahead of time, making party day super relaxed.
- Honestly, they’re just way better than those freezer-aisle versions. Once you try real cream cheese in there, you can’t go back. Check out my other quick snack ideas if these get made too fast!

Essential Ingredients for Perfect Jalapeno Mummies
You only need five very basic things to make these amazing Jalapeno Mummies, and chances are you have most of it already! The secret here is making sure those few ingredients are handled correctly. We aren’t doing anything fancy, just using good quality stuff!
- 12 fresh jalapeno peppers (You’ll need the whole dozen!)
- 8 ounces cream cheese, important: make absolutely sure it is fully softened to room temperature.
- 1/2 cup shredded cheddar cheese—sharp or mild, your call!
- 1/4 teaspoon garlic powder for just a little punch.
- 12 slices of everyday bacon.
Pro tip on the bacon: I find that regular-cut bacon works best here. Thin-cut bacon burns before the pepper cooks through, and super thick-cut takes forever to get crispy. Regular cut gives you that perfect balance of texture.
Ingredient Notes and Substitution Guidance
Okay, let’s talk jalapenos. Please, please, please wear some gloves when you’re slicing these open and scooping out those seeds and membranes! I’ve learned that lesson the hard way, trust me, your hands will thank you later.
Also, that cream cheese needs to be nice and soft—not melty, but soft enough that you can easily mix it without lumps. If it’s cold, you’ll end up with clumps of cheese in your filling, and we want ours smooth and creamy!
If cheddar isn’t your jam, Monterey Jack melts beautifully and is a great substitute. If you want a little extra flavor pop, try mixing in 1/4 cup of Pepper Jack instead of the cheddar. It just kicks up the heat a tiny bit.
Step-by-Step Instructions for Making Jalapeno Mummies
Putting these Jalapeno Mummies together is seriously quick once you get into the rhythm. Remember, we are baking these, so we need to set the stage for success right at the beginning! The oven needs to be hot and ready for action when the bacon starts wrapping.
First things first: get your oven cranked up to 375 degrees Fahrenheit. While that’s heating, grab your baking sheet and line it with parchment paper. This little step saves you so much scraping duty later, and it helps the bacon juices spread out nicely instead of getting glued to the pan. Don’t forget to check out my other favorite baked appetizers while you’re waiting for the oven to preheat!
Next, take those jalapenos and slice them right down the middle lengthwise. Now for the fun part: carefully scoop out all those seeds and the white membrane inside. That membrane is where most of the intense heat lives, so if you like things milder, scrape it out really well!
Preparing the Jalapeno Mummies for the Oven
Once you have your hollowed-out peppers ready, it’s time to make them look like little wrapped treasures. In a small bowl, just mush together that softened cream cheese, the shredded cheddar, and that tiny bit of garlic powder until it’s all happy and combined. No fancy mixer needed; a fork works just fine!
Take a good spoonful of that cheesy mix and gently press it into each jalapeno half. Don’t overstuff them, or the cheese will ooze out everywhere when it melts! Now for the wrapping—take one slice of bacon and wrap it snugly all the way around the stuffed jalapeno half. If your bacon slice isn’t quite long enough to meet on the bottom, use a little toothpick to secure the ends; it’s like stitching up your mummy!

Baking Your Jalapeno Mummies to Crispy Perfection
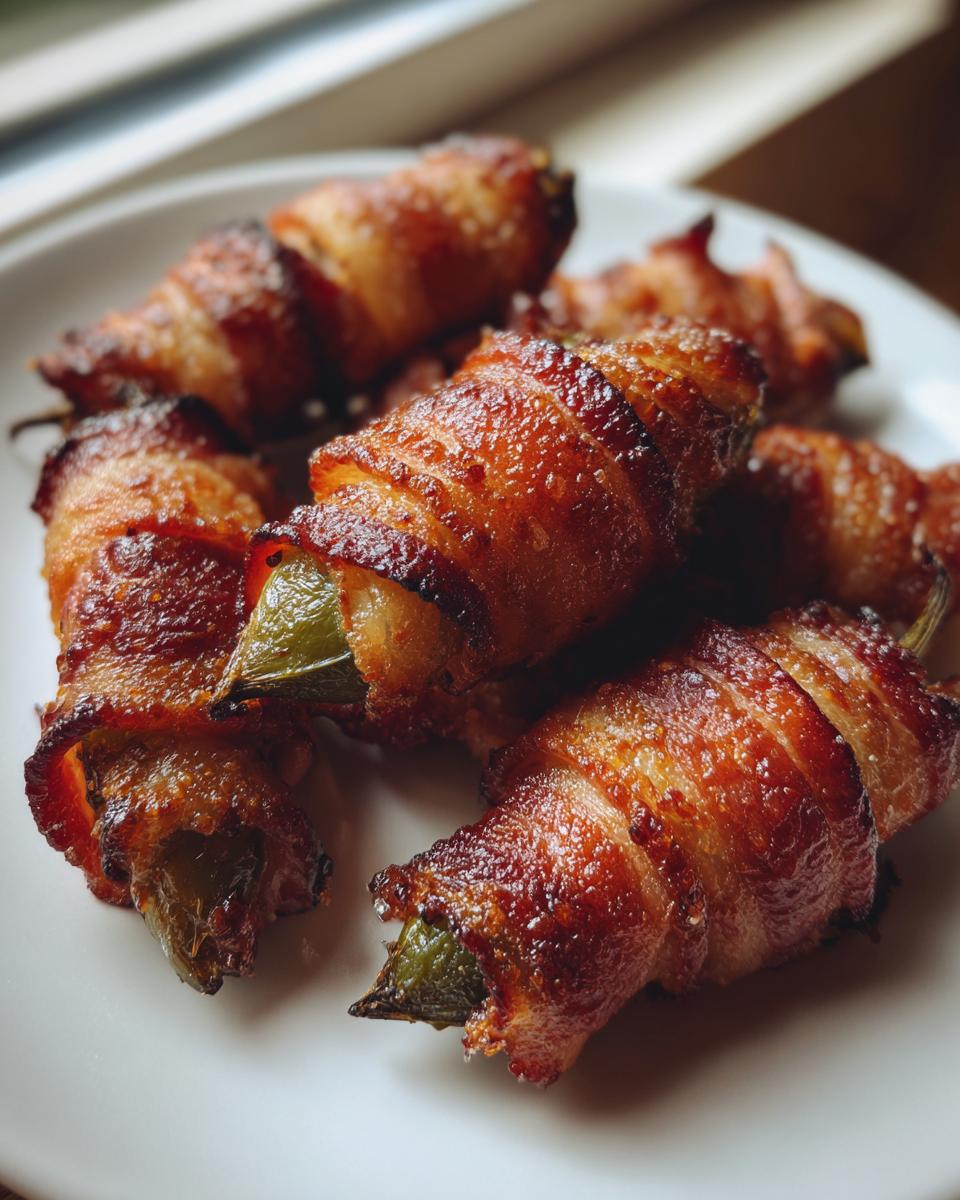
Lay all your wrapped, stuffed beauties onto that prepared baking sheet, seam-side down if you can manage it. They need to bake at 375 degrees Fahrenheit for about 20 to 25 minutes. That’s the sweet spot for melting that cheese to gooey heaven and making the bacon beautiful and crisp.
You’ll know they’re done when the bacon looks nice and browned—no one wants floppy bacon on their Jalapeno Mummies! The cheese filling should be puffy and just starting to turn golden around the edges. Pull them out, let them cool down for just two minutes so you don’t burn your mouth, and get ready to serve!
Tips for Making the Best Jalapeno Mummies
Even though these are super simple, a few little tricks will take your Jalapeno Mummies from good to absolutely legendary. I’ve picked up these pointers over the years, usually after a slight mishap or two! Follow these and you won’t go wrong.
First, let’s talk heat control. If you or your guests aren’t huge spice fanatics, use that tip from the notes! Soak your hollowed-out jalapeno halves in a bowl of cold water for about 15 minutes before you stuff them. It pulls out some of the harsh oils without ruining the flavor. Rinse them off really well afterward, too.
Next, to guarantee crispy bacon, try this: before you wrap the bacon around the cheese filling, pat the bacon slices dry with a paper towel. Removing that extra little bit of moisture helps it crisp up faster and brown beautifully instead of steaming itself. This is a game-changer, seriously!
Also, make sure you don’t overcrowd the pan. If the jalapenos are touching too much when they bake, the bacon steams instead of roasts, and you end up with soft spots. Give them a little space to breathe so that heat circulates nicely around every single one. You can always bake them in batches if needed; nobody minds waiting a few extra minutes for perfect texture! If you’re looking for other appetizers that disappear lightning-fast, definitely check out that link.
Variations on Classic Jalapeno Mummies
The basic Jalapeno Mummies recipe is fantastic on its own—I mean, bacon and cheese always win! But sometimes I get bored or I’m making them for people who like a little something *different*. This is where you can really have fun and make the recipe your own without messing up that perfect baked texture.
Tweaking the cheese blend is probably the easiest way to change things up. If you want to amp up that savory, smoky flavor, swap out the cheddar entirely for smoked Gouda. It melts so beautifully and gives the filling a wonderfully deep note. Or, if you like things spicier, use Pepper Jack cheese instead of cheddar. That little bit of extra heat mixes nicely with the bacon fat.
I also love giving them a savory crunch on top before they ever see the oven. Right before they go in, try crumbling some crushed corn chips or even Ritz crackers mixed with a tiny bit of melted butter right over the exposed cheese filling. It adds a great texture contrast to the creamy center and the crisp bacon wrapper. It’s a fun little addition, especially when paired with a rich dip, similar to what you’d use with my Rotel dip recipe!
For a bolder flavor profile, try mixing in a tablespoon of finely chopped, cooked green onion right into your cream cheese mixture. It brightens up the whole thing when you bite into it. Honestly, once you nail the basic wrapping technique, the filling variations are endless!
Serving Suggestions for Your Jalapeno Mummies
Once these gorgeous Jalapeno Mummies come out of the oven, you absolutely need something cool and creamy ready for dipping! The smoky bacon and sharp cheese seriously demand a nice, refreshing contrast. I always make sure I have a few options ready to go so everyone can tailor the heat level to their liking.
Ranch dressing is an absolute classic standby. It’s cool, it’s herby, and it cuts right through the richness of that bacon fat perfectly. You can use your favorite store-bought, or if you are feeling ambitious, whip up a quick homemade ranch dip. If you want something tangier, a light lime crema is amazing. Seriously, the fresh citrus just sings next to the spice!
For a side, a little bit of something fresh helps cleanse the palate. I sometimes serve them alongside a tiny, crisp salad—maybe something like my Cobb Salad if I’m making a bigger spread. But honestly, just a bowl of fresh celery sticks works wonders too. Just make sure you have those cooling dips ready!
Storage and Reheating Instructions for Leftover Jalapeno Mummies
Okay, let’s be realistic—sometimes you make too many, even though you swear you won’t! That is totally fine because these Jalapeno Mummies chill out beautifully in the fridge, but we have to handle reheating them right so they stay delicious. Nobody wants a soggy bacon wrap, am I right?
When you have leftovers, the first thing you need to do is let them cool completely on the counter. Once they are room temperature, carefully transfer them into an airtight container. You want to limit the air exposure so they don’t dry out or pick up any weird fridge smells. They should stay good and tasty in the refrigerator for up to three days. Any longer than that, and the bacon starts to lose its structural integrity, which is a tragedy!
Now, for the most important part: reheating! Do yourself a favor and NEVER put these in the microwave. I repeat: do not microwave the Jalapeno Mummies unless you enjoy chewy, soft bacon. Trust me, that steam will ruin the crispness we worked so hard to achieve.
The best way to bring these back to life is in a standard oven or, even better, an air fryer. Preheat your oven to about 350 degrees Fahrenheit. Spread the cooled Jalapeno Mummies out on a baking sheet—no need to cover them—and bake them for about 8 to 10 minutes. You are just aiming to warm the filling and crisp up that bacon again without scorching it.
If you’re using an air fryer, you’re going to get even better results! Set that basket to 325 degrees and only cook them for about 5 minutes. Watch them closely, though, because the basket circulation is intense. They’ll come out tasting nearly as good as freshly made, and you’ll be so glad you saved them!

Frequently Asked Questions About Jalapeno Mummies
I get so many messages about these Jalapeno Mummies after people try them, which is the best! It means people are keeping the snack tradition alive. Here are the top three things everyone asks me when they want to make a batch for a party or just for a weeknight treat.
How do I make these Jalapeno Mummies less spicy for the kids?
That’s a common concern! The heat definitely comes from the seeds and the white membranes inside the pepper, not just the pepper flesh itself. The number one trick, which I mentioned briefly, is soaking the hollowed-out peppers in a bowl of very cold water for about 15 minutes before you stuff them. This actually leaches out a good amount of the capsaicin oil. Make sure to pat them thoroughly dry before you add the cheese filling so your bacon wrap stays crisp!
Can I use turkey bacon or another meat substitute instead of regular bacon?
You definitely can experiment with the wrapper! If you use turkey bacon, just know it tends to dry out a lot faster than regular pork bacon because it has less fat. You’ll want to bake them for closer to the lower end of the time range—maybe only 18 minutes—and check constantly so they don’t get hard like chips. You might even consider weaving the turkey bacon strips instead of wrapping them straight around for better coverage.
Can I prep these Jalapeno Mummies the night before?
Yes, prepping ahead saves so much stress on party day! You can absolutely slice the peppers, remove the membranes, and mix the cheese filling mixture and stuff them all the way up the day before. Assemble them completely with the bacon wrapper, secure them with toothpicks if needed, and then place the assembled but unbaked poppers on a parchment-lined tray.
Cover the tray tightly with plastic wrap and pop them in the fridge overnight. When your guests arrive, just slide them straight onto the preheated 375-degree oven. They might need an extra minute or two in the oven since they are going in cold from the fridge, but they’ll be perfect! If you want more appetizer genius, you have to check out the surprising flavor in my Jalapeno Popper Macaroni Salad!
Nutritional Snapshot of These Jalapeno Mummies
Now, these are bacon-wrapped and cheese-stuffed, so they aren’t exactly a light salad, but because we bake them instead of deep-frying, they come out surprisingly reasonable for a satisfying appetizer. I always look at the macros before I serve them, just so I know what kind of spread I’m making!
- Serving Size: 1 popper
- Calories: Around 110
- Fat: About 9 grams (mostly from that glorious bacon!)
- Protein: Roughly 6 grams
- Carbohydrates: Just 2 grams
Keep in mind, these numbers are based on using standard bacon and cheddar cheese. If you substitute in turkey bacon or use leaner cheese, those numbers will shift slightly, of course. Enjoy them responsibly, but seriously, eat more than one!
Print
Jalapeno Mummies
- Total Time: 40 min
- Yield: 12 poppers 1x
- Diet: Low Fat
Description
Bacon-wrapped jalapeno poppers baked until crispy.
Ingredients
- 12 jalapeno peppers
- 8 ounces cream cheese, softened
- 1/2 cup shredded cheddar cheese
- 1/4 teaspoon garlic powder
- 12 slices bacon
Instructions
- Preheat your oven to 375 degrees Fahrenheit. Line a baking sheet with parchment paper.
- Cut the jalapenos in half lengthwise and remove the seeds and membranes.
- In a small bowl, mix the cream cheese, cheddar cheese, and garlic powder.
- Spoon the cheese mixture into each jalapeno half.
- Wrap one slice of bacon around each stuffed jalapeno half, securing it with a toothpick if necessary.
- Place the wrapped jalapenos on the prepared baking sheet.
- Bake for 20 to 25 minutes, or until the bacon is crisp.
Notes
- For easier handling, wear gloves when seeding the jalapenos.
- If you prefer a less spicy popper, soak the hollowed jalapenos in cold water for 15 minutes before stuffing.
- Prep Time: 15 min
- Cook Time: 25 min
- Category: Appetizer
- Method: Baking
- Cuisine: American
Nutrition
- Serving Size: 1 popper
- Calories: 110
- Sugar: 1
- Sodium: 250
- Fat: 9
- Saturated Fat: 4
- Unsaturated Fat: 5
- Trans Fat: 0
- Carbohydrates: 2
- Fiber: 0
- Protein: 6
- Cholesterol: 30
Keywords: jalapeno poppers, bacon wrapped, appetizer, spicy, cheese stuffed