
October is my absolute favorite time in the kitchen! Forget the fancy, complicated recipes; when Halloween rolls around, I want maximum spook factor with minimum cleanup. That’s why these Halloween Dirt Cupcakes are a true staple in my house. I’ve been whipping these up for neighborhood parties since my own kids were tiny—mostly because they are dangerously easy to assemble. Seriously, if you can open a box and crush a cookie, you can nail this dessert. They look amazing when you serve them up and they disappear faster than Dracula at sunrise!
Why You Need These Easy Halloween Dirt Cupcakes
Listen, I know you’re busy planning costumes and haunted houses, so we don’t have time for fussy baking projects in October. That’s where these dirt cupcakes shine! They take almost no effort, but the kids absolutely lose their minds when they see them. If you’re looking for a festive treat that doesn’t require you to be a pastry chef, these are your absolute ticket.
- Quick Assembly Time: We’re talking about 20 minutes of active work plus cooling time. You’ll have an army of spooky treats ready before your guests even arrive, especially if you’ve checked out my guide for quick Halloween cookie recipes for backup!
- Perfect for All Ages: These Halloween Dirt Cupcakes are foolproof. If you have little helpers who want to participate, let them crush the cookies! It’s tactile, messy fun, and they can’t really mess it up.
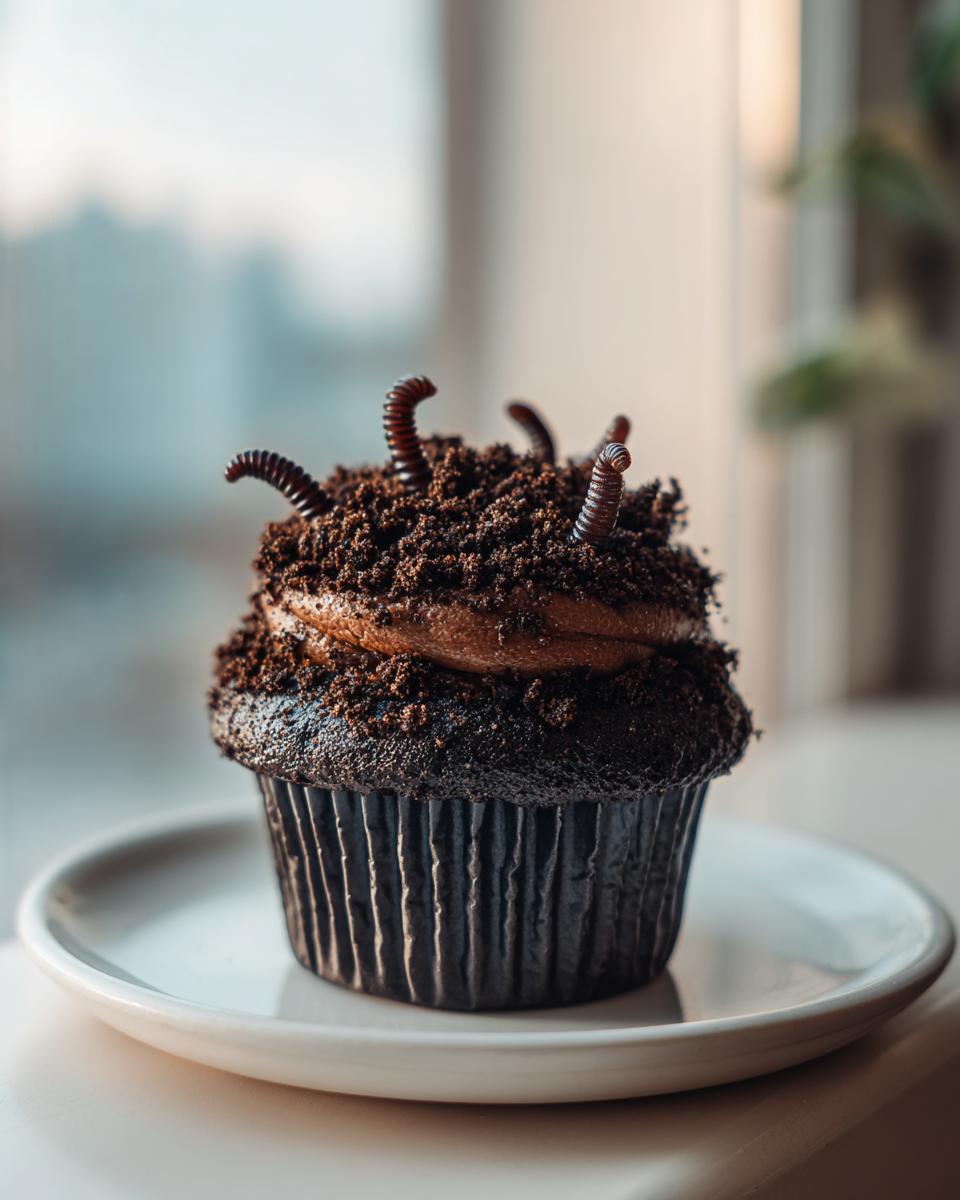
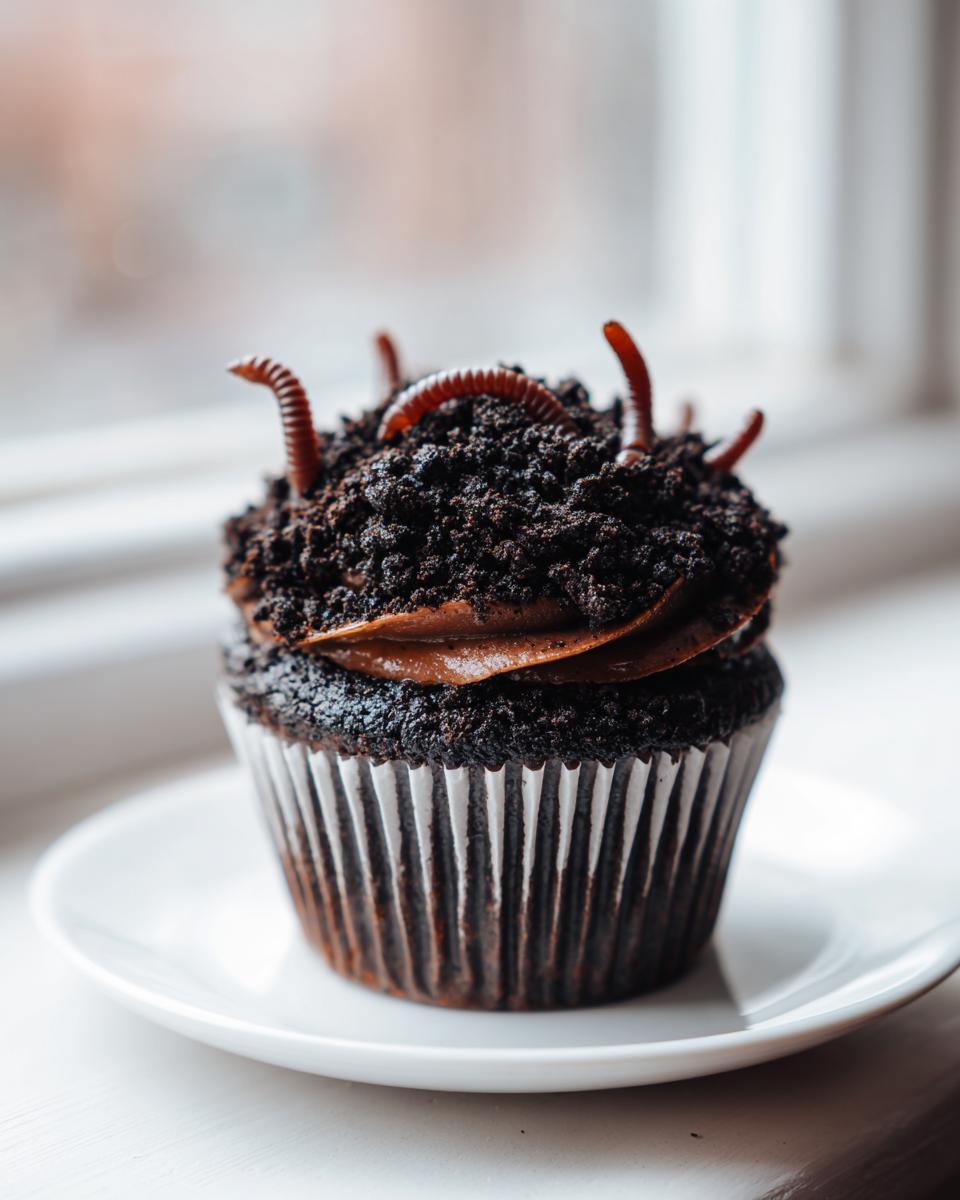
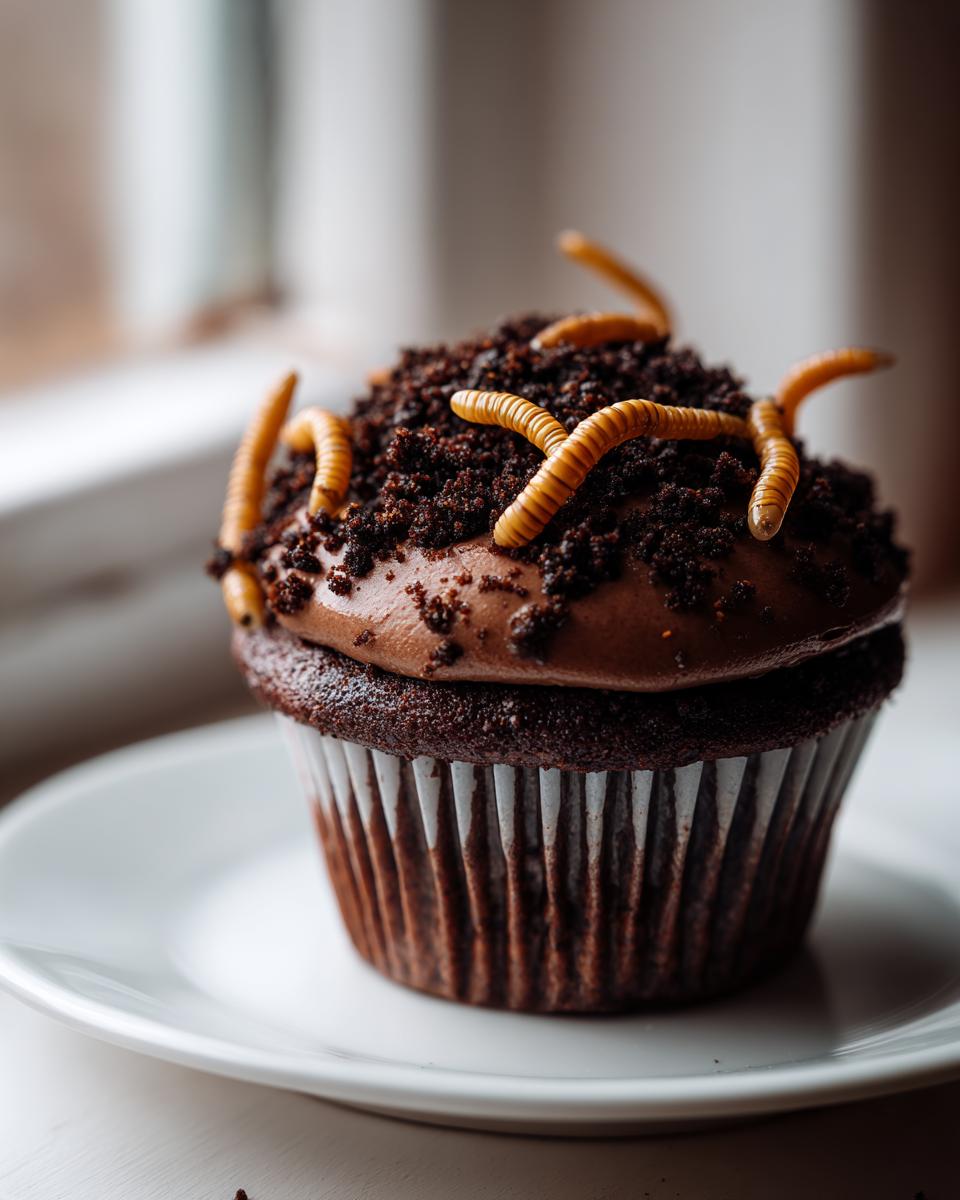
- Maximum Spooky Factor: Honestly, the visual payoff is huge for how little work we put in. Who doesn’t love seeing a chocolate cupcake that looks like rich graveyard soil complete with realistic sticky worms emerging? It’s instant party décor!

Gathering Ingredients for Halloween Dirt Cupcakes
Okay, the best part about this recipe is that it’s based on a box mix, so we aren’t running all over town for obscure items. That being said, the quality of the few things we *do* use makes a big difference to the final texture and taste. I always keep these staples stocked because you never know when a spontaneous spooky craving will hit!
We aren’t making a fancy layer cake here, we’re making fun, messy dirt! If you’re interested in looking up other simple chocolate magic, I have some great ones like these chocolate chip tahini cookies, but today, we stick to the theme.
For the Chocolate Cupcakes (Base)
You just need your favorite box of chocolate cake mix—any brand works great here. Make sure you grab the necessary additions listed on the box, which usually means eggs and oil. But here’s a little secret: Use milk instead of water for a richer flavor, as per expert tip. That little swap makes the standard mix taste way more homemade!
For the ‘Dirt’ and Frosting
This is where the mess factor gets high, which is why I love it. You’ll need one tub of store-bought chocolate frosting. It needs to be soft enough to spread easily. Then, the star ingredient: one package of chocolate sandwich cookies, crushed finely to resemble dirt. Don’t just crush them a little bit; we want that fine, crumbly texture, like it’s been plowed under!
For Decoration
You absolutely cannot have dirt without the things that live in it! Grab a bag of gummy worms. I usually budget for about 2-3 worms per cupcake, but honestly, the kids always sneak a few extra when I’m not looking. Don’t stress over exact counts here; just make sure you have plenty for that authentic, slightly gross, totally fun look.
Step-by-Step Instructions for Perfect Halloween Dirt Cupcakes
Getting these ready for your spooky table is surprisingly straightforward. We’re taking a store-bought shortcut on the cake, but the assembly stage is where we put in the loving, messy effort. Trust me, watching the dirt slowly cover the beautiful chocolate frosting is half the fun!
Baking the Cupcake Base
First things first, we need our chocolate foundations. Prepare your box mix according to the package directions—remembering that little swap for milk instead of water we talked about? Get them into the liners and into the oven. Keep an eye on them; you want them done but not dry. The biggest rule here, and I mean the BIGGEST rule if you want clean frosting, is that you must let those cupcakes cool completely. If they are even slightly warm, your frosting is going to melt right down the sides, and you’ll just have chocolate puddles instead of lovely hills of dirt.
Creating the Cookie ‘Dirt’
While the cupcakes are cooling down—which seems to take forever, doesn’t it?—it’s time to make the dirt! Take your chocolate sandwich cookies and get them into a food processor. Pulse them until they look exactly like rich garden soil. If you don’t have a processor, put them in a heavy zip-top bag, seal it tight (wrap it in a towel if you’re worried about noise!), and just bash them with a rolling pin until they’re fine crumbs. You want texture, so don’t turn it into fine dust, but definitely no big white cream centers showing through!
Assembling Your Halloween Dirt Cupcakes
Now for the grand finale! Grab your cooled cakes and your soft chocolate frosting. Slather a nice thick layer onto the top of each cupcake. Don’t be shy; you need enough ‘glue’ to hold the dirt on well! Next, take your crushed cookies and sprinkle them generously over that frosting. Cover every single surface—we’re making graves here, not just toppings!
Here is the pro move: For best results adhering the ‘dirt,’ chill the frosted cupcakes for 15 minutes before sprinkling. It firms up that frosting just enough. Once they are coated, take your gummy worms and gently push them into the crumbly topping. Push them in at different angles so they look like they are actually crawling out of the earth! Check out my tips on using cake mix cookie hacks for other fast weekend baking projects while you wait for them to set!
Tips for Next-Level Halloween Dirt Cupcakes
Okay, so you’ve got the basic dirt cupcake down, but you want to take yours from “cute” to “terrifyingly delicious,” right? I get it! We need to elevate this from a simple box mix to something that makes people stop and say, “Wow, you *made* these?” These little tweaks really add depth to the flavor and make the presentation so much cooler. If you really want to dive into decadent chocolate textures, take a peek at my guide to chocolate caramel toffee cake recipes for inspiration!
Making the Frosting Look Deeper
Store-bought chocolate frosting is usually a bit reddish-brown, which isn’t exactly deep, menacing graveyard soil. My trick? Add a teeny, tiny drop—and I mean tiny—of black food coloring right into your tub of frosting and mix it up really well. When you frost the cupcake with this almost-black icing, it creates a perfect dark base layer. It makes the lighter brown cookie crumbs really pop, giving you that incredible earthy dimension.
Worm Placement Secrets
Don’t just lay your gummy worms right on top like they are sunbathing! That looks flat. Instead, when you poke them in, go at an angle. Gently press them deep enough so that only the head and maybe a curl or two peek out of the cookie topping. It gives the illusion that they are actively burrowing their way through the soil. It’s a small change that makes a huge, creepy difference!
Adding Texture to the Dirt
The sandwich cookies give us that standard crumbly look, but if you want texture that looks even more realistic—like different types of soil—try this: After crushing your main batch of sandwich cookies, take about a quarter cup of plain chocolate wafer cookies (like Nabisco wafers, the ones without the cream) and crush those separately. Mix these slightly chunkier bits into your main ‘dirt’ pile. It gives your Halloween Dirt Cupcakes a fantastic varied texture that screams realism!
Variations on the Classic Halloween Dirt Cupcakes
Even the easiest recipes deserve a little yearly makeover, don’t you think? While there is nothing wrong with sticking to the classic dirt and worm combo—it’s a winner for a reason—sometimes I like to add just a little something extra to make my Halloween Dirt Cupcakes stand out on the dessert table. These optional steps let you get really creative without adding much more time at all. If you’re looking for other fun twists on chocolate, you should check out my guide on swirled chocolate cupcakes for a slightly fancier base.
Spiderweb Frosting Detail
This is a simple presentation trick that looks way more complicated than it is! Before you cover the whole cupcake in that dark ‘dirt,’ take a little bit of white chocolate—melted slightly, or even just plain white icing if you have piping bags—and pipe a small spiral right onto the center of the dark frosting. Then, take a toothpick and gently drag it from the center out to the edge in four or five spots. You get this perfect, spooky spiderweb effect right underneath your cookie crumbs!
Grave Decorations
Why stop at worms when you can have a whole miniature cemetery? Take a few extra chocolate wafer cookies—the ones without the cream filling work great because they are flatter and sturdier. Break them into thin rectangles. Then, use a small tip and some white icing or royal icing to write ‘RIP’ on them. Gently stick these little tombstones into the sides of the frosted cupcakes before you cover them with the cookie dirt. They stand up nicely and give your Halloween Dirt Cupcakes a real graveyard vibe!
Serving Suggestions for Your Halloween Dirt Cupcakes
Since these Halloween Dirt Cupcakes are just pure, rich chocolate decadence, you need drinks that are either super simple or something bright to cut through that sweetness. My kids always go straight for an ice-cold glass of milk; you can’t beat that classic pairing, right? For the adults or older kids at a party, mix up a big bowl of bright red or purple non-alcoholic punch. Something fruity keeps things light! If you need a super-fast treat for yourself later, you should still check out my guide on the quick chocolate mug cake for instant gratification!
Beverage Pairings
Cold milk is non-negotiable for the full childhood experience. If you want something a little more festive, try making a simple, brightly colored punch. A cranberry-ginger ale mix looks spooky red in a glass punch bowl and balances the heavy chocolate perfectly!
Display Ideas
Presentation is everything, even for dirt! Instead of just setting the platter down, take some extra powdered sugar—the stuff you use for dusting—and very lightly dust the entire serving platter *around* the cupcakes. It mimics that foggy, misty look of a spooky graveyard at dawn. It makes people pause before grabbing one, and honestly, it just elevates the whole spooky setup!
Storage and Reheating for Halloween Dirt Cupcakes
We’ve put in the effort to make these look great, so we definitely want them to last past the first hour of the party! Because these Halloween Dirt Cupcakes have that crumbly cookie topping and those wiggly gummy worms, storage is important. You really don’t want them getting soggy or sliding off in a warm room.
Keeping the ‘Dirt’ Fresh
If you are making these ahead of time, the best way to go is to keep your baked cupcakes completely unfrosted and stored in an airtight container on the counter. Frost and top them right before the party starts. If you must frost them ahead of time—maybe you’re short on time on Halloween day—put them in an airtight container. Just know that if they sit in the fridge for too long, that lovely cookie topping might soften up a bit because of the condensation. The worms are fine, but the ‘dirt’ texture will change slightly, so fresh assembly is always the goal!
Frequently Asked Questions About Halloween Dirt Cupcakes
I always get questions about these because everyone wants to make sure their chocolate cookies look perfectly muddy! It’s smart to ask ahead of time so your spooky dessert centerpiece is always a hit. If you need more ideas for treats that always make people gasp, my guide to making Halloween ghost brownies is another winner!
Can I make the ‘dirt’ topping ahead of time?
Oh yes, you absolutely can! That’s one of my favorite time-savers. You can crush all your chocolate sandwich cookies and store the resulting ‘dirt’ in a really airtight container at room temperature for up to two whole days. The key is to keep them dry so they don’t go soft before application. We want crisp, crumbly earth, not damp mud!
What if I don’t have a food processor for the cookies?
Don’t worry about that fancy gadget! We’ve all been there, looking at a recipe and realizing our machine is packed away. Just place those chocolate sandwich cookies into a sturdy zip-top bag, seal it almost all the way, and gently squeeze out the air. Then, grab a rolling pin or even the bottom of a heavy saucepan and just bash away! It’s actually quite therapeutic after a long day, and you get that perfect coarse crumb texture for your Halloween Dirt Cupcakes.
Do these Halloween Dirt Cupcakes need to be refrigerated?
That depends on your frosting situation. If you stick to the standard canned chocolate frosting like I usually do, then yes, for food safety, especially if you’re making them more than a few hours ahead, you should keep them refrigerated. Just know that the cookie topping might soften a tiny bit in the cold air compared to room temperature. If you happen to make your own buttercream frosting without dairy, you might get away with keeping them covered on a cool counter, but I always default to the fridge just to be safe with that delicious cake base!
Estimated Nutritional Data for Halloween Dirt Cupcakes
Listen, these are fun Halloween Dirt Cupcakes, not kale smoothies, so we know we aren’t winning any health awards here! But if you are curious how much sweetness you’re sending out to the neighborhood goblins, here is the general breakdown. Remember this is just an estimate based on the standard box mix and store-bought frosting, and it’s based on sharing nicely—one cupcake per person.
Treat this table as a general guide for one serving:
- Serving Size: 1 cupcake
- Calories: 350
- Sugar: 35g (Yes, a lot of sugar, but that’s the fun part!)
- Sodium: 250mg
- Fat: 18g
- Saturated Fat: 5g
- Unsaturated Fat: 13g
- Trans Fat: 0g
- Carbohydrates: 45g
- Fiber: 2g
- Protein: 4g
- Cholesterol: 20mg
Share Your Spooky Creations
I absolutely love seeing how you all tackle these ridiculously fun Halloween Dirt Cupcakes! My version is just one way to do it, and I know your creative minds have probably dreamed up even spookier ways to decorate them. Once you’ve finished frosting and worm-placement, please, please leave me a comment below and let me know how they turned out. Did your worms look like they were really squirming? Did you use my black frosting trick?
If you end up posting pictures of your muddy masterpieces on social media, tag me! I always look forward to seeing your decorating skills. Seriously, showing off those finished spooky treats brightens my whole week. And always remember, if these dirt desserts were a hit, you should really take a look at my tutorial for making amazing Halloween vampire bite cupcakes next time you need a scary sweet fix!
Print
Halloween Dirt Cupcakes
- Total Time: 40 min
- Yield: 12 servings 1x
- Diet: Vegetarian
Description
Simple chocolate cupcakes topped with chocolate frosting and crushed chocolate cookies to resemble dirt, often decorated with gummy worms for a festive Halloween treat.
Ingredients
- 1 box chocolate cake mix
- Ingredients required for cake mix (eggs, oil, water)
- 1 tub chocolate frosting
- 1 package chocolate sandwich cookies (like Oreos)
- Gummy worms for decoration
Instructions
- Prepare the chocolate cupcakes according to the cake mix directions.
- Bake the cupcakes and let them cool completely.
- Place the chocolate sandwich cookies in a food processor or plastic bag and crush them until they resemble fine dirt.
- Frost each cooled cupcake with the chocolate frosting.
- Generously sprinkle the crushed cookies over the frosting on each cupcake.
- Insert a few gummy worms into the ‘dirt’ topping on each cupcake for decoration.
Notes
- For a richer flavor, use milk instead of water when preparing the cake mix.
- You can chill the cupcakes for 15 minutes after frosting to help the ‘dirt’ adhere better.
- Prep Time: 20 min
- Cook Time: 20 min
- Category: Dessert
- Method: Baking
- Cuisine: American
Nutrition
- Serving Size: 1 cupcake
- Calories: 350
- Sugar: 35
- Sodium: 250
- Fat: 18
- Saturated Fat: 5
- Unsaturated Fat: 13
- Trans Fat: 0
- Carbohydrates: 45
- Fiber: 2
- Protein: 4
- Cholesterol: 20
Keywords: Halloween, Dirt Cupcakes, Chocolate, Dessert, Cookies, Gummy Worms