
Oh my goodness, if you’re anything like me when October rolls around, you need snacks that taste amazing but take next to no adult supervision time. Seriously, between costumes, decorating, and trying to remember where you put your pumpkin carving kit, who has time for complicated appetizers? That’s why I lean hard on recipes that use pre-made shortcuts, and these Halloween Mini Pizzas are my absolute reigning champions!
I’ve hosted more last-minute holiday gatherings than I can count, and these little guys always disappear first. They’re so ridiculously fun to assemble—we’re talking ghosts and mummies made out of biscuits! I usually pull them out when the kids are getting restless while waiting for trick-or-treaters, or honestly, sometimes I just make a few for myself because they hit that perfect savory, cheesy spot without any guilt.
The best part? You’re using basic refrigerated dough. It’s instant pizza gratification! You just need six simple ingredients and about ten minutes before they go into the oven. Trust me, you’re going to want to keep this recipe card handy every single year.
Why You Will Love Making These Halloween Mini Pizzas
Look, Halloween food should be more about the theme and less about a stressful two-hour cooking marathon, right? That’s exactly why I keep coming back to this recipe. It delivers maximum holiday impact for minimal effort. Because we use dough straight from the tube, we skip so many steps, and the kids get obsessed with decorating them.
-
Quick Assembly Time
Seriously, from opening the can to sliding the tray into the oven, it takes about 10 minutes. If you need a last-minute after-school snack or suddenly realize you forgot to make an appetizer for the party tonight, these save the day, every time.
-
Kid-Friendly Fun for Halloween Mini Pizzas
This is where the magic happens! My nephews actually prefer laying out the mummy wrapping themselves. They get such a kick out of making sure the ghost eyes line up perfectly. It turns cooking into a fun, slightly spooky craft session.
-
Minimal Ingredients Required
You probably already have everything needed for the base components sitting in your fridge or pantry right now. We aren’t dealing with complicated sauces or specialty cheeses here. If you want to try a slightly different dough base sometime, you totally can, but the biscuit dough is the secret weapon for speed!
Essential Ingredients for Your Halloween Mini Pizzas
When you’re aiming for fun and fast, you need ingredients that cooperate right out of the packaging. These Halloween Mini Pizzas really depend on using a few shortcuts we all keep on hand. I listed everything out here, but let me tell you, getting the mozzarella prepared for the mummy is the only part that needs a tiny bit of patience—everything else is scoop and sprinkle!
Dough and Base Components
This is the foundation, and it’s the main reason these come together in minutes. Forget rolling out pizza dough from scratch! We’re leaning hard on the refrigerated stuff because it’s perfectly portioned for our little snacks.
-
Refrigerated Biscuit Dough Cups (6): This is the gold standard for speed. Just pop the can, separate the biscuits, flatten them just a smidge, and you’re ready to build your spooky pizza base.
-
Pizza Sauce (6 tablespoons): One tablespoon per biscuit cup. Don’t drown them! A thin layer is all you need, or the dough gets too soggy while baking.
Shaping and Decorating Ingredients for Halloween Mini Pizzas
This is where the ghost and mummy designs come to life. You need sturdy cheese for the wrapping and something dark for the eyes that won’t bleed color into your mozzarella.
-
Shredded Mozzarella Cheese (1 cup): This is for the base layer. It melts down beautifully and helps hold everything together before we add the dramatic toppings.
-
Thin Strips of Mozzarella Cheese (about 12): Okay, this is crucial for the mummy effect. If you’re buying a block of mozzarella, cut the strips super thin—think the thickness of a rubber band. If they are too thick, they won’t melt nicely into that classic mummy wrapping look. If you only have pre-shredded, you might have to skip the mummy design, or use slivers of provolone!
-
Small Black Olive Slices (12): These are the eyes! Make sure they are the little canned slices, not the giant stuffed ones. Two eyes per ghost, that’s all we need. They go on last, right after the pizzas come out of the oven.
Expert Tips for Perfect Halloween Mini Pizzas
I know these look simple—and they are!—but making sure they come out perfectly golden and holding their shape takes just a couple of little tricks I learned over the years of making quick holiday snacks. You don’t want a flat, sad biscuit base, and you definitely want those mummies to look distinct from the ghosts! These small steps elevate your Halloween Mini Pizzas from good party food to *the* essential snack.
Achieving the Best Crust Texture
When you flatten those little biscuit cups, it’s tempting to mash them down completely flat with your palm or a rolling pin. Don’t do it! Resist that urge. When you press them down gently with just your fingers, you are creating a slight rim around the edge while softening the center just enough for sauce.
See, that tiny bit of puffiness around the edge helps keep the sauce and cheese contained while baking. If you flatten them totally flat, you end up with cracker-like little pizzas that can burn quickly. A little bit of height means you get that satisfying, soft, bready crust inside, even after we bake them for just 12 minutes.
Creative Variations for Halloween Mini Pizzas
While ghosts and mummies are my go-to for these Halloween Mini Pizzas, you can totally get wild with the features! The beauty of using biscuit dough is that it’s a blank canvas for whatever spooky faces you can dream up.
-
Pepperoni Spiders: If you have pepperoni on hand, cut four small slivers from one slice and use those as legs around the edge of a round pizza. Then place a whole pepperoni slice in the center and top with the cheese. You get a cute, meaty spider snack!
-
Frankenstein Hair: If you have green bell pepper, thinly slice it and use those little strips instead of mozzarella for the mummy wrapping, or layer it right over the mozzarella. It gives a great, slightly textured, green “hair” look for a Frankenstein-inspired pizza.
-
Go Beyond the Olive: If you can find colored olives, use them! Yellow olives make really unsettling, alien-looking eyes for the ghost pizzas. If you don’t love black olives, try tiny slivers of sun-dried tomato pressed into the cheese for eyes—it adds a great tangy flavor too.
Also, if you get tired of opening those cold biscuit cans, remember you can always swap the base out entirely for a good sturdy pita bread slice or even English muffin halves, though you’ll need to adjust your baking time a bit!
Step-by-Step Instructions for Making Halloween Mini Pizzas
Okay, let’s get messy! This process flies by once you get moving, but keeping the steps straight will ensure you get that perfect ghost shape versus the mummy wrap. Because these Halloween Mini Pizzas bake so fast, you want your oven ready to go the second you finish dressing them up.
Prep Work: Oven and Dough Setup
First things first: get your oven warmed up! Check the top of your refrigerated biscuit dough package because temperature varies, but usually, you’re looking for around 375°F or 400°F. Set a baking sheet aside, maybe line it with parchment if you’re worried about cheese leakage, though honestly, you don’t have to for these tiny things.
Next, open that can of dough—always satisfying! Separate the six dough cups and place them onto your prepared sheet. Now, take your fingers and gently press down on the center of each biscuit. You’re not trying to make a flat cracker; you’re just flattening the main surface area so the sauce doesn’t slide off. Don’t worry about the edges; those will puff up into nice little crusts during the bake.
Assembling the Ghost and Mummy Halloween Mini Pizzas
Time to sauce them up! Spoon exactly one tablespoon of pizza sauce onto the flattened center of each dough piece. Now sprinkle a nice even layer of your shredded mozzarella over the sauce. Keep it light—we don’t want heavy pizzas here!
Here is where you divide your creations. If you’re making ghosts, skip the cheese on a small section where the head will be. This uncovered spot acts as the ‘face’ area; the exposed dough cooks up slightly different and gives you that clean white space for the eyes later.
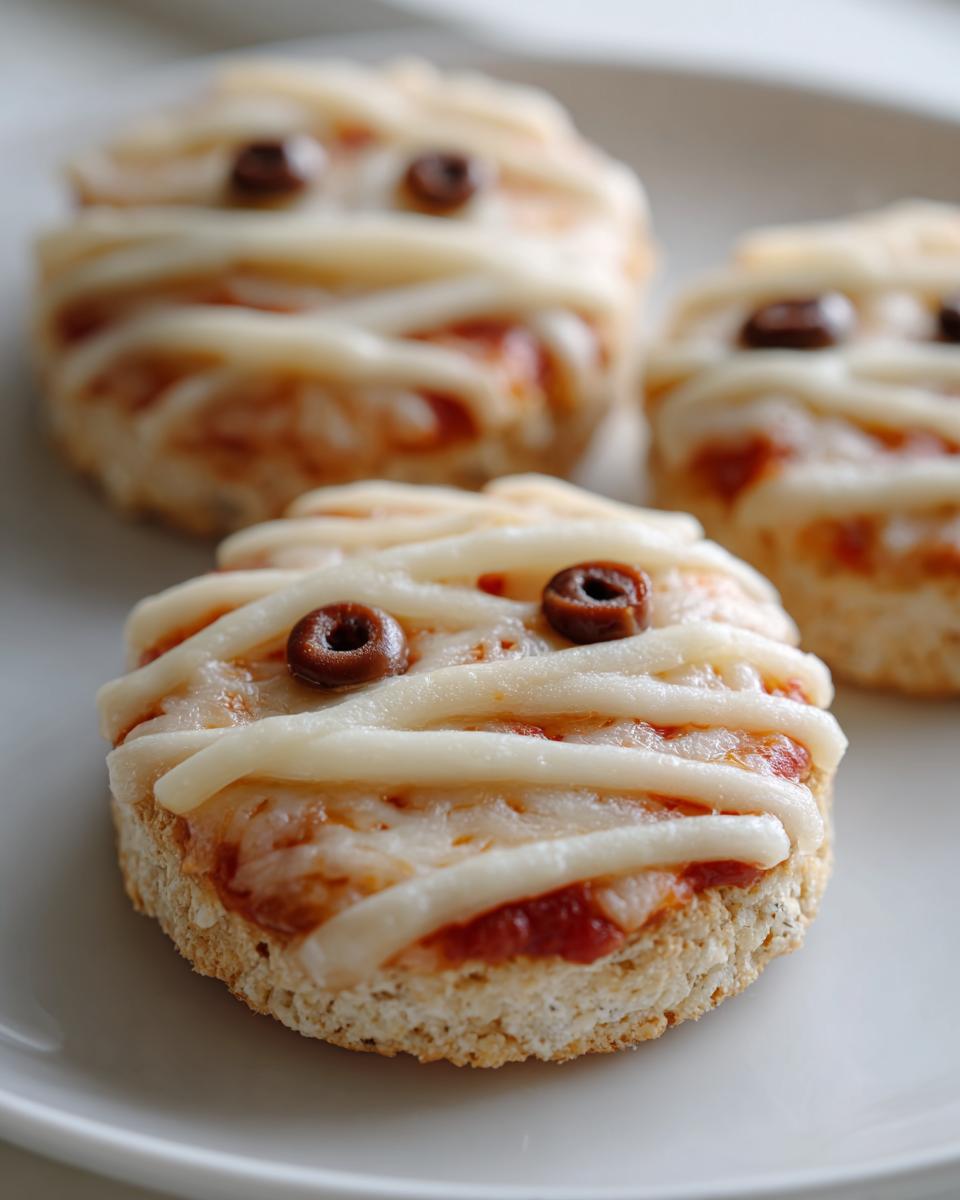
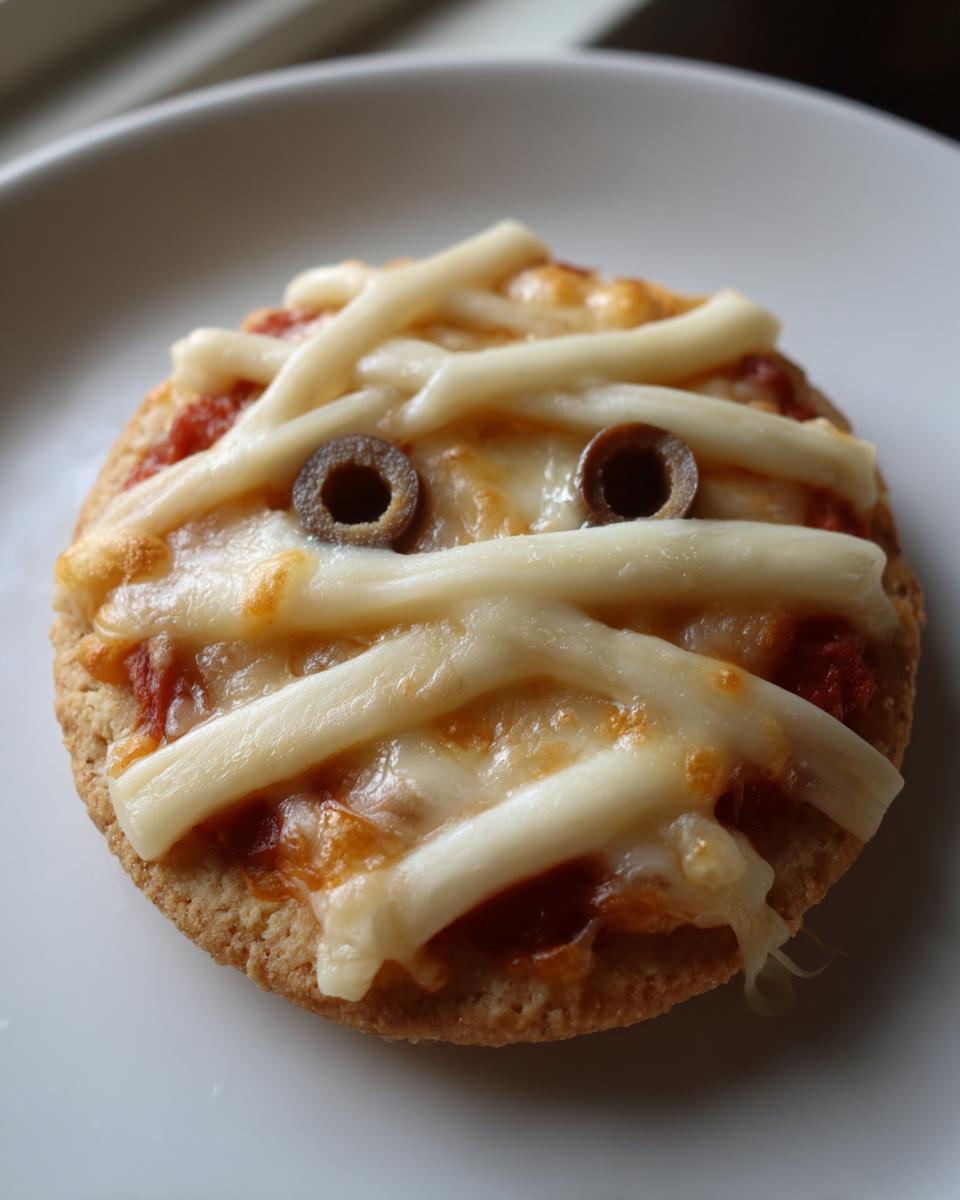
For the mummies, you grab those thin mozzarella strips we talked about. Lay the strips across the cheese layer in a criss-cross, messy wrapping pattern. Just weave them back and forth. Make sure you leave two small triangular gaps open between the strips so you can place the ‘eyes’ later on. Don’t stress if you leave a few big gaps—mummies are supposed to look a little raggedy, right?
If you have any extra dough scraps, you can use those or even make a quick pizza base out of a pita bread and top it like a normal pizza!

Baking and Final Decoration
Slide that tray into the preheated oven. They bake incredibly fast, usually only 10 to 12 minutes total, depending on your oven temperature. You’re looking for the biscuit edge to be nicely golden brown and the mozzarella to be melted and bubbly. Don’t walk away—they go from perfect to overdone quickly!
Pull them out! This is the exciting finish line. While the cheese is still scorching hot and tacky, grab those little black olive slices. Immediately press two slices onto the ghost pizzas in the area you left uncovered for the eyes. The hot cheese grabs onto the olive, and they stick perfectly. For the mummies, place two olive slices right into those gaps you left in the cheese wrapping.

Let these Halloween Mini Pizzas cool down for just a minute or two before serving. That cheese settles nicely, and you won’t burn anyone’s tongue off!
Storage and Reheating Instructions for Leftover Halloween Mini Pizzas
No joke, these things are usually gone before the first trick-or-treater heads home, but sometimes I manage to squirrel away two or three for lunch the next day. Now, since these Halloween Mini Pizzas are made with refrigerated biscuit dough, they don’t have the shelf life of a sturdy flatbread or pita. You want to eat them the day you make them, honestly!
If you have leftovers, get them into an airtight container right away. Don’t leave them sitting on the counter—the cheese will seize up, and the dough will get tough fast. They’ll actually keep okay in the fridge for up to two days, but the texture is definitely going to change.
My biggest word of warning—and this is important—is to avoid the microwave if you can. Microwaves are the enemy of biscuit dough; they make it chewy and strange. If you want that crust to taste good again, you need dry heat!
-
Best Reheat Method (Oven or Air Fryer): Pop them onto a small baking sheet or directly into your air fryer basket. Heat at about 350°F for maybe 4 to 6 minutes. This crisps up the base again and melts the cheese just enough without making the dough soggy. This is the way to recapture that fresh-out-of-the-oven glorious texture!
-
If You Must Use the Microwave: If you’re in a huge rush, zap one for just 15 seconds max. Be warned, though: the crust will soften significantly. It’s fine, but it won’t have that perfect little crunch we worked so hard to achieve during the first bake.
If you’re prepping way ahead of time for a big party, you can totally assemble the entire mini pizza—dough, sauce, cheese—and arrange them on the tray, cover it tightly, and keep it in the fridge for up to 12 hours. Just wait to bake and add the olive eyes until right before everyone arrives! That’s my trick for having perfectly fresh Halloween Mini Pizzas ready right on time.
Details on Yield and Preparation Time
Sometimes when you’re planning a party or just need to know if you have time to pull off a snack before the kids get home from school, you just need the raw facts, right? You don’t want to hunt through paragraphs for the baking time! Since these Halloween Mini Pizzas are such a speedy treat, it’s helpful to see exactly how little time they demand from start to finish.
I put together a quick little snapshot of the essentials below. Honestly, these are some of the fastest appetizers I’ve ever made—you can whip these up faster than I can decide which movie we’re watching for spooky movie night. If you’re looking for even more quick meals that won’t take up your whole day, check out my guide on twenty-one simple lunch ideas; some of those concepts are great for savory snacking too!
Here’s the breakdown on how fast these spooky little bites come together:
- Prep Time: A blazing fast 10 minutes! This is just for flattening the biscuits, saucing them, and decorating them.
- Cook Time: Right around 12 minutes. Keep an eye on them after 10, though, because different ovens bake differently!
- Total Time: Come on, 22 minutes total! That’s less time than it takes to find all those little costume pieces you swore you put away safely.
- Yield: You get 6 mini pizzas out of one can of standard biscuit dough. If you have a big crowd coming over, just multiply everything by two or three—it scales up without any fuss at all!
Frequently Asked Questions About Easy Halloween Mini Pizzas
I always get questions after I post these because everyone wants to know how to make them *the best* they can be, or how to adapt them for picky eaters. It’s funny, I think people underestimate how versatile these quick Halloween Mini Pizzas can be! Here are some of the things readers ask me most often when they try to put their own spin on the ghost and mummy designs.
Can I make the mummy strips ahead of time?
That’s a great question, especially if you’re trying to prep the night before a big party! The honest answer is yes, you can cut your mozzarella strips ahead of time. I would say cut them right before you go to bed, place them flat on a piece of parchment paper, and then stick them in a zip-top bag or an airtight container. Keep them in the fridge. They need to stay cool so they don’t start sticking together into one big gooey cheese blob.
But I have to warn you: they work best when they are freshly cut. If they sit too long, they can get a little tacky, and when you go to arrange them over the cheese, they might start stretching and breaking. They are just easier to handle when they are fresh, but prepping them saves maybe five minutes during the final rush!
What if I don’t have biscuit dough for these mini pizzas?
Oh, I totally understand! Sometimes the refrigerated aisle is looking a little sparse, or maybe you just prefer a thinner crust. If you don’t have the biscuit dough, don’t panic! These Halloween Mini Pizzas are really about the topping design, not the dough base itself.
You have a few great options. First, you can use those pre-made mini pizza crusts you find near the sandwich wraps—they are already perfectly flat and ready to go. Or, if you’re really making do with what you’ve got, grab a loaf of thick-cut sandwich bread or even slice up an English muffin. Just brush the bread lightly with a tiny bit of olive oil before adding the sauce, so it doesn’t soak everything up too fast. If you prefer a sturdier base that won’t get soggy, you might want to check out how I use pita bread rounds for snacks; that works beautifully too!
How do I make these look like monsters other than ghosts and mummies?
This is my favorite part—getting extra creative! If you want to move beyond the spooky basics, you just need a few more colorful veggies or meats. The base technique (sauce, cheese, bake) stays the same for all of them.
-
Pepperoni Spiders: You can combine them with the cheese layer before baking. Use one large pepperoni for the body, and cut four small slivers of the pepperoni slice to stick out from the sides as the legs. The cheese melts around them perfectly.
-
Frankenstein Hair: If you have green bell pepper, dice it up finely or cut it into thin, jagged strips. Layering this green “hair” right over the mozzarella before baking looks fantastic and adds a little crunch.
-
Goblin Faces: Use small bits of jarred, roasted red pepper. Cut them into triangles for little pointy ears or mouths. They add a great smoky flavor when they bake onto the cheese!
The key is always to use ingredients that are sturdy enough to hold their shape or stick well to the melted cheese once they come out of the oven!
Estimated Nutritional Snapshot
Now, I always have to put a little disclaimer here: Since these Halloween Mini Pizzas rely on variable ingredients—especially the brand of biscuit dough you use or how thick you slice that mozzarella—these numbers are just a general guide. I ran the basic 6-ingredient lineup through my usual calorie counter based on standard canned biscuit dough, mozzarella, and sauce measurements. Treat this as your estimated nutritional snapshot, not a lab analysis!
If you are making these for a big crowd and want to keep track, remember that the sodium and fat content can jump up quickly if you add pepperoni or heavy dipping sauces. But for the basic ghost and mummy designs, it’s a pretty solid and quick snack, clocking in pretty reasonable for a cheesy treat.
-
Serving Size: 1 mini pizza
-
Calories: Approximately 180
-
Fat: Around 9g, with about 4g being saturated fat from the cheese.
-
Carbohydrates: About 18g, mostly from the dough base.
-
Protein: A nice little boost of 7g, thanks to that cheese!
-
Sodium: This comes in higher, around 350mg, which is something to watch if you’re making a huge batch.
Overall, they are a fun, satisfying, cheesy bite perfect for a busy holiday evening!
Share Your Spooky Creations
That’s it! You are officially ready to bake up the quickest, cutest, and most delicious Halloween Mini Pizzas on the block. Seriously, I’m getting hungry just thinking about those gooey mozzarella mummies.
Now, I am dying to know which design you chose! Did your family lean toward the classic, wide-eyed ghost, or did you master the art of the crisscross mummy wrap? Drop a comment down below and let me know how they turned out for you! Did you use any secret ingredients of your own?
If you snap a picture while you’re making these—and you absolutely should, because watching kids cut little olive eyes is priceless—tag me on social media! I love seeing everyone’s spooky results. It truly makes my day when I see your creations come to life.
If you loved how quick these turned out and you’re already looking for another quick, themed treat, you absolutely have to check out my recipe for easy Halloween cookies next! Happy haunting and happy eating!
Print
Halloween Mini Pizzas
- Total Time: 22 min
- Yield: 6 mini pizzas 1x
- Diet: Vegetarian
Description
Simple, fun mini pizzas shaped like ghosts and mummies for a Halloween treat.
Ingredients
- 6 refrigerated biscuit dough cups
- 6 tablespoons pizza sauce
- 1 cup shredded mozzarella cheese
- 12 small black olive slices (for eyes)
- 12 thin strips of mozzarella cheese (for mummy wrapping)
Instructions
- Preheat your oven to the temperature specified on the biscuit dough package.
- Place the biscuit dough cups on a baking sheet. Press each cup down slightly to flatten the base.
- Spread one tablespoon of pizza sauce onto each flattened biscuit base.
- Sprinkle mozzarella cheese over the sauce on each pizza.
- For the ghost shape: Leave one section of the pizza base uncovered for the ‘head’ area.
- For the mummy shape: Arrange the thin mozzarella strips across the top of the pizza in a crisscross pattern, leaving small gaps for the eyes.
- Bake according to the biscuit dough package directions, usually 10-12 minutes, or until the crust is golden brown and the cheese is melted.
- Remove from the oven. Immediately place two black olive slices onto the uncovered ‘head’ area of the ghost pizzas for eyes.
- Let the pizzas cool slightly before serving.
Notes
- You can use pre-made mini pizza crusts instead of biscuit dough for a faster option.
- Use small pieces of bell pepper or pepperoni for other facial features if desired.
- Prep Time: 10 min
- Cook Time: 12 min
- Category: Snack
- Method: Baking
- Cuisine: American
Nutrition
- Serving Size: 1 mini pizza
- Calories: 180
- Sugar: 1
- Sodium: 350
- Fat: 9
- Saturated Fat: 4
- Unsaturated Fat: 5
- Trans Fat: 0
- Carbohydrates: 18
- Fiber: 1
- Protein: 7
- Cholesterol: 20
Keywords: Halloween, mini pizzas, snack, easy, kid-friendly, biscuit dough, mozzarella