
You know how much I love making holiday meals totally unforgettable, right? Forget boring mashed potatoes! If you’re hosting anyone in October, you absolutely need to serve something that gets them talking before they even take a bite. That’s where my famous Skull Potatoes come in. Seriously, carving spuds into spooky little faces is my go-to trick for elevating any Halloween spread. I’ve been perfecting this method for years, trying out different knives and potato types until I found the perfect balance between culinary skill and sheer festive fun.
Why You Will Love These Skull Potatoes
These aren’t just some fancy garnish; they are genuinely delicious baked potatoes dressed up for the party! I know carving sounds intimidating, but stick with me here—it’s way simpler than trying to sculpt a tiny dragon. Plus, the flavor payoff? Amazing. They hit that savory, salty spot every good side dish should.
Here’s why these carved beauties end up being the star of my Halloween table:
- They stop traffic! Everyone wants to know how you made such silly-looking yet perfectly cooked Skull Potatoes.
- They smell incredible while baking—all that garlic powder roasting on the surface is just heaven.
- You can totally serve them guilt-free since they are completely vegetarian. More room for pie later!
Quick Preparation for Your Skull Potatoes
You’ll be shocked how quickly you get these ready for the oven. We’re only talking about 30 minutes of prep time total. That’s because you’re just peeling, carving out the basic shapes—eyes, nose, teeth—and then you toss them with simple olive oil and seasoning. Honestly, it’s one of the fastest ways to get maximum visual impact. My friends always think I spent hours on these spooky Skull Potatoes, but nope!

Perfectly Baked Side Dish
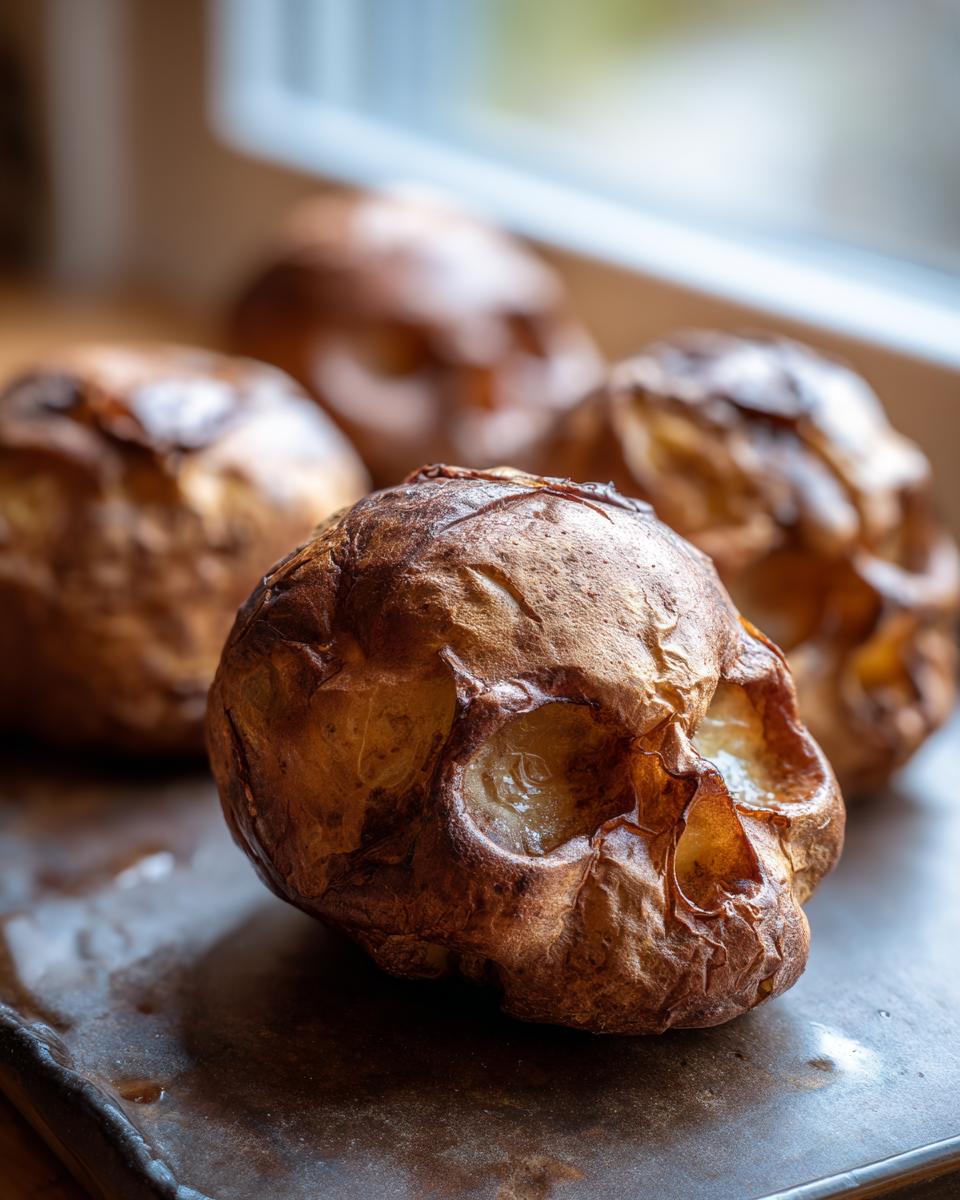
The best part about using Russets, which I tell everyone to grab, is that even with all that cutting, they bake up beautifully. You get that desirable crispy, slightly browned edge from the olive oil, but the inside stays completely tender. Seriously, they melt in your mouth. Since the recipe doesn’t call for any meat products, they are a hit with everyone, and they pair perfectly with a big bowl of chili.
Gathering Ingredients for Your Skull Potatoes
We aren’t going crazy with exotic spices here; the beauty of these is keeping things simple so the potato flavor shines through! You need just a handful of pantry staples to get these carved horrors ready for the oven. Make sure you read the list carefully because the ratio of spices is important for getting that great salty crust.
Essential Components for Carved Skull Potatoes
You really only need five things, which I love. It means less running around and more time getting those eye sockets just right!
- You need 4 large russet potatoes. I stress large because they give you more real estate to carve those spooky features!
- Grab 2 tablespoons of olive oil—this helps everything crisp up nicely in the oven.
- For seasoning, measure out 1 teaspoon of salt.
- Then, add 1/2 teaspoon of black pepper.
- And finally, 1/4 teaspoon of garlic powder. That little bit gives them a huge flavor boost!
Expert Tips for Carving Perfect Skull Potatoes
Okay, this is where we go from ‘baked potato’ to ‘Halloween centerpiece.’ Don’t panic if you’ve never carved anything except maybe a jack-o’-lantern. The secret to successful Skull Potatoes isn’t realism; it’s about establishing clear, spooky shapes quickly. I learned the hard way that trying to get too detailed just makes the potato crumble when you try to bake it. Trust me, simple is powerful here!
Choosing the Right Tools for Your Skull Potatoes
First things first: you must peel your potatoes before you start carving. Get them slick and clean. As for tools, forget those huge bread knives. You absolutely need a small, sharp paring knife. I use one that’s maybe three inches long. It gives you the control you need for tiny details like separating those teeth. If your knife isn’t sharp, you end up crushing the potato structure instead of slicing cleanly, and that’s disaster territory.
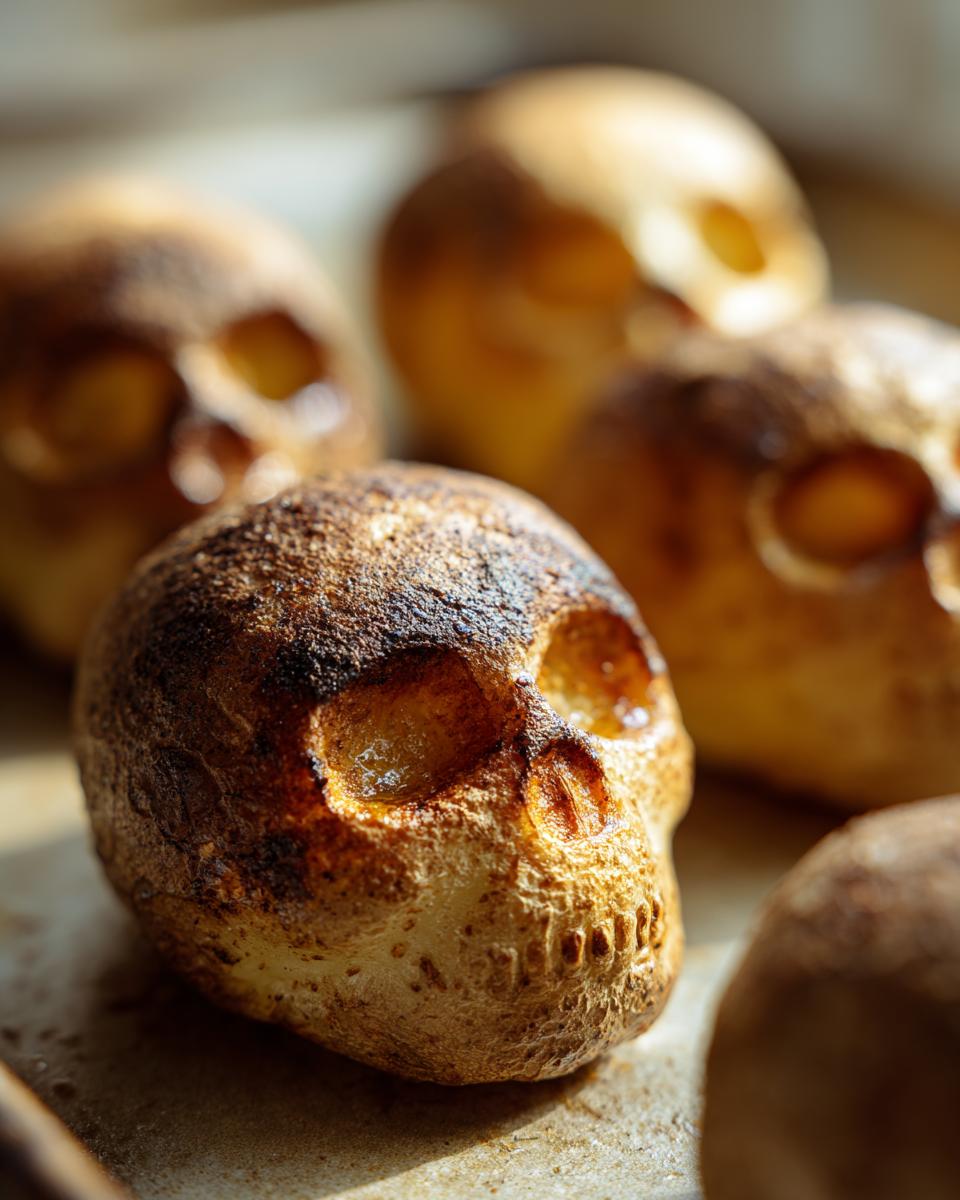
Techniques for Shaping the Skull Potatoes
When you start cutting, aim for those three major features: two eye sockets, one inverted triangle for the nose cavity, and a horizontal line where the mouth will be. Don’t worry about individual teeth at first! Just score deeper lines in that mouth area—maybe three or four vertical cuts—to suggest teeth. The heat from the oven will naturally soften the edges and make those cuts look more authentic. If you ever want to add some extra pizzazz later, check out this garlic butter potato recipe for flavor inspiration!
Step-by-Step Instructions to Bake Your Skull Potatoes
Are you ready to see your spooky creations transform into edible art? Following these steps ensures you get perfect Skull Potatoes every single time—they’ll be tender inside and just begging for a dollop of sour cream. It all starts before the potatoes even hit the pan, so don’t skip that oven preheating step!
Prepping and Seasoning the Carved Skull Potatoes
Once you’ve finished carving your magnificent little faces, it’s time to get them ready for the heat. Lay all your carved potatoes out onto a sturdy baking sheet. Don’t crowd them too much; they need a little breathing room to crisp up right. Now, drizzle that olive oil evenly over every crevice. You want to make sure every nook and cranny is coated. Next, grab your salt, pepper, and that fragrant garlic powder and sprinkle it generously over the top. Shake the pan a little to distribute the seasoning, making sure those eye sockets get some love too!
Baking Time and Tenderness Check for Skull Potatoes
Pop those seasoned beauties into your preheated 400 degrees Fahrenheit oven. They usually take between 35 to 45 minutes to get perfectly baked. You’ll know they are close when the edges start looking delightfully browned. If you notice them getting dark too quickly—maybe your oven runs hot, which mine totally does—just fold a sheet of aluminum foil loosely over the top. This slows the surface browning down. When you think they’re done, pierce the thickest part near the bottom with a fork. If it slides in easily, you’re ready to serve your amazing baked potato creation right away!
Ingredient Notes and Substitution Guidance
I always get questions about swapping ingredients, and honestly, for something specific like this, the ingredients matter a little more than usual! It’s not just about flavor; it’s about structure, since we’re cutting these things into faces. Stick close to the plan for your first batch, trust me. If you want to try something different later, I have tons of ideas, but the classic recipe is a winner for a reason.
Potato Selection for Best Carving Results
My absolute requirement here is that you must use Russet potatoes. They are starchy, right? This starchiness is what lets you carve those sharp edges for the eyes and teeth without the potato falling apart into mash. If you use a waxy potato, like a Yukon Gold, they look great mashed, but when you try to carve them, they sort of crack and crumble. You need that solid, uniform structure for good results!
Flavor Variations for Baked Potatoes
Once you master the carving and baking, feel free to start experimenting with the spices for next time. If you’re looking for a smoky kick, maybe swap out the garlic powder for some smoked paprika—that adds a fantastic depth of flavor. Or, if you’re feeling very autumnal, using dried rosemary instead of black pepper works wonders. It turns these spooky sides into something that feels a little more earthy and rustic. If you like bold flavor combos, you should definitely look at this cheesy ranch potatoes recipe for inspiration!
Serving Suggestions for Your Skull Potatoes
Since these are essentially perfectly seasoned, spooky baked potatoes, they go with almost anything, especially hearty fall food! They look scary on the plate, but their flavor is pure comfort food, which is the perfect contrast for a holiday spread. Don’t just serve them plain, though; you want to make them part of a bigger scary feast!
Pairing with Main Dishes
When I set these out, I usually have a big pot of smoky chili bubbling away nearby. The chili is rich, and spooning some of it right over the potato feels amazing. They are also fantastic served alongside a slow-roasted pork shoulder or even just a crispy roasted chicken—the contrast between the dark, carved potatoes and a simpler main course is just gorgeous.

If you want something extra creamy on the side, these go wonderfully next to my recipe for creamy mashed potatoes with gravy, even though you already have a starch! It’s just that good.
Storage and Reheating Instructions for Leftover Skull Potatoes
Oh, leftovers! That’s always the real test, isn’t it? While these are best eaten fresh right out of the oven when they are perfectly crisp on the outside, I know we always end up with a few spooky faces left over. Don’t just toss them! With a little care, they taste almost as good the next day. It’s all about how you handle them once they’ve cooled down a bit.
Keeping Carved Potatoes Fresh
When they’re completely cool, you’ll want to tuck them into an airtight container. Seriously, seal them up tight! If you just leave them exposed on a plate, they’ll dry right out into sad little rocks. Stored properly in the fridge, they should keep well for up to three days. I try to eat them sooner, just because the texture is better, but three days is totally fine!
Best Way to Reheat Baked Potatoes
If you want that original tender inside paired with a slight crust, you have to use the oven. Pop them on a baking sheet at about 350 degrees Fahrenheit for maybe 10 to 12 minutes. They just need to heat through, and the dry heat brings back a little bit of that baked exterior we worked so hard to achieve. If you’re in a huge rush, sure, zap them in the microwave for about 30 seconds, but you’ll lose all the crispness that way. Oven revival is always the winner!
Frequently Asked Questions About Skull Potatoes
I know you’re probably looking at those carving instructions and getting a few jitters. It happens to everyone! I’ve gathered the questions I always get asked when I bring these to parties so you can feel totally confident before you even start peeling. You’ve got this!
Can I use sweet potatoes instead of russets for Skull Potatoes?
That’s a great question! Technically, yes, you can use sweet potatoes. But here’s my advice: Russets are definitely better for carving detail because they are so much denser and starchier. They hold those little eye sockets and teeth lines without collapsing. Sweet potatoes are softer, so they might look a bit more mushy when you cut them. If you want that classic, slightly spooky, sharp look for your Skull Potatoes, stick to the russets.
How long do the Skull Potatoes take to bake?
We bake these at a nice hot 400 degrees Fahrenheit. You’re looking at about 35 to 45 minutes total cooking time. The absolute best way to check is to poke one of the thicker parts—not a carved edge!—with a fork. If the fork slides in with basically zero resistance, they are done. You want them super tender inside before you pull them out.
What is the best way to prevent my carved potatoes from drying out?
If you’re worried about them turning into dry little rocks, I have two easy solutions. First, don’t overbake them! Pull them out the second they are tender. Second, you have to be generous with the olive oil before they go in. Coat every single surface, including inside the carved areas. That oil acts like a shield, locking in moisture while crisping up that gorgeous exterior crust. Oh, and if you want to see a fun way to use potatoes in desserts, check out these Halloween cookies for inspiration!
Estimated Nutritional Data for Skull Potatoes
Okay, so these little guys are super fun and surprisingly well-behaved nutritionally! Since we are keeping it simple with just potatoes, oil, and basic seasonings, they are a great addition to any holiday meal, even if you’re watching what you eat. Remember, this data is an estimate because we only got four servings out of those four large spuds, and seasoning amounts can always vary when you’re sprinkling them on!
Here is the breakdown based on the recipe yield:
- Serving Size: 1 potato
- Calories: 200
- Sugar: 1 gram
- Sodium: 300mg
- Fat: 5 grams (with 1 gram being Saturated Fat)
- Carbohydrates: 38 grams
- Fiber: 4 grams
- Protein: 4 grams
See? Nothing too wild happening here! Low sugar, decent fiber—it’s just good, wholesome spud goodness, looking totally spooky. These are way healthier than most of those processed appetizer things you see around Halloween!
Print
Skull Potatoes
- Total Time: 75 min
- Yield: 4 servings 1x
- Diet: Vegetarian
Description
A recipe for making potatoes shaped like skulls for a festive presentation.
Ingredients
- 4 large russet potatoes
- 2 tablespoons olive oil
- 1 teaspoon salt
- 1/2 teaspoon black pepper
- 1/4 teaspoon garlic powder
Instructions
- Preheat your oven to 400 degrees Fahrenheit.
- Peel the potatoes.
- Using a sharp knife, carefully carve the potatoes into skull shapes. Aim for basic features like eye sockets, a nose cavity, and teeth lines.
- Place the carved potatoes on a baking sheet.
- Drizzle the potatoes with olive oil and sprinkle with salt, pepper, and garlic powder.
- Bake for 35 to 45 minutes, or until the potatoes are tender inside and slightly browned on the edges.
- Serve immediately.
Notes
- Use a small, sharp paring knife for detailed carving.
- If the potatoes start browning too quickly, loosely cover them with aluminum foil.
- Prep Time: 30 min
- Cook Time: 45 min
- Category: Side Dish
- Method: Baking
- Cuisine: American
Nutrition
- Serving Size: 1 potato
- Calories: 200
- Sugar: 1
- Sodium: 300
- Fat: 5
- Saturated Fat: 1
- Unsaturated Fat: 4
- Trans Fat: 0
- Carbohydrates: 38
- Fiber: 4
- Protein: 4
- Cholesterol: 0
Keywords: skull potatoes, carved potatoes, Halloween potatoes, baked potatoes, shaped potatoes