
Forget everything you think you know about light, fruity cheesecakes, because when October rolls around, my kitchen demands something dark and delicious! If you’re looking to truly wow your guests this Halloween, you absolutely *have* to try my **Witch Cauldron Cheesecake**. It looks incredibly complex, like something brewed by a master enchantress, but trust me, it’s just skillful layering!
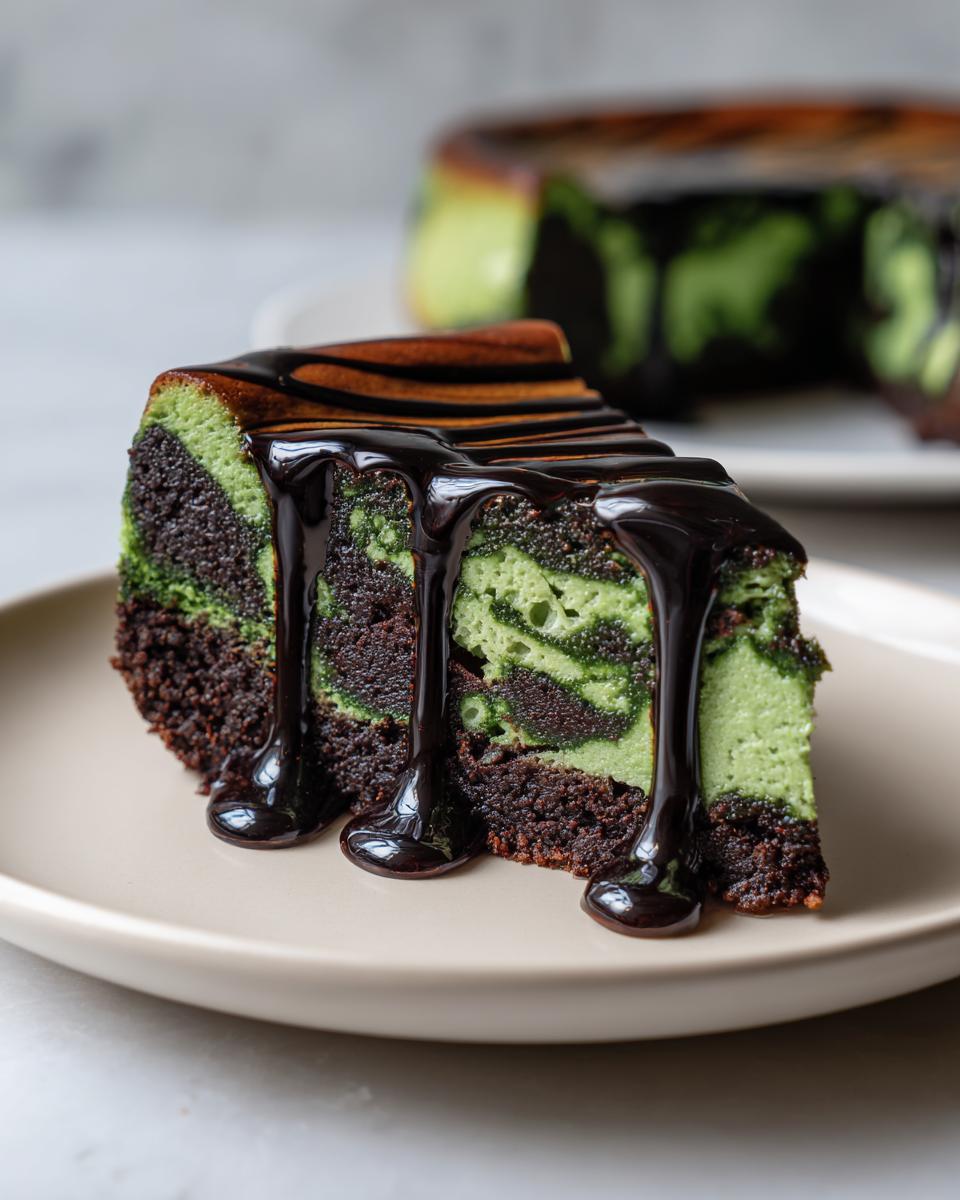
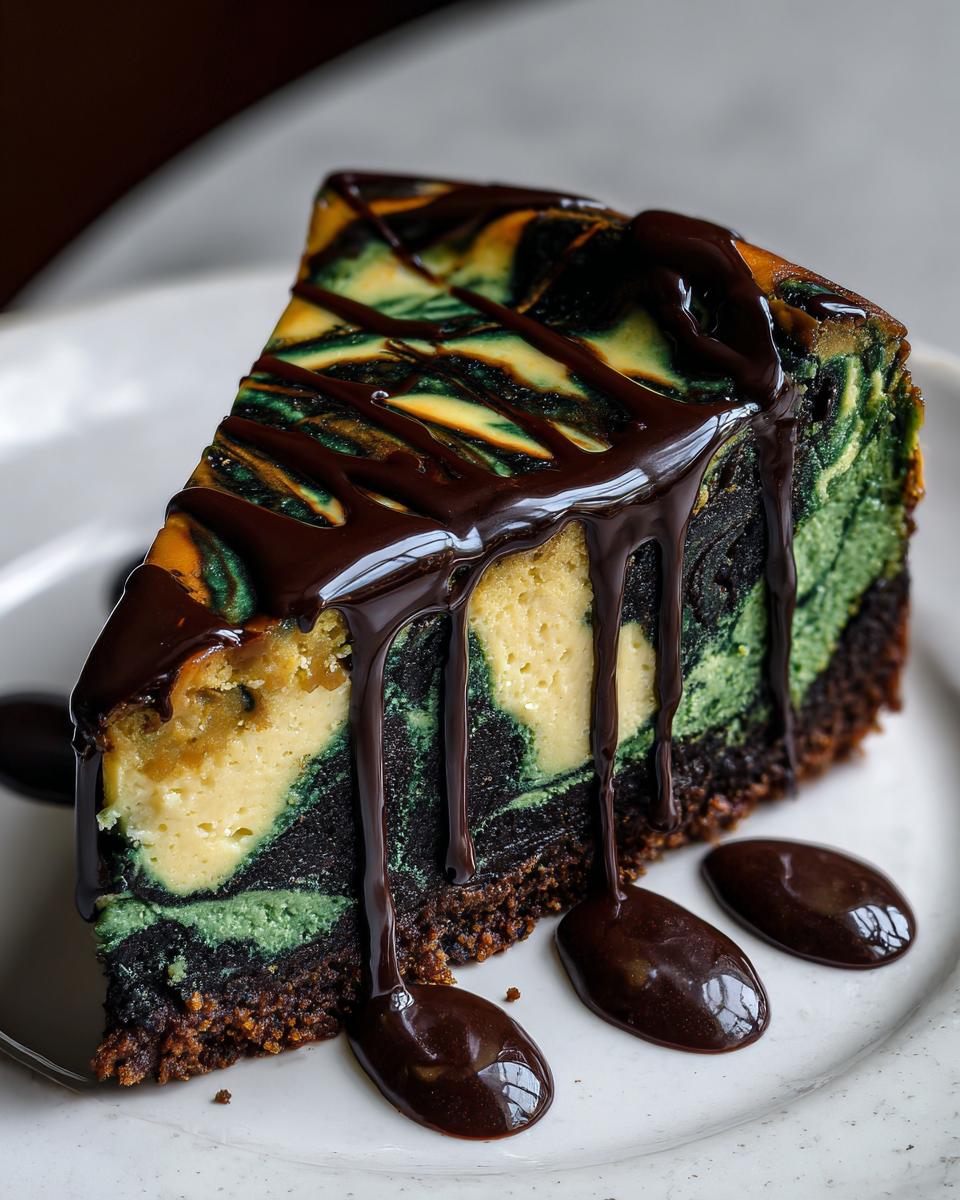
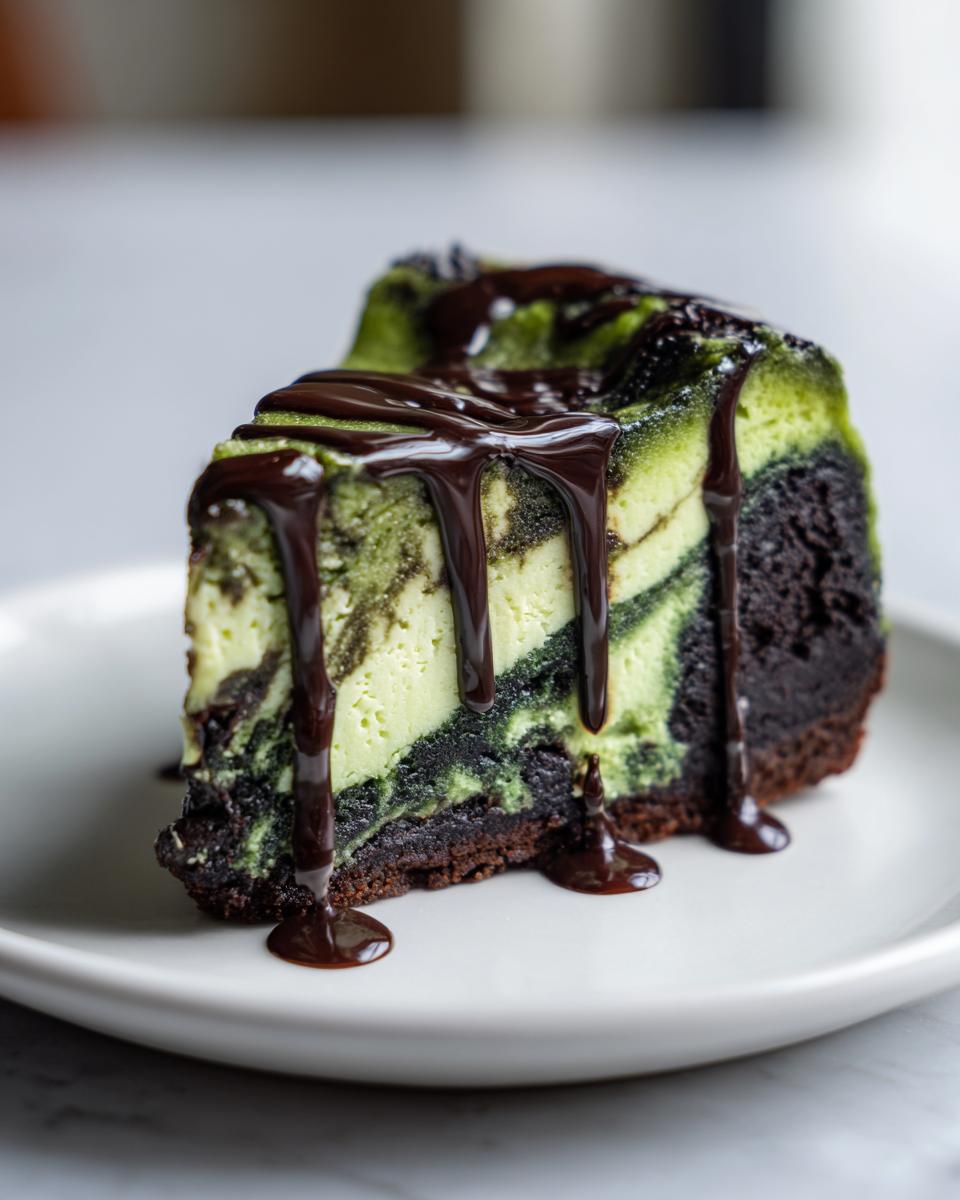
The magic is in that deep, dark, marbled swirl—your very own edible cauldron bubbling with mystery. I love making this because it’s the showstopper for every spooky party we host. It’s rich, it’s creamy, and the colors are spot-on creepy-chic. Plus, the fact that it tastes even better the next day means I can stress less right before the doorbell rings!
Why This Witch Cauldron Cheesecake is Perfect for Halloween
Honestly, this cheesecake isn’t just a dessert; it’s a centerpiece! The reason I drag out my springform pan every single year for this recipe is purely because of the visual impact. It looks like you spent days perfecting it.
If you’re new to cheesecake, don’t let the colors scare you off. The technique to get a cool, spooky look is shockingly easy. You can see how I handle a similar project with my Grinch Mini Cheesecakes—it’s all about the gentle layering!
Spooky Marbled Appearance
By using intense black and eerie green, we nail that bubbling, witchy potion vibe instantly. The slight marbling we create with a knife looks chaotic and magical, just like a real cauldron mixture should!

Make-Ahead Friendly for Parties
This is the best part for a busy host. You truly cannot rush this recipe; it needs that long, deep chill time—we’re talking 6 hours minimum, but overnight is gold. That means you bake it completely the day before your gathering, and all you worry about on Halloween night is the spooky drizzle!
Essential Ingredients for Your Witch Cauldron Cheesecake
Getting the visual right in this spooky dessert hinges entirely on having the right color saturation, which means quality ingredients matter here, especially the coloring! Don’t skimp on letting your cream cheese warm up, either—lumpy batter is the enemy of a smooth cauldron top. If you want a truly decadent treat, you might also check out my recipe for Chocolate Caramel Toffee Cake for another showstopper!
Here’s what you need to pull off this gorgeous, dark dessert;
For the Crust
- 1 1/2 cups graham cracker crumbs (make sure you measure that heap!)
- 1/4 cup granulated sugar
- 6 tablespoons unsalted butter, melted
For the Marbled Cheesecake Filling
Remember, the cream cheese absolutely needs to be softened—room temperature! Don’t try to rush it.
- 3 (8 ounce) packages cream cheese, softened
- 1 1/2 cups granulated sugar
- 1/4 cup all-purpose flour
- 1 teaspoon vanilla extract
- 1/4 teaspoon salt
- 4 large eggs (make sure they are large!)
- 1/2 cup sour cream
- Black food coloring gel (this is non-negotiable for that deep color!)
- Green food coloring gel
For the Potion Garnish
This is what sells the look when you bring it to the table!
- Chocolate syrup, for drizzling
Step-by-Step Instructions for the Witch Cauldron Cheesecake
This is where the actual magic happens! Don’t let all those colors overwhelm you; we’re just going to treat this like a very deliberate, very spooky layering project. If you followed my advice on using room-temperature dairy, this should flow smoothly. If you’re looking for another delicious baked treat idea, check out the steps for my Homestyle Yellow Cake—it uses a similar base mixing philosophy!
Preparing the Crust and Oven
First things first: preheat your oven to 325 degrees F (160 degrees C). You absolutely must wrap that 9-inch springform pan tightly with heavy-duty foil; we don’t want any water sneaking in during the bath later. Mix your graham cracker crumbs, 1/4 cup sugar, and melted butter until it looks like damp sand. Press that firmly into the bottom of the pan and bake it for just 10 minutes. Let it cool down a little bit while you start the filling.
Mixing the Cheesecake Base
In your big bowl, beat that soft cream cheese, the main 1 1/2 cups of sugar, flour, vanilla, and salt until it is completely smooth. Seriously, scrape down the sides well! Then, add those 4 large eggs in, one at a time. Mix just until it disappears before adding the next one. Finally, mix in the sour cream at the end.
Creating the Cauldron Colors
Now for the fun part! Divide your smooth batter evenly into three separate bowls. Leave one bowl as is—that’s your creamy swirl. Take your second bowl and add several big drops of black food coloring gel. Keep mixing until it turns a deep gray or truly black. For the third bowl, add the green gel until you get a nice, deep, spooky green color.
Layering and Swirling the Witch Cauldron Cheesecake
Pour all of the black batter right over your cooled crust first—that’s our dark cauldron base. Next, spoon dollops of the green batter on top of the black. Then, randomly spoon dollops of the plain batter right over the green layer. Now, grab a thin knife or a wooden skewer and gently *swirl* the colors together, just once or twice. The key here is to **not overmix**! We want distinct areas of color, not a uniform muddy brown.
Baking with a Water Bath
Place your foil-wrapped springform pan inside a larger roasting pan. Carefully pour hot water into the roasting pan until it comes halfway up the sides of the cheesecake pan. Bake for 60 to 75 minutes. It’s done when the edges are set but the center still jiggles just a bit when you nudge the pan. Turn the oven off, crack the door open, and let it hang out in there for a full hour to relax before you take it out.
Chilling and Final Presentation
Let it cool completely on a cooling rack before you refrigerate it. You need patience here: chill it for a minimum of 6 hours, but overnight is always best for that perfect texture and clean slicing. Right before you serve this Halloween masterpiece, drizzle the top generously with chocolate syrup. That’s your bubbling potion effect, and it looks amazing!
Expert Tips for a Perfect Witch Cauldron Cheesecake
Look, I know cheesecakes can be fussy, but this Witch Cauldron Cheesecake is worth sticking to the rules for. Building authoritative knowledge means knowing *why* you do certain steps, not just blindly following them. I’ve learned a few tricks over the years that keep my cake from fighting me, whether I’m making this spooky version or my zesty Key Lime Cake.
Choosing the Right Food Coloring
If you want that deep, spooky black that reads like a true cauldron, you must use food coloring **gel**, not the liquid stuff you might have lying around for Easter eggs. Liquid coloring is mostly water, and adding many drops to thin out the batter when we’ve worked so hard to keep it thick and creamy? No thank you! High-quality black gel coloring is worth every penny because it gives you intense color payoff without changing the texture of your base batter at all.
Mastering the Water Bath Technique
I know the water bath—or *bain-marie*—seems like extra fuss, but this is where you prevent sad, cracked tops. The whole point of wrapping that springform pan tightly in foil and sitting it in the roasting pan filled with hot water is to create a steamy environment for baking. This steam keeps the ambient temperature around the cheesecake even and gentle. Without it, the edges bake faster than the center, and BAM! You get that classic crack, which ruins the cauldron artistry.
Also, make sure your water is hot when you pour it in after the cheesecake is already in the oven. Pouring cold water in and then heating it up with the oven just delays everything and can cause uneven baking transitions that lead to weeping later on.
Ingredient Notes and Substitutions for Your Witch Cauldron Cheesecake
I always get questions once people see how dark this cheesecake gets! While the recipe is pretty specific because we are aiming for that specific spooky aesthetic, there are a few spots where you can switch things up if you’re missing something or have a dietary need. If you’re into chocolatey bases, you might want to check out the recipe structure for my Chocolate Chip Tahini Cookies just to see how they handle texture!
Crust Alternatives
The graham cracker crust is classic, but if you don’t have any on hand, don’t panic! You can absolutely swap those out. My favorite alternative for a deeply dark base that matches the vibe is to use chocolate wafer cookies—you know, the kind for icebox cakes. You’ll use about the same amount, finely crushed, and treat them exactly the same way: mix with the melted butter and sugar and press ’em in.
If you’re going gluten-free, most standard gluten-free graham-style crackers work just fine here since the sugar and butter do most of the binding work. Just make sure whatever cookie you use is relatively dry before crushing!
Achieving the Black Color
Listen, I can’t stress this enough: if you try to make this cheesecake *black* with standard liquid food dye, you’ll end up with a huge volume of thin, watery batter that won’t set right. We need that intense pigment without adding liquid volume.
The best way to get that deep, witchy black without compromising the smooth texture of the cheesecake filling is definitely using a high-quality **gel coloring**. If you happen to have black cocoa powder, you can substitute some of the flour for that, but you might need to slightly increase the sugar or reduce the black gel coloring, as cocoa powder is also drying.
Whatever you choose, stick to the black mixture being the darkest, as it will bake up slightly lighter than it looks when raw. Consistency is key for this layered look to truly pop!
Serving Suggestions for Your Witch Cauldron Cheesecake
Okay, once this beauty is chilled and set, what do you serve alongside it? Since the cheesecake itself is so rich, dense, and deeply flavored—a total powerhouse—I like pairings that offer a little contrast, something light and maybe a tiny bit tart to cut through all that glorious fat.
The slight tang from the sour cream in the filling helps, but serving it alongside something brighter really makes the dark chocolate drizzle pop. I often pull out a loaf of Raspberry & Almond Tea Bread that I baked the day before. The tartness of the raspberry is just fantastic against the creamy base!
For a truly spooky presentation, serve it cold with a small dusting of powdered sugar around the stark black edges—almost like spiderwebs—and maybe a side of tart cherry sauce for people to drizzle on their plates if they want extra fruitiness. Honestly, though? This cheesecake is so good on its own, it barely needs anything else!
Storage and Reheating of Your Witch Cauldron Cheesecake
Because we put so much effort into that perfect, velvety texture, reheating this **Witch Cauldron Cheesecake** really isn’t something I recommend at all. Seriously, just don’t! The high proportion of eggs and cream cheese just doesn’t respond well to being warmed up again, and you risk drying out the edges or making the center grainy and weird. It’s designed to be eaten cold, straight from the fridge, where it maintains that fantastic, dense consistency!
Storage, now that’s an important conversation. Since this cheesecake needs that long chill, it’s naturally excellent for keeping leftovers fresh. You want to keep it covered tightly in the refrigerator for up to five days. Make sure you use a good seal—plastic wrap right against the surface, followed by aluminum foil, works best to keep fridge smells out and the moisture locked in.
If you happen to have leftovers that have been sitting out for serving at a party, don’t put them back in the fridge after about two hours. Eat what’s left, or toss it. Dairy doesn’t mess around! But honestly, if you store it properly and keep it covered, it’s so rich that five days is usually more than enough time to finish it off.
Frequently Asked Questions About the Witch Cauldron Cheesecake
People always have great questions once they get ready to tackle a showstopper like this! It’s a little different than a standard New York style, so let me clear up some of the things I hear most often about making this ultimate Halloween dessert. If you’ve got your mind set on baking, I’ve got tons of other fun ideas on my site, like these amazing Strawberry Cheesecake Cookies.
Can I use liquid food coloring instead of gel for the Witch Cauldron Cheesecake?
Oh, please don’t! I learned this the hard way decades ago with a simple dye project. Liquid food coloring is mostly water. Since this cheesecake filling is already perfectly balanced for texture, dumping in extra liquid is a recipe for disaster. It will thin your batter, make it runny, and that beautiful marbled cheesecake effect won’t hold its shape during the bake. Stick to the gel—it gives you intense color payoff without altering the precious cheesecake structure.
How do I get clean slices when cutting this marbled cheesecake?
This is one of my biggest cheesecake secrets, and it applies to every rich cake! You need a *hot* knife. After you’ve chilled the cake overnight and taken it out of the pan, grab your sharpest, straightest knife and dip the entire blade into a tall glass of very hot water. Wipe the blade completely dry with a paper towel, then make one slow, clean downward cut. Before you cut the next slice, clean and reheat that knife again. Trust me, this will give you those gorgeous, sharp lines that show off your handiwork!
Is the green layer supposed to taste different in this spooky dessert?
Nope! That’s the beauty of it—it’s all visual trickery! All three bowls of batter come from the exact same creamy base we mixed together—sugar, cream cheese, eggs, and sour cream. The only difference between the black, the green, and the plain batter is a few drops of food coloring gel.
So whether you get mostly deep black or a lovely swirl of bright green in your bite, the texture and the mild vanilla-tang flavor will be exactly the same. It’s all about creating that eerie, layered cauldron look for your Halloween party!
Estimated Nutritional Values for Witch Cauldron Cheesecake
Now, let’s talk fuel! I always have to give a little disclaimer here: since this is such a rich, decadent dessert, the numbers aren’t exactly light. But hey, it’s Halloween—we deserve a treat! These values are just estimates based on the ingredients listed, calculated per single slice (Yield is 12 servings).
Keep in mind that since this is a homemade dessert, your exact measurements and brand choices might shift these slightly, but this will give you a great overall idea of what you’re digging into!
- Calories: About 450 per slice. Wow, that’s rich!
- Fat: Roughly 30 grams total, with about 18 grams coming from saturated fat. Real butter and cream cheese give you that amazing texture, you know?
- Carbohydrates: Around 40 grams.
- Sugar: This is a sweet one—expect around 35 grams of sugar per slice.
- Protein: A little boost here, coming in around 8 grams.
It’s definitely an indulgence, but when you see that gorgeous, swirled cauldron top on the table, you won’t regret a single bite!
Share Your Spooky Creations
I’ve shared all my secrets for getting that perfect swirl and preventing cracks, but now I want to see what you whip up! Baking from a recipe is one thing, but seeing *your* version of the **Witch Cauldron Cheesecake** come to life is the best part of sharing these family-style recipes with you all.
When you finish chilling this beast and drizzle that chocolate syrup on top, snap a picture! Tag me on social media using the recipe hashtag—I absolutely love seeing those eerie green and black swirls show up in my feed. I promise I look at every single one!
If you made this for a big gathering and it was a hit, please come back here and leave a rating for me. A simple 5-star review lets other bakers know that this recipe is truly the best spooky dessert they can make this season. Speaking of tried-and-true comfort bakes, if you ever need a solid, non-spooky recipe, my guide to the Easy Banana Bread is always around!
Did you have any unexpected results? Did you try a different cookie in the crust? Don’t be shy! Drop all your thoughts, questions, and triumphant spooky stories in the comments below. Happy haunting and happy baking!
Print
Witch Cauldron Cheesecake
- Total Time: 8 hours 45 min
- Yield: 12 servings 1x
- Diet: Vegetarian
Description
A spooky, dark cheesecake recipe perfect for Halloween gatherings.
Ingredients
- 1 1/2 cups graham cracker crumbs
- 1/4 cup granulated sugar
- 6 tablespoons unsalted butter, melted
- 3 (8 ounce) packages cream cheese, softened
- 1 1/2 cups granulated sugar
- 1/4 cup all-purpose flour
- 1 teaspoon vanilla extract
- 1/4 teaspoon salt
- 4 large eggs
- 1/2 cup sour cream
- Black food coloring gel
- Green food coloring gel
- Chocolate syrup, for garnish
Instructions
- Preheat your oven to 325 degrees F (160 degrees C). Wrap the outside of a 9-inch springform pan tightly with heavy-duty aluminum foil.
- Mix graham cracker crumbs, 1/4 cup sugar, and melted butter. Press the mixture firmly into the bottom of the prepared springform pan. Bake for 10 minutes. Let cool slightly.
- In a large bowl, beat the softened cream cheese, 1 1/2 cups sugar, flour, vanilla extract, and salt until smooth.
- Beat in the eggs one at a time, mixing just until combined after each addition. Mix in the sour cream.
- Divide the batter into three bowls. Leave one bowl plain. Add several drops of black food coloring to the second bowl until you achieve a dark gray or black color. Add green food coloring to the third bowl until you reach a deep green color.
- Pour the black batter over the cooled crust. Gently spoon dollops of the green batter over the black layer. Then, spoon dollops of the plain batter over the green layer.
- Use a knife or skewer to gently swirl the colors together to create a marbled, cauldron effect. Do not overmix.
- Place the springform pan in a larger roasting pan. Carefully pour hot water into the roasting pan until it reaches halfway up the sides of the springform pan (this is a water bath).
- Bake for 60 to 75 minutes, or until the edges are set but the center still jiggles slightly.
- Turn off the oven, crack the door open, and let the cheesecake cool in the oven for 1 hour.
- Remove the cheesecake from the water bath and let it cool completely on a wire rack. Refrigerate for at least 6 hours, or preferably overnight, before serving.
- Before serving, drizzle with chocolate syrup to look like bubbling potion.
Notes
- Use high-quality black food coloring gel for the best dark color.
- A water bath helps prevent cracking and ensures even baking.
- Chill the cheesecake thoroughly for the best texture and clean slices.
- Prep Time: 30 min
- Cook Time: 75 min
- Category: Dessert
- Method: Baking
- Cuisine: American
Nutrition
- Serving Size: 1 slice
- Calories: 450
- Sugar: 35g
- Sodium: 300mg
- Fat: 30g
- Saturated Fat: 18g
- Unsaturated Fat: 12g
- Trans Fat: 0.5g
- Carbohydrates: 40g
- Fiber: 1g
- Protein: 8g
- Cholesterol: 110mg
Keywords: cheesecake, halloween, spooky dessert, cauldron cake, black cheesecake, green cheesecake