
Oh my gosh, are you tired of searching forever for that perfect, unique Asian-inspired sweet? Me too! I used to spend hours wrestling with steamer baskets, trying to get that springy, soft texture that real mochi needs. Seriously, it was a disaster—lumpy and sometimes sticky in all the wrong ways. But I finally cracked the code, and now I can whip up the most perfectly chewy, sweet **Watermelon Mochi** in like, five minutes flat, thanks to the microwave! Trust me, this method is a game-changer. Forget the complicated steaming setup; we’re making authentic texture easily right on the counter. It’s just the best for hot summer evenings when you want something gorgeous but don’t want the oven on.
Why This Watermelon Mochi Recipe Stands Out
When I tell you this recipe is sunshine in a bite, I mean it. It hits that perfect middle ground between being incredibly fast and tasting gourmet. You get that fantastic, slightly sticky, satisfying chew that makes mochi so addictive, but without any of the fuss. If you’ve been scared off traditional mochi making, you need to try this. We’re using simple swaps that give huge payoffs!
Honestly, this recipe makes me look like a baking genius when I bring them out. If you love tasty treats, you should check out some other things I’ve been messing around with lately over at my favorite spots for fun dessert recipes.
- It’s lightning fast—seriously, the dough cooks in under two minutes total.
- The fresh watermelon cream filling is light, summery, and perfectly balanced against the sweet dough.
- The texture is exactly what I look for: wonderfully chewy, never grainy!
Quick Preparation for Perfect Watermelon Mochi
Forget waiting an hour for steam to build up! We aren’t steaming anything here, folks. The microwave does all the heavy lifting in two quick one-minute blasts, with a stir in between. That’s less than five minutes total for the dough itself. It frees up your stovetop for, I don’t know, making iced tea instead!
Chewy Texture Achieved with Glutinous Rice Flour
If you want *real* mochi texture—that bouncy, squishy mouthfeel—you have to use glutinous rice flour. It’s sometimes called sweet rice flour, and it’s totally different from regular all-purpose flour. It’s the secret ingredient that turns our simple mix into that beautifully stretchy, authentic glutinous rice dessert.
Ingredients for Your Watermelon Mochi
Gathering your ingredients together before you start is a non-negotiable step, especially when dealing with hot mochi dough! Trust me, you don’t want to be searching for the watermelon extract while your dough is setting up. I always lay everything out on the counter. If you’re looking for other great simple ingredient lists, check out some fluff recipes I adore!
The key here is measuring precisely, especially the flour and water, so you get that perfect chewiness. We are dividing this into two main groups: the dough that we microwave, and the filling that makes these so special.
For the Watermelon Mochi Dough
This is the base, and it only takes a few minutes of mixing. Make sure you look for *glutinous* rice flour—regular rice flour just won’t work for this texture, unfortunately!
- 1 cup glutinous rice flour
- 1/4 cup granulated sugar
- 3/4 cup water
- 1/2 teaspoon watermelon extract
- 1 drop red food coloring (optional, but how else do we get that perfect candy-pink look?)

For the Watermelon Cream Filling
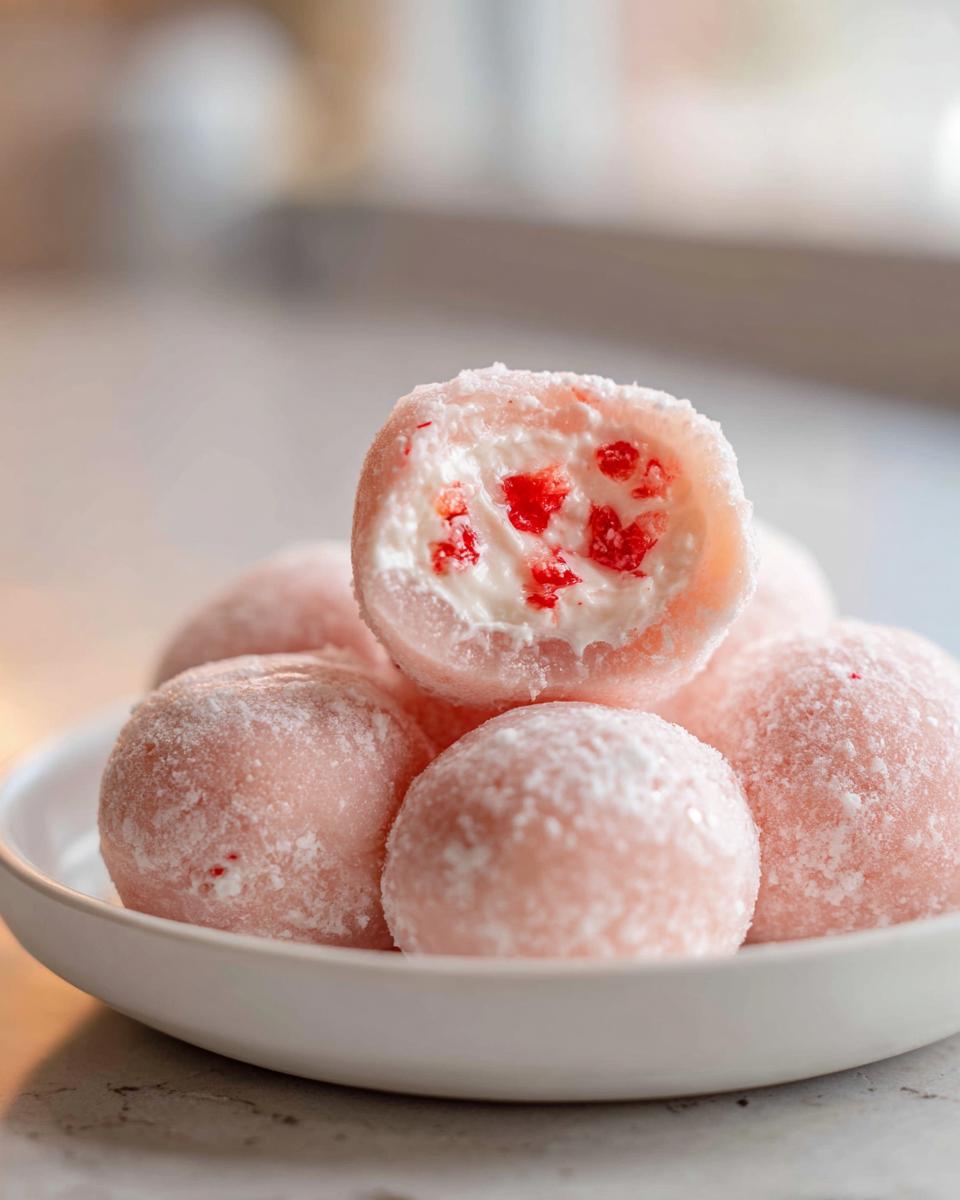
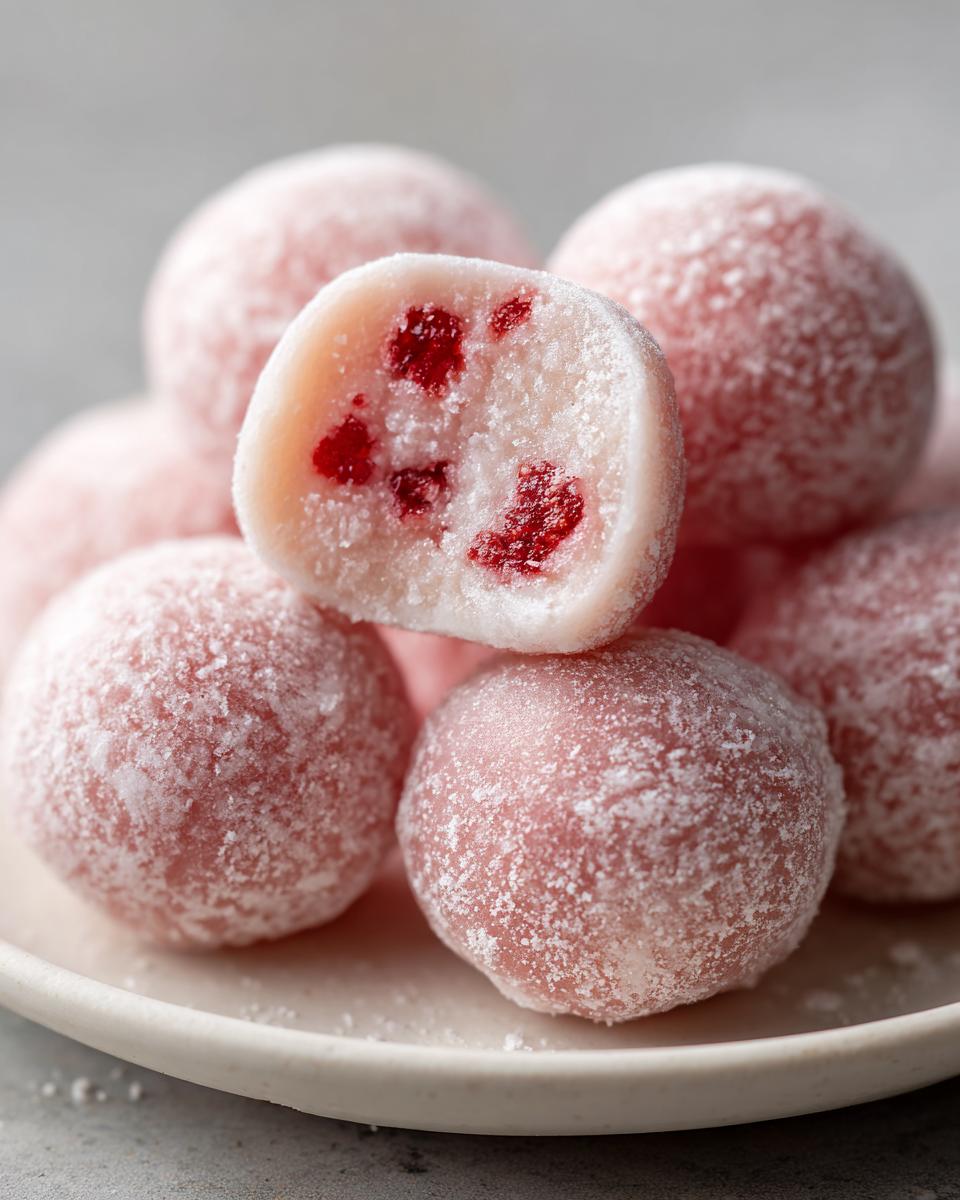
This filling is lighter than traditional red bean paste, which is perfect for summer. A huge tip: make sure that heavy cream is *ice cold*. If it’s lukewarm, it just won’t whip up nicely into those soft peaks we need for easy sealing!
- 1/2 cup heavy cream
- 2 tablespoons powdered sugar
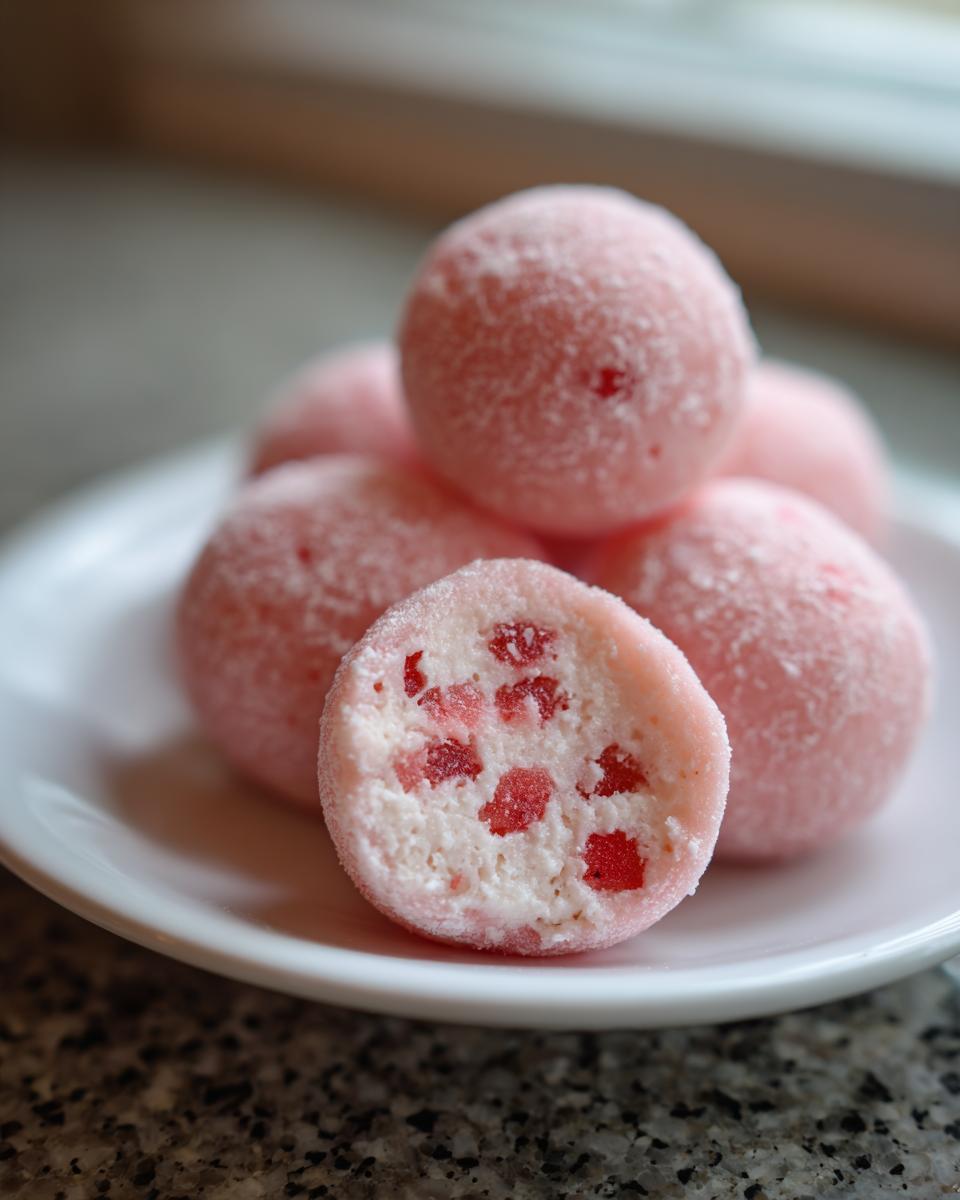
- 1/4 cup finely diced fresh watermelon (Make sure this is diced small so it doesn’t squish out when you seal the mochi!)
Oh, and don’t forget the cornstarch! That’s coming in handy later as our dusting agent to keep everything from sticking to your countertops and your hands. You’ll need about 1/4 cup for dusting purposes.
Essential Equipment for Making Watermelon Mochi
Before you dive into mixing, let’s talk about what you need sitting out on your counter. Think functional, not fancy! Since we’re skipping the traditional steam setup, your equipment list is wonderfully short. Having these things ready means you can move super fast once that dough comes out of the microwave.
I got pretty good at making do with mismatched bowls, but for this quick method, a few specific things really make the process smoother. Check out my favorite quick-prep tools over here if you need inspiration for other simple kitchen gadgets: some blending tools I love.
Here’s what you’ll definitely need for these awesome watermelon mochi treats:
- A sturdy, microwave-safe mixing bowl (Glass or ceramic is great—avoid plastic if you can).
- A whisk or a strong wooden spoon for mixing the dough evenly before it cooks.
- Plastic wrap to cover the bowl loosely during microwaving—this traps just enough steam to cook the dough without drying it out.
- A clean, flat work surface where you can spread out all that cornstarch.
- A rolling pin to flatten the dough evenly.
- A sharp knife or bench scraper to cut your sticky dough into perfect squares.
- A small spatula or offset spatula for easily scooping the cream filling onto the dough squares.
See? Nothing scary in there! Just everyday stuff. Having extra cornstarch nearby is my silent promise to you—you’ll thank me later when you’re folding those little joy-bombs shut!
Step-by-Step Instructions for Watermelon Mochi
Okay, this is the moment of truth! We move fast here, but don’t panic. The beauty of the microwave method is that it’s hard to mess up the cooking time, but we need to get the filling ready while the dough is cooling down a tiny bit. When you’re working with mochi, speed and a little bit of dusting flour save the day!
If you want to compare this fast technique with some other recipes that also use simple measurements, check out this recipe collection—sometimes simple upfront prep makes all the difference!
Preparing the Watermelon Mochi Dough Base
First things first: get your dry stuff married together in that microwave-safe bowl. You want the 1 cup of glutinous rice flour and the 1/4 cup of granulated sugar completely mixed before anything wet touches it. That helps prevent lumps later on.
Now, pour in your water, your flavoring, and that single drop of red coloring—oops! Add too much, and it looks like a weird clown nose, so be gentle! Whisk it until it’s totally smooth. Cover it loosely with plastic wrap (we need the steam, but not *too* much confinement) and pop it in the microwave for the first minute on high power.
Pull it out, and you’ll see it’s starting to set up. Stir it vigorously—it’s going to look weird, kind of gloppy. Cover it again, and send it back in for a second one-minute blast. After that, stir it one last time. The dough should be shiny, sticky, and mostly translucent looking, like a thick, pink gummy bear. If you see any white, pasty spots in the middle, give it another 20 seconds. That translucency is your sign it’s cooked through!
Creating the Watermelon Cream Filling
While that dough cools just enough so you don’t burn your fingers, let’s focus on the filling. Remember what I said? Make sure that heavy cream is seriously cold. We’re whipping it up with the powdered sugar until you get soft peaks. Soft peaks mean when you lift the whisk, the tip flops over gently—not stiff like meringue, just soft and pillowy.
Now, this step is crucial for texture: you *gently* fold in those tiny pieces of finely diced fresh watermelon. Folding is important because once we whip the cream, we don’t want to knock all the air out of it. Keep this bowl covered in the fridge until you are ready to assemble, because warm cream filling turns into soup fast!
Assembling and Sealing the Watermelon Mochi
Time to bring chaos and order together! Generously dust a clean surface—a cutting board or counter—with cornstarch. Don’t skip this; I mean it! Turn that warm, slightly sticky mochi dough right out onto the cornstarch mountain and dust the top heavily too.
Use your rolling pin to gently roll that dough out into a thin rectangle. We want it thin enough to wrap, but not so thin that it rips when you pick it up. Use a sharp knife or a bench scraper to cut this rectangle into small, even squares—maybe about 2 inches wide. You’ll need a constant supply of extra cornstarch on your hands while you work!
Take one square of dough in the palm of your hand. Place a spoonful—just a small dollop—of that cold watermelon cream filling right in the center. Now, gently bring the four corners of the mochi up and over the filling. Pinch them together firmly right at the top to seal it shut completely. Don’t seal it too tight at the very top, or the cream will bulge out the sides. Just try to cup it in your hand and gently roll it a tiny bit until it forms a cute, round ball. Repeat until you run out of dough or filling!
Tips for Achieving the Best Watermelon Mochi Texture
I know, I know, mochi dough can feel like it has a mind of its own! But getting it just right—that perfect chew that doesn’t stick to your teeth or your fingers—is totally achievable. My biggest piece of advice, which I learned the hard way, is to respect the cornstarch and keep that filling cold. If you look over on my favorite spot for avoiding baking errors, you’ll see I talk a lot about sticking powders and doughs!
When handling this glutinous rice dessert, think of the cornstarch as your security blanket. It’s there to protect you from a sticky nightmare! And keep everything moving quickly once the dough has cooled just enough to touch.
Managing Sticky Mochi Dough
If your dough is still too warm, it’s going to be incredibly hard to work with, even with cornstarch. Let it cool down just to the point where you can comfortably cup it in your hand without flinching from the heat. That’s your sweet spot.
When you’re rolling out that rectangle, you need a dusting of cornstarch underneath it *and* on top. If you think you’ve used enough cornstarch, add a little more! It’s much, much easier to brush off a little excess powder later than it is to salvage a mochi ball that has glued itself to your cutting board. If the dough starts sticking to your actual hands while you’re folding, just quickly dip your fingertips into the powder before touching the dough again. It’s the only way to keep that signature smooth exterior.
Filling Consistency for Watermelon Mochi
Listen, the filling has to be colder than the dough when you seal these up. If your heavy cream filling isn’t firm enough—if it’s runny or too soft—two bad things happen. First, it’s going to ooze out the sides before you can pinch the mochi shut. Second, it will seep into the rice dough, making that sealing point weak, and your beautiful Japanese sweet will pop open later!
We aimed for soft peaks when we whipped the cream for a reason. They need body to hold those little chunks of watermelon, but they shouldn’t be stiff. Stiff cream is harder to fold neatly into the pocket of the mochi dough. If your cream looks loose, pop the bowl back in the freezer for five minutes before you start assembly. Seriously, colder filling equals tighter seals!
Variations on Your Watermelon Mochi Recipe
You know I love to tinker! While this watermelon mochi is perfect as is—that light, sweet cream is divine—sometimes you want something a little different, or maybe you’re making these for someone who can’t have dairy. That’s when our creativity needs to shine! If you’re looking for other fun ways to mix things up in the kitchen, I always share my little kitchen experiments over at my page for great fluff recipes.
Don’t feel pressured to stick to the original recipe, especially if you want to make a batch entirely vegan or just want a more jelly-like texture inside your chewy rice shell. Changing the flavoring extract is also super fun!
Substituting the Cream Filling in Watermelon Mochi
If you want to replace the gorgeous whipped cream filling, my go-to alternative is a simple watermelon jelly. It keeps the fruit theme strong but makes the whole thing lighter and obviously dairy-free! This is a fantastic option if you plan to serve these when it’s really hot outside because the jelly stays firmer than cream.
Here’s the trick: you just need a basic jelly mix—maybe unflavored gelatin or agar-agar if you’re going strictly vegan—and flavor it intensely with extra watermelon extract and a tiny bit of sugar. You need to set this jelly *firmly* ahead of time, then chill it well before dicing it into small cubes.
When assembling, treat these jelly cubes exactly like you treated the cream filling: scoop a small cube into the center of the square dough. Because the jelly is set, it won’t ooze out while you’re pinching the mochi shut. Just make sure your jelly pieces aren’t too big; we still need enough rice dough wrapped around them to seal the deal! It gives a slightly different, slightly firmer bite, but it’s just as delicious!
Serving Suggestions for Watermelon Mochi
These little gems are so pretty, you almost don’t want to eat them, right? Almost! But they really shine when they are served correctly. Since we put so much effort into making the dough nice and chewy, the absolute number one rule for serving your **watermelon mochi** is this: they must be chilled!
Mochi dough, especially when it’s filled with cream, just tastes better when it’s cool. If they sit out on the counter for too long, that amazing chewiness starts to soften up a bit, and the cream can get soupy. So, always pop them into the fridge for at least 30 minutes after you finish sealing them. They’ll firm up beautifully.
When it comes to pairing them, I love keeping the entire experience light and refreshing. They are so flavorful on their own that they don’t need heavy accompaniments. For a really traditional feel, I always make a pot of simple, mild green tea. If you’re new to brewing tea, I’ve got some easy guidance over at my simple tea recipes page that can get you started without any fuss.
If you’re putting together a dessert platter, try arranging them on a white or light blue plate to really make that bright pink color pop! I usually arrange them nestled alongside slices of fresh, ripe honeydew melon or maybe a few simple raspberries. The colors look fantastic together, and the extra fruit complements the watermelon flavor without overpowering the delicate mochi texture. Seriously, just seeing them lined up makes me happy!
Storage and Reheating Instructions for Watermelon Mochi
Alright, let’s talk about keeping these beauties fresh. This is where mochi gets a little tricky, so listen up! Because we used that starchy glutinous rice flour to get that wonderful, yielding chew, your **watermelon mochi** *will* get hard if you leave them in the fridge for too long. They just really prefer to be eaten fresh, you know?
If you’ve got leftovers—and I always hope you do, because they are that good—you need to store them properly. I usually only make what I plan to eat that day, but if I have extra, the refrigerator is the only way to go because of that fresh cream filling. But you have to protect them!
The absolute best way to store them is in a truly airtight container. I mean seal it tight! If air hits that dough, it draws out the moisture, and they turn hard like little rubber balls. If you have a lot, put a piece of plastic wrap directly on top of the mochi before you put the lid on the container. This double barrier helps keep the moisture locked in close to the rice dough.
If you plan on keeping them longer than 24 hours, be prepared for a little texture change. They might feel a bit firm when you pull them out. If they’ve firmed up slightly, don’t even think about the microwave! Microwaving filled mochi is a recipe for disaster—the cream filling will explode or liquefy instantly. That’s just not a texture we aim for.
If they are a bit stiff after refrigeration, the best thing you can do is let them sit out on the counter for about 20 to 30 minutes before serving. That little bit of time at room temperature usually coaxes the chewiness right back out of the rice dough again. Honestly, though, these are best enjoyed within the first 12 hours of making them when that dough is at peak fluffiness!
Frequently Asked Questions About Watermelon Mochi
I get so many questions every time I post these little pink beauties! It’s totally normal; when you start working with rice flour, you just want to make sure you get that perfect result. If you want to see how I tackle other tricky recipes with simple solutions, swing by here—we love simplifying things!
Here are the things I hear most often about making this summery glutinous rice dessert that ends up being the best Japanese sweet you’ve ever tried.
Can I make this Watermelon Mochi recipe without a microwave?
Yes, absolutely! But be prepared for a bit more work, okay? The microwave is truly my favorite shortcut here because it cooks the dough evenly and fast. If you want to use the traditional method, you’ll need to steam the dough mixture in a heat-proof bowl, covered, over simmering water. Instead of two minutes, it will likely take you 20 to 30 minutes of steaming until the dough is completely translucent and cooked through. You’ll need to keep checking on it and adding water to your steamer pot so it doesn’t boil dry. It works, but wow, the microwave is faster!
How long does fresh Watermelon Mochi stay soft?
This is the eternal dilemma of mochi! Because we are using glutinous rice flour, it loves to firm up once it cools down. If you eat these mochi within just a few hours of making them, they will be at their absolute softest and chewiest—that perfect consistency we are looking for. If you refrigerate them, they usually stay okay for about 24 hours, but by day two, they become noticeably firm, even if stored airtight. So, if you can, try to make them the day you plan to serve them for the best possible experience!
Is this a good Japanese sweet for beginners?
One hundred percent, yes! I designed this specifically to be beginner-friendly. Traditional mochi techniques involving steaming or using a Mochi Maker can be intimidating if you’ve never touched rice flour before. But by using the microwave, we remove most of the guesswork related to temperature control and uneven cooking. The only tricky parts are handling the dough while it’s warm and getting the filling consistency right, but I’ve given you all the tips for that above! If you can stir ingredients together and press a button, you can nail this recipe.
Nutritional Estimate for Watermelon Mochi
Alright, let’s talk turkey for a second about the boring but necessary stuff: the numbers. I know when I’m making something this delicious, I already know it’s a treat, but sometimes it’s nice to know where you stand! I ran these ingredients through a standard calculator, so take these figures as a general guideline, okay? Everyone’s dicing of that watermelon is different, and how much cornstarch you use for dusting really throws the final count off!
This delicious watermelon mochi is surprisingly lighter than some of those heavy, coconut-based rice desserts out there. It’s mostly sugar and carbs from the rice flour, which is just how these things go, but the serving size is small, which helps keep things in check!
Here is the rough breakdown per piece, based on 10 servings:
- Serving Size: 1 piece
- Calories: 110
- Sugar: 10 grams
- Sodium: 5 mg
- Fat: 3 grams
- Saturated Fat: 2 grams
- Trans Fat: 0 grams
- Carbohydrates: 20 grams
- Fiber: 0 grams
- Protein: 1 gram
- Cholesterol: 10 mg
Remember, these estimates are based on the ingredients listed in the recipe for the dough and the cream filling combined. If you skip the heavy cream and go with the jelly variation I mentioned earlier, those numbers will definitely shift in a lighter direction! It’s just a guide, but it shows you these little bites aren’t too heavy for an afternoon snack!
Share Your Homemade Watermelon Mochi Experience
Okay, now that you’ve whipped up these amazing, chewy, pink delights, I absolutely need to see them! Honestly, taking pictures of my own batches of watermelon mochi is half the fun after the baking is done. There is nothing more satisfying than seeing a recipe I love travel out into the kitchens of my readers.
I really hope you enjoyed how fast this microwave method was. When you find a recipe that delivers so much flavor and fun texture in under 25 minutes, you want to shout about it from the rooftops, right? If you made these, please, please leave a star rating right down below. It helps other bakers see that this recipe is safe, reliable, and totally worth the effort.
And if you snapped a picture, tag me! I love seeing your creativity, especially how you styled them or what you paired them with. Did you go totally pink and summery, or did you try a different flavor extract?
Don’t forget to share your creations! If you’re looking for other inspiring things people are making that I think are just pure fun, you have to check out what folks are baking when they try my favorite strawberry cheesecake cookie recipe. We have such a fun community over there!
Happy cooking, everyone! I can’t wait to hear what you thought of this unique Japanese sweet!
Print
Watermelon Mochi
- Total Time: 22 min
- Yield: 10 servings 1x
- Diet: Vegetarian
Description
A simple recipe for making chewy mochi with a sweet watermelon flavor.
Ingredients
- 1 cup glutinous rice flour
- 1/4 cup granulated sugar
- 3/4 cup water
- 1/2 teaspoon watermelon extract
- 1 drop red food coloring (optional)
- 1/4 cup cornstarch, for dusting
- 1/2 cup heavy cream
- 2 tablespoons powdered sugar
- 1/4 cup finely diced fresh watermelon
Instructions
- Mix the glutinous rice flour and granulated sugar in a microwave-safe bowl.
- Stir in the water, watermelon extract, and food coloring until smooth.
- Cover the bowl loosely with plastic wrap and microwave on high for 1 minute.
- Stir the mixture. Cover and microwave for another 1 minute.
- Stir again until the dough is translucent and sticky.
- Spread cornstarch on a clean surface. Turn the hot mochi dough onto the cornstarch. Dust the top with more cornstarch.
- Let the dough cool slightly until you can handle it.
- While the dough cools, whip the heavy cream and powdered sugar until soft peaks form. Gently fold in the diced watermelon.
- Roll the mochi dough into a thin rectangle. Cut the dough into small squares.
- Place a spoonful of the watermelon cream filling onto the center of each mochi square.
- Fold the edges of the mochi up and around the filling to seal it, forming a ball.
- Repeat with the remaining dough and filling.
Notes
- Use extra cornstarch if the dough sticks to your hands during shaping.
- Keep the cream filling cold until ready to use.
- You can substitute the cream filling with a simple watermelon jelly if desired.
- Prep Time: 20 min
- Cook Time: 2 min
- Category: Dessert
- Method: Steaming/Microwaving
- Cuisine: Japanese
Nutrition
- Serving Size: 1 piece
- Calories: 110
- Sugar: 10
- Sodium: 5
- Fat: 3
- Saturated Fat: 2
- Unsaturated Fat: 1
- Trans Fat: 0
- Carbohydrates: 20
- Fiber: 0
- Protein: 1
- Cholesterol: 10
Keywords: watermelon mochi, mochi recipe, glutinous rice dessert, japanese sweet, watermelon cream