
Oh my gosh, you guys, Halloween is practically here and you know what that means? It’s time to elevate the humble appetizer game! Forget the overly complicated treats that take three days to assemble. My absolute favorite thing to bring to any October party—beyond my famous pumpkin bars—are these amazing Halloween Deviled Eggs. They look like they took hours of fussy piping, but trust me, they are the easiest trick in the book!
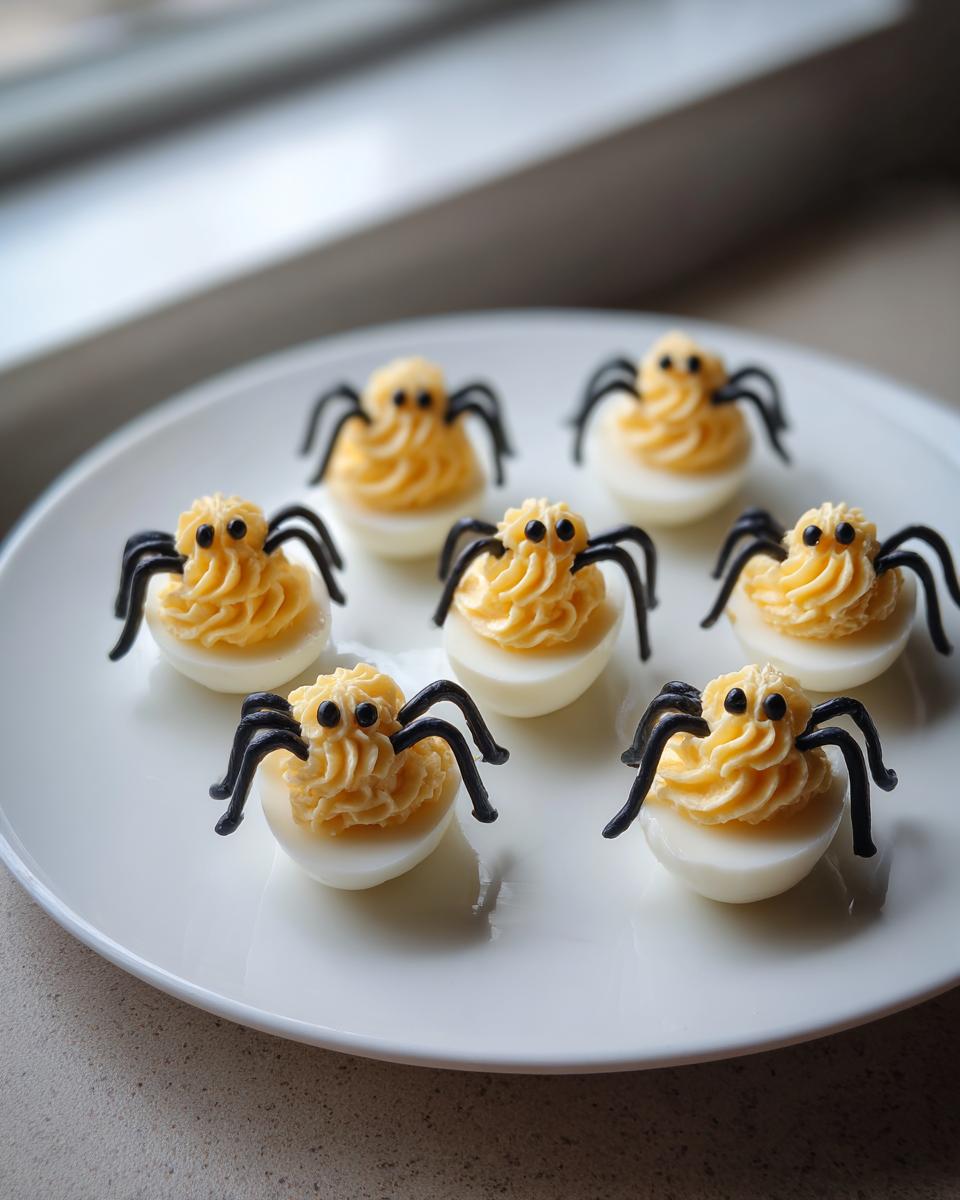
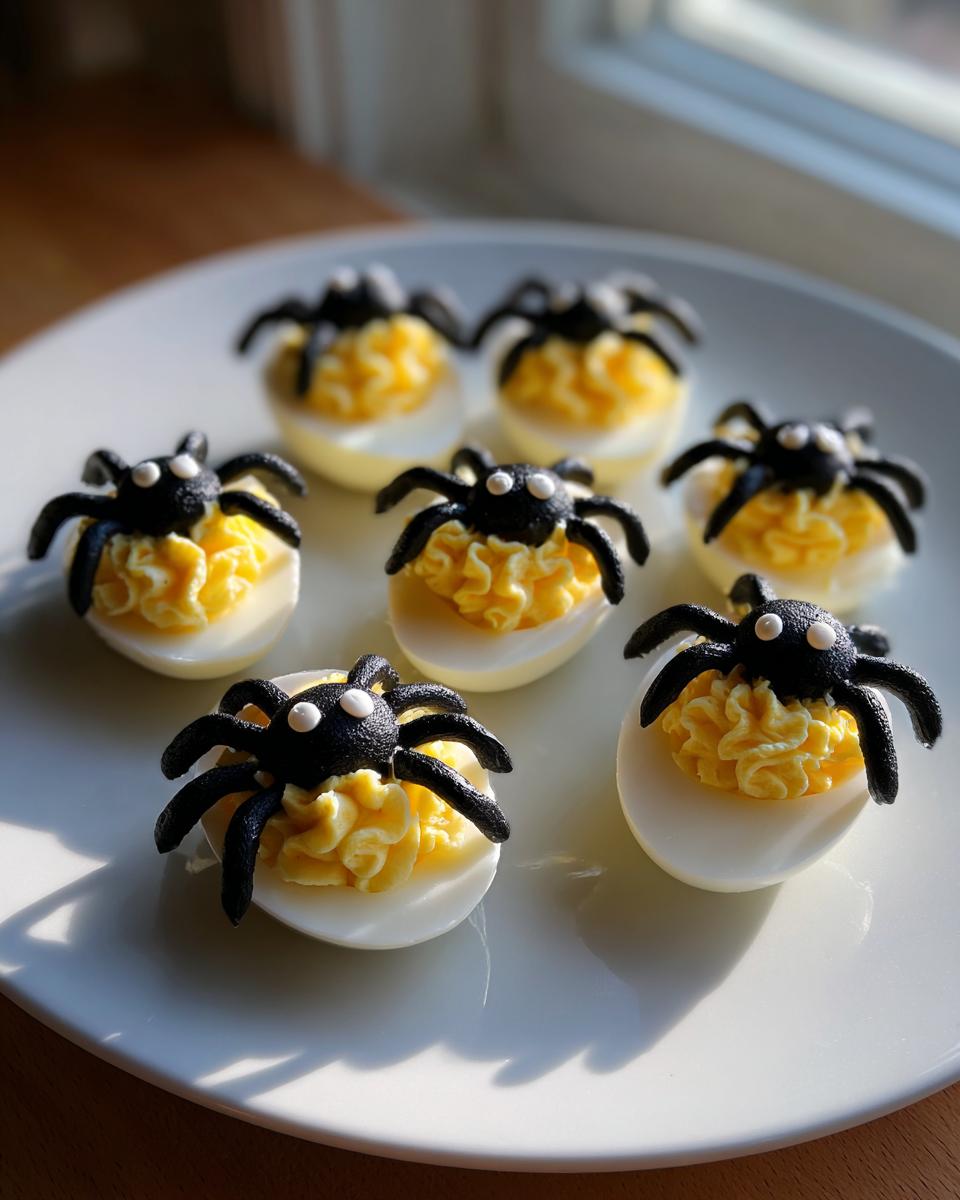
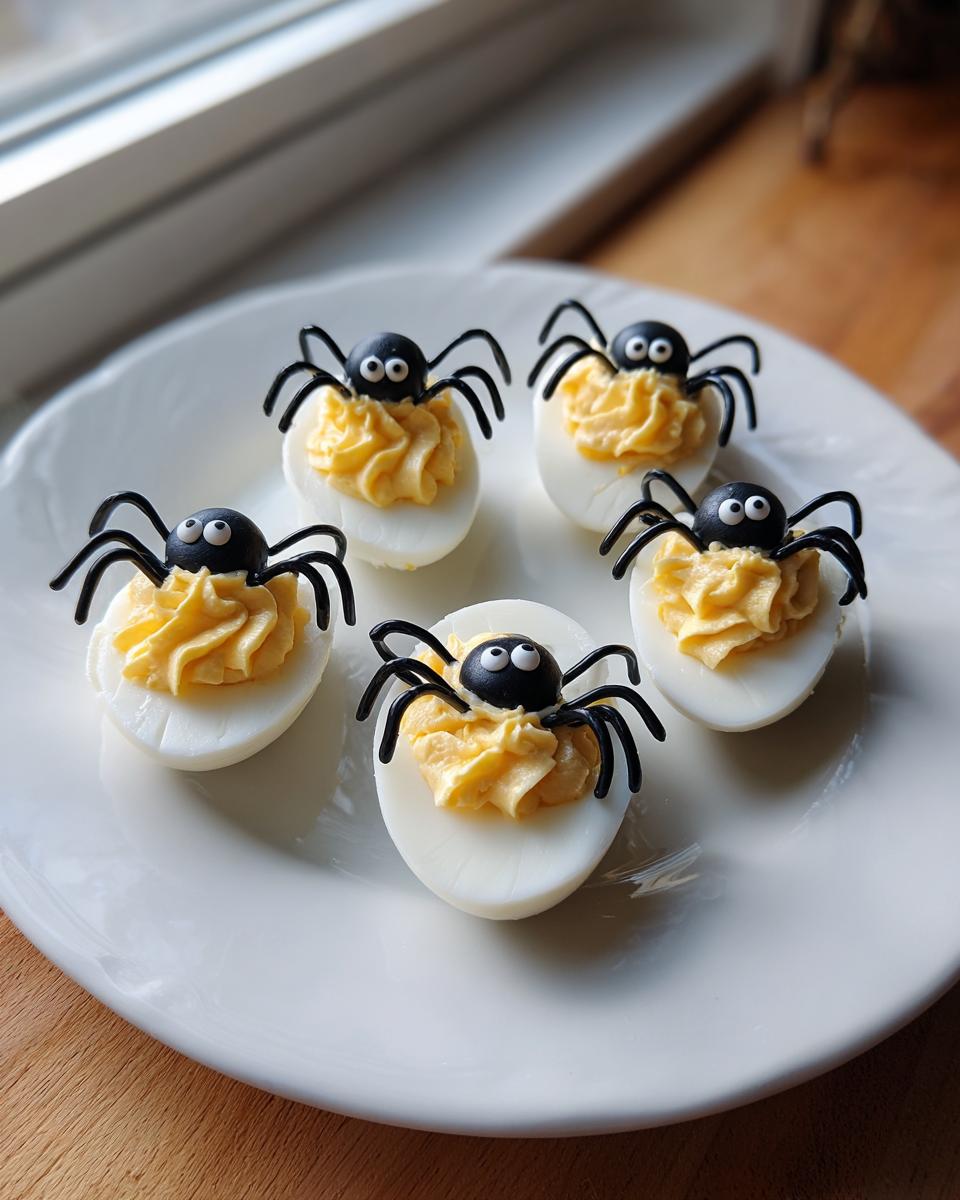
We’re talking about taking the creamy, tangy deviled egg filling you already know and love and turning it into the cutest, creepiest little spiders crawling across the platter. Seriously, every single time I make these Spider Eggs, people hover around the station until they’re gone. They’re the perfect blend of classic flavor and maximum spooky impact. You don’t need fancy ingredients, just a few minutes of assembly, and suddenly, you’ve got the star of the dessert table!

Why You Will Love These Halloween Deviled Eggs
If I could only bring one thing to a Halloween party, it would be these eggs. They are just so fun, and honestly, the payoff versus the effort is insane! Here’s the quick scoop on why you need to make these this year:
- They are unbelievably easy to decorate—the spider look comes together in mere seconds.
- They get rave reviews because the taste is pure, classic deviled egg perfection!
- These Halloween Deviled Eggs make a huge visual impact for very little time investment.
- No weird ingredients needed; everything is straight from your basic pantry stock.
Quick Assembly for Maximum Spook Factor
You want to spend your party mingling, not slaving over tiny legs, right? That’s why I adore these. Once your eggs are boiled and your filling is mixed up, transforming them into little spiders takes no time at all. It moves so fast, which is crucial for anyone hosting a big Halloween bash!
Classic Flavor Profile
Don’t let the spooky look fool you! Underneath those olive legs, this is the most reliable, creamy, tangy deviled egg recipe you’ve ever had. We aren’t messing with strange spices or flavors here. It’s the familiar, comforting taste everyone hopes for in their classic Halloween Deviled Eggs.
Essential Ingredients for Your Halloween Deviled Eggs
Okay, let’s talk about what you need to make these adorable little monsters. I promise, a trip to the store is all it takes to grab what you need for these Halloween Deviled Eggs. It’s simple stuff, which is why I love them so much. Everything is measured out here so you don’t have to stress about guessing the spice levels. You can check out my general guide for making amazing deviled eggs, but the decoration steps are what make this version special!
For the Perfect Base and Filling
This is where the classic, creamy goodness comes from. Make sure you have your eggs ready to go! We start with:
- 12 large eggs
- 1/2 cup mayonnaise (for mixing into the yolks)
- 1 tablespoon yellow mustard
- 1/4 teaspoon salt
- 1/8 teaspoon black pepper
For Decorating the Spider Legs and Eyes
This is the fun part where we bring in the spooky elements! Don’t skimp here; the presentation is everything for these little spider eggs.
- 1/4 cup mayonnaise (this is the extra amount you’ll use for piping the spider body!)
- 1/4 cup black olive slices (these need to be sliced for the legs and cut smaller for the eyes)
See? So easy! Even if you’re running late, grabbing these ingredients means you can still pull off a visually stunning Halloween appetizer.
Step-by-Step Instructions for Making Halloween Deviled Eggs
Alright, here comes the fun part! Don’t panic—this process is totally straightforward. I’ve found that separating the cooking and the decorating really keeps things smooth. You’ll boil your eggs, fix up the filling, and then we get to the crucial part of turning them into creepy crawlies. Remember to check out my guide on getting perfect boiled eggs if you are nervous about boiling! These steps will get your amazing Halloween Deviled Eggs ready in no time, followed by the necessary chilling period.
Cooking and Peeling the Eggs
First things first, we need perfectly cooked and easy-to-peel eggs. Here’s my foolproof method that works almost every time:
- Put your eggs right into a saucepan and cover them completely with cold water.
- Bring the water up to a rolling boil, then immediately turn off the heat, cover the whole pot, and just let them stand there for exactly 10 minutes. That’s what gives us beautiful, fluffy yolks!
- As soon once that timer buzzes, drain that hot water right out and switch it up by covering the eggs completely with ice water. They need to chill out completely in that cold bath. Once they are cool, you can peel away the shells.
Preparing the Yolk Filling
Once everything is peeled, slice every egg in half lengthwise. Gently scoop those yolks out into a mixing bowl—be careful not to tear the white halves; those are our spider bodies!
Take a fork and mash those yolks until they are crumbly. Now, we mix in the creamy stuff: add the 1/2 cup of mayonnaise, the mustard, that little bit of salt, and the pepper. Mash mash mash! Keep going until it’s a smooth, uniform mixture. It should be pipeable but still thick—that texture is key for a good spider body!
Assembling and Decorating the Spider Halloween Deviled Eggs
This is the moment we transform them! First, put that remaining 1/4 cup of mayonnaise into a piping bag. I love using a star tip because it makes a nice, puffy, rounded spider body, but hey, snip a tiny corner off a Ziploc bag if you don’t have a fancy tip! Pipe a small, lovely dollop right in the center of each yolk filling.
Next, grab those black olive slices. You need to cut them in half lengthwise to make them look like little legs. For each egg, take four halves and carefully arrange them coming off the sides of that piped mayo—that’s your eight legs ready for its creepy stroll! Finally, use a tiny sliver of another olive piece right on the front of the mayo dome to make the two little eyes. Done! Don’t forget that these Halloween Deviled Eggs need at least 30 minutes in the fridge to set up those decorations and chill thoroughly before serving.
Expert Tips for Perfect Halloween Deviled Eggs
I’ve made enough of these creepy little guys to know a few things that really make the difference between a good batch and a show-stopping platter of Halloween Deviled Eggs. You want them to look good *and* taste great, right? A few quick tweaks make all the difference, especially when you are working against the clock! If you like the texture profile of the filling, you might also want to check out my recipe for amazing deviled egg potato salad, but for these spiders, technique is key.
The Best Eggs for Peeling
This is my number one golden rule for any deviled egg project. You absolutely, positively do NOT want to use eggs straight from the carton if you’re planning on peeling them immediately. Super fresh eggs cling to that inner membrane like crazy! My handwritten note—the one with the little grease stain on it—explicitly says to use eggs that are about a week old. They just cooperate so much better when you’re peeling them after cooling.
Piping Technique for the Spider Body
When you’re piping that center dollop that forms the spider’s body, you need the mayo to hold its shape, but you don’t want it stiff. If your extra 1/4 cup of mayonnaise feels too thin after being mixed around a bit, just stir in maybe half a teaspoon of powdered sugar (if you have some handy) or just stick it in the fridge for five minutes to firm up slightly before piping. A firmer mayo mixture stands up taller, making a nicer, rounder spider abdomen versus a flat puddle. We want height for these creepy crawlies!
Ingredient Notes and Substitutions
People often ask me about tweaking things in recipes, especially when it comes to fussy decorations like these spiders. When it comes to these specific Halloween Deviled Eggs, I have to draw the line in a couple of places because the aesthetics depend on those core ingredients behaving properly. Stick to the plan for the best results!
The mayonnaise amounts are critical here not just for flavor, but for structure. We use the first 1/2 cup entirely mixed into the yolks to make them creamy and rich. The second batch of 1/4 cup is solely dedicated to piping that spider body on top. If you try to use the same bowl of filling for both tasks, you won’t get that necessary height for the body to look like, well, a body!
And speaking of design, let’s talk olives. You need those black olive slices for the legs and the eyes, and they just have to be black olives. I tried using pimentos once because a friend swore it would look festive, but trust me, the red just completely ruins the spooky effect! Also, while I normally love dusting my regular deviled eggs with paprika, please skip it here. That red dusty layer will completely obscure the sharp black shapes of your spiders where the legs and eyes are placed, and that’s the whole point of making them spooky!
Serving Suggestions for Your Halloween Deviled Eggs
The key to a killer Halloween spread is variety, and since these Halloween Deviled Eggs are the undisputed star of the show, you need some solid backup appetizers! You don’t want everything to be egg-based, you know? People need options!
When I put together my appetizer table, I try to lean into the fun, dark colors of the season. Since our spider eggs are creamy and delicious, we need things that offer a little crunch or a different texture profile. Think about balancing out that richness! If you’re looking for some other easy wins for your party, check out these fantastic Iowa party bites or something visually amazing like a spooky dip.
Here are a few quick ideas that always fly off the table when I serve them alongside the spider eggs:
- Black or Purple Grapes: So easy! Just serve them cold on a platter. They look almost black in low light and they’re just simple, healthy palate cleansers.
- Crackers with Dark Toppings: Think dark rye crackers topped with sharp cheddar or a cream cheese spread mixed with cracked black pepper. It keeps that slightly savory theme going.
- Web-Themed Dip: Anything that you can swirl the top of to look like a ghost or a spiderweb underneath makes a huge splash! You’d be amazed at how easy it is to make a stunning Halloween centerpiece dip just by dragging a toothpick through the topping. That always pairs perfectly with our spooky spiders!
Keep it simple, keep it themed, and your entire spread will look incredibly put-together!
Storage and Make-Ahead for Halloween Deviled Eggs
Planning ahead for a big Halloween party is key, and thankfully, these little spooky guys are pretty good travelers, but timing is everything when it comes to presentation! While you can definitely get a jump start on the cooking and mixing, I have a firm rule about when you should actually assemble the spiders. You want those olive legs to look crisp and the piped mayo body to be perky, not sunken!
The first step you *can* do way ahead of time is boiling and peeling the eggs. Once they are peeled, just store the empty whites and the mixed yolk filling separately in airtight containers in the fridge. They hold up beautifully that way for a day, maybe even two if your fridge is super cold. I usually cook the eggs the day before I plan to serve them.
However, the final assembly of these Halloween Deviled Eggs should happen as close to serving time as possible. Once you pipe that mayo body and stick on those tiny olive legs, they need that minimum 30-minute chill time recommended in the recipe. This time lets the filling firm up against the egg white, which keeps everything stable when people start grabbing them!
If you assemble them too early, say, more than four hours before the party starts, the humidity in the fridge can start to soften the piped mayo, and those little legs might start sliding. Nobody wants a sad, oozing spider! So, my advice is: cook eggs the day before, mix the filling the morning of, and assemble and decorate them about an hour before your guests arrive. That way, they get that required 30-minute chill, and you serve up the freshest, spookiest looking Halloween Deviled Eggs possible!
Frequently Asked Questions About Spider Deviled Eggs
I always get so many questions once people see these little guys! It’s usually about how to keep the design looking sharp or if they can be made ahead of time for a big event. These little spider eggs are deceptively simple, but a few tips make them absolutely perfect for any Halloween appetizer spread! If you’ve made my spooky Halloween cookies, you know I love a good theme!
Can I make the yolk filling for these Halloween Deviled Eggs ahead of time?
Yes, absolutely! That’s one of the huge time savers. I often make the filling mixture—the mashed yolks, mayo, mustard, salt, and pepper—a full day before I plan to serve them. Once it’s mixed smooth, transfer it into a small, airtight container. Pop it in the fridge and it stays perfect for 24 hours. But here’s the big ‘but’: you must wait to put the filling back into the whites and decorate them until about an hour before the party. You want those spider bodies to be fresh and firm when people start eating them, otherwise, the filling can soften too much.
What if I don’t have a piping bag for the spider body?
Don’t you worry one bit if your kitchen cabinet is missing a fancy star tip! You don’t need specialized equipment for these Halloween Deviled Eggs. My go-to backup trick is grabbing one of those sturdy Ziploc sandwich bags, you know, the ones that seal really well. Scoop that extra 1/4 cup of mayo right into the bag, seal it tight (pushing out as much air as you can!), and then snip just a tiny corner off with a sharp pair of scissors. Snip too much, and you’ll get a flat mess; you only need a small hole for that nice, round body mound. It works like a charm every single time!
Nutritional Information Estimate
Now, I know some of you are tracking macros or watching your intake, and I always want you to have all the info possible when you make my recipes! Since these are appetizers, it’s easy to overlook the nutrition facts, but I’ll give you the lowdown.
Please remember that since we are dealing with homemade creamy filling and whole eggs, these numbers are just an estimate! They can change based on your brand of mayonnaise or the exact size of your olives. But this gives you a really good baseline for what you’re looking at per serving of these fun little spider bites.
Here’s the breakdown for two halves of our spooky treat:
- Serving Size: 2 halves
- Calories: 105
- Fat: 9.5g (This includes about 2.0g Saturated Fat—remember, we’re using real mayo!)
- Protein: 4.5g
- Carbohydrates: 0.5g
Aren’t those carbs surprisingly low? That’s because the filling is mostly fat and protein! It means you can totally afford to have a couple of these creepy crawlies while you’re enjoying the rest of your Halloween feast. Enjoy responsibly, friends!
Print
Halloween Deviled Eggs
- Total Time: 35 min
- Yield: 24 halves 1x
- Diet: Vegetarian
Description
Simple deviled eggs decorated to look like spiders for a Halloween theme.
Ingredients
- 12 large eggs
- 1/2 cup mayonnaise
- 1 tablespoon yellow mustard
- 1/4 teaspoon salt
- 1/8 teaspoon black pepper
- 1/4 cup mayonnaise (for piping)
- 1/4 cup black olive slices (for legs and eyes)
Instructions
- Place eggs in a saucepan and cover with cold water. Bring water to a boil, then remove from heat, cover, and let stand for 10 minutes.
- Drain hot water and immediately cover eggs with ice water. Let cool completely, then peel the eggs.
- Slice each egg in half lengthwise and carefully scoop out the yolks into a bowl.
- Mash the yolks with a fork. Add 1/2 cup mayonnaise, mustard, salt, and pepper. Mix until smooth.
- Spoon the yolk mixture back into the egg white halves.
- Place the remaining 1/4 cup mayonnaise into a piping bag fitted with a star tip (or a plastic bag with a corner snipped off). Pipe a small dollop on top of each yolk filling to create a spider body shape.
- Cut black olive slices in half to create eight small legs for each egg. Arrange four halves on each side of the filling to look like spider legs.
- Use a small piece of black olive for the eyes on the piped mayonnaise body.
- Chill for at least 30 minutes before serving.
Notes
- For easier peeling, use eggs that are a week old rather than very fresh.
- You can use paprika for a dusting, but it will hide the spider effect.
- Prep Time: 25 min
- Cook Time: 10 min
- Category: Appetizer
- Method: Boiling and Assembling
- Cuisine: American
Nutrition
- Serving Size: 2 halves
- Calories: 105
- Sugar: 0.5
- Sodium: 110
- Fat: 9.5
- Saturated Fat: 2.0
- Unsaturated Fat: 7.5
- Trans Fat: 0.0
- Carbohydrates: 0.5
- Fiber: 0.1
- Protein: 4.5
- Cholesterol: 75
Keywords: Halloween, Deviled Eggs, Spider Eggs, Party Food, Appetizer