
There is honestly nothing quite like the smell of fresh baking coming from your oven, is there? It instantly makes the whole house feel cozier, and when it can be done in under 30 minutes? Even better! I wanted to share my go-to recipe for truly simple **Ginger Scones** because they hit that sweet spot between breakfast pastry and afternoon treat perfectly.
I used to think scones were fussy—you know, something you only got at fancy tea shops. But I struggled for ages trying to get that flaky middle layer. My game-changer? It wasn’t the recipe ingredients as much as the technique I learned: keeping everything, I mean *everything*, ice cold. Once I started chilling my milk and treating the butter like it was lava, the scone texture finally clicked. Trust me, these are tender, perfectly spiced, and don’t require hours of fussing!

Why You Will Love These Simple Ginger Scones
Honestly, these scones are a weeknight miracle. I keep telling people they are perfect because they are just so straightforward. Here’s why they’ve become my new favorite breakfast pastry:
- They come together faster than you can brew the tea! Total time is barely 30 minutes.
- The crystallized ginger gives you these wonderful little bursts of sharp, sweet zing in every bite.
- The ingredient list is super basic; no weird specialty flours needed here!
- They bake up beautifully golden and are incredibly tender inside, not dry and crumbly like some recipes.
Trust me, once you try this simple recipe, you’ll never go back to store-bought!
Essential Ingredients for Flavorful Ginger Scones
You only need a few standard pantry items to get these lovely ginger scones going. That’s part of the magic—simple things making something so delicious! Here is exactly what you’ll need:
- 2 cups all-purpose flour
- 1/4 cup granulated sugar
- 1 tablespoon baking powder
- 1/2 teaspoon salt
- 1 teaspoon ground ginger
- 1/2 teaspoon ground cinnamon
- 1/4 teaspoon ground cloves
- 6 tablespoons cold unsalted butter, cut into small pieces
- 1/2 cup crystallized ginger, chopped
- 3/4 cup cold milk
- 1 large egg, lightly beaten (for brushing)
Now, for my biggest rule—and this is where so many people mess up scones: Your butter and milk absolutely have to be cold. I mean, water-bath shocking cold! If the butter softens even a little bit before it hits the dry mix, you’re just making biscuits, not fluffy scones. That cold fat creates steam pockets during baking, which gives us that wonderful lift and slight flakiness we’re looking for!
Equipment Needed for Perfect Ginger Scones
You don’t need fancy gear for these quick breads, thankfully. All you really need is a good mixing bowl, a whisk, and your trusty pastry blender if you have one—though your fingers work just as well. Grab a baking sheet, line it with paper, and find a 2-inch round cutter. That’s it! Prep is done in minutes.
Step-by-Step Instructions to Make Ginger Scones
This is where the magic happens, and trust me, it moves fast. Since these are such quick breads, you need to have all your ducks in a row before you start combining wet and dry!
- First things first: Get your oven cranked up! Preheat it to 400 degrees Fahrenheit (200 Celsius) and line a baking sheet with parchment paper. We want that immediate, hot blast of heat for good lift.
Preparing the Dough for Your Ginger Scones
Grab your biggest bowl. You’re going to whisk together all the dry stuff first—the flour, sugar, baking powder, salt, and all those wonderful spices like ground ginger, cinnamon, and cloves. Once that’s mixed, throw in your super-cold butter pieces. You need to cut this butter in until it truly looks like coarse crumbs, maybe like tiny peas or coarse sand. I use my fingers because I can feel when it’s right, but a pastry blender works too! Next, stir in that chopped crystallized ginger. Don’t mix it too much yet; we don’t want it getting warm.
Now, here’s the super important part: Pour in that cold milk all at once. Mix it gently, just until everything barely comes together. I mean it—just fork it together until there’s no dry flour hiding. If you overmix this sticky dough, you develop the gluten too much, and those lovely ginger scones turn into hockey pucks. We want tender, remember? It’s okay if the dough looks a little shaggy.
Shaping and Baking Your Ginger Scones
Turn that slightly sticky dough out onto a lightly floured surface. Gently pat it down or roll it out until it’s about 3/4 inch thick. Don’t press it too thin! Use a 2-inch round cutter to stamp out your shapes, placing them nicely on that prepared baking sheet. Give the tops a nice, light brush with that beaten egg—this is what gives you that beautiful, shiny golden-brown color we love.
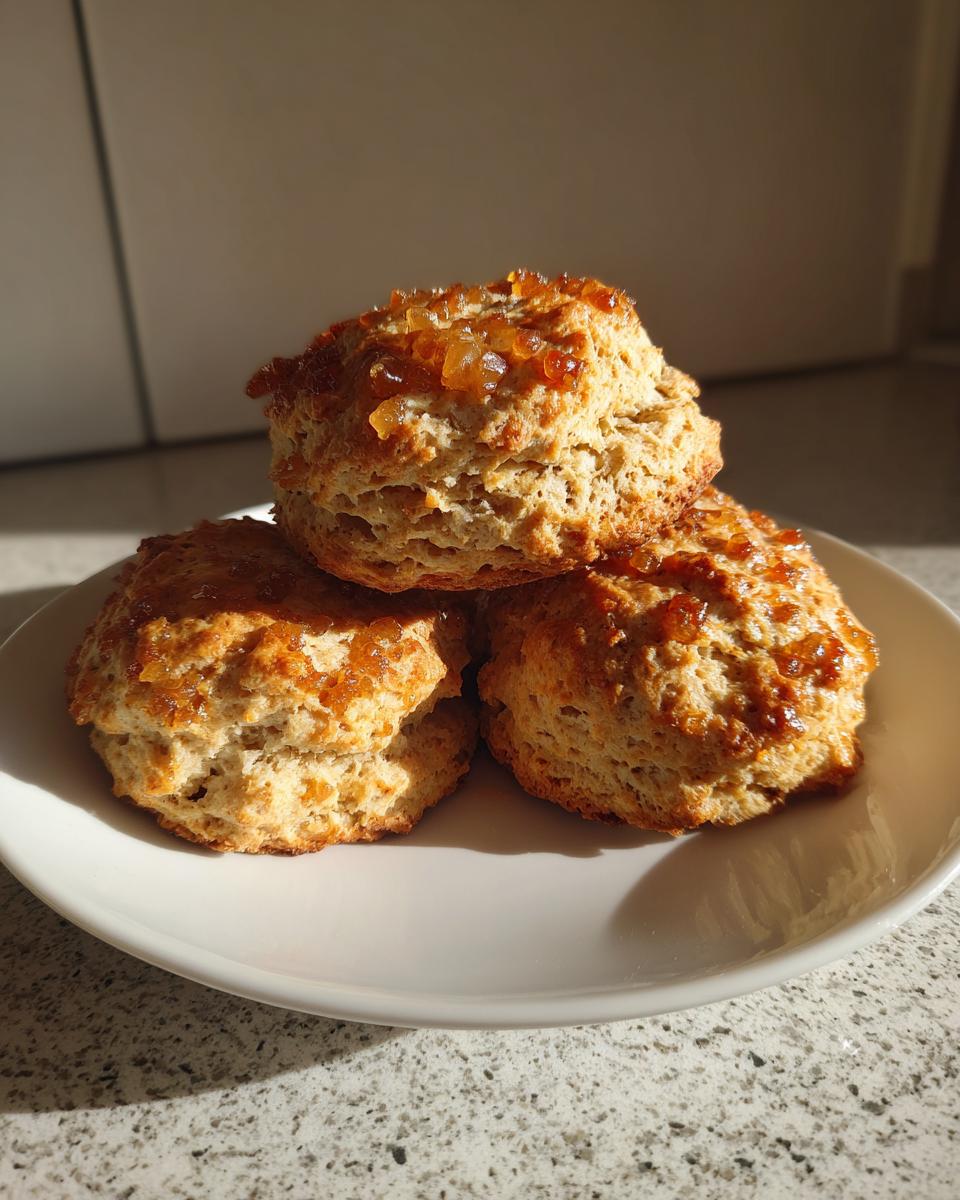
Into the hot oven they go for about 12 to 15 minutes. Seriously, watch them closely! When they are perfectly golden brown on top, pull them out immediately and transfer them to a wire rack. They are best served warm, maybe even slightly warm, with a little smear of butter!
Tips for Success When Baking Ginger Scones
I’ve made batches of these ginger scones that were flat disappointments, and batches that were perfection. It all comes down to a few little nudges that aren’t always written down on the ingredient list. You absolutely have to trust me on these little tricks if you want the best breakfast pastry possible!
First up, let’s talk chilling again, because it’s vital. If you’re working in a warm kitchen, just pop your mixing bowl—the one you’re using for the dry ingredients—into the freezer for ten minutes before you start. Keeping the flour and spices cold helps the butter stay firm when you cut it in. That firmness is the secret weapon for flaky layers!
When you are patting the dough out, try not to reuse your flour too much on the surface. Too much extra flour toughens up the sides of the scones. Just dust lightly. Also, when you cut the rounds, push down straight with the cutter. Don’t twist it! Twisting seals the edges and prevents the scone from rising straight up. It’s like cheating the way the dough bakes!
If you want an extra spicy kick, try adding just a teaspoon of fresh grated ginger along with your ground spices. It really amps up the warmth! And if you’re looking for other great tea-time treats, you should check out my recipe for Raspberry Almond Tea Bread—it has a similar cozy vibe!
Ingredient Notes and Substitutions for Ginger Scones
Okay, so what if you’re missing that fancy crystallized ginger? Don’t panic! If you substitute it entirely with just ground ginger, your texture will definitely change—you’ll lose those chewy, sweet bits scattered through the scone, so they become more of a simple quick bread flavor profile. That’s fine, but not the same!
If you want that flavor boost without the crystals, try adding an extra teaspoon of fresh grated ginger to the dry mix, as I mentioned in the notes. It gives a fantastic, sharp heat! If you’re curious about other simple quick bread recipes that use pantry staples, you really should peek at my Easy Banana Bread—it’s another winner!
Serving Suggestions for Warm Ginger Scones
These ginger scones are heavenly when they are just slightly warm from the oven. I mean, piping hot is okay, but slightly warm allows the butter to just melt perfectly on top without making a huge mess!
The greatest accompaniment, in my humble opinion, is simply a thick smear of good quality salted butter. The salt plays so nicely off the spice in the scone. If you’re feeling truly indulgent, especially if you’re having company, I love setting out a bowl of clotted cream. It’s just decadent, you know? And definitely jam—strawberry or a nice tart apricot jam cuts through the sweetness beautifully.
As for what to drink? Tea, obviously! A strong black tea is the classic pairing. But honestly, I’ve made these in the morning when I needed a grab-and-go breakfast, and they are fantastic dunked quickly into a piping hot mug of coffee. If you’re ever looking for a slightly heavier breakfast bake that still fits that warm, cozy vibe, you should check out my recipe for Coffee Cake—it’s amazing!
Storage and Reheating Instructions for Ginger Scones
These ginger scones are so good that you might actually have leftovers, though I doubt it! If you do manage to save a few, proper storage is key to keeping that beautiful texture intact. We don’t want them going stale overnight!
For short-term storage—say, if you plan to eat the rest within two days—just keep them in an airtight container at room temperature. Don’t refrigerate them! Refrigeration tends to dry scones out faster than anything else. I usually line the container with a paper towel first, just to absorb any stray moisture, and then seal it up tight. They stay just as good the next morning.
If you need them to last longer, you can absolutely freeze them! Once they are completely cooled, wrap each individual ginger scone tightly in plastic wrap, and then tuck them all into a heavy-duty freezer bag. They freeze beautifully for up to three months. This is great if you bake a big batch for later!
Reheating is simple but important. If they’ve been sitting out, pop them in a toaster oven or a conventional oven set to about 325 degrees Fahrenheit for maybe five minutes. You just want to warm them through and crisp up the exterior a little bit. Don’t microwave them unless you absolutely must, because microwaving makes scones rubbery fast. A quick trip to the oven will bring back that fresh-baked perfection!
Frequently Asked Questions About Ginger Scones
Can I use frozen butter instead of cold butter for these ginger scones?
Yes, you absolutely can, and sometimes I prefer it! If you use frozen butter, just make sure you grate it on the largest holes of a box grater before tossing it into your dry ingredients. Freezing and grating keeps the butter super cold but also breaks it down into smaller pieces really fast, which is great for the ‘coarse crumbs’ stage. It’s a real time-saver when you’re making this quick bread first thing in the morning!
Can these ginger scones be made ahead of time?
You can definitely prepare the dough ahead of time, which is handy if you want a warm breakfast pastry ready to go! Once the dough is mixed (right before cutting), cover it tightly and chill it for up to 24 hours. When you’re ready to bake, roll it out and cut the scones right away. You might need to add an extra minute or two to the baking time since the dough starts colder than room temperature.
Do I have to use crystallized ginger, or can these be less sweet?
You don’t have to use crystallized ginger if you prefer a less sweet experience. If you leave it out completely, you’ll end up with a lovely ginger-spiced scone, but it will definitely be less sweet overall because the crystallized pieces add a nice sugar punch. If you want sweetness but not the chewiness of the crystals, just stick with the ground spices and maybe increase the granulated sugar slightly, or use my advice on adding fresh ginger for that heat!
Are these considered a breakfast pastry or more of a dessert?
That’s the beauty of a great scone—they fit anywhere! Because they aren’t overly sweet compared to, say, a cinnamon roll, they absolutely qualify as a wonderful breakfast pastry. They pair perfectly with coffee or juice. However, when you add jam and cream, they transition seamlessly into that afternoon tea time slot. They are wonderfully versatile!
If I don’t have a round cutter, what should I use instead?
Don’t sweat it if your drawer doesn’t hold a 2-inch round cutter! You can cut traditional wedges, just like a pizza. After you pat the dough to that 3/4-inch thickness, just use a sharp knife to slice the circle into 8 even triangles before you brush them with egg wash. It’s the same result, just a different shape! If you’re looking for other simple recipes using basic kitchen techniques, you might enjoy my guide on Quick Pasta Salad; it’s all about simple assembly!
Print
Simple Ginger Scones
- Total Time: 30 min
- Yield: 8 scones 1x
- Diet: Vegetarian
Description
A straightforward recipe for making flavorful ginger scones.
Ingredients
- 2 cups all-purpose flour
- 1/4 cup granulated sugar
- 1 tablespoon baking powder
- 1/2 teaspoon salt
- 1 teaspoon ground ginger
- 1/2 teaspoon ground cinnamon
- 1/4 teaspoon ground cloves
- 6 tablespoons cold unsalted butter, cut into small pieces
- 1/2 cup crystallized ginger, chopped
- 3/4 cup cold milk
- 1 large egg, lightly beaten (for brushing)
Instructions
- Preheat your oven to 400 degrees Fahrenheit (200 degrees Celsius). Line a baking sheet with parchment paper.
- In a large bowl, whisk together the flour, sugar, baking powder, salt, ground ginger, cinnamon, and cloves.
- Cut in the cold butter using a pastry blender or your fingertips until the mixture resembles coarse crumbs.
- Stir in the chopped crystallized ginger.
- Pour in the cold milk all at once. Mix gently with a fork until just combined; do not overmix. The dough will be slightly sticky.
- Turn the dough out onto a lightly floured surface. Gently pat or roll the dough to about 3/4 inch thickness.
- Use a 2-inch round cutter to cut out scones. Place them on the prepared baking sheet.
- Brush the tops of the scones lightly with the beaten egg.
- Bake for 12 to 15 minutes, or until the tops are golden brown.
- Transfer the scones to a wire rack to cool slightly before serving.
Notes
- For a stronger ginger flavor, you can add 1 teaspoon of fresh grated ginger to the dry ingredients.
- If you do not have crystallized ginger, use 2 tablespoons of ground ginger instead, but the texture will change.
- Serve warm with butter or jam.
- Prep Time: 15 min
- Cook Time: 15 min
- Category: Breakfast
- Method: Baking
- Cuisine: American
Nutrition
- Serving Size: 1 scone
- Calories: 230
- Sugar: 8
- Sodium: 210
- Fat: 10
- Saturated Fat: 6
- Unsaturated Fat: 4
- Trans Fat: 0
- Carbohydrates: 32
- Fiber: 1
- Protein: 5
- Cholesterol: 35
Keywords: ginger scones, breakfast pastry, quick bread, crystallized ginger, tea time