
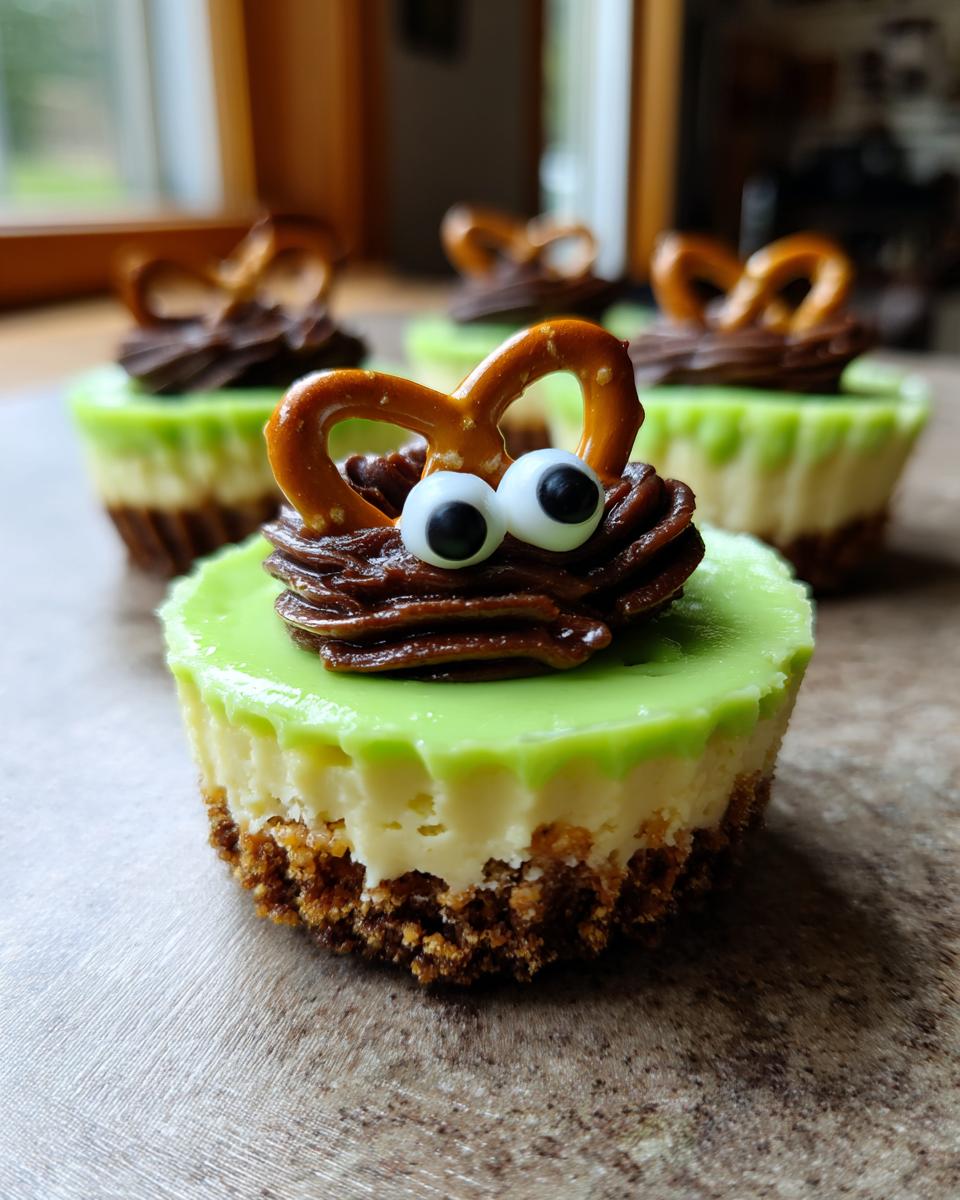
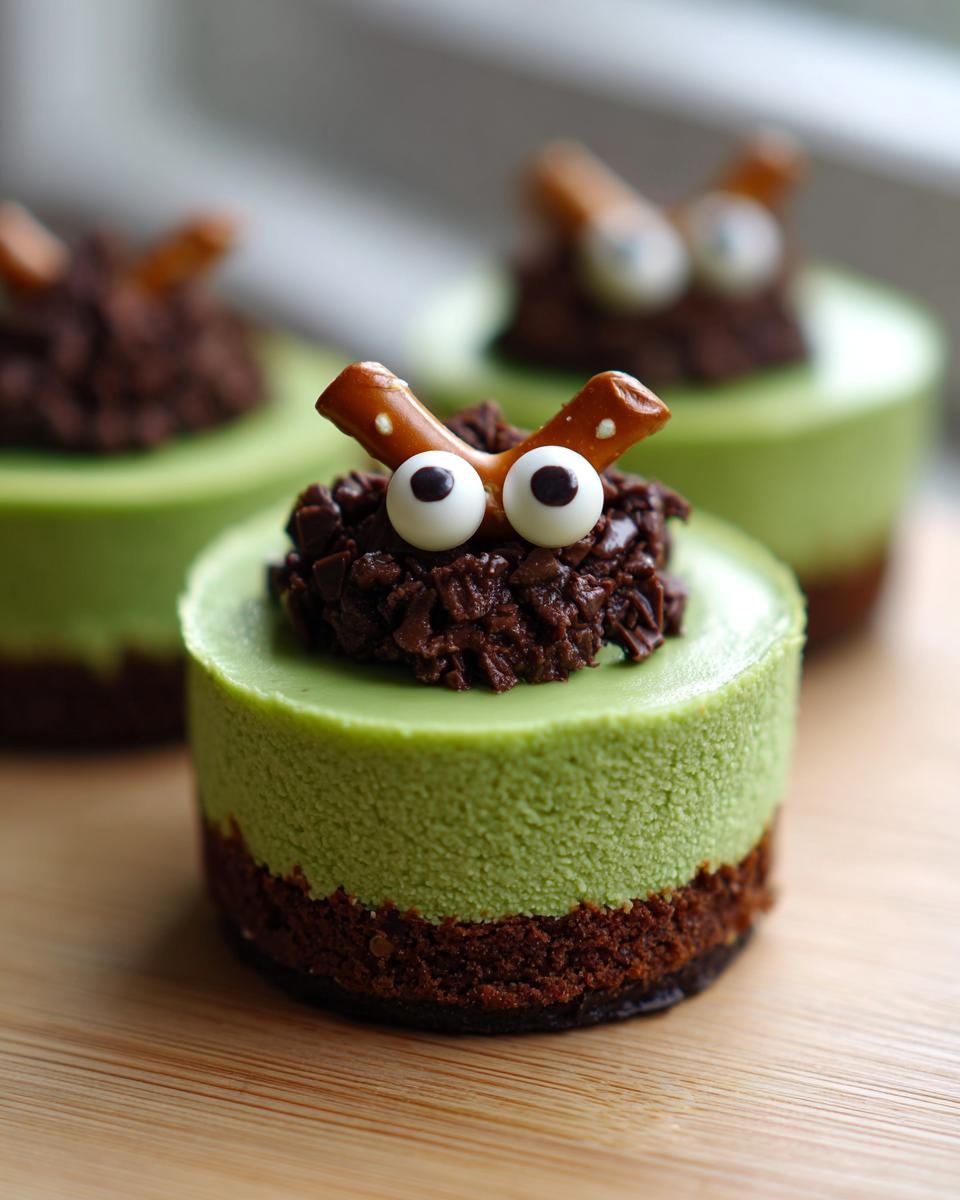
Oh my gosh, okay, if you’re anything like me, Halloween isn’t just about the costumes; it’s about the snacks! I need treats that are fun, a little bit spooky, but still taste absolutely incredible. Forget those complicated, giant desserts that get messy when you try to serve them. I have found the perfect solution that knocks everyone’s socks off every year: these amazing Frankenstein Mini Cheesecakes!

Seriously, these little guys are everything I want in a holiday dessert. They’re perfectly portioned, so people can grab one (or three!) and mingle without juggling plates or cutting corners off a cake. Plus, the decoration process is SO rewarding. I love seeing the faces of the kids—and honestly, the adults too—when they see these bright green little monsters staring up at them. Trust me, making individual desserts like these Frankenstein Mini Cheesecakes is my favorite way to kick off the spooky season around here.
Why These Frankenstein Mini Cheesecakes Are Your New Favorite Halloween Dessert
I know you see a lot of Halloween recipes out there, but these little mini cheesecakes just hit different. They are so reliable, and honestly, they are the star of any dessert table right now. You just don’t have to worry about any slicing messes, which is huge when you’re hosting a party!
- Perfect Individual Portions: This is my favorite part! Since they are already baked in those mini crusts, there is zero slicing required. People just walk up, snag one, and they’re good to go. No server mess, no uneven pieces—just perfect little squares of deliciousness every time.
- Spooky, Fun Decoration: You don’t need to be an artist to make these look amazing. The green color is instantly festive, and honestly, the simpler the face looks, the cuter the little monster becomes. The cookies for the eyes and those little pretzel bolts make them look unbelievably professional with barely any effort.
If you’ve been looking for that perfect blend of spooky and sweet without spending all day in the kitchen, these are for you. If you tried my Grinch Mini Cheesecakes last year, you already know how much fun individual cheesecakes can be!
Perfect Individual Portions
Listen, I am all about a big slice of birthday cake, but when it comes to a party, individual servings are lifesavers. These Frankenstein Mini Cheesecakes are totally self-contained, sitting right there in their little crust beds. It means everyone gets the perfect cheesecake-to-crust ratio, and you don’t have to stress about a huge dessert melting or crumbling when you try to cut into it. They’re ready to eat right out of the fridge!
Spooky, Fun Decoration
The fun factor here is sky-high, right? Achieving that classic, slightly clumsy Frankenstein look is shockingly easy. We use chocolate sandwich cookies for the eyes, which stay perfectly put once the cheesecake sets up in the chill. The black decorating gel just takes a quick squeeze to get those signature stitches and that classic stitched-up mouth. It really captures that fun, B-movie vibe!
Essential Ingredients for Perfect Frankenstein Mini Cheesecakes
You know, when I first tried this, I thought, oh, it’s just cheesecake mix, how hard can it be? But the key to getting that perfectly creamy texture that these individual desserts require is all in the ingredients and making sure they are ready to go before you even turn the oven on. Trust me on this one—ingredient prep is half the battle!
You’ll need the following items to get these spooky little guys whipped up:
- We start with 12 pre-made mini graham cracker crusts. Seriously, don’t bother making these from scratch for this recipe; we’re focusing on the fun part!
- You need 8 ounces of cream cheese, and this is important: it has to be fully softened. I usually take mine out about two hours before I plan on mixing.
- We use 1/4 cup of good old granulated sugar.
- Just one large egg will bind everything together nicely.
- A half teaspoon of vanilla extract for that classic sweet background flavor.
- Don’t skimp on the green food coloring! You’ll need several drops to get that vibrant monster hue.
- For the decorations, grab 12 chocolate sandwich cookies—you’ll split these for the eyes.
- You’ll need some black decorating gel for drawing mouths and those little stitches.
- And finally, those little salty pretzel twists for the neck bolts! They offer the best little textural surprise.
If you are interested in exploring rich, decadent flavors alongside our spooky treats, you should definitely check out this Chocolate Caramel Toffee Cake recipe for another time!
Ingredient Notes and Substitutions for Frankenstein Mini Cheesecakes
Okay, let’s talk about the fine points. My biggest tip here, which I cannot stress enough, is that the cream cheese needs to be truly room temperature soft. If it’s cold, you’ll end up with those annoying little lumps in your batter, and we want smooth, smooth cheesecake, not lumpy monster goo!
When it comes to the green color, if you can splurge on gel food coloring, please do. Liquid coloring can sometimes thin out your batter just enough to cause cracks later on, but the gel gives you intense color without messing up the consistency. If you don’t have that black decorating gel on hand, don’t panic! Melted dark chocolate works beautifully for drawing the faces; just put it in a small piping bag or a ziploc bag with the corner snipped off.
Remember what I said about the cream cheese? If you try to rush that step, I promise you’ll regret it when you’re trying to beat out lumps later. Give it time to warm up properly!
Step-by-Step Instructions for Making Frankenstein Mini Cheesecakes
Okay, time to roll up our sleeves! When we get to the mixing stage, we want to move swiftly but gently. This isn’t like mixing up a quick bread; we need that smooth texture that cheesecake promises. I always pull out my mixer right after I pull the cream cheese out of the fridge so everything is ready to go at the right time. These instructions, when followed exactly, get you professional-looking results without the stress!
Preparing the Green Cheesecake Batter
First things first, let’s get that oven humming! You want to pop it to 325 degrees Fahrenheit before you start combining anything. We start by beating that softened cream cheese with the sugar until it looks lovely and smooth—no graininess allowed!
Next, gently beat in the egg and the vanilla extract. Mix it just until everything comes together into a creamy liquid. Now for the fun part: add your drops of green food coloring. Keep adding until you hit that perfect, slightly eerie monster green color you want. Mix that thoroughly but don’t overdo it!
Baking and Cooling the Frankenstein Mini Cheesecakes
Once the batter is gorgeously green, spoon it evenly into all 12 of those little graham cracker crusts you have ready. Don’t overfill them, or they might try to escape onto the pan! They go into the oven for about 15 to 18 minutes. You’ll know they are done when the edges look set, even if the very middle still has a tiny wiggle. That wiggle will vanish as they cool!
Take them out and let them cool completely on a wire rack. Don’t even think about decorating until they are totally room temperature—I mean it! If you rush this, your decorations will slide right off.
Decorating Your Frankenstein Mini Cheesecakes
This is where these treats truly become Frankenstein’s buddies! Once they are cool, grab two halves of a chocolate sandwich cookie and set them on top for the eyes. Then, take your black decorating gel and draw a little horizontal mouth across the center, maybe add a few vertical stitches too if you’re feeling adventurous!

The final, amazing touch? The bolts! Take one small pretzel twist and gently insert it into each side of the cheesecake. They look like perfect little metal bolts holding the head on. If you’re planning on serving these the next day, just cover them loosely and pop them into the fridge. If you want to see how I made my classic yellow cake layer cakes, that’s a totally different level of fun!
Tips for Achieving Perfect Frankenstein Mini Cheesecakes
The biggest fear with any cheesecake, even these cute little guys, is the dreaded crack right down the middle. Don’t worry, I’ve got a couple of tricks up my sleeve that make sure your little monsters stay smooth and lovely right up until they get gobbled up!
Preventing Cracks in Your Mini Cheesecakes
Cheesecake cracks usually happen because of a sudden temperature change. First, stick to the temperature I listed—325 degrees—and try not to open that oven door while they are baking, even if you hear a strange noise! Give them the full 15 minutes before peeking. Also, let them cool down slowly. Once they come out, leave the oven door cracked open slightly for about 15 minutes before taking them out fully onto the wire rack. That slow transition is key to keeping the top flawless, especially since we paint faces on them!
Making the Decorations Last
If you are preparing these the day before your party, which I totally recommend, just focus on the chilling! You need that minimum hour of chill time after they reach room temperature, but honestly, 3 or 4 hours is even better for structure. I always wait until the very last possible second—maybe an hour before guests arrive—to put on the pretzel bolts and the icing faces. If you decorate them too early and they sit in the fridge for 24 hours, the pretzel can sometimes get soft, and the icing might ‘sweat’ a little.
If you happen to be making these for an outdoor spooky bash, make sure they stay chilled until serving time. You can even use a tiny dot of melted chocolate under the pretzel and under the cookie halves to really glue them down before chilling.
I found that after I learned this gentle cooling method, my cheesecakes came out perfect every time, just like the results I get when I try my Key Lime Cake!
Storage and Make-Ahead Options for Frankenstein Mini Cheesecakes
One of the best things about individual desserts is that they are usually fantastic for making ahead of time! Who wants to be frantically decorating when the doorbell is ringing? With these Frankenstein Mini Cheesecakes, planning ahead is super easy.
I always recommend baking the cheesecakes entirely—crusts, batter, and baking—at least a day before your party. Once they are completely cooled down, I cover the whole tray tightly with plastic wrap and stick them in the fridge. They hold up beautifully. They’re actually better the next day because the crust gets really firm, and the cheesecake filling tastes richer!
Now, here’s the critical part about decoration: Don’t decorate the faces until the day you plan to serve them, or maybe just a few hours ahead of time. If you put those little cookie eyes and pretzel bolts on yesterday, the moisture from the fridge can make the pretzels a bit soft, and the black gel might start to bleed a tiny bit. You want those spooky faces looking crisp when everyone sees them!
So, step one—baking—is done on Day 1. Step two—chilling—is done overnight. Step three—decorating and serving—is Day 2! It spreads out the work so you aren’t overwhelmed. If you enjoy making things ahead of time, you should check out my recipe for the easiest banana bread; it freezes wonderfully!
If you happen to have leftovers (which, let’s be honest, rarely happens at my house!), they stay wonderfully fresh in an airtight container in the refrigerator for up to four days. Just make sure the pretzel bolts aren’t sticking up so high that they get knocked off when you close the container!
Serving Suggestions for Your Frankenstein Mini Cheesecakes
Presentation is EVERYTHING when it comes to Halloween snacks, right? These little Frankenstein Mini Cheesecakes are already showing off with their bright green color and goofy faces, but you can really take your dessert table up a notch with a few simple styling tricks.
Since these are so rich and wonderfully creamy, they pair really nicely with bitter or slightly tart flavors to cut through that richness. I love setting them up on a dark platter—maybe something slate grey or even black—so that vibrant green just pops! You can scatter some crushed Oreo crumbs around the base of the platter to look like dirt, which is a super easy way to up the spooky factor.
When it comes to drinks, plain milk is always a huge hit, especially with the kids who are sugar-rushing from the party. But for the adults, skip the overly sweet stuff! A nice dark roast coffee would be amazing, or maybe a spiced apple cider (warmed up, of course!). If you’re looking for a boozy pairing, a dark rum punch or a simple bourbon cocktail would balance the sweetness of the cheesecake filling perfectly. It’s amazing how this specific dessert theme pulls together an whole party!
And speaking of combining treats, if you want another amazing coffee accompaniment that’s more cake-like, you absolutely have to try my recipe for classic coffee cake. It’s a completely different vibe, but the sweet streusel topping just screams cozy autumn!
Frequently Asked Questions About Frankenstein Mini Cheesecakes
I get asked about these little monsters all the time! People usually have questions about timing, color, and whether they can sneak out of baking altogether. Here are the things I hear most often about making these Frankenstein Mini Cheesecakes for a great Halloween dessert!
Can I make these Frankenstein Mini Cheesecakes ahead of time?
Yes, absolutely, and I really encourage it! The baking part should be done at least a day ahead if you can manage it. Once they are totally cool, cover them up securely and let them chill overnight. The flavor really develops! However, I would strongly advise against putting the faces on until about an hour or two before serving. You want those pretzels to be firm and the cookie eyes to look perfect, not soft and sad from sitting in the fridge too long.
How do I get the best monster green color?
This is where you gotta stick to the good stuff! If you want that truly vibrant, electric, monster-appropriate green for your green cheesecake filling, you need to use gel food coloring, not the liquid kind from the grocery store. The liquid stuff is mostly water, and adding too much will thin out your batter, leading to those dreaded cracks. Gel is super concentrated, so just a couple of tiny toothpick dips gives you intense color without messing up the rich cheesecake texture we worked so hard to achieve.
Can I skip the baking step for these mini cheesecakes?
Oh, I wish we could! I know no-bake recipes are tempting, but for this specific recipe, no, you really do need to bake them. The ingredients—especially the egg and the amount of cream cheese—are designed to set up properly in the heat of the oven. If you skip baking, your filling will stay soft and goopy, and you definitely won’t get that lovely, sturdy base needed to hold up the cookies and pretzels. Trust me, the 15 minutes in the oven is worth it for that perfect, velvety texture. If you want a no-bake option, you’d actually need a totally different recipe base entirely!
If you’re curious about another simple treat that holds up well under pressure, you should check out my recipe for chocolate chip tahini cookies. They are amazing!
Estimated Nutritional Information for Frankenstein Mini Cheesecakes
Okay, let’s be real for a second. These are tiny, delicious, spooky desserts loaded with cream cheese, so they aren’t exactly diet food, but that’s why they taste so amazing, right? Since we are using pre-made crusts and a specific set of decorations, the exact counts can swing a little bit depending on the brand of cookie you use or how much pretzel you manage to shove in there!
These numbers below are just an estimate per one single Frankenstein Mini Cheesecake, based on standard calculations for the ingredients listed. If you are tracking calories or macros closely, you might want to weigh the batter before dividing it, but this gives you a really good ballpark idea!
- Serving Size: 1 cheesecake
- Calories: 250
- Sugar: 18g
- Fat: 14g (with about 8g being saturated fat)
- Protein: 4g
- Carbohydrates: 28g (Fiber is about 1g)
- Cholesterol: 45mg
See? Totally worth it for the fun factor! They are surprisingly filling for such a small treat. If you’re looking for more ways to enjoy cheesecake without the fuss, I have this collection of nineteen summer cheesecake recipes saved that are perfect for any occasion.
Share Your Spooky Creations
Seriously, I have shown you all my best tricks for these Frankenstein Mini Cheesecakes—the softened cream cheese, the perfect green shade, and how to keep those pretzel bolts from sliding off! But the absolute best part of sharing these recipes is seeing what you all come up with in your own kitchens!
I really, really want to see your little green monsters! When you make them, please snap a picture. Tag me on social media so I can oooh and ahhh over your decorations! Did you make yours extra grumpy? Did you use melted chocolate instead of the gel? Don’t be shy; I love hearing about all the little twists everyone tries!
And if you loved this recipe as much as my family does, please come back here and leave a rating. Five stars if they totally blew your expectations out of the water! Your feedback helps other bakers know this recipe is tried, tested, and totally worth the effort for Halloween.
If you’re looking for more fun ideas that are just as addictive as these mini guys, you absolutely have to try my strawberry cheesecake cookies sometime soon. Happy haunting, and happy baking!
Print
Frankenstein Mini Cheesecakes
- Total Time: 1 hour 38 min
- Yield: 12 servings 1x
- Diet: Vegetarian
Description
Small, festive cheesecakes decorated to look like Frankenstein’s monster for Halloween.
Ingredients
- 12 graham cracker crusts (pre-made mini size)
- 8 oz cream cheese, softened
- 1/4 cup granulated sugar
- 1 large egg
- 1/2 teaspoon vanilla extract
- Green food coloring
- 12 chocolate sandwich cookies (for eyes)
- Black decorating gel (for mouths and stitches)
- Small pretzel twists (for bolts)
Instructions
- Preheat your oven to 325 degrees Fahrenheit.
- In a medium bowl, beat the softened cream cheese and sugar until smooth.
- Beat in the egg and vanilla extract until just combined.
- Add several drops of green food coloring until you achieve a desired monster green color. Mix well.
- Spoon the cheesecake batter evenly into the 12 mini crusts.
- Bake for 15 to 18 minutes, or until the edges are set.
- Let the cheesecakes cool completely on a wire rack.
- Once cool, decorate each cheesecake. Place two chocolate sandwich cookie halves on top for eyes.
- Use the black decorating gel to draw a mouth and stitches on each cheesecake.
- Insert one pretzel twist into each side of the cheesecake for the neck bolts.
- Chill for at least 1 hour before serving.
Notes
- You can use melted chocolate instead of black decorating gel for facial features.
- Make sure the cream cheese is fully softened for a smooth batter.
- Chill the cheesecakes for a minimum of one hour for best texture.
- Prep Time: 20 min
- Cook Time: 18 min
- Category: Dessert
- Method: Baking
- Cuisine: American
Nutrition
- Serving Size: 1 cheesecake
- Calories: 250
- Sugar: 18
- Sodium: 150
- Fat: 14
- Saturated Fat: 8
- Unsaturated Fat: 6
- Trans Fat: 0
- Carbohydrates: 28
- Fiber: 1
- Protein: 4
- Cholesterol: 45
Keywords: Frankenstein, mini cheesecakes, Halloween dessert, green cheesecake, individual desserts