
Oh my gosh, you know those incredible, crisp, creamy cannoli shells that everyone devours in two bites? Well, I’ve cracked the code on making that iconic Italian flavor accessible, even when I don’t have time to fuss with frying pastry!
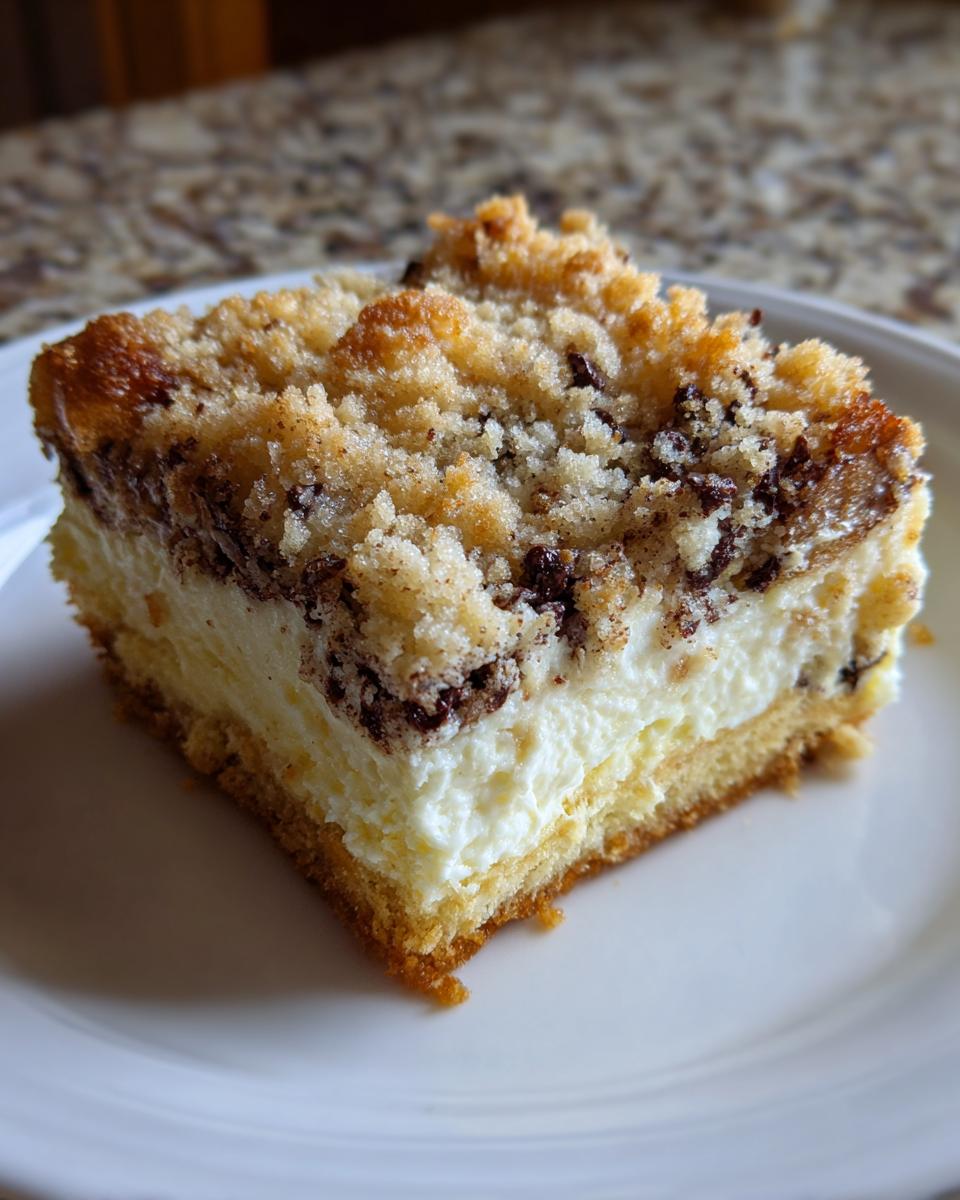
I am so excited to share my recipe for the absolute best Cannoli Squares. Seriously, these layered dessert bars capture that gorgeous, sweet ricotta filling and pair it with a buttery, slightly crisp pastry crust that bakes right in your 8×8 pan. No messy piping bags, no oil splatter—just pure, unadulterated cannoli flavor in a perfectly portioned square.

When I first thought about turning cannoli into bars, I worried I’d lose that magic crunch, but trust me on this one—the texture we achieve by crumbling the topping is incredible! It’s meant for busy home bakers like us who want that stunning bakery flavor without the drama. This recipe is truly all about making the classics easier!
Why You Will Love These Cannoli Squares
If you’ve ever tried making actual cannoli shells, you know it’s an event. You end up covered in flour and maybe a little bit of oil splatter! These squares skip all that fuss, but keep all the amazing flavor. I am so excited to share my recipe for these incredible Cannoli Squares. Seriously, these layered dessert bars capture that gorgeous, sweet ricotta filling and pair it with a buttery, slightly crisp pastry crust that bakes right in your 8×8 pan.
Here is why I reach for this recipe again and again when I need a showstopper dessert that doesn’t take all day:
- Total Portability: Forget the awkward tubes! These are perfect little squares you can easily grab, pack for picnics, or serve on a platter without worrying about the filling falling out. They travel like a dream.
- The Texture Contrast is Everything: You get that satisfying buttery crunch from the crust and the crumble topping against that unbelievably smooth, cool ricotta filling. It’s a textural party right there in your mouth!
- Make-Ahead Magic: Unlike some delicate desserts, these actually taste better the next day. You can totally whip these up way ahead of time to serve later. Less stress for you means more time enjoying your guests!
- Simple Assembly: Because we’re using a food processor for the crust and just mixing the filling, the clean-up is minimal. It’s shockingly fast considering how gourmet they look. Honestly, they require very little active work!
Essential Ingredients for Perfect Cannoli Squares
When you’re making something this simple, every single ingredient needs to be top-notch, right? Since we aren’t relying on deep-fried shells to hold everything together, the quality of our crust dough and that creamy ricotta is what makes or breaks these squares. I’ve listed out everything you need below. Don’t panic; it’s all pantry staples plus that sweet, creamy filling!
- Crust needs: 1 1/2 cups all-purpose flour, just 1/2 cup granulated sugar, and a tiny pinch of salt (1/4 teaspoon).
- For structure: 1/2 cup very cold unsalted butter, cubed up small, plus one large egg yolk, and 2 tablespoons of ice-cold water.
- The star filling: You absolutely need 15 ounces of whole milk ricotta cheese. This is the most important part, so buy the good stuff!
- Sweeteners and flavor: 1/2 cup powdered sugar and 1 teaspoon of vanilla extract.
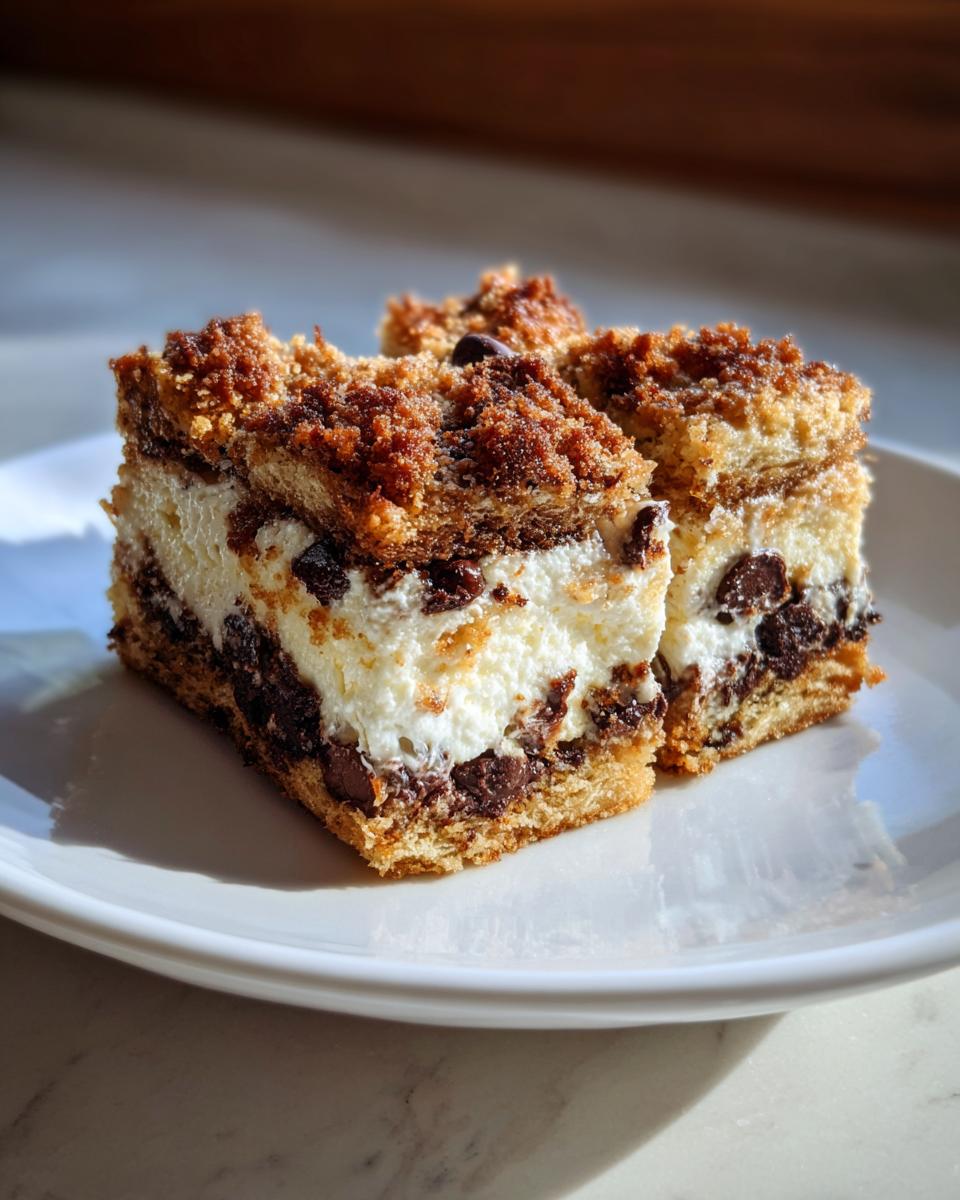
- The fun bits: About 1/4 cup of mini chocolate chips, and if you’re feeling fancy, 1/4 cup of chopped candied fruit. I sometimes skip the fruit, but the zest of one lemon makes everything sing!
We’re aiming for that beautiful, rustic look, similar to the gorgeous ricotta cake my aunt makes, but in bar form! If you want perfect results, you have to pay attention to how you prep the cheese. It makes all the difference!
Ingredient Notes and Ricotta Preparation
Okay, let’s talk ricotta. This is the one spot where you cannot cut corners, or you’ll end up with soupy *Cannoli Squares* that just won’t set up properly! Too much liquid means a soggy crust base, and we absolutely do not want a soggy base. Nobody wants to eat a wet pastry!
You must drain your ricotta. I mean, really drain it. I usually set mine up in a fine-mesh sieve lined with a piece of cheesecloth—or even a clean paper towel if I forgot the cheesecloth—over a bowl in the fridge. Let it sit for a good 30 minutes, maybe even an hour if you have time, while you prep your other ingredients. I’m telling you, getting rid of that excess whey is essential for a filling that feels thick and spoonable, not runny.
When it comes to the mix-ins, those chocolate chips and optional candied fruit just need a gentle fold at the very end. We aren’t whipping the ricotta mixture; we are just combining it gently so we don’t work those air bubbles out we worked so hard to keep in the crust!
Step-by-Step Instructions for Making Cannoli Squares
Look, I’m not going to lie; this recipe has a few steps, but really, it’s all about assembly line efficiency. Once you get the hang of making the crust dough, the rest is just waiting for the oven! Remember, we aren’t baking one thing; we’re building these beautiful layers. Get your 8×8 pan ready by lining it with parchment paper, leaving those handy overhangs on two sides—this is my little trick, just so I don’t have to scrape anything later. And before you do anything else, crank that oven up to 350 degrees Fahrenheit!
I often think of this process like making a really simple dump cake, but with way more structure. You’ll use your food processor for the crust ingredients, which makes things super quick. Once you’ve baked that first layer, you’re rolling toward those golden brown squares!
Preparing the Crust Base for Your Cannoli Squares
First things first, get your dry crust ingredients in that food processor: the flour, the granulated sugar, and that little bit of salt. Pulse them a few times just to make sure they’re all singing the same tune. Now, toss in your cold, cubed up butter. You need to pulse this until it looks like coarse crumbs, you know, like sand at the beach mixed with those little pea-sized butter clumps.
Next, drizzle in the egg yolk and the cold water. You only pulse here until the dough barely starts to look like it wants to stick together. Stop the second it does! Overmixing the dough that early gives you tough pastry, and we want flaky crust, not flat rocks!
Now, this dividing step is crucial! Take two-thirds of that dough and press it firmly and evenly across the bottom of your prepared pan. That’s your base layer. Pop that crust in the preheated oven and let it bake for about 15 minutes. You just want it lightly golden, not deeply browned. When it comes out, let it sit on the counter while you whip up the filling.
Creating the Signature Ricotta Filling for Cannoli Squares
This is where that properly drained ricotta we talked about becomes your best friend! In a separate bowl—no food processor needed here, thank goodness—combine your drained cheese, the powdered sugar, and the vanilla. Whisk it gently until it’s smooth and creamy. You shouldn’t see any grainy sugar.
If you decide to add those mini chocolate chips or the optional candied fruit, fold those in now. And I mean *fold*. Don’t use the mixer here! We want a light, airy texture, not something overworked. Remember, the less liquid we introduced into this filling post-draining, the better the final bake will be. Keep it light and lovely!
Assembling and Baking the Final Cannoli Squares
Time to build! Take that beautiful, creamy ricotta filling and spread every last bit of it evenly over that warm, partially baked crust. Try not to push too hard, or you might disturb our lovely base!
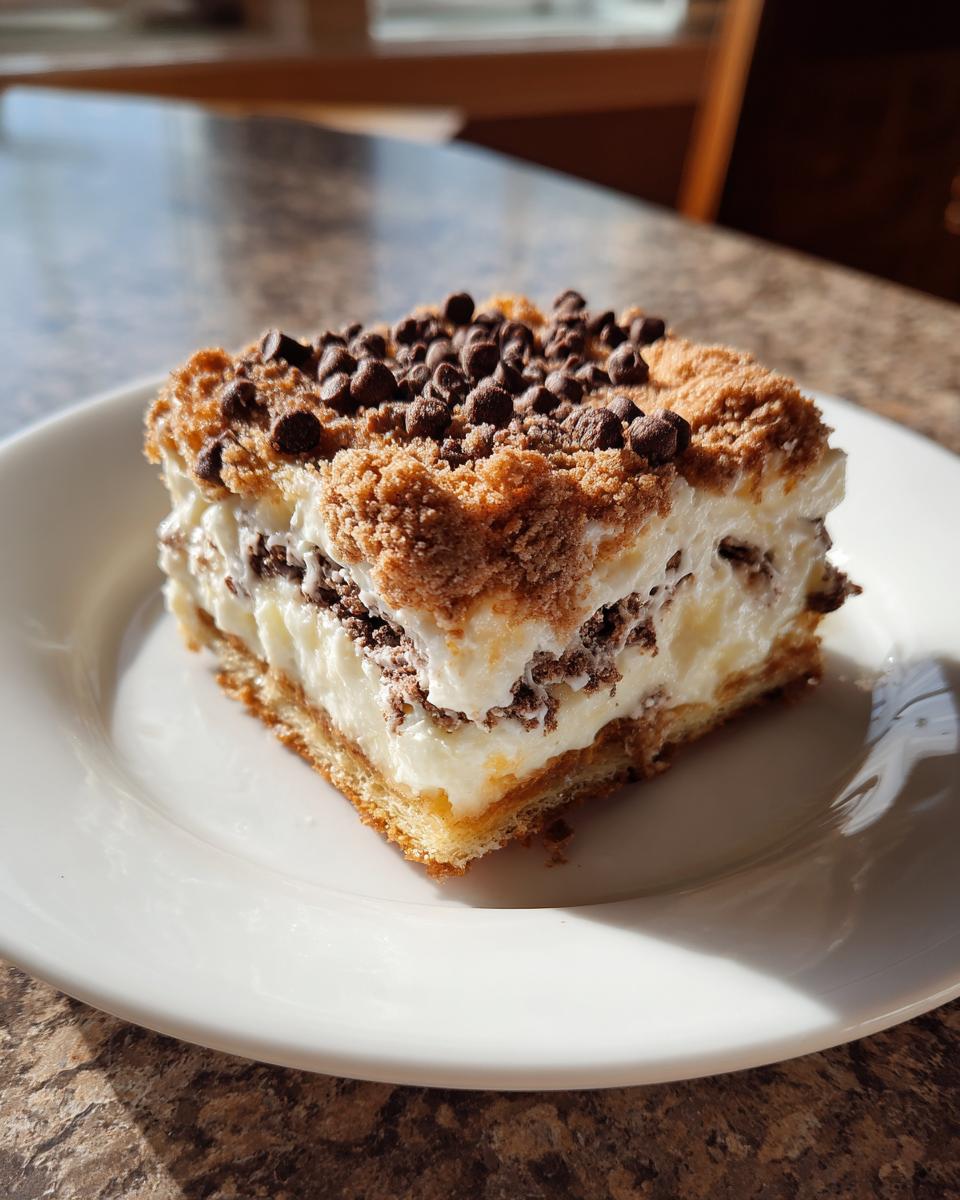
Now for the fun part: take that remaining one-third of the raw dough you set aside, and just crumble it right over the top of the ricotta layer. I like to make sure the crumbles are uneven in size; it looks more professional that way, honestly!
Back into the 350 oven it goes. Bake this beauty for about 25 to 30 minutes. You’re looking for the topping to be golden brown and, most importantly, the ricotta filling should look set. If you gently shake the pan, the center shouldn’t look wobbly like water.
Once it’s out, resist the urge to cut it immediately! That’s a rookie mistake. You need to let it cool completely on a wire rack first. Then, here’s the real trick for clean squares: transfer the whole thing—still sitting on that parchment sling—into the refrigerator. It needs a solid 2 hours in the cold. Trust me, chilling locks in that filling so you can lift it out and slice perfect squares without everything squishing!
Tips for the Best Ever Cannoli Squares
I’ve made these enough times now that I know exactly where you might run into trouble, so I wanted to give you a few little insider secrets. These aren’t complicated changes, just tiny adjustments that make a huge difference in texture and how pretty they look when you serve them up!
The biggest thing, as always, is managing that crust dough. Since you handle it so little, it stays flaky, but if you overwork it in the food processor trying to force it into a ball, you’ll activate too much gluten. You want that coarse crumb texture—that’s what gives you the perfect mix of tender base and crumbly topping.
When mixing the base dough, work in quick pulses. If you see that the mixture seems too dry to even gather, add maybe half a teaspoon more water, but stop right there! If you feel like you have to really knead it to get it to come together, you’ve gone too far, and the crust might end up tough instead of buttery. It’s better to have a crumbly dough you press together than one that turns into tough pastry!
Here are a few other things I live by when whipping these up:
- Use Cold Everything: I really mean it when I say use cold butter and cold water for the crust. That temperature difference hitting the flour creates steam pockets while it bakes, which results in a much lighter, flakier base layer for your Cannoli Squares.
- Don’t Skip the Chill Time: I know waiting 2 hours feels like forever when you smell that vanilla and cream cheese goodness coming from the fridge, but you absolutely need that chilling time. It firms up the ricotta so perfectly that when you cut them, you get those clean, sharp edges. No messy squishing!
- Presentation Polish: Once they are chilled and cut, if you want that authentic, bakery-style presentation, you simply must dust them lightly with powdered sugar right before serving. It just mimics that finishing touch you see on real cannoli shells, and the contrast looks divine on the golden crumb topping.
Follow those simple texture and chilling rules, and I promise you’ll have the most enviable **Cannoli Squares** at your next gathering!
Storage and Reheating for Your Cannoli Squares
So, what do you do with the leftovers? Because let’s be real, unless you are serving these to a massive crowd, you will definitely have some left over! These **Cannoli Squares** are honestly even better the next day once the filling has really bonded with the crust, but you have to store them the right way.
Since our filling is primarily that glorious, fresh ricotta cheese, these are absolutely a refrigerator dessert. No leaving these bad boys out on the counter overnight! That’s a recipe for disaster, and nobody wants to risk that sweet filling going off. Keep them tightly covered in an airtight container, preferably in a single layer if you can manage it, though stacked carefully with parchment paper in between works too.
When stored correctly in the fridge, they hold up beautifully for about three to four days. They firm up a little more after that first day in the cold, which I personally adore for clean cutting.
Can I reheat my Cannoli Squares?
This is where I have to give you a stern, loving, ‘No, don’t do it!’ Look, because of the fresh dairy in that ricotta component, reheating these bars is just not worth the risk. You’ll end up with a hot, potentially liquidy, slightly weird-tasting filling sitting on a soggy crust.
These dessert bars are meant to be enjoyed cold or slightly chilled straight from the fridge. If you’re serving them, just pull the container out about 15 minutes before you plan to cut or serve them. That little bit of tempering takes the chill off just enough so you can still taste all those lovely flavors, but it keeps that ricotta perfectly set and firm enough to hold its shape.
Think of these like a cheesecake bar—always better cold! Resist the urge to microwave them; just enjoy that cool, creamy contrast against the crunchy topping!
Variations on Classic Cannoli Squares
Once you master the base recipe—and honestly, once you realize how easy it is—you unlock a whole world of flavor possibilities! I love having a base recipe that’s so solid, like the foundation of a fantastic lemon icebox pie, because you can just swap in tiny elements to make it feel totally new the next time around.
The filling is where you have the most fun, but you have to be careful not to get too heavy-handed or add anything that releases too much water, or back to square one with the soggy bottom, right?
Here are a few little tweaks I use when I’m feeling adventurous but still need to stick close to that authentic cannoli flavor profile for my **Cannoli Squares**:
- Switch Up the Chocolate Drama: Instead of mini chocolate chips, try using slightly larger, good-quality dark chocolate chunks. They melt just a little bit more beautifully into the ricotta as the squares bake and chill, giving you those lovely pockets of melted chocolate instead of just little chips.
- Hello, Citrus Zest!: This is my favorite small change. If you’re skipping the candied fruit, grab one bright, beautiful lemon. You only need about a teaspoon of the zest, mixed right in with the powdered sugar and the vanilla. Lemon zest wakes up the creamy ricotta flavor instantly and cuts through the richness! It makes them taste incredibly fresh.
- A Hint of Almond: If you want a deeper, more complex flavor that reminds you of classic Sicilian sweets, swap out the standard vanilla extract for almond extract. You only need about a half-teaspoon, though, because almond extract is potent! It combines beautifully with the pastry crust.
- Nutty Crunch Topping: If you’re feeling adventurous with the topping, instead of crumbling plain dough over the top, mix a couple of tablespoons of finely chopped pistachios into that final one-third portion of dough before you crumble it on. The green pops against the golden brown, and pistachios are basically mandatory in a real cannoli!
The key to all these variations is keeping the liquid content the same. Since the base recipe already has the perfect moisture level established by the drained ricotta, don’t go adding things like fresh berries or anything super wet. Keep it focused on extracts, zest, or dry additions, and your **Cannoli Squares** will be perfect every single time!
Frequently Asked Questions About Cannoli Squares
I know you’ve got questions! When you try to twist a traditional Italian dessert into something new like these squares, it’s only natural to wonder about the details. I’ve pulled together the most common things people ask me about that buttery pastry crust and that lovely ricotta filling.
Can I make the Cannoli Squares ahead of time?
Yes, please do! If anything, these are better when made a day ahead of time. When that ricotta filling sits overnight against the crust, the flavors really get to know each other. I find that the base stays slightly crisp even after a day in the fridge, which is exactly what you want!
I recommend baking them completely, letting them cool on the wire rack, chilling them for the minimum 2 hours, cutting them, and then storing the finished squares in an airtight container in the fridge. They are perfect for making Thursday if you plan on serving them on Saturday. It makes weekend entertaining so much easier!
What if I don’t have a food processor for the crust?
Oh, I totally get it! Not everyone has every gadget under the sun, and my Grandma certainly never used a food processor for her pastry work. You can absolutely make the crust dough by hand. It just takes a little more elbow grease!
You’ll need a large bowl and a pastry blender, or even two knives if you don’t have a blender. Combine the flour, sugar, and salt. Then, cut in the cold, cubed butter until the mixture looks like coarse crumbs. This means you are looking for pieces about the size of small peas. Once that’s done, gently drizzle in the cold water and egg yolk, mixing with a fork just until the dough barely holds together when you press it. You still need to stop mixing right before it fully clumps up to keep that crust tender!
What if my ricotta filling seems too runny after mixing?
If your ricotta filling is looking a bit soupy, it means you skipped the draining step, or your ricotta started out much wetter than mine did. Don’t stress, we can save it!
The only real fix here is to drain it aggressively. Scoop that filling back into your fine-mesh sieve lined with a few layers of paper towel or cheesecloth. Set it over a bowl and let gravity do its work for as long as you can spare—even 15 extra minutes helps! If you are ready to bake right now, you could try gently folding in just a tablespoon of powdered sugar or a tiny bit of heavy cream cheese (like a teaspoon) to help firm it up, but draining is always my first recommendation for the best texture.
Why do I need to bake the crust first before adding the filling?
This is a classic technique called ‘blind baking,’ and it’s essential for a great dessert bar! If you put the wet ricotta filling directly onto raw dough, the crust at the bottom will never cook properly. It will just absorb all that moisture and turn into a gummy mess, which is the exact opposite of the crisp pastry we want holding our delicious filling.
The initial 15-minute bake sets the foundation. It solidifies the crust enough so that when the ricotta goes on top, it has a barrier against the moisture, ensuring that bottom layer bakes up perfectly golden and sturdy!
Estimated Nutritional Information for Cannoli Squares
Okay, now for the real talk! I always feel a little silly posting nutrition facts because, let’s face it, we are making decadent, delicious, cream-filled dessert bars here. These are meant to be enjoyed, not analyzed under a microscope! But for those of you who like to know what you’re diving into, I’ve pulled together the estimates based on the recipe measurements.
Please remember that these are just rough numbers. If you use low-fat ricotta instead of whole milk, or if you skip the optional candied fruit, your totals will shift. This is a homemade treat, so think of these figures as a general guideline rather than a hard-and-fast rule. As always, the joy is in the eating!
Based on 16 squares per recipe, here’s approximately what you’re looking at:
- Serving Size: 1 square
- Calories: Around 250
- Fat: About 13g (Remember, some of that is the lovely butter in that crust!)
- Saturated Fat: Roughly 8g
- Carbohydrates: Around 28g
- Sugar: About 18g (That’s the beauty of the powdered sugar mixed into that sweet ricotta!)
- Protein: 6g
We are doing pretty well with the protein, which I attribute mostly to that wonderful, wholesome ricotta cheese doing the heavy lifting in the filling. Enjoy these squares responsibly—which, for me, usually involves having seconds!
Share Your Experience Making These Cannoli Squares
Now that you’ve baked up your own tray of these incredible layers, I am dying to hear what you thought! Seriously, my favorite part of sharing these family-friendly recipes is seeing your creations pop up online. I love seeing how you present them!
Did you stick to the classic vanilla and chocolate chip filling, or did you try adding some citrus zest? Did the almond extract give it that extra little kick I love so much? Whether you enjoyed the buttery crumb topping or you’re a devout lover of that creamy ricotta filling, I want to know all the details.
If these **Cannoli Squares** were a hit at your house, please do me a huge favor and leave a star rating right down below! It helps other bakers find these easy ways to tackle classic desserts, and honestly, positive feedback really fuels my baking passion!
If you snap a picture of your final, perfectly chilled squares—especially after that gorgeous powdered sugar dusting—please tag me on social media! I love seeing them sitting on party platters. Imagine pairing these alongside something rich like a chocolate caramel toffee cake for a real dessert spread!
There is nothing better than knowing that my effort to simplify cannoli for your busy week paid off with a square of pure joy on your plate. Don’t be shy—drop a comment below, tell me all about the process, and let’s keep this delicious conversation going!
Print
Cannoli Squares
- Total Time: 65 min
- Yield: 16 squares 1x
- Diet: Vegetarian
Description
A simple recipe for layered dessert bars resembling cannoli filling and shells.
Ingredients
- 1 1/2 cups all-purpose flour
- 1/2 cup granulated sugar
- 1/4 teaspoon salt
- 1/2 cup cold unsalted butter, cubed
- 1 large egg yolk
- 2 tablespoons cold water
- 15 ounces whole milk ricotta cheese, drained well
- 1/2 cup powdered sugar
- 1 teaspoon vanilla extract
- 1/4 cup mini chocolate chips
- 1/4 cup chopped candied fruit (optional)
Instructions
- Preheat your oven to 350 degrees Fahrenheit. Line an 8×8 inch baking pan with parchment paper, leaving an overhang on two sides.
- In a food processor, pulse the flour, granulated sugar, and salt until combined.
- Add the cold butter cubes and pulse until the mixture resembles coarse crumbs.
- Add the egg yolk and cold water. Pulse until the dough just comes together. Do not overmix.
- Press two-thirds of the dough evenly into the bottom of the prepared pan to form the crust.
- Bake the crust for 15 minutes, or until lightly golden. Let it cool slightly.
- While the crust cools, prepare the filling. In a medium bowl, combine the drained ricotta cheese, powdered sugar, and vanilla extract. Mix until smooth.
- Gently fold in the mini chocolate chips and candied fruit, if using.
- Spread the ricotta filling evenly over the partially baked crust.
- Crumble the remaining one-third of the dough over the top of the filling.
- Bake for 25 to 30 minutes, or until the topping is golden brown and the filling is set.
- Cool completely on a wire rack before chilling in the refrigerator for at least 2 hours.
- Lift the bars out of the pan using the parchment paper overhang and cut into squares.
Notes
- Drain the ricotta cheese for at least 30 minutes in a fine-mesh sieve lined with cheesecloth to remove excess liquid.
- You can dust the cooled squares with powdered sugar before serving for a finished look.
- Prep Time: 20 min
- Cook Time: 45 min
- Category: Dessert
- Method: Baking
- Cuisine: Italian-American
Nutrition
- Serving Size: 1 square
- Calories: 250
- Sugar: 18
- Sodium: 80
- Fat: 13
- Saturated Fat: 8
- Unsaturated Fat: 5
- Trans Fat: 0
- Carbohydrates: 28
- Fiber: 1
- Protein: 6
- Cholesterol: 45
Keywords: cannoli, squares, ricotta, dessert bars, pastry, chocolate chip