
Let’s face it, Halloween is all about the gross-out factor, but it still needs to taste amazing! Forget those dry, complicated cookies that take forever. I’ve found the absolute perfect party showstopper: incredibly squishy, slightly gory, and totally delicious Halloween Rice Krispie Brains. Seriously, these treats are my secret weapon every October.
We are taking the classic, comforting Rice Krispies treat and turning it into something delightfully macabre using just a little bit of food coloring magic. You won’t believe how easy they are to make, even if you’re wrestling with a costume zipper while trying to cook! My guests always freak out (in the best way) when they see these on the dessert table.
Why You Will Love These Halloween Rice Krispie Brains
Honestly, I’ve tried making everything for Halloween—cookies, candies, even those fancy layered desserts. But nothing gets the same reaction as these silly, squishy treats. They are just so much fun! You’ll want to make these year after year because they hit that perfect sweet spot between spooky fun and nostalgic flavor.
- They are ridiculously fast! The actual mixing and coloring only takes about 15 minutes, and then they just sit there setting up.
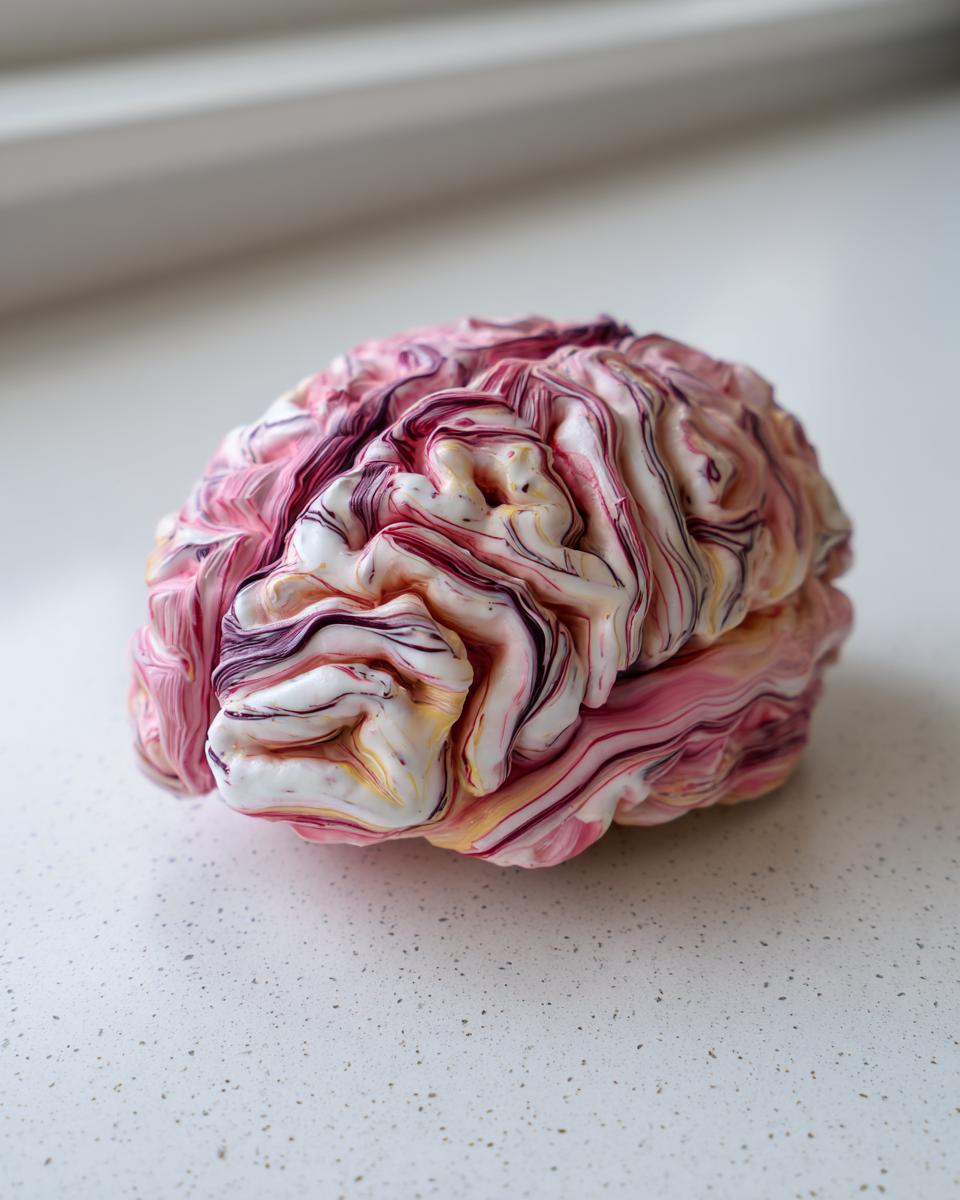
- They look way grosser than they actually are, which is the goal! The marbling of the colors creates that perfect fleshy, veiny look.
- It’s a no-bake situation, which is a huge win when your oven is already full of actual dinner.
- The classic sweet, buttery Rice Krispies flavor means even the pickiest eaters will gobble these up once they get over the initial shock.
Quick Assembly for Spooky Halloween Rice Krispie Brains
When you’re trying to get a whole Halloween spread ready, time is precious. These Halloween Rice Krispie Brains are your best friend because they are pure no-bake magic. We’re talking about 15 minutes of active work getting the colors mixed and pressed. That’s it! You just melt, stir, color, and shape. You can easily whip up a huge batch while watching a scary movie.
Visually Terrifying Edible Halloween Rice Krispie Brains
This is where the fun really starts! The key to making these look like actual brains and not just pink blobs is how you handle the colored marshmallow mixtures. Trust me, you don’t want to mix them completely smooth. We are aiming for streaks, swirls, and veins. The combination of bright red, soft pink, and sometimes a little creepy green (if you’re feeling extra gruesome) makes the final product look shockingly realistic. They are instantly the centerpiece of my spooky dessert table.

Essential Ingredients for Your Halloween Rice Krispie Brains
Okay, gathering your supplies is half the battle when it comes to these gruesome treats. I try to keep my ingredient list short because I want less shopping and more terrifying decorating time! Remember, you already have the marshmallows and cereal base if you make standard Rice Krispies treats, but the magic here is in the coloring. Seriously, don’t even try to skip the coloring or you’ll just have a plain white blob!
- 6 cups Rice Krispies cereal (Your trusty standard brand works just fine here!)
- 1 package (10 oz) marshmallows (The big bag is usually the best value.)
- 3 tablespoons butter (Don’t try to substitute this; butter gives the best structure.)
- 1 teaspoon vanilla extract
- Red food coloring (You’ll need a good amount!)
- Pink food coloring
- Green food coloring (Optional, but great for adding those sickly veins underneath.)
Ingredient Notes and Substitutions for Halloween Rice Krispie Brains
A quick note on coloring: I always recommend using gel food coloring if you have it. It gives you super vibrant colors without adding extra liquid, which is key for crispy treats. If you only have the liquid drops, that’s totally fine, but you might need to use a tiny bit less butter or marshmallows to keep your mixture from getting too sticky. The proportions listed here assume you’re using standard liquid food coloring sparingly, but the overall goal for your Halloween Rice Krispie Brains is color saturation, so follow your gut!
Equipment Needed for Perfect Halloween Rice Krispie Brains
You don’t need a ton of fancy gear for these treats, which is honestly fantastic when you’re trying to keep the spooky mess to a minimum! Forget the stand mixer for this one—we’re keeping it simple, just like my favorite classic cereal treats.
Here is the shortlist of what you absolutely need to pull off these gruesome Halloween Rice Krispie Brains:
- A large saucepan: This is for melting down the butter and marshmallows. Make sure it’s big enough to hold everything later!
- Separate bowls: You’ll need at least three bowls, maybe four, to portion out the marshmallow goo for coloring. I just use glass Pyrex types so I can see the colors clearly.
- A sturdy spatula or wooden spoon: Essential for stirring everything until it’s smooth and combining those colors later.
- Greased surface or wax paper: You need something non-stick to work on when you’re shaping them or pressing them into molds.
- The brain mold: Okay, this isn’t *strictly* required, but it makes life so much easier! If you have a silicone brain mold, use it! If not, don’t panic—we can shape them by hand.
- A small utensil for detailing: Think a thin offset spatula, a butter knife, or even just a toothpick for scoring those final brain wrinkles.
Step-by-Step Instructions to Make Halloween Rice Krispie Brains
Okay, time for the fun part where your kitchen starts smelling like childhood nostalgia while you create something truly horrifying! These steps need to be followed somewhat quickly once the marshmallows are melted, so make sure your bowls and colors are ready to go *before* you start melting the butter. We need speed to get those awesome color streaks in!
Always remember to start by getting your pan or wax paper ready. I usually spray a big mixing bowl liberally with cooking spray—it makes everything easier later. Don’t skip that pre-prep!
Melting and Coloring the Marshmallow Mixture for Halloween Rice Krispie Brains
First things first: melt your butter in that large saucepan over the lowest heat you can manage. We don’t want brown butter here, just melted butter! Toss in the entire package of marshmallows and stir constantly until they are completely melted down and smooth as silk. Take that pan RIGHT off the heat the second it’s smooth, and stir in your vanilla extract.
Now, here’s where we divide the labor! Scoop the hot marshmallow mix evenly into three separate bowls. This is crucial for getting those random colors. Immediately start coloring: mix the red coloring into the first bowl until it’s a uniform, deep red. Do the same with the pink in the second bowl. For the last bowl, leave it white, or, if you want that extra creepy effect, mix in a *tiny* drop of green coloring—just enough to make it look vaguely sickly.
Next, working fast, take random little chunks from the red bowl, the pink bowl, and the white/green bowl, and gently press them together in one big pile. You are NOT mixing them smooth! You just want them to squish together so you see glorious streaks of color running through the mass. This gives the Halloween Rice Krispie Brains their fleshy texture.
Shaping and Detailing Your Spooky Halloween Rice Krispie Brains
Once you have your marbled mess, quickly press that mixture into your lightly greased brain mold. If you’re improvising (like I often do!), press it onto the prepared wax paper into a basic oblong, slightly wobbly brain shape. Don’t press too hard, or you’ll blend the colors! Let this whole thing rest on the counter to cool and set up completely—about 30 minutes is usually perfect.

Once they are firm, it’s time for the artistic torture! Carefully pop them out of the molds. Now, take a bit of extra food coloring and thin it down with just a drop or two of water or clear corn syrup (that’s what I use for a good flow). Dip a toothpick or small brush into this ‘brain blood’ mixture and gently paint thin, squiggly lines across the surface to mimic the fissures.
For my absolute best batch of Halloween Rice Krispie Brains, I always grab a small, dull knife before the final painting step and gently score some deeper lines into the surface while the goo is still slightly soft. This gives the painted lines something to sink into, making them look even more realistic! You can check out all my favorite spooky cookies recipes for more inspiration on creepy details right here.

Tips for Success When Creating Halloween Rice Krispie Brains
When I first started making these fun, gory treats, I had a couple of sticky disasters and some very boring-looking pink lumps! But over the years, I’ve figured out the secrets to making the absolute best Halloween Rice Krispie Brains that scare guests but delight their sweet tooth. It all comes down to how you handle the colors and the cooling process.
Here are my two must-do things to ensure your brains look fantastic and hold their shape perfectly:
- Don’t Overwork the Color Marble! This is the number one mistake people make. Remember, we are aiming for distinct rivers of red, pink, and white/green swirling together. If you mix that marshmallow mixture too thoroughly trying to get a uniform pink, you’ll end up with one giant blob of light pink Rice Krispies. You want streaks! Work quickly and gently when you combine the colored portions.
- Use Gel Coloring if You Can Swing It. If you are serious about vibrant colors without making your goo runny, grab some gel food coloring. It’s concentrated paste, so you use way less, and it helps maintain that perfect, sticky-but-set texture needed for these treats. If you need more ideas on how to handle colored treats, check out my recipe for the gooey Frankenstein Rice Krispie Bars!
- Thin Your ‘Blood’ Paint Properly. For those final squiggly lines, don’t just dip your toothpick into the raw food coloring bottle! That stuff is too thick and will sit awkwardly on top. Mix your food coloring with just a teensy bit of water or, even better, clear corn syrup. The syrup adds a nice shine and helps the color flow like a fresh splatter, making your Halloween Rice Krispie Brains look instantly more sinister.
Serving Suggestions for Your Halloween Rice Krispie Brains
Once you’ve got these surprisingly detailed Halloween Rice Krispie Brains cooled and painted, the presentation is everything! It’s not enough to just put them on a plate; we need a whole horrifying scene. These treats deserve the spotlight on your Halloween spread. They look amazing all on their own, of course, but a few simple props can take them from “cool treat” to “centerpiece of horror.”
I always try to aim for “creepy chic” on my party tables. You want things that look delicious but just slightly wrong. Here are a couple of ways I love to showcase these squishy masterpieces:
- The Blood Pool Platter: This is non-negotiable for me. I use a long, dark slate or black rectangular platter. If you have any leftover thinned red food coloring (or a bit of warm raspberry jam), drizzle a small, intentional-looking ‘pool’ or trail of ‘blood’ near one end of the platter. Place the brains artfully nestled near this pool. It just elevates the whole look!
- Next to the ‘Dirt’: If you are making those famous Halloween Dirt Cupcakes, these brains look unbelievably good sitting right on top of the finely crushed Oreo ‘dirt.’ It looks like they just crawled out of the graveyard and onto your serving station. The contrast between the dark, crumbly toppings and the pale, fleshy brains is fantastic.
- Serving Them Warm (Wait, No!): A quick word of caution! While some treats are better warm, these must be fully set. If they are even slightly soft, presentation is hard. I serve them at cool room temperature so they keep their structure, even if guests are grabbing them quickly at a party.
- The Vintage Medical Tray: If you have any kind of old-looking silver tray or a white enamel tray, those make amazing serving dishes. It gives them a slightly authentic, mad-scientist vibe, like they’ve just been prepped for examination.
Don’t forget that dusting of powdered sugar I mentioned earlier! A light, uneven dusting across the whole platter looks like morning dew or, perhaps, a light layer of dust settling over your gruesome specimens. They are ready for their close-up!
Storage and Make-Ahead Options for Halloween Rice Krispie Brains
I know Halloween season is chaotic, and sometimes you just need to get things done early. Good news! Because these Halloween Rice Krispie Brains are mostly marshmallow and cereal—very little actual moisture—they hold up beautifully. Honestly, I think they taste even better the next day once the colors have really settled in.
The key here is keeping the air out. Marshmallows are notorious for hardening up if they get exposed too long, right? We want them soft and chewy, not rock solid! So, storage method matters if you want to keep that perfect texture we worked so hard to achieve.
Here are my go-to rules for keeping these treats fresh for the party:
- Airtight is Essential: Never just leave them on a platter uncovered at room temperature. The air will dry them out fast. Pop them into a proper airtight container. I like those big, flat ones so I don’t smash the brain shapes.
- Room Temperature Only: Keep the container on the counter, away from direct sunlight or too much heat. Refrigeration is the enemy of the chewy Rice Krispies treat—it makes them hard and brittle, and that’s the last thing we want for our squishy brains! They should be fine for 3 to 4 days this way.
- Make-Ahead Window: You can definitely make these a few days in advance! I usually tackle them three days before the big party. If you plan on making them way ahead, wait until about 12 hours before you serve them to do the final, artistic painting of the brain fissures. Why? Because the food coloring paint, even thinned, can sometimes slightly bleed or dry out looking dull if left sitting for days.
- Keep Hands Off! This should be obvious, but resist the urge to nibble on them while you’re storing the leftovers. Every piece you eat means less creepy goodness for your guests!
If you package them up right, your guests will get that perfect soft, chewy, slightly gory bite of Halloween Rice Krispie Brains right up until the night of your party.
Frequently Asked Questions About Halloween Rice Krispie Brains
I totally get it! When you’re deep into party planning, you think of all the little things you forgot to ask. People always send me DMs about mixing colors or pan sizes for these fun no-bake treats. Here are some of the most common questions I get about making the perfect batch of Halloween Rice Krispie Brains!
Can I make the Halloween Rice Krispie Brains ahead of time?
Yes, you absolutely can! I highly recommend it, actually. These treats love to sit and set up. As long as you store them in an airtight container at room temperature, they’ll stay perfectly chewy for 3 to 4 days. If you can, wait until about a day before serving to do the final, artistic painting of the brain fissures, just so the color looks its absolute brightest.
What if I don’t have a brain-shaped mold for the Rice Krispies?
Oh, honey, don’t stress about the mold! Molds are trendy, but they aren’t mandatory. If you don’t have one, you just shape them by hand. After you’ve gently combined your red, pink, and white mixtures, just slap the whole thing onto some wax paper. With lightly greased hands, mold it into a slightly oblong, lumpy shape. Think about a very messy, oblong loaf shape, and then gently poke and prod it to look slightly more lumpy and uneven—that’s what makes it look realistic anyway! It’s totally fine if they don’t look perfectly identical; that just adds to the spooky effect. If you are looking for more spooky appetizer ideas, check out my take on Spiderweb Dip!
Is it better to use gel or liquid food coloring?
If you can grab the gel colors, please do! Gel coloring is much more concentrated, which means you can get that deep, fleshy red and pink color you need without adding extra liquid to your melted marshmallow mixture. Too much extra liquid can make your final batch a little sticky or slow to set. But if all you have are the drops, just be careful not to add too much at once! You can always add more color, but you can’t take it out.
Why are my colors mixing together too much?
That means you’re mixing too long! Remember, the goal isn’t a solid color, it’s marbling. Once you’ve taken the marshmallow mixture off the heat and divided it into your bowls—the red, the pink, the white—you should work super fast. Just gently pinch off pieces of the different colors and press them together quickly before smothering them with the cereal. The less time the different colors spend folded together, the better the streaks will look in your finished Halloween Rice Krispie Brains.
Estimated Nutritional Value for Halloween Rice Krispie Brains
Okay, I know we are making these gruesome Halloween Rice Krispie Brains for looks and sugar rushes, not for counting macros, but I still get asked about the nutrition stuff all the time! Since these are a fun, celebratory treat and not something we eat daily, you can relax a little. But for those of you keeping track, I pulled the standard estimates based on the ingredients list—mostly butter, sugar, and cereal.
Please take these numbers with a grain of salt (or a sprinkle of powdered sugar, if you prefer!). They are just good estimates based on general ingredient databases. If you use low-sugar marshmallows or different butters, the numbers will shift, so treat this as a guideline!
Here is the typical breakdown for one of these wonderful, albeit slightly gory, treats:
- Serving Size: 1 brain
- Calories: 280
- Sugar: 25g (Yep, that’s the marshmallow talking!)
- Sodium: 150mg
- Fat: 5g
- Saturated Fat: 3g
- Unsaturated Fat: 2g
- Trans Fat: 0g
- Carbohydrates: 58g
- Fiber: 0g
- Protein: 3g
- Cholesterol: 10mg
See? Mostly sugar and carbs, which is exactly what a good party treat should be! You get a little something from the butter and milk solids in the marshmallows, but mostly, this is just pure, unadulterated fun fuel for your October festivities. Don’t worry about the sugar; you burned it all off running around in that costume!
Print
Halloween Rice Krispie Brains
- Total Time: 50 min
- Yield: 6-8 brains 1x
- Diet: Vegetarian
Description
Make spooky, edible brains using Rice Krispies treats for a Halloween dessert.
Ingredients
- 6 cups Rice Krispies cereal
- 1 package (10 oz) marshmallows
- 3 tablespoons butter
- 1 teaspoon vanilla extract
- Red food coloring
- Pink food coloring
- Green food coloring (optional, for veins)
Instructions
- Lightly grease a large bowl or cooking spray a sheet of wax paper.
- Melt the butter in a large saucepan over low heat.
- Add the marshmallows to the melted butter and stir until completely melted and smooth.
- Remove the saucepan from the heat. Stir in the vanilla extract.
- Divide the marshmallow mixture into three equal portions in separate bowls.
- Add red food coloring to the first portion and mix until uniform. Add pink food coloring to the second portion and mix until uniform. Leave the third portion white or add a tiny amount of green coloring for a sickly look.
- Working quickly, take small, random amounts of the colored mixtures and gently press them together without fully mixing them. You want streaks of color.
- Press the combined mixture into a lightly greased brain-shaped mold. If you do not have a mold, shape the mixture by hand into an oblong, slightly lumpy brain shape on wax paper.
- Let the mixture cool and set completely at room temperature for about 30 minutes.
- Carefully remove the Rice Krispie shapes from the molds.
- Use extra food coloring mixed with a tiny bit of water or clear corn syrup to paint thin, squiggly lines on the surface to resemble brain fissures.
Notes
- For a more realistic look, use a small knife to gently score lines into the surface before painting the fissures.
- You can dust the finished brains with powdered sugar for a dusty look.
- Prep Time: 15 min
- Cook Time: 5 min
- Category: Dessert
- Method: No-Bake
- Cuisine: American
Nutrition
- Serving Size: 1 brain
- Calories: 280
- Sugar: 25
- Sodium: 150
- Fat: 5
- Saturated Fat: 3
- Unsaturated Fat: 2
- Trans Fat: 0
- Carbohydrates: 58
- Fiber: 0
- Protein: 3
- Cholesterol: 10
Keywords: Halloween, Rice Krispies, brains, treats, dessert, no-bake, spooky