
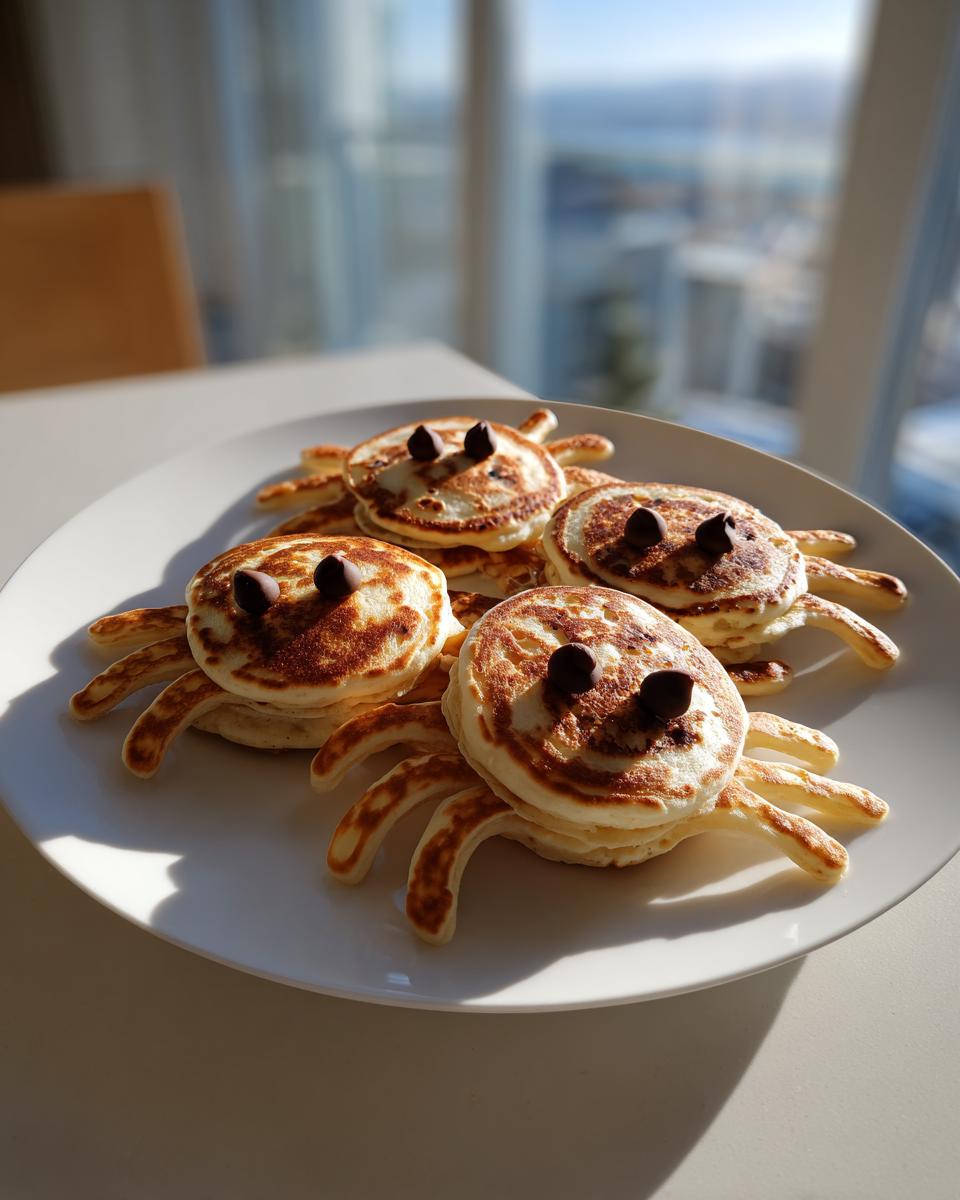
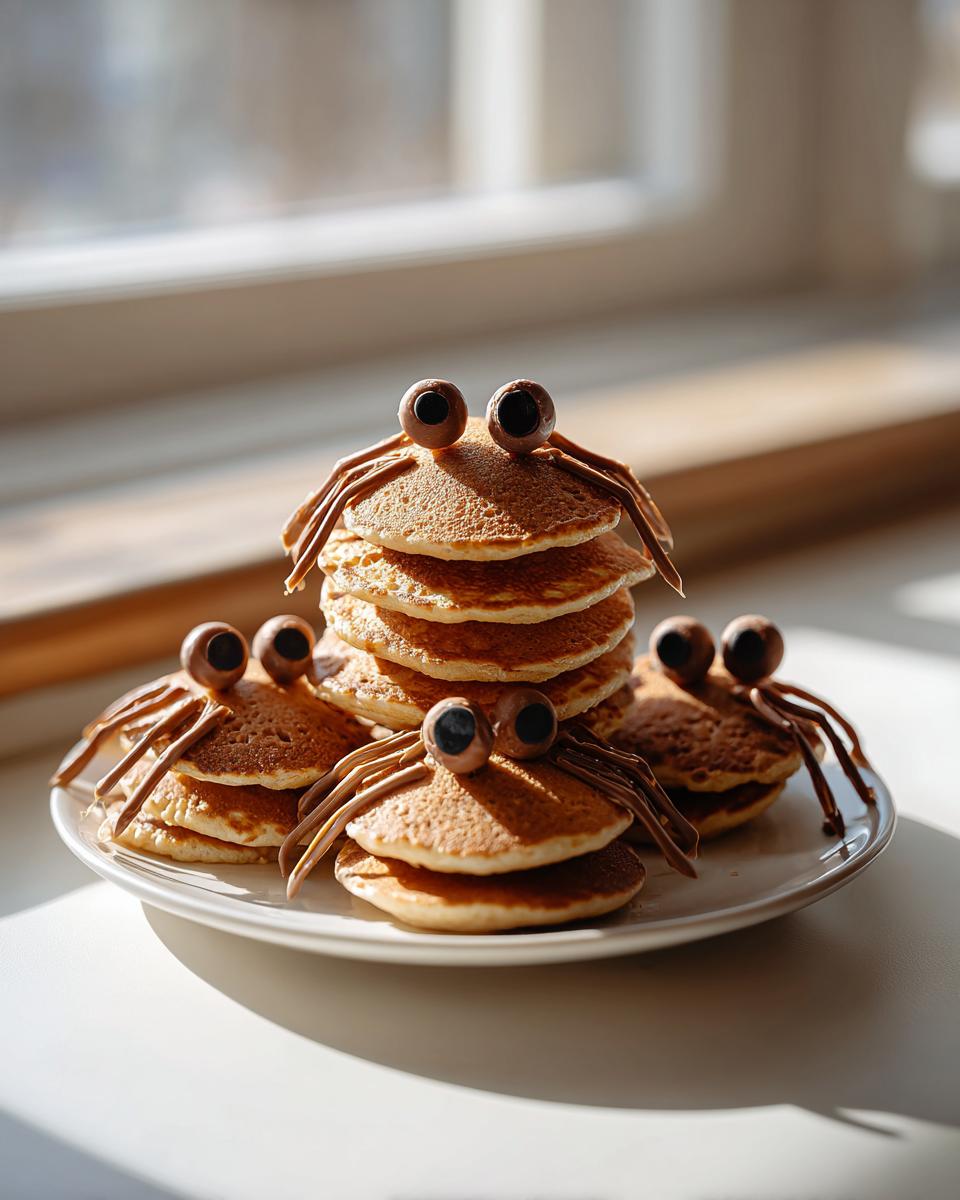
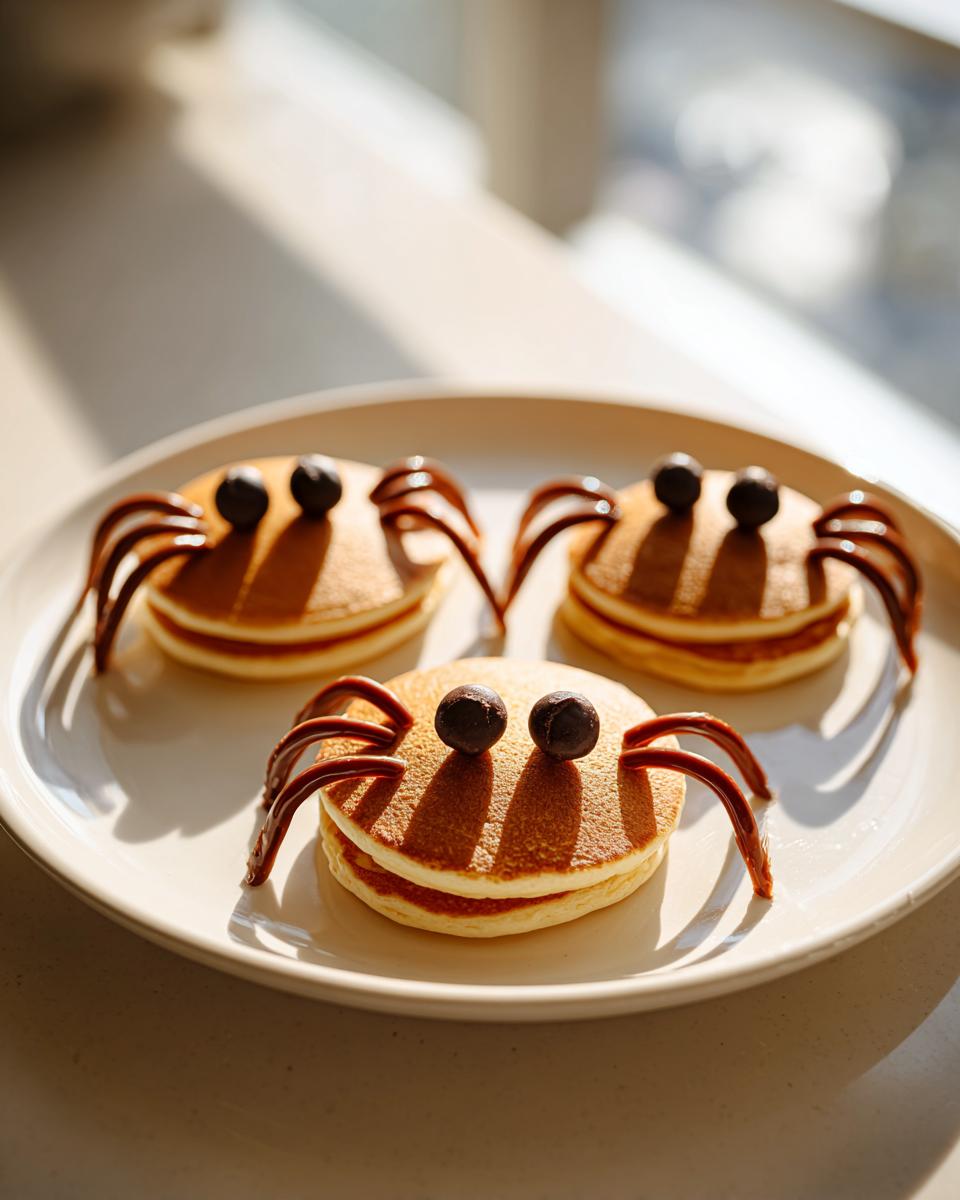
Mornings around here can get hectic, I know! But sometimes, you just need a little bit of magic to turn a Tuesday into a celebration, right? That’s why I live for these breakfast creations that make the kids squeal the second they see them. Honestly, watching my youngest try to politely eat a batter-legged arachnid without laughing is the highlight of my week. These **Spider Pancakes** are my secret weapon for themed days—Halloween, or just a random dreary Wednesday. And here’s the best part: they are shockingly fast. Seriously, we’re talking about less time than it takes to find matching socks!
Why You Will Love Making Spider Pancakes
If you’re on the fence about getting the batter just right for the legs, let me convince you why this whole process is worth the tiny bit of extra effort. These aren’t just pancakes; they are guaranteed mood-boosters!
- Speedy Assembly: The batter itself is completely standard, so you whip it up in minutes. The shaping only adds about two extra minutes per pancake, meaning you still have a super quick breakfast, even with the flair.
- Kid-Friendly Engagement: The fun factor here is through the roof! If you have little ones who usually drag their feet getting out of bed, promise them a silly spider breakfast, and watch them zoom out the door. They’re so colorful (well, brown!) and fun.
- Only Needs Minimal Supplies: You don’t need fancy molds or cutters. All you need is your standard griddle, a ladle, and, honestly, the real game-changer, a squeeze bottle for those spindly legs. It’s simple equipment for maximum impact!
- Perfect Portion Size: Each spider is a nice, cozy breakfast portion—about the size of a coaster for the body. They cook fast because the legs are so thin, so you aren’t waiting around forever for large layers of batter to set.
Essential Ingredients for Perfect Spider Pancakes
Okay, listen up! When planning your Spider Pancakes, you have to think of this recipe in two parts: the main pancake body batter, which needs to be fluffy and just right, and the bits you use to bring our little friend to life. Don’t try to substitute the baking powder; that’s what gives you the lift you need for a good body shape. These ingredients are exactly what I use every time for reliable, kid-approved results.
For the Spider Pancake Batter
This is just your favorite classic pancake mix, bumped up just a hair in sweetness for the morning treat. I always measure my flour carefully; baking is just chemistry, after all!
- 1 cup all-purpose flour – make sure it’s level!
- 2 tablespoons sugar – this amount keeps them sweet without making the griddle messy.
- 2 teaspoons baking powder – our main lifting agent, don’t skip this!
- 1/2 teaspoon salt – essential for balancing the flavor.
- 1 cup milk – whole milk works best for richness, but any milk is fine.
- 1 large egg – room temperature is ideal, but if you’re rushing, it’s okay.
- 2 tablespoons melted butter – this goes into the wet ingredients for flavor and tenderness.
For Decorating Your Spider Pancakes
This is the artist’s kit for making your pancake look spooky and cute! The key here is that the ‘legs’ are made from the main batter, but you need to reserve some *before* you add the wet stuff to the dry stuff.
- Chocolate chips for eyes – small ones are perfect so they don’t look like giant spider eyes!
- Thin strips of pancake batter for legs – this is crucial! You need to take out about 1/4 cup of the dry ingredients *before* you mix in the milk and egg. Keep this dry portion aside. When you mix the main wet ingredients, add just a tiny splash of milk (maybe 2 tablespoons total) to get this reserved dry flour mix into a super thin, pipeable liquid.
Equipment Needed for Your Spider Pancakes
You don’t need a whole drawer full of specialized tools to pull these Spider Pancakes off. We’re working with what most of us already have on hand for regular weekend breakfast prep, with just one special item that really makes the legs look authentic. Trust me, getting the right tool for the legs makes the difference between a cute spider and just a blob with sticks coming out.
First, you need a good, solid surface. A non-stick griddle or a heavy-bottomed pan works perfectly. Make sure your griddle is big enough to handle three or four spiders at once, especially if you’re trying to feed a hungry crew! You’ll use your standard mixing bowls, one for the dry team and one for the wet team, plus a whisk or a wooden spoon for combining.
Now, for the secret sauce—the legs! You absolutely must have something that lets you control the batter stream into those thin lines. I strongly recommend a clean plastic squeeze bottle with a fine tip. If you don’t have one, don’t panic! You can also use a liquid measuring cup with a spout, but you have to pour very carefully. Failing that, you can use a zip-top bag, snip just the smallest corner off, and pipe quickly. Whatever you choose, make sure the batter reserved for the legs is thin enough to flow easily!
- Heavy-bottomed skillet or electric griddle.
- Standard mixing bowls (one large, one smaller for the leg batter).
- Whisk or mixing spoon.
- Ladle or 1/4 cup measuring cup for pouring the bodies.
- Squeeze Bottle (or piping bag/small Ziploc): This is essential for drawing those neat, eight legs radiating out from the body.
- Spatula for flipping.
- Small butter knife or offset spatula for spreading the chocolate chip eyes on top just after flippng.
Step-by-Step Instructions to Make Spider Pancakes
I swear, once you get the rhythm down for shaping these little creatures, you’ll want to make them every weekend. It’s all about efficiency! We move fast so the griddle stays hot and the pancakes stay light. If you’re looking for other fun griddle ideas besides these eight-legged wonders, you should definitely check out these breakfast pancake poppers sometime for a change of pace!
Mixing the Spider Pancake Batter
Get those dry ingredients together first in your big bowl—that’s the flour, sugar, baking powder, and salt. Just give that a quick whisk to make sure everything is married before we start adding wet stuff. Now, in a separate jug or bowl, whisk your milk, the egg, and the melted butter together really well. Pour the wet mixture into the dry mixture. Whatever you do, don’t mix it into oblivion! We want lumps. Seriously! Overmixing develops the gluten and you end up with flat, chewy pancakes instead of fluffy bodies. Mix just until you can’t really see streaks of dry flour anymore. That takes us right into the next specialized step.
Forming the Spider Bodies and Legs
This is where the fun starts, and where you absolutely need that squeeze bottle mentioned earlier! Heat up your griddle over medium heat and give it a touch of oil or butter—it needs to be hot enough to sizzle slightly when you flick water on it, but not smoking. For each spider, use your ladle or 1/4 cup measure to pour a round dollop right in the center for the body. You need to move FAST. Immediately take your thin batter mix (the one we prepared specifically for the legs) in your squeeze bottle. Pipe four thin lines radiating out from the body in one direction, then four more in the other, making those signature eight legs shooting out. Try to keep the leg lines thinner than the body!

Cooking and Finishing Your Spider Pancakes
Like any good pancake, you watch the top surface. You’re waiting for those bubbles to pop up and start setting around the edges—usually about 2 to 3 minutes. When the edges look set and the bubbles are showing themselves, carefully slide your spatula underneath and flip. The legs are delicate, so be gentle when flipping so they don’t smear the spider pattern. Cook on the second side until golden brown, which usually takes just a minute or so less than the first side since the legs are so thin. As soon as you pull the finished, hot spider off the griddle, immediately place two chocolate chips right on the body for the eyes before they cool down and stick in place!
Tips for Success When Making Spider Pancakes
I’ve definitely made a few batches that looked more like weird sea creatures than spiders, so don’t worry if your first try isn’t Pulitzer prize-winning art! The biggest hurdle people run into is the heat management, especially because the thin legs cook way faster than the thick body.
If you find your legs are turning dark brown or even burning before the main body has a chance to puff up, your griddle is too hot! Pull the heat setting down a notch. You want that medium, steady warmth. I sometimes even move the pan off the direct center heat while I pipe the legs quickly, and then slide it back on. It takes practice!
Another huge point of success is the consistency of that reserved leg batter. If it’s too thick, you’ll end up with little blobs instead of defined, spindly lines. Remember I said to make it thin? I mean it! It should flow almost like melted chocolate sauce. If your reserved dry mix has dried out a bit while you were mixing the main batch, just stir in another teaspoon of milk until it flows like water from a faucet. If you ever need a great pumpkin version for the fall, check out my fluffy pumpkin pancakes—the technique is similar!
Here are my absolute must-dos to make sure you get perfectly shaped spiders every time:
- Keep the Leg Batter Thin: If the legs are thicker than a matchstick, they will burn before the body cooks through. Don’t be afraid to thin it out with a tiny splash more milk!
- Work Fast on the Griddle: Get the body puddle down, and immediately start piping those eight lines. You need the heat from the body batter to help the thin legs set slightly before you flip the whole thing.
- Clean the Spatula Often: If you notice batter sticking to your spatula when you flip, wipe it clean before you go for the next spider. Excess batter makes it hard to get under the delicate legs for a clean lift.
- Monitor the Eyes: The chocolate chips need to be touched to the pancake while it’s still steaming hot from the griddle so they melt just slightly and adhere perfectly. If you wait too long, they fall off when you try to serve them!
Fun Variations for Your Spider Pancakes
While the classic batter makes perfectly yummy, sweet spiders, there is zero reason to stop there! Once you master the technique for getting those legs just right—which you totally will after the tips above—you can start experimenting with different flavor profiles. It’s kind of like having a blank canvas, except the canvas is breakfast, and it’s totally edible!
My kids always ask for one crazy flavor, and one traditional one, so I end up making a few different varieties on the griddle at the same time. It helps keep everyone happy, even if the banana ones look slightly different than the original.
If you are looking for something that feels a little more substantial or perhaps a bit healthier without sacrificing the fun, try swapping out some of the white flour. For example, substituting about half a cup of your all-purpose flour with whole wheat flour gives you a nice nutty flavor and a little extra fiber. Just be warned: whole wheat batter can sometimes be slightly thicker, so remember the golden rule—add milk sparingly until the leg-batter is thin!
Here are a few ways I like to switch things up on our pancake rotation. If you ever want to try a loaf version instead of pancakes, my recipe for moist banana bread is a fantastic, hearty switch-up for a different morning!
- Vanilla or Almond Extract Swap: Add half a teaspoon of vanilla extract or even almond extract into the main wet ingredients. It gives the standard pancake a really classy, subtle aroma that makes them smell incredible while cooking.
- Cinnamon Spice Spiders: Mix 1/2 teaspoon of cinnamon and a tiny pinch of nutmeg into the dry ingredients along with your flour. These taste amazing, especially dipped in a little maple syrup. They feel extra cozy!
- Blueberry Bodies: Before you start pouring the bodies, gently fold in a handful of small fresh or frozen blueberries into the main batter. You can skip decorating the eyes on these, as the blueberries look like little blue spots instead! Just remember to pour the blueberry batter quickly so the berries don’t sink to the bottom of the bowl.
- Chocolate Chip Bodies: This is mandatory for my oldest child. Instead of reserving batter for the legs, just use the standard batter *as is*, but instead of piping legs, you quickly press 4 to 5 mini chocolate chips into the batter circle right after you pour the body. Then, top with another small spoonful of batter to hide them, flip when ready, and add the two eyes later. It’s a chocolate-stuffed spider pancake!
See? It’s so easy to turn this simple, kid-friendly breakfast idea into whatever fun shape or flavor you feel like that morning. Keep experimenting with those leg lines!
Serving Suggestions for Spider Pancakes
Once you have your cute little crew of Spider Pancakes cooling on the rack, the next critical phase is deciding how to dress them up for the table! These are already sweet and buttery, so they don’t need a mountain of frosting, but a good topping really finishes the whole presentation. My kids love when we pair these with something savory on the side, just to make it feel like a real, decadent weekend breakfast.
Maple syrup is always the obvious winner here. Since the legs are thin and crispy, they soak up the syrup beautifully without getting overly soggy immediately. I always heat up my pure maple syrup just slightly in the microwave—it makes the texture better and helps it spread nicely over the spider body. If you’re feeling extra ambitious and want to serve a full savory side, you simply have to try those amazing biscuits and sausage gravy I have on the blog; it’s the perfect contrast to the sweet spiders!
Here are my go-to ways to serve these fun little guys:
- Classic Maple & Butter: Keep it simple! A pad of melting butter right on top of the warm body, followed by a delicate drizzle of warm maple syrup over everything.
- Fruit Garnish: Since we’re sticking to a breakfast theme, fresh berries are perfect. We use raspberries or sliced strawberries scattered around the plate—they look like cute little flowers next to the spider. Banana slices also work beautifully if you need some extra body in the meal.
- Whipped Cream Cloud: For a real treat, a dollop of lightly sweetened whipped cream sits perfectly perched on the body of the spider, almost like a saddle. You can even dust a tiny bit of cinnamon over the cream for a finishing touch.
- A Side of Crispy Bacon or Sausage: I like to use the spiders as the main event, but a few crisp strips of bacon on the side make the whole plate feel balanced and complete. Plus, the salty crunch is just unbeatable next to the soft pancake.
Honestly, the best topping is just whatever your favorite breakfast treat is. The shape is the star; the toppings just cheer it on!
Storage and Reheating Spider Pancakes
Okay, so sometimes you make a giant batch because you just get in the zone, or maybe the kids decided they only wanted one spider and suddenly you have an army of leftover breakfast creatures! Don’t worry, these Spider Pancakes store surprisingly well, but you do need to treat them right so those delicate legs don’t turn chewy or soggy overnight.
First rule: they have to be completely cool before they go anywhere near a container. If you stack them while they’re even a little warm, you’ll generate steam, and steam is the enemy of crispy edges!
How to Store Spider Pancakes Safely
Once cool, you need to separate them layered style. I always grab some wax paper or parchment paper and place a sheet between each pancake. This stops them from sticking together, which is especially important between the body and the legs!
Slip the stack into an airtight container. I prefer glass containers so I can see how many I have left! If stored correctly in the fridge, these little guys will last happily for about three to four days. If you know you won’t be eating them within that window, freezing is your best friend. For freezing, use the parchment paper layers again, wrap the whole stack tightly in plastic wrap, and then tuck that into a freezer bag. They keep beautifully for up to two months this way!
Reheating for Maximum Crispness
The trick to reheating pancakes is getting the moisture out quickly without drying out the main body. Microwave reheating is a definite no-go here; it just turns everything soft and rubbery, and nobody wants a floppy spider leg!
My absolute favorite way, especially if I’m busy in the morning, is the toaster. Yes, you read that right! If you pull off one of the thinner legs, you can often pop those right into the toaster slots for about 60 to 90 seconds on a medium setting. They come out perfectly crisp, just like chips.
For the main body, you have a couple of great options:
- The Skillet Method (Best Texture): Heat a dry, non-stick skillet over medium-low heat. Place the pancake on the dry pan. Cook for about one minute per side. This brings back that lovely, buttery exterior without adding extra oil.
- The Oven/Toaster Oven (Best for Batches): If you’re warming up a bunch, set your oven to 350°F (175°C). Lay the pancakes on a wire rack set over a baking sheet. Bake for about five to seven minutes. The wire rack lets the air circulate, which keeps the underside from getting soggy while the top warms up evenly.
Remember to place the chocolate chip eyes back on after reheating, especially if you used the oven method, as you don’t want them melting off in storage!
Frequently Asked Questions About Spider Pancakes
I get so many wonderful questions about these silly, fun breakfast creations! It’s great seeing how many people are ready to make breakfast an adventure. Whether you’re new to making character foods or just need a quick adjustment, here are the things I hear most often about getting those perfect Spider Pancakes onto the plate.
Can I make the batter for Spider Pancakes ahead of time?
You can, but with a tiny caveat regarding the legs! The main body batter is generally fine if you mix it up the night before and keep it covered in the fridge. Pancakes batteries are fine overnight, but they can get a bit puffier because the baking powder gets busy working even when cold. You might need to stir an extra splash of milk in there when you wake up to loosen it back up.
However, that super thin batter you need for the legs? You absolutely should *not* make that ahead of time! It’s temperamental, and if it sits, it either gets too thick or, worse, starts to separate and lose its smooth consistency. For the legs, mix that small portion of dry ingredients with just enough milk right when the griddle is heating up. That way, you get the best, most controlled stream for keeping your Spider Pancakes looking neat!
What if I don’t have a squeeze bottle for the legs?
Oh, this happens to the best of us! The squeeze bottle is ideal, but you can absolutely get those eight legs on there without one. My favorite backup method, which gives surprisingly good control, is using a standard drinking straw. You need to dip the very end of the straw into the thin leg batter, cover the top opening of the straw with your finger to trap the batter, carefully move it over to your pancake body on the hot griddle, and then lift your finger.
When you lift your finger, the batter should flow right out in a thin line! Keep practicing the motion—it’s all about quick dips and controlled placement. If a straw seems too tricky, the small Ziploc bag snipped at the tiniest corner is the next best option. Just make sure that corner snip is *tiny* to avoid thick legs, which leads us to our next question!
How can I make these Spider Pancakes healthier?
I love that you’re thinking about ways to sneak in some good stuff! Since pancakes are often the fun-over-function meal, you have to be smart about substitutions. For instance, swapping half of the all-purpose flour for white whole wheat flour is a fantastic way to add fiber without totally changing the texture, as white whole wheat is milder. If you do that, remember you might need a tiny extra bit of liquid, as whole grains absorb more.
Another easy tweak for flavor balance is cutting the sugar in the main batter by one full tablespoon. The chocolate chip eyes and the maple syrup you’ll serve it with add plenty of sweetness, so this little reduction keeps these kid-friendly treats from being too much of a sugar bomb. You can find some other neat substitution ideas when you look at other kid-friendly recipes, like this easy pita bread technique where technique matters as much as ingredients!
Estimated Nutritional Information for Spider Pancakes
Okay, so while these Spider Pancakes are designed for maximum fun and minimal kitchen time, I know some of you are curious about what’s going into those cute little bodies. I always pull this sheet together just as a rough guide, but remember that adding extra syrup, butter, or using different kinds of milk can definitely change these numbers!
These stats are calculated per single spider pancake serving, assuming the standard recipe measurements and minimal toppings. Consider this a little snapshot of the basics before you load it up with delicious maple goodness!
- Serving Size: 1 pancake body
- Calories: 180 (That’s pretty reasonable for a fun morning treat!)
- Total Fat: 7g
- Saturated Fat: 4g (Mostly from that lovely melted butter!)
- Unsaturated Fat: 3g
- Trans Fat: 0g
- Cholesterol: 45mg
- Sodium: 250mg
- Total Carbohydrates: 25g
- Dietary Fiber: 1g
- Total Sugars: 6g (This is just for the batter, remember!)
- Protein: 6g
So there you have it! A reasonably balanced breakfast—especially when you pair it with a side of protein like eggs or bacon! But truly, don’t stress too much over the exact numbers when you’re serving up something this fun. The joy factor easily outweighs the few extra grams of sugar!
Share Your Spider Pancake Creations
I had such a blast walking you through how to get those legs just perfectly thin and those eyes exactly where they belong! Now that you’ve made your very own happy little crew of **Spider Pancakes**, I desperately want to see them in action! Seriously, this is my favorite part of sharing recipes—seeing how they turn out in your kitchens.
Don’t be shy! If you used a different kind of chocolate for the eyes, or maybe you added a fun tiny hat to your spider, snap a picture! It helps other bakers see how flexible this recipe really is while still being a guaranteed fun breakfast. Take a quick photo and tag me over on Instagram or Facebook. I always try to reshare my favorites on my story so everyone can see your amazing work!
And please, if you haven’t already, pop back up to the top of the post and give this recipe a rating. Five stars? Three stars because the legs got smeary? I genuinely read every single comment and rating, and your feedback helps me make sure future cooks have the very best chance at success. Happy flipping, and I can’t wait to see who you’ve cooked up!
Print
Spider Pancakes
- Total Time: 25 min
- Yield: 4 servings 1x
- Diet: Vegetarian
Description
Simple pancakes shaped like spiders for a fun breakfast.
Ingredients
- 1 cup all-purpose flour
- 2 tablespoons sugar
- 2 teaspoons baking powder
- 1/2 teaspoon salt
- 1 cup milk
- 1 large egg
- 2 tablespoons melted butter
- Chocolate chips for eyes
- Thin strips of pancake batter for legs
Instructions
- Mix flour, sugar, baking powder, and salt in a bowl.
- Whisk in milk, egg, and melted butter until just combined. Do not overmix.
- Heat a lightly oiled griddle or pan over medium heat.
- Pour about 1/4 cup of batter onto the griddle for the spider body.
- Immediately pipe thin lines of batter radiating from the body for the legs.
- Cook until bubbles appear on the surface, then flip and cook until golden brown.
- Remove from the griddle and place two chocolate chips on the body for eyes before serving.
Notes
- Use a squeeze bottle for precise leg batter placement.
- Adjust cooking time to keep the legs from burning before the body cooks through.
- Prep Time: 10 min
- Cook Time: 15 min
- Category: Breakfast
- Method: Griddling
- Cuisine: American
Nutrition
- Serving Size: 1 pancake
- Calories: 180
- Sugar: 6
- Sodium: 250
- Fat: 7
- Saturated Fat: 4
- Unsaturated Fat: 3
- Trans Fat: 0
- Carbohydrates: 25
- Fiber: 1
- Protein: 6
- Cholesterol: 45
Keywords: spider pancakes, fun breakfast, kid-friendly, griddle recipe, sweet breakfast