
It’s officially time to ditch the summer berries and pull out the autumnal spices, right? I seriously get so excited when I can start bringing fall flavors into the kitchen. But you know what I really love? Taking a classic treat and making it perfectly seasonal and fun. That’s why I’m obsessed with sharing my recipe for these adorable Candy Corn Cheesecakes. They remind me of those perfect October evenings when the air is crisp and you just want something sweet that screams ‘holiday comfort.’ Forget giant desserts; these mini cheesecakes capture the iconic white, yellow, and orange layers in one bite. Trust me, these are going to be the star of your Halloween or Thanksgiving spread!

Why You Will Love These Candy Corn Cheesecakes
Honestly, I don’t know why anyone bothers with a full-sized cheesecake when these little beauties exist! They bake up so fast and look impressive without all the fuss of a large springform pan. They are the definition of an easy win.
-
Perfectly Portioned Mini Treats
Since they bake right in a standard muffin tin, you get exactly 12 perfect servings. No messy slicing required! You can grab one, walk away, and nobody even notices it’s gone—great for parties!
-
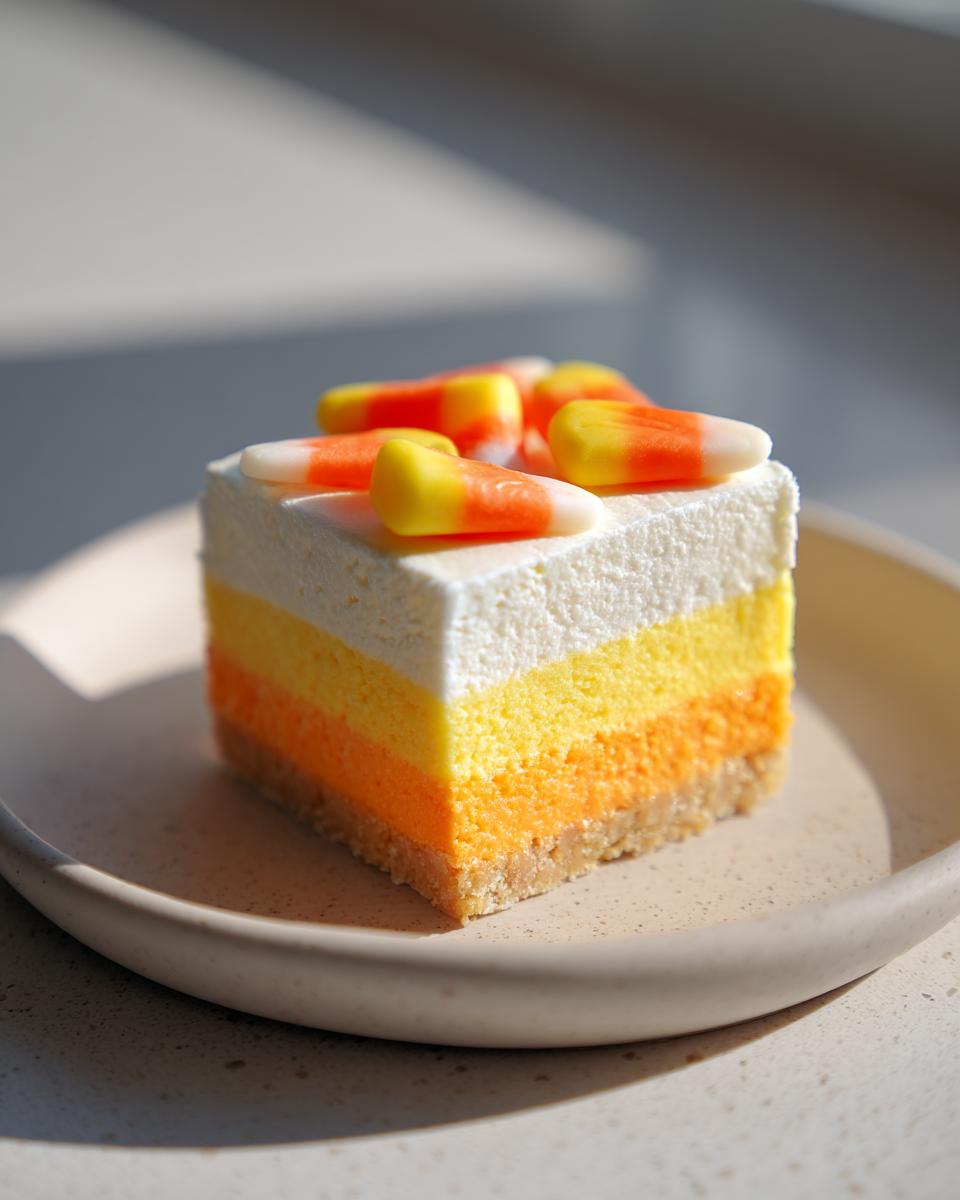
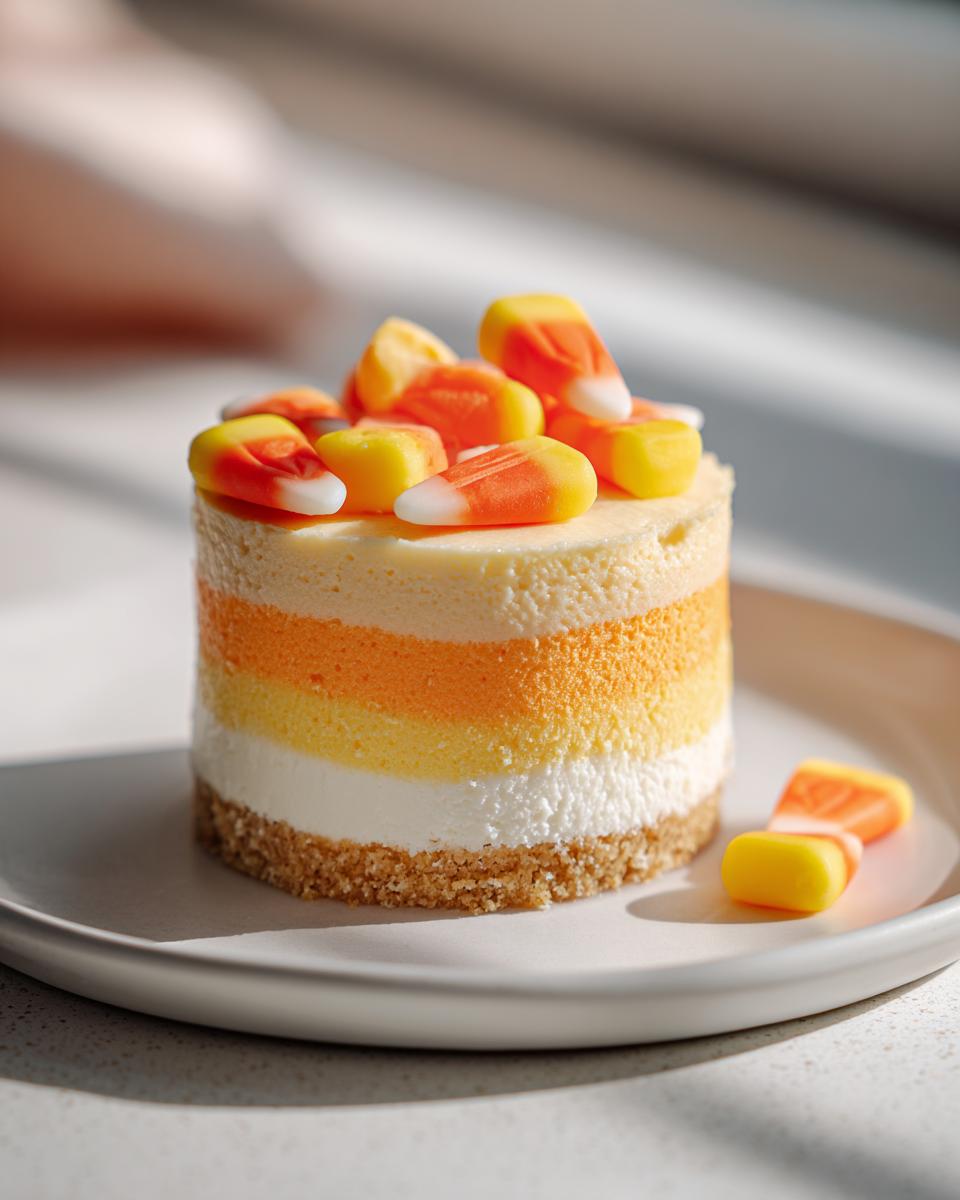
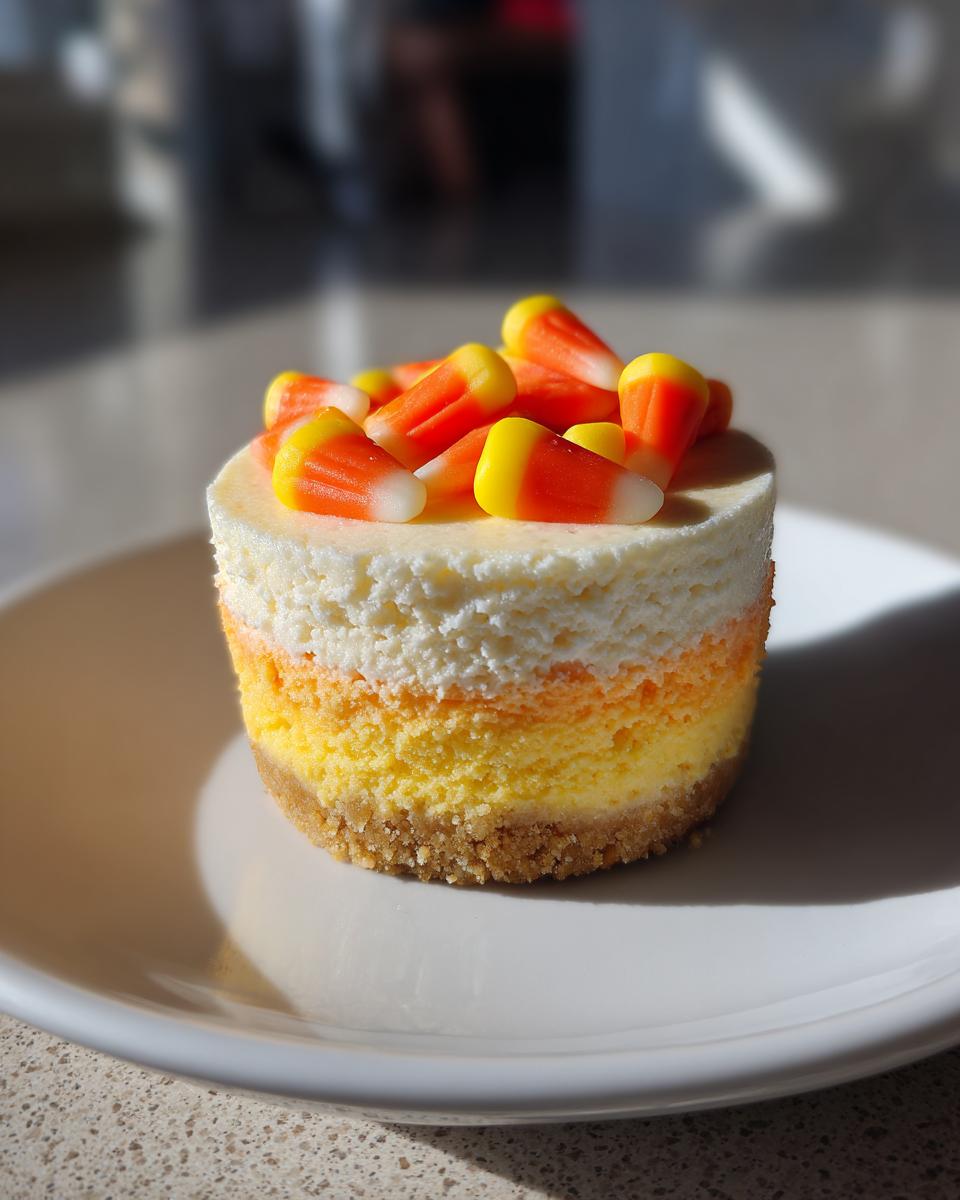
Visually Stunning Candy Corn Cheesecakes
The three distinct layers—white, yellow, and orange—are super easy to achieve but look like you spent hours on them. When that little triangle of candy corn sits on top, it’s instantly festive!
Essential Ingredients for Candy Corn Cheesecakes
Okay, listen up, because the quality of your dairy makes or breaks a cheesecake—even these tiny ones! For the absolute creamiest texture, you need to use full-fat, brick-style cream cheese, and it simply MUST be softened completely. If it’s cold, you’ll end up with lumps, and that makes me sad! This recipe is pretty standard for cheesecake bases, but the magic is in how we divide and color everything later. If you’re looking for other creamy treats, check out my recipe for marshmallow whip cheesecake for comparison!
Here is what you need to gather before you even think about preheating that oven:
- 1 cup of graham cracker crumbs (Don’t sweat the brand, just get the flavor right!)
- 1/4 cup of butter, melted (Make sure it’s fully melted, not just vaguely soft!)
- 8 ounces of cream cheese, softened (Yep, room temperature is key!)
- 1/2 cup granulated sugar
- 1 large egg
- 1 teaspoon vanilla extract
- 1/4 cup sour cream (This adds that lovely little tang!)
- Orange food coloring (Gel gets you the deepest color, by the way!)
- Yellow food coloring
- Candy corn for topping (The star of the show!)
Equipment Needed for Perfect Candy Corn Cheesecakes
You don’t need a ton of fancy gadgets for these cheesecakes, which I just love! A good set of mixing bowls will handle most of the work, but having your mixer ready is a must for that smooth cream cheese base. I always grab my stand mixer, but if you only have a hand mixer, don’t panic—it will work just fine!
Here are the absolute essentials you’ll want laid out on your counter:
- A standard 12-cup muffin tin.
- Paper liners—the plain white ones really make the colors pop, but use whatever you have!
- Three small bowls—these are crucial for holding your separated, colored batter layers.
- An electric mixer (stand or hand mixer) for creaming the ingredients.
- A rubber spatula—perfect for scraping down the sides so you don’t waste a single drop of that rich batter!
- A wire rack for cooling everything down later.
Step-by-Step Instructions for Layered Candy Corn Cheesecakes
This part is where the fun begins! It looks complicated because of the layers, but honestly, it’s just a lot of patient spooning. We’re going to work in stages, so don’t rush the baking between the colorful additions. Remember, the small size means we bake in short bursts. For super vibrant colors that don’t water down, you really want to try gel food coloring if you have it handy!
Preparing the Crust Base
First things first: get that oven preheated to 325 degrees Fahrenheit. Line your muffin tin with the paper liners—this is non-negotiable for easy cleanup later! In a small bowl, mix your graham cracker crumbs and the melted butter until it looks like wet sand. Then, take about a spoonful of that mixture and firmly press it into the bottom of each liner. Press it down hard; we want a sturdy foundation for our cheesecake!
Creating the Cheesecake Batter Layers
Now for the main event! Beat your softened cream cheese and sugar until it’s perfectly smooth—no lumps allowed! Mix in the egg and vanilla extract, and then gently stir in the sour cream until everything is just combined. Here’s the secret: divide the entire batch evenly into three separate bowls. Leave one bowl plain white. Add yellow coloring to the second bowl and orange coloring to the third. Mix each one gently until the color is consistent.
Baking the Layered Candy Corn Cheesecakes
Start by spooning an equal amount of the *white* batter over the crusts in all 12 cups. Pop them into the oven and bake for exactly 5 minutes. Take them out, gently spoon the *yellow* batter over the baked white layer, and bake for another 5 minutes. Finally, top everything off with the *orange* batter. Bake this last batch for 10 to 12 minutes, or until they look set when you gently wiggle the tray.
Cooling and Chilling
Once they are set, they need time to breathe! Pull the tin out and let those beauties cool completely on a wire rack. Seriously, don’t try to move them yet! After they reach room temperature, cover the whole tin loosely with plastic wrap and move them directly into the fridge. They need a minimum of 2 hours chilling time to firm up perfectly before we finally top them with the candy corn!
Tips for Achieving Perfect Candy Corn Cheesecakes
I’m like you—I want beautiful, smooth cheesecakes without needing a science degree to bake them! Because these are mini versions, we get to skip one major headache: the water bath. I know, right? A water bath (bain-marie) is usually my go-to recommendation for large cheesecakes because it ensures the heat is gentle and prevents cracking, leading to that silkiness you see in bakeries.
However, with only 12 small cups, the heat transfers much faster and more evenly, so you are usually fine without one. That being said, if you are baking these on a particularly hot day or you just crave that absolute smoothest texture possible, you can still use one! Just place your muffin tin inside a larger, shallow roasting pan before filling the roasting pan with hot water about halfway up the sides of the tin.
My biggest piece of advice, even without the bath, is to absolutely make sure your cream cheese and egg are room temperature. Seriously, cold ingredients fight each other, and you end up with streaks when you bake. If you want to read about another way I sneak richness into my baked goods, check out my thoughts on vanilla bean brown butter cheesecake!
When you pull them out of the oven, let them cool slowly before refrigerating. Sudden temperature changes are the enemy of a perfect cheesecake top!
Ingredient Notes and Substitutions for Your Candy Corn Cheesecakes
We already chatted about using beautiful, softened cream cheese, but let’s dive deeper into why certain ingredients matter so much here. When you’re creating visual layers like this, the texture of your base batter needs to be absolutely perfect so the colors don’t just bleed into each other. If your cream cheese is even slightly firm, you get bumps that make spooning even layers nearly impossible.
Seriously, this is my hill to die on: softened cream cheese is non-negotiable! You should be able to gently press your finger into the brick and leave an indent without much resistance. Don’t microwave it for five seconds, either—that makes it melty and oily. Just leave it out on the counter for an hour before you start.
The other big talking point is the food coloring. I know some people default to those little bottles of liquid coloring you find in the baking aisle. If that’s all you have, go ahead! But if you want those vibrant, true candy corn hues without thinning out your perfectly proportioned batter, you absolutely have to use gel food coloring. Liquid color adds unwanted moisture, which can mess with the final structure, especially since we are baking these layers individually. Gel coloring gives you intense color with just a tiny toothpick dip!
As for the graham cracker crumbs? You can actually use vanilla wafers or maybe even shortbread cookies if you crush them really fine. It will change the flavor slightly, but it works great in a pinch. Just make sure the butter you melt for the crust is cool before mixing it in, or you’ll end up with greasy crumbs that won’t hold together!
Make-Ahead and Storage for Candy Corn Cheesecakes
One of the best things about these mini cheesecakes is that they are actually *better* when made ahead! Since they need that full two hours of chilling time just to set, pushing that to overnight is usually perfection. They taste so much richer and firmer the next day. Planning a party? You can totally bake these off a day or two before you need them, which seriously cuts down on the day-of stress. I treat them like little edible decorations that only get better with time!
For storage before you add the final topping, keep them covered tightly in the refrigerator. I usually just use plastic wrap draped loosely over the muffin tin if I haven’t removed them yet. If you have already removed the Candy Corn Cheesecakes from the liners, place them in an airtight container with a layer of paper towels at the bottom; this helps wick away any condensation that might try to make your crust soggy.
They hold up beautifully in the fridge for up to four days. Just remember the candy corn topping—that’s the one part you want to hold off on! Putting candy corn on too early means it might absorb moisture from the air or the cheesecake itself and get soft or sticky, and we want that little crunch contrast.
So, my rule of thumb is: bake and chill completely the day before. Then, about an hour before serving, pull them out, pop on the candy corn triangles, and watch everyone devour them! Easy peasy!
Serving Suggestions for Your Candy Corn Cheesecakes
Because these Candy Corn Cheesecakes are so individual and look like tiny masterpieces, they really shine when you give them a little stage presence! I always take them out of the fridge about 15 minutes before serving; that lets that cold edge soften just a tiny bit so you get the full flavor profile.
When it comes to presentation, think about the rest of your holiday spread. These are fantastic as the centerpiece of a dessert grazing table. Because they are already perfectly portioned, you don’t need extra plates or forks; guests can just grab and go, which is a lifesaver during a busy gathering.
Here are a few ways I like to serve them up:
- Simple Coffee Pairing: A strong, dark-roast coffee or a lightly spiced latte cuts through the richness of the cream cheese beautifully. It’s such a classic combination.
- Holiday Platter: Arrange them artfully on a wooden board or a platter with some seasonal greenery or small bowls of spiced nuts. They look great next to dark chocolate truffles because the colors complement each other.
- Mini Dessert Bar: If you’re doing a spread, pair these with something gooey, like a small brownie bite, or something acidic, like tart lemon bars. The variety keeps people coming back for more!
And remember what I said about the topping! You absolutely must wait until the very last minute to add that candy corn. Have a bowl of the little triangles ready. Right before guests arrive or right before you take them out to the party table, gently press one candy corn triangle onto the center of the orange layer. That way, the candy corn stays perfectly firm and colorful, giving you that wonderful sugary crunch against the smooth, tangy cheesecake. It’s the final, perfect touch!
Frequently Asked Questions About Candy Corn Cheesecakes
I always get the same few questions—and honestly, those questions are exactly why I love this recipe so much! It seems fiddly, but it’s designed to be easy, even for baking newbies. If you want to see how I handle other layered desserts, you can check out my tips for making a decadent chocolate caramel toffee cake, but for now, let’s tackle these little orange, yellow, and white treats!
Can I skip the chilling time for these mini cheesecakes?
Oh, I know that feeling—you want to eat them right now! But please, please don’t skip that minimum two-hour chill. These are baked cheesecakes, not no-bake, so they rely on that cold time in the fridge to finish firming up. If you try to top or cut them warm, they’ll just collapse into a gooey mess. That chilling time is vital for the structural integrity, keeping the layers distinct and giving you that dense, creamy cheesecake texture we worked so hard to create!
What is the best food coloring to use for the candy corn layers?
This is one of the most important tips for keeping those colors bright and separate! You really, really want to use gel food coloring if you can get your hands on it. Liquid food coloring (the kind you use for Easter eggs) is water-based, and adding extra liquid to cheesecake batter is always a risk—it can thin the batter too much. Gel coloring gives you super saturated color with just a tiny toothpick dip, so you get that electric yellow and deep orange without disturbing the smooth, thick texture of the batter at all!
How do I prevent my layers from mixing during assembly?
That’s the million-dollar question for any layered dessert! The key here is twofold: texture and heat control. First, make sure your cream cheese mixture is nice and smooth before you divide it, as lumps cause uneven layers that might sink into each other. Second, and this is crucial, you *must* bake each layer briefly before adding the next. That first white layer goes in for 5 minutes to set up, then the yellow layer bakes for 5 minutes to set *itself* before the final orange layer goes in. That little bit of baking time between colors creates a barrier that keeps them looking sharp and defined once they cool!
Print
Candy Corn Cheesecakes
- Total Time: 165 min
- Yield: 12 cheesecakes 1x
- Diet: Vegetarian
Description
Small cheesecakes topped with a candy corn theme.
Ingredients
- 1 cup graham cracker crumbs
- 1/4 cup melted butter
- 8 ounces cream cheese, softened
- 1/2 cup granulated sugar
- 1 large egg
- 1 teaspoon vanilla extract
- 1/4 cup sour cream
- Orange food coloring
- Yellow food coloring
- Candy corn for topping
Instructions
- Preheat oven to 325 degrees Fahrenheit. Line a muffin tin with paper liners.
- Mix graham cracker crumbs and melted butter. Press mixture into the bottom of each liner.
- Beat cream cheese and sugar until smooth. Add egg and vanilla extract; mix well.
- Divide batter evenly into three bowls.
- Color one bowl yellow, one bowl orange, and leave one bowl white.
- Spoon a layer of white batter over the crusts. Bake for 5 minutes.
- Spoon a layer of yellow batter over the white layer. Bake for 5 minutes.
- Spoon a layer of orange batter over the yellow layer. Bake for 10-12 minutes, or until set.
- Cool completely on a wire rack. Chill for at least 2 hours.
- Top each cheesecake with candy corn before serving.
Notes
- You can use a water bath for smoother cheesecakes, but it is not required for these small versions.
- Use gel food coloring for more intense colors.
- Prep Time: 20 min
- Cook Time: 25 min
- Category: Dessert
- Method: Baking
- Cuisine: American
Nutrition
- Serving Size: 1 cheesecake
- Calories: 250
- Sugar: 20
- Sodium: 150
- Fat: 15
- Saturated Fat: 9
- Unsaturated Fat: 6
- Trans Fat: 0
- Carbohydrates: 25
- Fiber: 1
- Protein: 5
- Cholesterol: 45
Keywords: cheesecake, candy corn, mini cheesecake, dessert, baked