
You know how it is around Halloween—you want something totally spooky and fun, but facing a huge tiered cake that needs careful slicing when everyone is hyped up is just too much stress for me! I’ve learned over the years of making holiday treats that individual portions are seriously the secret to stress-free hosting. That’s why I absolutely adore these Witch Halloween Cake Jars. They package all the drama, the chocolatey goodness, and that eerie black and green color scheme into perfect little servings. Trust me, assembling these jars is way easier than carving a pumpkin, and they look just incredible sitting out on your dessert table!
Why You’ll Love These Witch Halloween Cake Jars
Honestly, I keep coming back to this recipe because it solves so many holiday dessert headaches! When you’re trying to manage spooky punch and noisy trick-or-treaters running in and out, you don’t need a giant cake that requires precise knife work. These Witch Halloween Cake Jars are the answer for easy, fun Halloween table presentation. Look at how quickly they come together!

- Forget slicing! Cleanup is basically nonexistent since everything is already served.
- They hold up perfectly in the fridge, which is a lifesaver when you need to prep party food early.
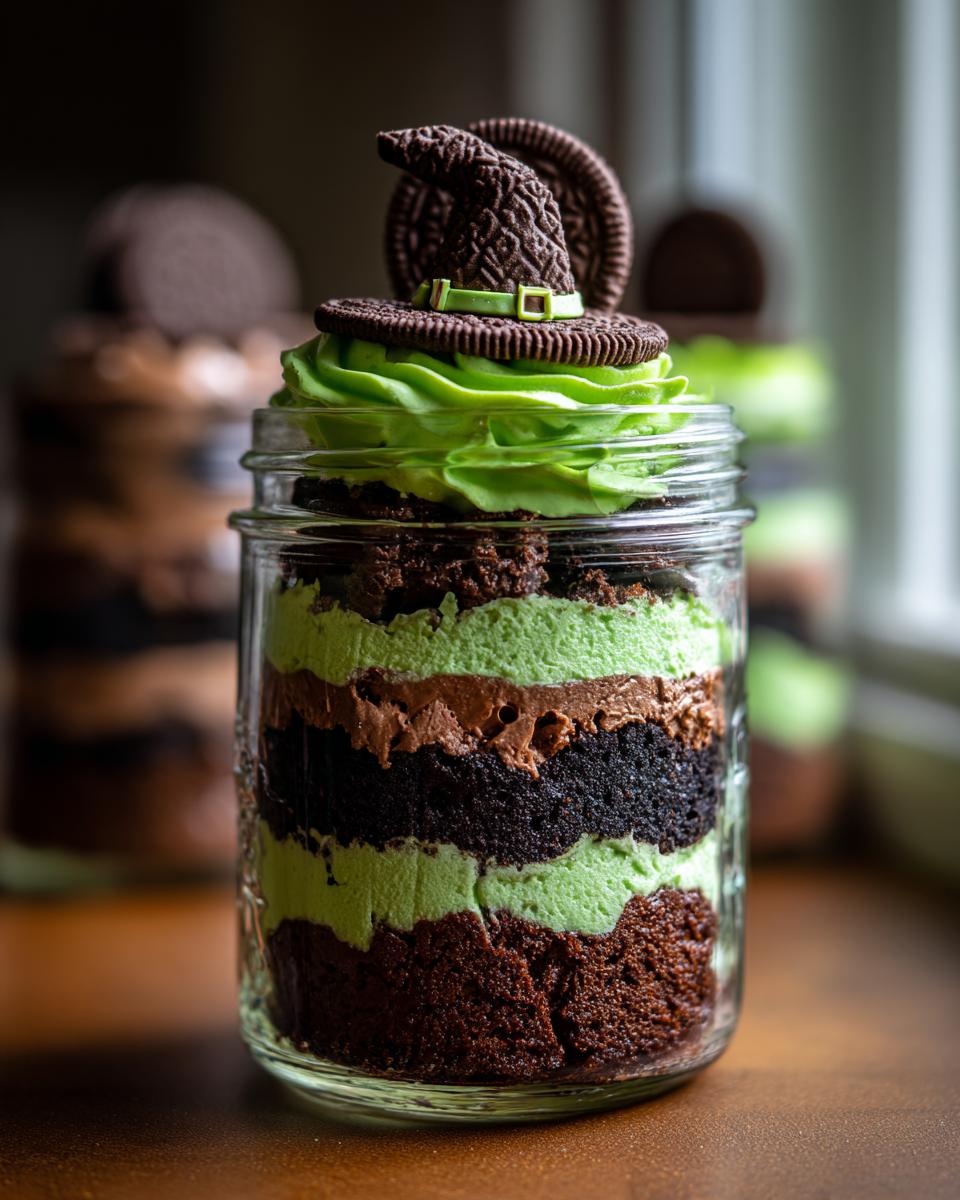
- The layers look so dramatic, especially when you use clear jars. People seriously love seeing the black and green mix!
- If you want to check out some other super fun spooky treats, you should definitely look at my guide for amazing Halloween cookies—we love having a variety!
Perfectly Portioned Individual Servings
This is my favorite part. Think about it: no serving platter, no smearing frosting everywhere, and everyone gets the exact same perfect ratio of cake to frosting. They are just grab-and-go goodness for your guests, which is essential when the evening gets chaotic. You just grab a tiny spoon, and you’re good to go!
Maximum Spooky Visual Impact
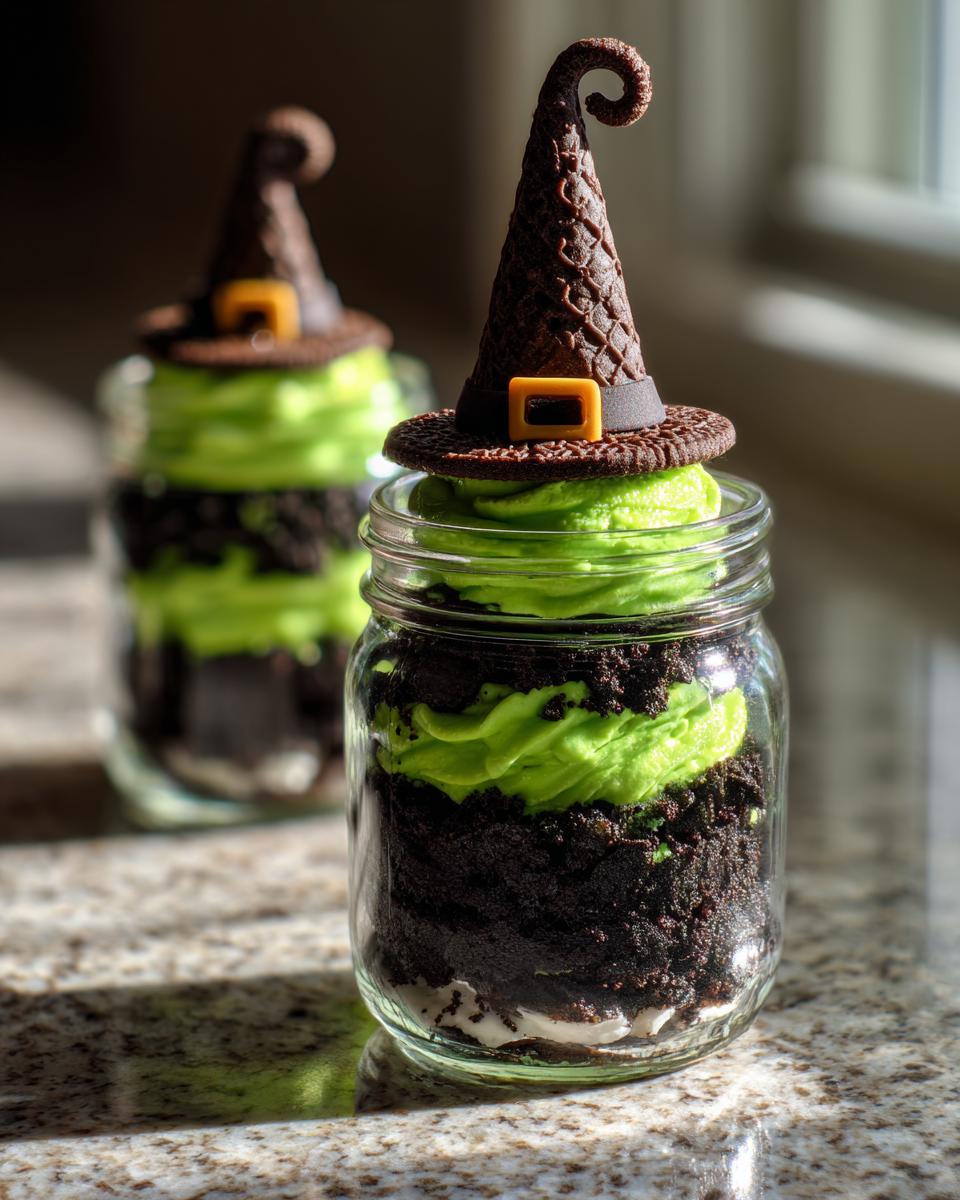
The whole point of Halloween food is the fun factor, right? These deliver! When I assemble them, I make sure the green frosting is right under the hat because it looks just like the color of a witch’s skin or potion bubbling over. Then you top it with that iconic little hat made of cookies? Wow! They are instantly recognizable and totally Instagram-worthy.
Essential Ingredients for Your Witch Halloween Cake Jars
When I put these jars together, I lean hard into convenience because getting the layers set is the fun part, not the baking part! If you’re short on time, you can absolutely use pre-baked chocolate cake layers, but make sure they are completely cooled down before you start crumbling them up. Gotta keep those crumbs light, you know? You’ll need just a few things to get that spooky color palette going, especially for the toppers. If you ever want to see what I use for lighter birthday cakes, which is a different vibe entirely, check out my notes on yellow birthday cake—though for Halloween, the dark chocolate is key!
For the Chocolate Cake Base
We are kicking this off with a standard box of chocolate cake mix—no shame in that game! Just grab whatever brand you love, and then make sure you have the eggs, oil, and water listed on the box to get it baked up nice and fudgy. Once it’s baked, let it cool down completely on the counter. If it’s even a little warm when you crumble it, you’re going to end up with a dense, sticky mess instead of light confetti!
For the Layered Frosting
The visual pop comes from the frosting, so you need a big tub of vanilla frosting. It’s crucial that you divide this up evenly into three separate bowls. One bowl stays totally white for contrast in the jar, one needs serious black gel coloring—don’t use liquid drops or it will thin out!—and the last bit gets that vibrant green coloring. Make sure all three frostings are soft enough to easily scoop or pipe so they layer without tearing up your beautiful cake crumbs.
For the Edible Witch Hat Topper
This is where the magic truly happens! For the hat, you’ll need some sturdy chocolate wafer cookies—they are usually the perfect shape for the brim and the cone. Then we make a simple black glaze using powdered sugar and just a splash of milk until it’s pourable but not watery. And here’s the trick I learned the hard way: you absolutely need those small pretzel sticks! You actually insert a tiny piece between the cookie brim and the cookie cone after glazing. It acts as a little hidden support beam so your hat doesn’t flop over in the jar!
Step-by-Step Instructions to Create Witch Halloween Cake Jars
Okay, buckle up, because this is the fun assembly part! We’re taking slightly messy cake and making it look like something out of a fancy bakery, except it’s way easier. Remember, we are layering texture against smooth frosting here, so having everything ready to go makes this go super quickly. If you ever want a hack for making a yellow cake mix taste gourmet—my favorite is in this post about boxed mix yellow cake—but for this spooky treat, stick to chocolate!
Baking and Preparing the Cake Crumbs
First things first, we need to bake that chocolate cake according to the box directions. Once it’s done, you absolutely must let it cool completely. Seriously, this is my number one tip for texture: Make sure the cake is completely cool before crumbling to avoid sticky crumbs. Once cooled, just use your hands—I find they are the best tools—and crumble it all up until you have nice, fine pieces. We don’t want big lumps in the jar!
Coloring and Dividing the Frosting
Next up is our colorful filling. Take that tub of vanilla frosting and divide it into three equal parts. One pile stays white, one gets the black food coloring, and the last one gets that creepy green gel coloring. A huge word of warning about the black frosting: wear disposable gloves while you mix that in! If you don’t, you’ll be scrubbing black off your hands until Thanksgiving!
Assembling the Layered Witch Halloween Cake Jars
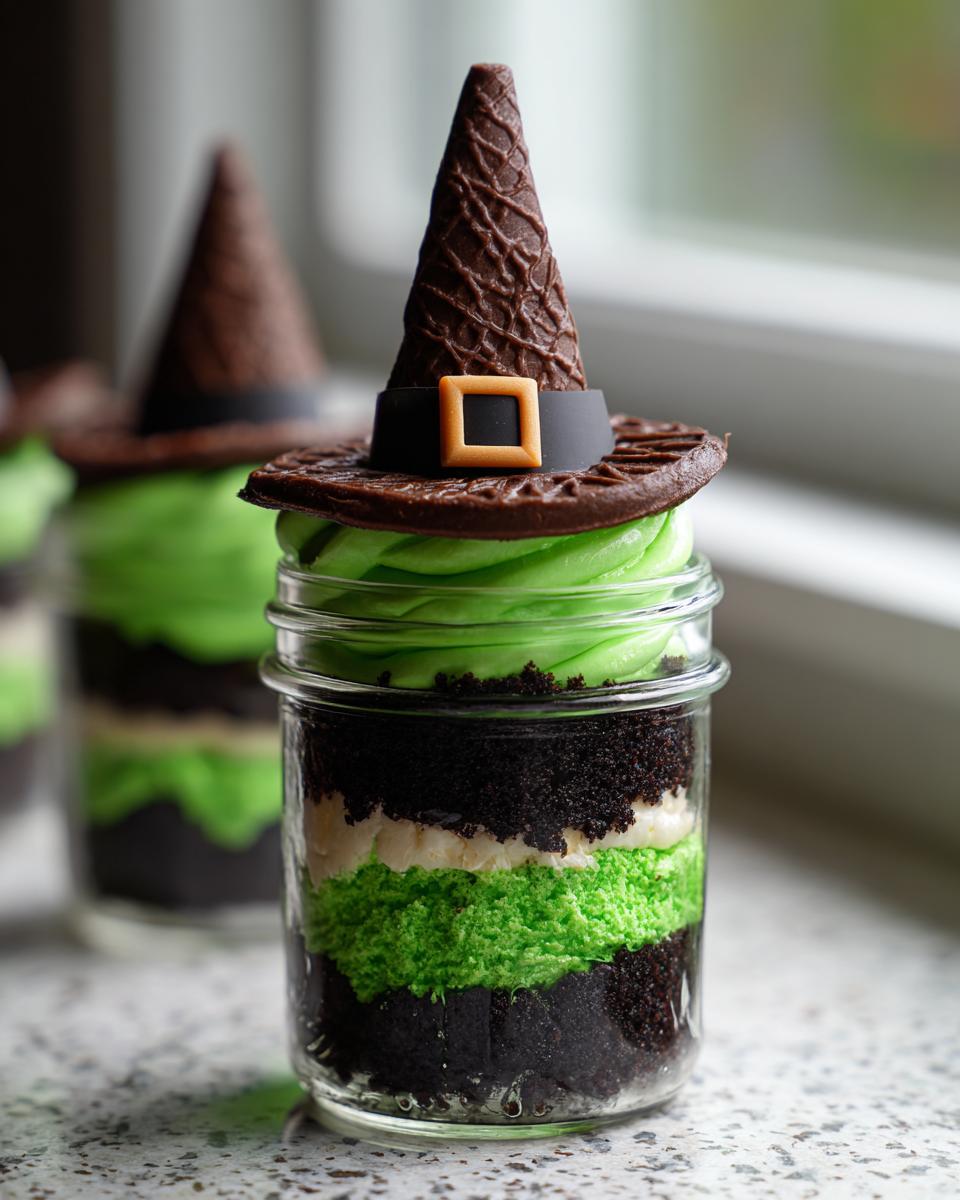
Now we start layering in your clean jars. The order here is important for looks and consistency! You start with a layer of the cake crumbs, then you follow immediately with a layer of the black frosting. Add another layer of cake crumbs on top of the black, and finally, top that with your green frosting layer. If you want really sharp, clean lines between those layers, I highly recommend using a piping bag for the frosting instead of a spoon—it just keeps everything neat!
Constructing the Edible Witch Hat
Time for the topper! Lay out a piece of parchment paper. Take one chocolate wafer cookie flat for the brim of the hat. Then, take your second cookie and dip just the top edge into your simple black glaze (powdered sugar mixed with a little milk). Place this glazed cookie cone right on top of the brim cookie. And here is the structural trick I always use: very gently, insert a small piece of that pretzel stick vertically between the two cookies. It lets the glaze set up and keeps that hat standing straight and tall!
Final Touches and Chilling
Once the hats are constructed, let them dry for just a few minutes so the glaze firms up a bit. Then, gently place one completed witch hat right on top of that bright green frosting layer in each jar. Don’t push too hard; we don’t want to mess up our pretty layers! The very last step is to cover the jars tightly and put them in the fridge. Chilling for about an hour lets everything settle and firms up the frosting so that hat stays perfectly in place until serving time.
Tips for Perfect Witch Halloween Cake Jars
I’ve made this recipe so many times now that I know exactly where things can go wrong, and honestly, it’s usually just about the color or the texture. You want those layers to pop, and you definitely don’t want a cake jar that feels like eating a mouthful of dry dirt mixed with sludge! Keeping the texture right in the crumbs and getting that witchy color deep enough are my two biggest missions when I make these for parties.
Achieving Deep Black Frosting Color
If you want true, spooky black frosting that screams Halloween, you cannot cheap out on your coloring approach. Please, please, please do not use the regular liquid food coloring you get at the grocery store. If you add enough drops of that stuff to turn your vanilla frosting black, you’ll just end up with gray, runny frosting because of all the extra liquid! My advice, based on years of trying to get that deep shade without thinning out the whole batch, is to always use a high-quality gel food coloring paste. It takes a surprising amount of paste, so be patient, but it changes the color without changing the consistency of your frosting. Keep adding tiny bits until it looks truly midnight black.
Crumb Consistency Matters
This is a texture tip that my Aunt Carol taught me—she specializes in layered desserts—and it makes all the difference in your Witch Halloween Cake Jars. When you crumble that cooled cake, you want it to be light and airy, almost like rich soil! If you have big chunks in there, they absorb the moisture from the frosting unevenly, and you’ll get hard little bites next to mushy bites. I use my fingertips, gently rubbing the cake into the finest crumbs possible before I even start layering. The finer the crumb, the better it soaks up that creamy frosting, giving you that lovely, melt-in-your-mouth feel, rather than a heavy chew.
If you’re curious about how to work with frosting textures in other recipes, like when I make my chocolate caramel toffee cake, the rules are a little different, but keeping that base moist is always the goal!
Making Ahead and Storing Your Witch Halloween Cake Jars
One of the best parts about these layered desserts, besides how cute they look, is that you can totally make them early! Seriously, prepping these Witch Halloween Cake Jars the day before your party takes so much pressure off the day of. When you’re dealing with cake crumbs and frosting, moisture is always the enemy here, but we can totally cheat the system to keep everything fresh and tasty. My goal is always to have them set and ready to grab.
Best Practices for Chilling
You can absolutely assemble the cake and frosting layers a full 24 hours ahead of time, which is a total game-changer for busy hosts. Just make sure those jars are sealed really tightly, or the crumbs can start to dry out a little bit. Chilling overnight is totally fine; in fact, I think it makes the layers settle in nicely and taste even better!
But here is the important bit about the hat itself: that little cookie topper, especially the glaze holding the cone on, is delicate. If you add the witch hat the day before, there’s a small risk the frosting underneath might make the glaze soft, or just that the whole setup gets bumped around in the fridge. So, my absolute best practice is to assemble the cake layers, seal them up, and keep them chilled. Then, about 30 minutes to an hour before your guests arrive, carefully take those hats out of their safe spot and place them gently on top of the green frosting layer. That way, the hat is perfectly crisp and stable for the moment everyone goes digging in!
If you want to see some other tips on keeping baked goods super moist for days—because dry cake is a tragedy—you should check out my thoughts on keeping banana bread loaves moist; that applies here too!
Variations for Your Witch Halloween Cake Jars
You know, even though I swear by this chocolate and black/green theme for true witchy vibes, sometimes a person just needs a little shake-up! I love a recipe that can be tweaked based on what I have on hand or what kind of spooky mood I’m in that year. These Witch Halloween Cake Jars are incredibly adaptable, especially if you’re getting tired of chocolate. We can change the base flavor or even cheat the topper entirely if we’re running low on time the night before the party!
Flavor Swaps for the Cake Layer
If you’re not a die-hard chocolate fan, or maybe you just want something a little different, swapping out the cake mix is a breeze. You can absolutely use a vanilla cake mix instead of chocolate. It works beautifully! Just be aware that the final look of the layers might change slightly—the beautiful contrast between the dark black frosting and the dark cake won’t be there, so you might see the black coloring showing through the cracks a bit more easily. If you decide to go this route, you might want to switch your colors to something like purple and lime green for a totally different, maybe more fairy-tale witch vibe. For fun, if you ever look at my review of the key lime cake recipe, you can see how a bright flavor totally changes the feeling of a dessert!
Another fun twist is using a red velvet cake mix! That deep red cake crumb looks absolutely spectacular layered next to the stark black frosting. It gives the whole jar a much richer, slightly more elegant look, even though it’s still super easy because we’re using the box mix.
Alternative Hat Toppers
I’m all about making things look impressive without adding extra hours to the prep time, so let’s talk about saving time on that iconic hat. While I love the pretzel stick stability trick for the wafer cookies, sometimes I’m just too tired to assemble two cookies and glaze them perfectly.
If you’re in a rush, here are my two favorite backups for the witch hat: First, just grab some mini chocolate-covered cones—you know, the ones shaped like Hershey’s Kisses? Dip the very tip of the cone in that black glaze and stick it straight onto the green frosting. It gives the illusion of a hat instantly! Second, if you happen to have black candies or black circus peanuts lying around, you can sometimes just wedge a larger black candy right on top of that smooth green frosting layer. It might not look exactly like a hat, but it still reads as perfectly spooky for your Witch Halloween Cake Jars!
Serving Suggestions for Witch Halloween Cake Jars
So, you’ve got these gorgeous, individual Witch Halloween Cake Jars ready to go—the chocolate is rich, the frosting is spooky, and the hat is sitting perfectly on top. Now, what are we going to drink alongside these little monsters? You want beverages that lean into the fun of Halloween, right? Forget boring water; we need something that matches the vibe, or at least something that cuts through that rich chocolate sweetness perfectly. I usually plan a couple of options, one comforting and one completely over-the-top thematic!
Pairing with Halloween Beverages
The first thing that pops into my head when I eat anything super chocolatey and rich, even something as fun as these cake jars, is a tall, cold glass of milk. It’s simple, nostalgic, and it cuts through the richness of the cake crumbs and frosting so perfectly. Plus, kids think just having milk and a spooky dessert is the best tradition. It’s a guaranteed win!
But if you’re hosting a party and really want to lean into the theme, you need a mocktail! I always try to whip up a big batch of something green to match the frosting. You can make a simple, spooky punch by mixing pineapple juice, some lemon-lime soda, and a tiny bit of green food coloring—it fizzes and looks just like a potion bubbling away. If you want a great recipe idea that uses fantastic green ingredients, you should check out my guide for a witchy green smoothie recipe; you can easily adapt the flavors to make a punch version!
A little hot apple cider works wonders too, especially if you’re serving these on a porch when the weather starts getting chilly. The warm spice of the cider is the perfect contrast to the cool chocolate cake in the jar.
Frequently Asked Questions About Witch Halloween Cake Jars
Whenever I post these adorable little Witch Halloween Cake Jars online, I always get a ton of questions about timing and ingredients, which is totally understandable! Since presentation is half the fun here, people want to make sure they get those layers looking sharp and those hats standing up tall. Here are the things I get asked most often about achieving the perfect individual spooky dessert!
Can I use homemade cake instead of a box mix in these Witch Halloween Cake Jars?
Oh, please do! Box mix is just for when I’m having a serious time crunch, but if you have a favorite chocolate recipe, use that! Homemade cake usually tastes richer, which is a bonus. The one thing you absolutely have to promise me, though, is that you let that cake cool down completely—and I mean completely—before you even think about crumbling it. Warm cake turns into paste when it touches the frosting, and we are aiming for light, ethereal crumbs like something a witch would sweep up!
How far in advance can I assemble the layered cake jars?
This is the beauty of the jar dessert! You can definitely assemble the cake crumbs and the black and green frosting layers a full day ahead of time. Seal those jars up tight with their lids, and they keep beautifully in the fridge because the fat in the frosting keeps the crumbs soft.
However, when it comes to the edible witch hat topper, I really, really suggest you wait to put those on until maybe an hour or two before you plan to serve them. The moisture from the frosting over time can eventually soften the cookie brim and the sugary glaze, and you don’t want to risk that perfectly balanced little hat flopping over right when people are lining up for dessert!
What size jars work best for this individual dessert?
For the best visual appeal—because we want to clearly show off those dark layers—I strongly recommend using standard mason jars that hold about 8 ounces. If you want a slightly more generous serving, 12-ounce jars are also fantastic. They give you just enough height to get 3 or 4 distinct layers of crumb and frosting before you place that cute little hat right on top. Anything smaller than that, and you won’t get a good view of that spooky black and green contrast!
Estimated Nutritional Snapshot
Okay, so these Witch Halloween Cake Jars are definitely a treat, not an everyday snack! We’re dealing with chocolate cake, lots of sweet frosting, and those cookies for the hat, so the numbers aren’t exactly diet-friendly, but since it’s Halloween, we can totally look the other way for one night, right?
The estimates below are based on a standard jar assembly using the box mix and store-bought frosting. Please keep in mind that these values are highly dependent on the exact brands of cake mix and frosting you end up using—especially if you decide to go wild with extra frosting layers!
- Serving Size: 1 jar
- Calories: Approximately 450
- Sugar: Around 55g (Yep, that’s a chunk of change!)
- Fat: Roughly 22g
- Protein: About 5g
- Carbohydrates: About 60g
I always say, we eat with our eyes first, and these jars are visually gorgeous! Don’t worry too much about the exact numbers when you’re enjoying a fun, festive dessert like this. As long as you balance it out with some healthy stuff the rest of the week, you’re golden!
Share Your Spooky Creations
Alright, you’ve baked, you’ve layered, and now you have these incredible little Witch Halloween Cake Jars sitting on your counter—the best part is showing them off! I truly love seeing how you all interpret my family recipes and how you dress them up for the holidays. It makes all the work worth it when I see your photos popping up!
When you’ve finished your batch, please don’t be shy! Snap a picture of those spooky jar layers (make sure the light catches that green frosting!) and tag me on social media. I always make time to look through them, and trust me, I get inspired by your creativity every single year.
And I always look forward to hearing what worked for you. So, after you’ve had a chance to taste them, zip down to the comments section below. Did you stick strictly to the black and green? Or did you experiment with a red velvet base? Let me know what your absolute favorite layer was—I’m dying to know if people preferred the crumb, the black frosting, or that bright green topping!
If you’re looking for another super fun, themed bake to share online, you have to check out my recipe for Halloween ghost brownies next. They are almost as easy as these jars and everyone loves the ghostly shape!
Happy Haunting, and happy baking!
Print
Witch Hat Halloween Cake Jars
- Total Time: 65 min
- Yield: 6 servings 1x
- Diet: Vegetarian
Description
Individual servings of layered cake and frosting decorated like a witch’s hat for Halloween.
Ingredients
- 1 box chocolate cake mix
- Ingredients required for cake mix (eggs, oil, water)
- 1 tub (16 oz) vanilla frosting
- Black food coloring
- Green food coloring
- 1/2 cup powdered sugar
- 1 tablespoon milk
- Small pretzel sticks (for hat brim support)
- Chocolate wafer cookies (for hat base)
Instructions
- Prepare and bake the chocolate cake according to the box directions. Let the cake cool completely.
- Crumble the cooled cake into fine crumbs.
- Divide the vanilla frosting into three bowls. Leave one bowl white. Color one bowl black using black food coloring. Color the third bowl green using green food coloring.
- In each clean jar, layer ingredients starting with cake crumbs, then a layer of black frosting, then more cake crumbs, and finish with a layer of green frosting on top.
- For the witch hat, take a chocolate wafer cookie and place it flat on parchment paper; this is the brim.
- Mix the powdered sugar and milk to create a thin black glaze.
- Dip the top of a second chocolate wafer cookie into the black glaze, letting excess drip off. Place this cookie on top of the brim cookie to form the cone of the hat. You may need to use a small piece of pretzel stick inserted between the two cookies for stability if the glaze is too thin.
- Once the glaze is set, place one completed witch hat on top of the green frosting layer in each jar.
- Chill the cake jars before serving.
Notes
- You can use store-bought cake layers to save time.
- Use a piping bag for cleaner frosting layers if desired.
- Make sure the cake is completely cool before crumbling to avoid sticky crumbs.
- Prep Time: 30 min
- Cook Time: 35 min
- Category: Dessert
- Method: Assembly
- Cuisine: American
Nutrition
- Serving Size: 1 jar
- Calories: 450
- Sugar: 55g
- Sodium: 300mg
- Fat: 22g
- Saturated Fat: 8g
- Unsaturated Fat: 14g
- Trans Fat: 0g
- Carbohydrates: 60g
- Fiber: 2g
- Protein: 5g
- Cholesterol: 25mg
Keywords: Witch, Halloween, Cake Jars, Chocolate, Individual Dessert, Black, Green