
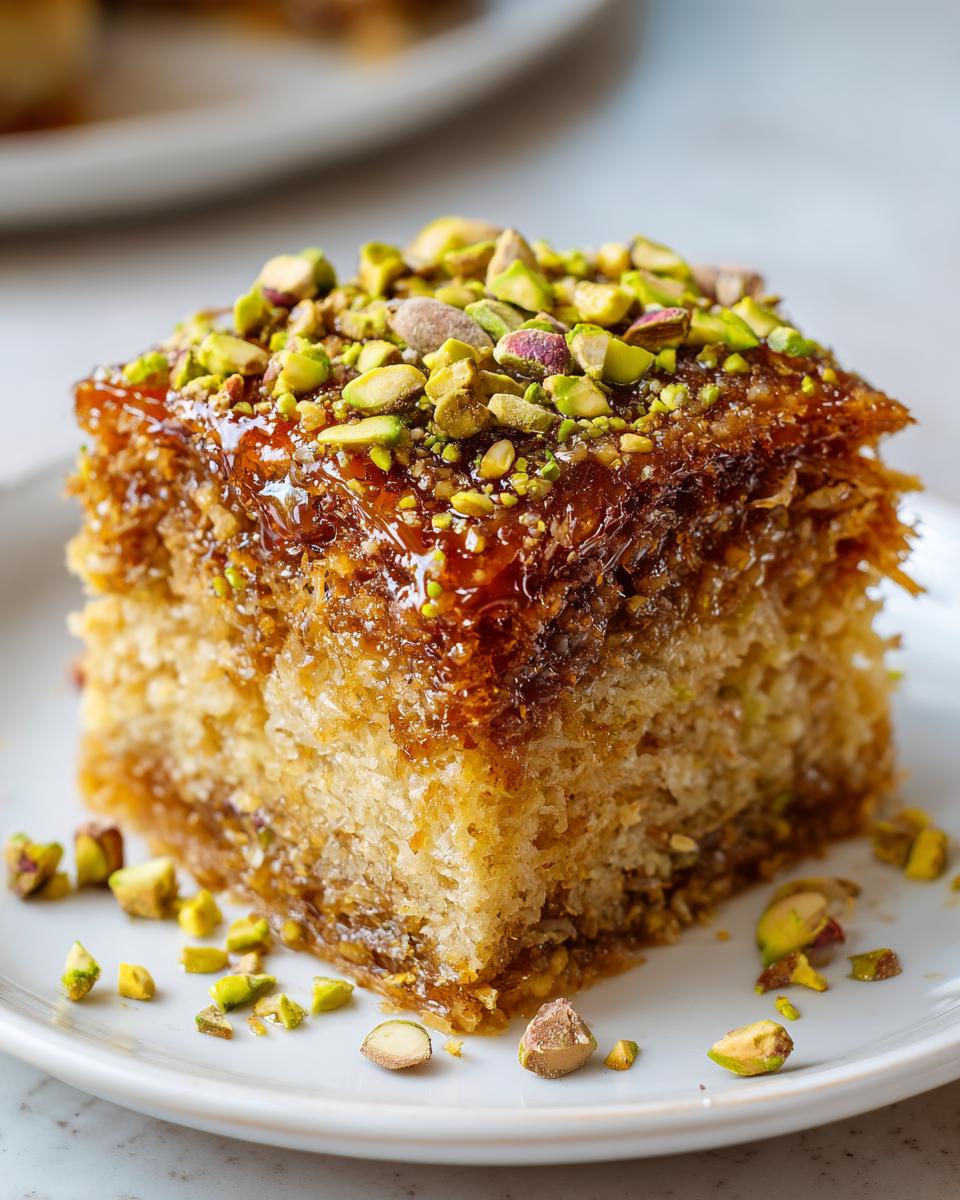
Okay, listen up, because I’ve been messing around in the kitchen trying to smash two of the best desserts ever made into one glorious creation, and I think I finally nailed it. You know how I love to take something really fiddly, like traditional layered phyllo dough, and make it wildly easier? Well, this time I took the unbelievably rich, nutty, honey-soaked flavors of classic baklava and turned it into the most decadent, moist crumb you’ve ever seen in a cake. Seriously, the richness of a good yellow cake mixed with that unmistakable syrupy nut punch? That’s what we have here. I’ve spent ages fine-tuning this Baklava Layer Cake to ensure it has that perfect textural harmony—it’s divine, I promise!
Why This Baklava Layer Cake Recipe Stands Out
Let’s be real, making actual baklava takes hours of folding thin sheets and dealing with sticky fingers. That’s why I developed this version. It gives you all that gorgeous, complex honey-nut flavor without needing a pastry degree or a full afternoon off. If you love deep, decadent desserts, this is your new go-to.
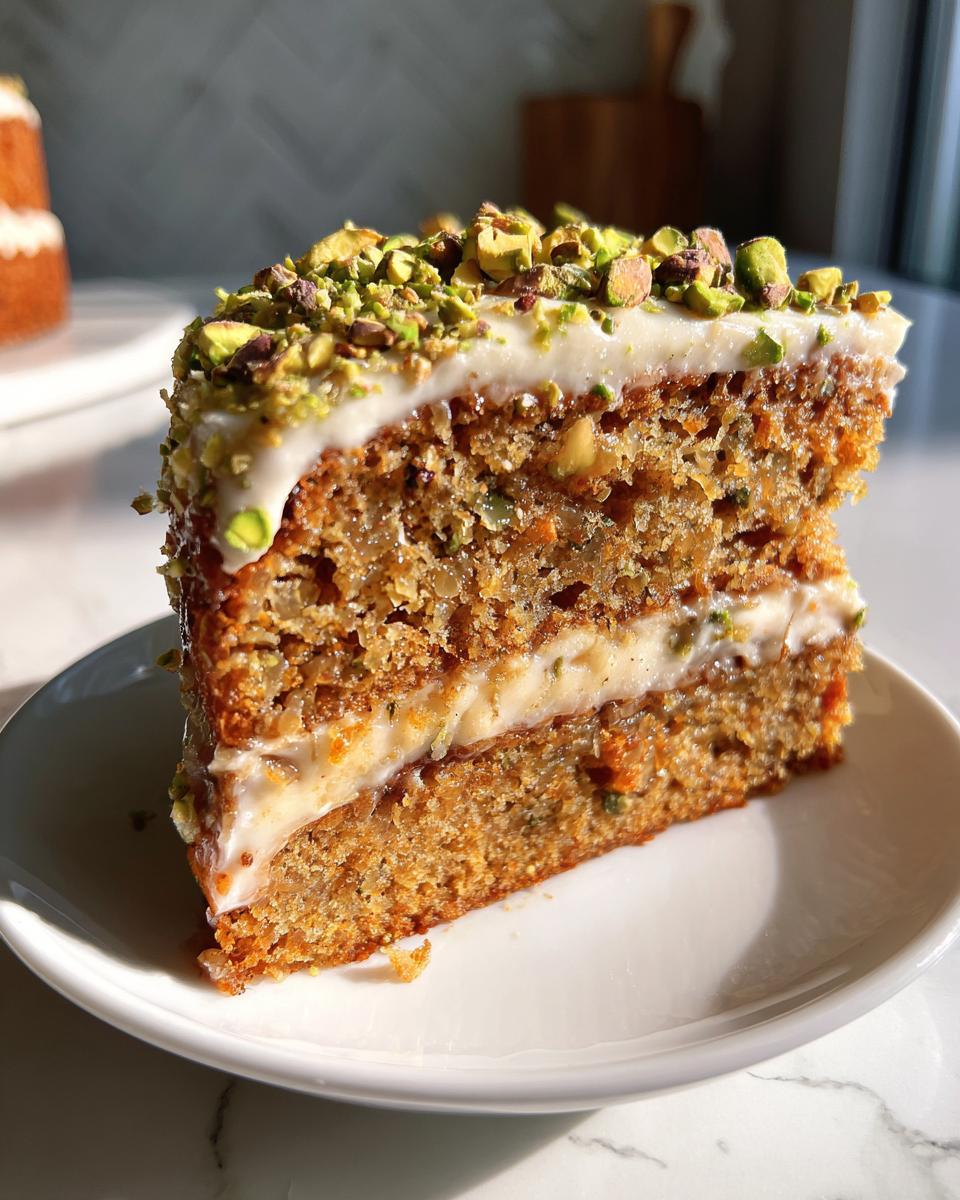
- You get the wonderfully soft, airy interior of a quality layer cake, which is huge!
- The nutty crunch and the glorious honey soak are perfectly distributed, not just dumped on top.
- It’s fast, relatively clean (compared to pulling apart phyllo), and tastes just as comforting.
Effortless Assembly of the Baklava Layer Cake
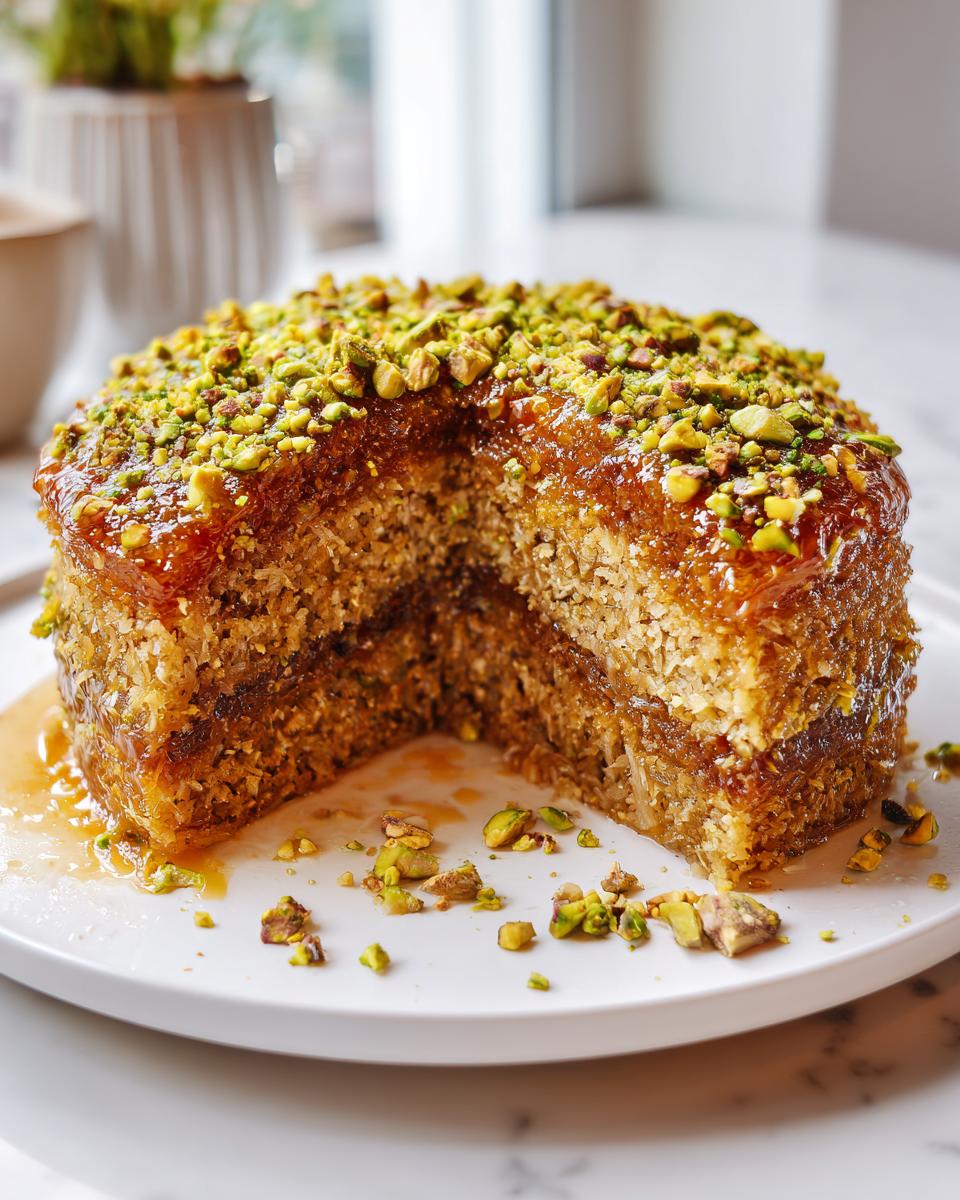
This is where we cheat the system, in the best way possible! Traditional baklava is all about layering dozens of sheets. We skip that whole tedious process. We bake two normal cakes, and that’s it for the structure. You get that beautiful, tall presentation without the fuss. It’s baking magic, pure and simple.

Perfectly Balanced Sweetness
The biggest hurdle with classic baklava is that it can sometimes be *too* sweet, right? Like it sticks your teeth together! Not here. Because the cake batter itself is only mildly sweet, the honey syrup acts as a flavor enhancer rather than just a sugar bomb. The acidity from the lemon juice cuts through the richness perfectly. Honestly, this Baklava Layer Cake tastes sophisticated, not heavy.
Gathering Ingredients for Your Baklava Layer Cake
Okay, gathering everything we need is the first step to turning simple cake pans into something truly special. Since this recipe is all about that signature texture, quality matters here. You’ll need softened butter—and I mean soft, not melty!—and make sure your nuts are ground up super fine. That ground nut we put right into the batter is what gives this Baklava Layer Cake that incredible, slightly denser crumb that soaks up the syrup so well later on. Don’t skip the toasting step later, but for now, just get these things ready to go!
Cake Batter Components
We keep the dry stuff pretty straightforward—flour, baking powder, and salt. But the flavor depth comes from those finely ground walnuts or pistachios folded right in at the end. These act almost like almond flour in other recipes, adding richness and helping structure the cake without making it tough. Remember, eggs go in one by one, don’t rush that step!
The Essential Honey Syrup for the Baklava Layer Cake
This is non-negotiable, folks. The syrup is what makes a cake taste like baklava! For the soaking magic in this Baklava Layer Cake, you just need three things: good quality honey, some plain water, and a nice squeeze of fresh lemon juice. That little bit of acid is crucial to balance everything out. Quick tip: you’ll make this syrup while the cakes are baking, and it needs to be warm when it meets the warm cakes.
Expert Tips for the Perfect Baklava Layer Cake
If you want this dessert to sing like authentic greasy-spoon baklava, you need to pay attention to detail outside the mixing bowl. Trust me, these finishing touches are what separate a good cake from the masterpiece that is the Baklava Layer Cake. We’re talking about flavor depth achieved through simple patience!
Nut Preparation and Flavor Depth
You absolutely must toast those ground nuts before they go near the batter! It wakes them up. Just toss them in a dry pan over medium heat for maybe five minutes until you can really smell them. I tried once, in a rush, when I forgot to toast them, and the cake tasted flat, all sweetness and no depth. It was depressing. Toasting unlocks those oils, which is key to mimicking that flavor you get from traditional baklava frying in butter.
Syrup Application Technique for the Baklava Layer Cake
This is probably the most critical part of the entire process for any syrupy cake, especially the Baklava Layer Cake. You need the cake layers to be hot—fresh out of the oven, after just 10 minutes cooling—and the syrup needs to be warm, but not boiling, when you pour it over. Why? If the syrup is cold, it just sits on top and makes a sticky mess. If the cake is cold, it shuts down and won’t absorb that honey goodness into its structure. Warm meets warm allows perfect absorption; it just melts right in and keeps the crumb moist for days.
Step-by-Step Instructions for Your Baklava Layer Cake
Alright, let’s get messy! This is where the real fun begins. We’re moving from ingredient prep to actual baking. Remember, the goal is to get that wonderful moisture sink happening, so timing is everything once those layers come out of the oven. Don’t freak out about the steps; just follow the sequence below for perfect results in your Baklava Layer Cake.
Mixing the Moist Cake Batter
First things first: get that oven heated up to 350 degrees F, and make sure those two 8-inch pans are greased and floured. They need to be ready for action! In one bowl, whisk your dry stuff—flour, baking powder, salt. In the big bowl—and I mean *big*—you start by creaming that softened butter and sugar until it’s genuinely fluffy. If you stop too soon, your cake won’t have the right texture, so beat it until it looks pale, okay?
Next, introduce the eggs one at a time, mixing well when each one joins the party. Then we do the classic trade-off. Alternate adding the dry mixture and the milk—start and end with the dry ingredients. Just mix until it *just* comes together. We do not want to overmix! Lastly, gently fold in those ground nuts we prepared. This batter needs to go straight into the prepared pans!
Baking and Syrupping the Layers
Pop those pans into the oven for about 30 to 35 minutes. Keep checking with a wooden pick; you want clean crumbs, not wet batter clinging to it. While they bake, get your honey syrup simmering—honey, water, lemon juice—stir until dissolved, and then pull it off the heat. That’s it for the syrup!
Here’s the moment of truth for the Baklava Layer Cake success: Let the cakes sit in their pans for only 10 minutes after they come out. They need to be warm for soaking! Grab a skewer or a fork and poke holes all over the top surface of both layers. Then, pour that warm syrup slowly, half over each cake layer while they’re still cozy in the pan. Let them cool completely in the pans so they suck up all that glorious sweetness. This makes such a difference compared to pouring it on them once they’re flipped out. Once they’re totally cool, carefully lift those syrupy beauties out. If you aren’t frosting them, you can drizzle any extra syrup on top before you sprinkle those reserved chopped nuts over the whole thing. If you’re using a thin layer of frosting or jam between layers—like in my almond cake recipe—now’s the time to stack them up!
Serving and Storing Your Finished Baklava Layer Cake
Once those layers have fully absorbed all that amazing honey syrup, you have achieved something truly special! For presentation, you want a little visual cue that this isn’t just any birthday cake. Take those chopped walnuts or pistachios you saved—the ones that didn’t go into the batter—and sprinkle them generously over the top layer. That flash of green or brown looks absolutely professional, and it gives everyone a heads-up about the flavor inside this Baklava Layer Cake.
Storage Guidelines
Because we drenched this cake in syrup, it behaves a little differently than a plain sponge. It stays incredibly moist, which is great, but you have to treat it right. I always store my leftover slices wrapped tightly in plastic wrap, and then I keep it in an airtight container in the fridge. Seriously, don’t leave it out on the counter for days; the humidity won’t do the texture any favors. It honestly tastes even better the next day once the flavors have settled in. But hey, if you need a quick snack, it’s delicious right out of the fridge!
Variations for Your Next Baklava Layer Cake Attempt
Once you master the foundational bake of this incredible Baklava Layer Cake, you can start playing around! Because the structure is so solid thanks to the nuts in the batter, it holds up beautifully to extra flavor bombs. If you used walnuts this time, try swapping entirely to pistachios next time. It gives the cake a slightly sweeter, brighter, more emerald-green hue, which looks amazing when sliced.
I also love sneaking in a tiny bit of warmth. Don’t go crazy, but a quarter teaspoon of finely ground cardamom mixed in with your dry ingredients totally elevates the whole honey profile. Think of it like a more sophisticated cousin to the standard cinnamon flavor you find everywhere. Or, if you want something really cozy, try a pinch of the spice mixture I use in my chai cake recipe. These tiny additions will keep your tradition fresh every time you make your signature Baklava Layer Cake!
Frequently Asked Questions About the Baklava Layer Cake
I get so many questions about baking this recipe, which just tells me you guys are as excited about this fusion dessert as I am! It’s tough making a cake that needs to absorb so much syrup without turning into a mushy mess, but I promise, once you get the hang of it, it’s seamless. Here are the things I hear most often regarding the Baklava Layer Cake.
Can I use different nuts besides walnuts or pistachios in this Baklava Layer Cake?
Absolutely! This is totally flexible. Walnuts and pistachios are traditional for a reason—they have great flavor and texture—but please feel free to substitute almonds or even pecans. If you use almonds, you might want to toast them a little longer because that flavor is a bit milder than walnuts. Just make sure whatever nut you choose is ground finely for the batter, just like we did for the original recipe.
How do I prevent the cake layers from becoming soggy?
This is all about that temperature game we talked about earlier! You cannot just randomly pour syrup over a cold cake, or it will just pool up everywhere and you’ll end up with a sticky mess, not a moist crumb. The main trick for preventing sogginess in your Baklava Layer Cake is ensuring both the cake layer and the syrup are *warm* when they meet. The warm cake layer is porous and drinks the warm syrup right up into the crumb before it has time to sit on the surface. Also, don’t drown it! If your cake seems done but you still have a ton of syrup left, just stop. It’s better to have a slightly less soaked cake than one that collapses under the weight of the honey.
Estimated Nutritional Snapshot
Now, I’m not a dietitian, so take this with a grain of salt—or maybe a drizzle of that glorious honey syrup! Since this cake is rich with butter, nuts, and a significant amount of honey soak, it definitely falls into the decadent category. I used the standard recipe proportions you see above to estimate what you’re looking at per slice, assuming you get 8 even servings. This is just a ballpark figure, of course, since how much syrup you pour on really changes things!
If you happen to be looking for lighter treats, you might want to check out some of my tips on making smaller swaps for lower-calorie meals, but honestly, this Baklava Layer Cake is meant to be an indulgence!
- Calories: Around 450 per slice. That’s a hefty but delicious slice!
- Fat: We’ve got about 25 grams, mostly from the butter and those healthy ground nuts in the batter.
- Carbohydrates: Expect around 55 grams. Remember, a lot of this comes from the honey syrup!
- Sugar: Closely following the carbs, we’re looking at about 45 grams of sugar from the sugar in the batter and the honey soak.
- Protein: A modest 6 grams, mainly from the eggs and the nuts.
So, yeah, it packs a punch, but every single bite is worth it when you taste that syrupy nut perfection marrying the soft cake. Enjoy it responsibly!
Share Your Baklava Layer Cake Creations
Now that you’ve made this absolute showstopper of a dessert, I really, truly want to see what you came up with! There is nothing better than seeing someone else’s kitchen filled with the smell of honey and toasted nuts. I put so much love and tweaking into getting this Baklava Layer Cake just right, and knowing it turned out amazing for you makes all that testing worthwhile.
Did you use walnuts or switch to pistachios? Did you sneak in a tiny bit of cardamom? Tell me everything! Please hit those little star ratings right below if you loved the recipe—it helps other bakers know this fusion idea is a winner. And if you snap a picture of your finished, syrupy creation, tag me on social media!
Drop your thoughts, questions, or even praise (I won’t mind!) in the comments section below. I read every single one, and I’m always here if you run into a snag next time you make your favorite new dessert: the amazing Baklava Layer Cake!
Print
Baklava Layer Cake
- Total Time: 55 min
- Yield: 8 servings 1x
- Diet: Vegetarian
Description
A rich layer cake combining the flavors of traditional baklava with a moist cake structure.
Ingredients
- 2 cups all-purpose flour
- 1 teaspoon baking powder
- 1/2 teaspoon salt
- 1 cup unsalted butter, softened
- 1 1/2 cups granulated sugar
- 4 large eggs
- 1 teaspoon vanilla extract
- 1/2 cup whole milk
- 1 cup finely ground walnuts or pistachios
- 1/2 cup honey
- 1/4 cup water
- 1 tablespoon lemon juice
- 1/2 cup chopped walnuts or pistachios for topping
Instructions
- Preheat your oven to 350 degrees F (175 degrees C). Grease and flour two 8-inch round cake pans.
- Whisk together the flour, baking powder, and salt in a medium bowl.
- In a large bowl, cream together the softened butter and sugar until light and fluffy.
- Beat in the eggs one at a time, mixing well after each addition. Stir in the vanilla extract.
- Gradually add the dry ingredients to the wet ingredients, alternating with the milk, beginning and ending with the dry ingredients. Mix until just combined.
- Fold in the ground nuts.
- Divide the batter evenly between the prepared cake pans.
- Bake for 30 to 35 minutes, or until a wooden pick inserted into the center comes out clean.
- While the cakes bake, prepare the syrup: Combine the honey, water, and lemon juice in a small saucepan. Bring to a simmer over medium heat, stirring until the honey dissolves. Remove from heat.
- When the cakes are done, let them cool in the pans for 10 minutes. Poke holes all over the top of each warm cake layer with a skewer.
- Slowly pour half of the warm syrup over each cake layer while they are still in the pans. Let the cakes cool completely in the pans.
- Once cool, carefully remove the layers from the pans.
- Place one layer on a serving plate. If desired, spread a thin layer of frosting (not included in ingredients) or a small amount of reserved syrup. Top with the second layer.
- Drizzle any remaining syrup over the top of the assembled cake. Sprinkle with chopped nuts.
Notes
- For a more intense flavor, toast the ground nuts lightly before adding them to the batter.
- You can substitute almond flour for some of the all-purpose flour for a different texture.
- If you prefer a less sticky cake, use less of the syrup or reserve some for serving on the side.
- Prep Time: 20 min
- Cook Time: 35 min
- Category: Dessert
- Method: Baking
- Cuisine: Middle Eastern Inspired
Nutrition
- Serving Size: 1 slice
- Calories: 450
- Sugar: 45
- Sodium: 150
- Fat: 25
- Saturated Fat: 12
- Unsaturated Fat: 13
- Trans Fat: 0
- Carbohydrates: 55
- Fiber: 2
- Protein: 6
- Cholesterol: 80
Keywords: Baklava, Layer Cake, Walnut Cake, Pistachio Cake, Honey Syrup, Dessert