
Oh my gosh, are we talking spooky fun in the kitchen yet? Because I live for October baking! Forget those complicated frosted sugar cookies that take three days; for Halloween, we need something fast, delicious, and just a little bit creepy. That’s why these Peanut Butter Spider Cookies are my absolute favorite thing to whip up. They use the best, simplest peanut butter cookie base you already know, but we turn them into adorable, slightly terrifying little creatures in minutes. Trust me, the kids (and the grown-ups!) absolutely lose it when they see these on the platter. It’s instant Halloween party success!

Why You Will Love Making Peanut Butter Spider Cookies
Seriously, these spiders are the easiest way to win Halloween! They pack that classic, perfect peanut butter flavor everyone craves, but with a fun visual twist that only takes a couple of extra minutes. You absolutely don’t need to be an expert decorator to make these look fantastic.
- They are lightning fast—you can mix and bake the base cookies in under 30 minutes!
- The peanut butter cookie dough holds up beautifully, meaning virtually no spreading or oddly shaped spiders.
- They are utterly charming! Kids love decorating them, which makes decorating a fun activity rather than just a chore.
- We get that wonderful salty-sweet combo that makes peanut butter cookies irresistible. Check out more fun Halloween Cookie recipes too!
Essential Ingredients for Perfect Peanut Butter Spider Cookies
The ingredient list here is so short, which is why I adore this recipe when Halloween gets hectic! Everything here goes into the base cookie dough, and then we just need chocolate and those fun eyes for decoration. Don’t overthink this part; just gather what you have!
Here’s what you need on hand:
- 1 cup of peanut butter – This is where you decide your fate! Creamy makes a smoother body dough, but crunchy adds tiny textural surprises, just like in my chocolate chip tahini cookies. Either works great!
- 1 cup granulated sugar
- 1 large egg
- 1 teaspoon baking soda
- 1/2 teaspoon salt
- 2 tablespoons shortening (I use this to help them hold their shape)
- 1/2 cup semi-sweet chocolate chips (for the legs!)
- 12 small candy eyes (don’t skimp here, they make the spider!)
The rule of thumb for the peanut butter is whatever you’re using for your sandwiches works perfectly here. We aren’t doing any fancy substitutes, so just stick to the standard stuff!
Step-by-Step Instructions for Peanut Butter Spider Cookies
Okay, this is the fun part! Because this recipe is so fast, we need to keep things organized. We’re breaking this into two main jobs: making the cookie bodies and then decorating them once they are totally cool. If you try to put chocolate on a warm cookie, you’ll just get a melted chocolate puddle nightmare, so patience during the cooling phase is key!
First things first: get that oven warmed up. Preheat your oven to 350 degrees Fahrenheit. I always line my baking sheets with parchment paper for easy cleanup—it prevents sticking and makes sliding the spiders off so much easier later. If you want more great quick baking hacks, check out my thoughts on using cake mixes!
Mixing and Baking the Peanut Butter Spider Cookies Base
You just combine everything that isn’t chocolate or eyes! In a medium bowl, toss together your peanut butter, the sugar, that one egg, baking soda, and salt. Mix it until it just comes together into a solid dough. Don’t overmix it, we aren’t making bread here!
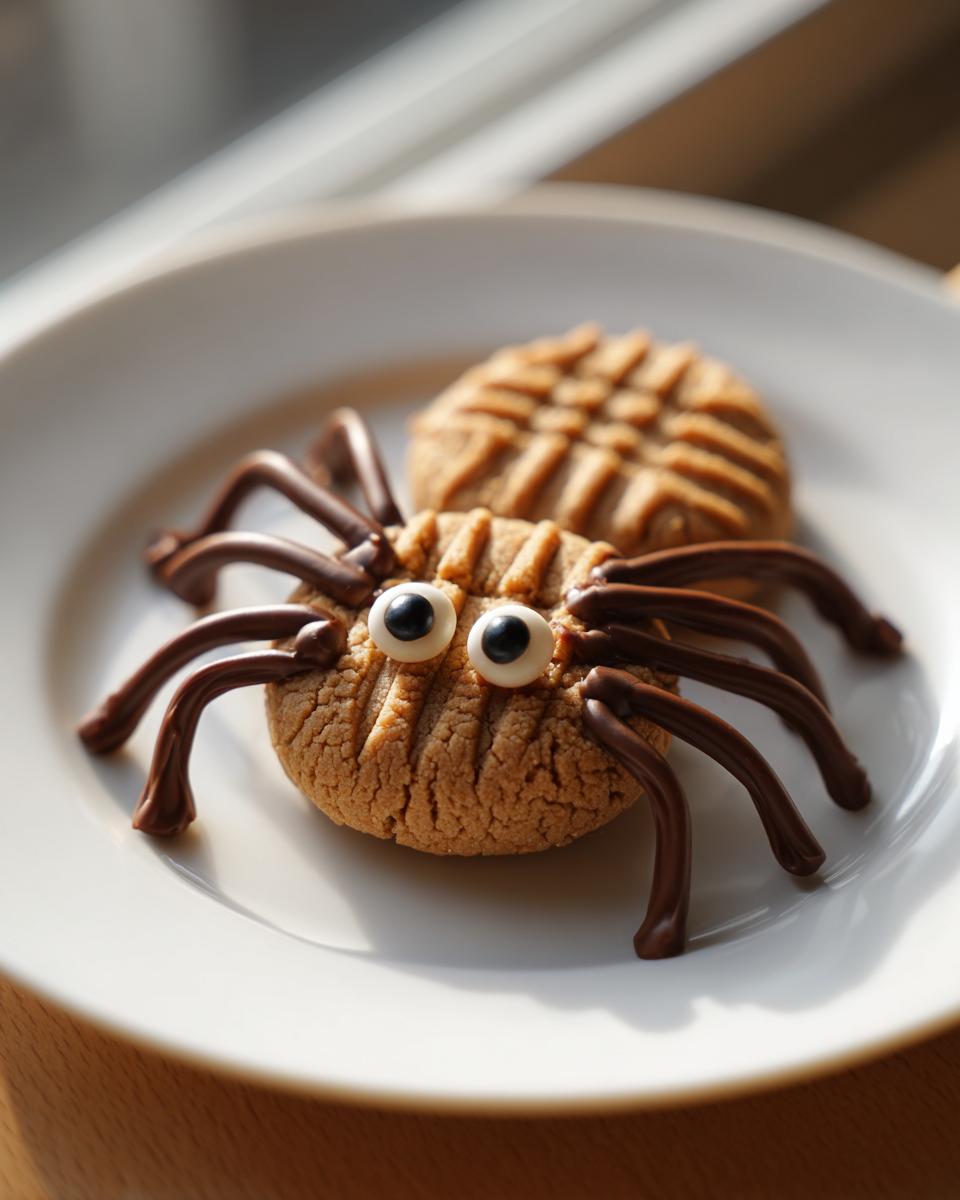
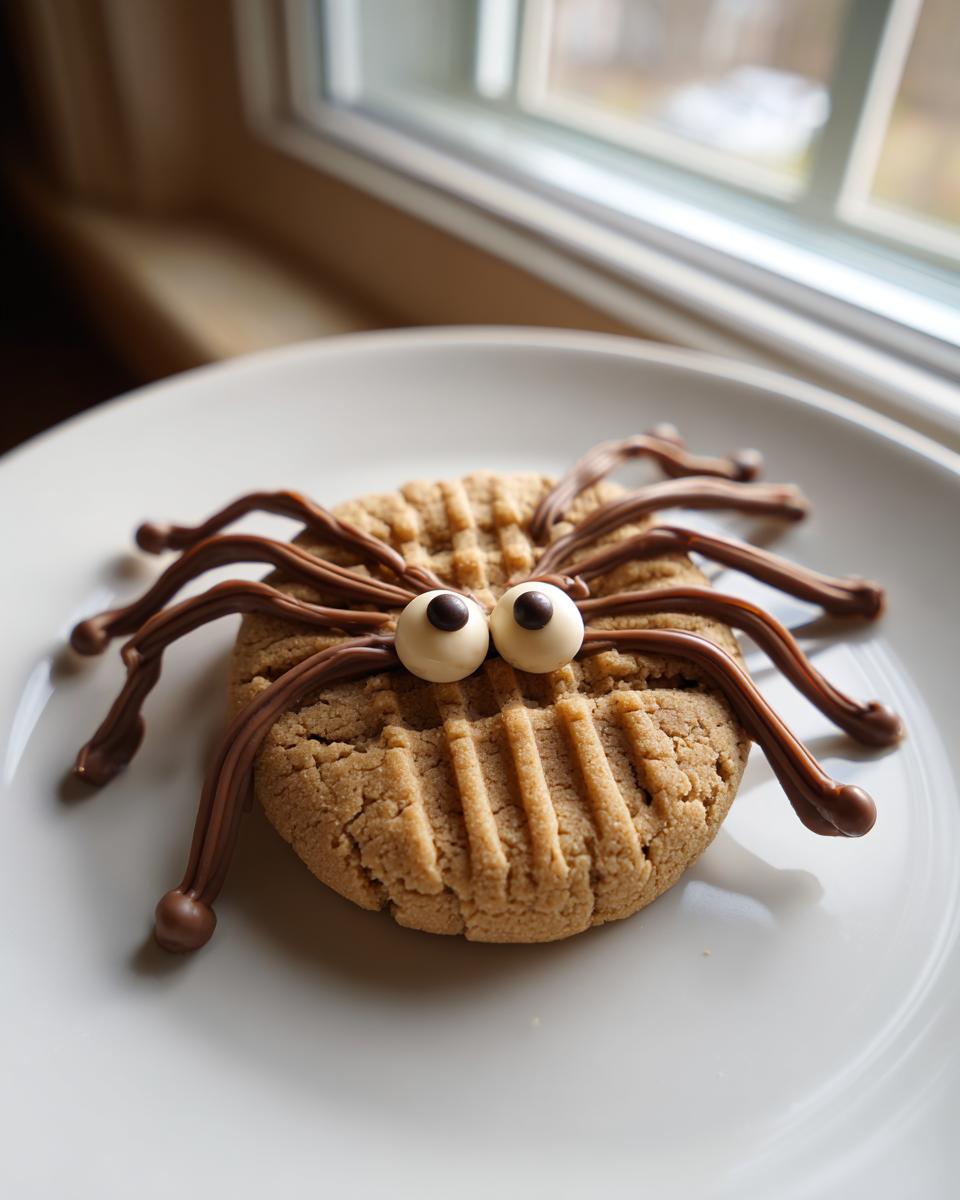
Scoop out little balls, about 1 inch across, and place them onto your lined sheets. Now for tradition: take a fork, dip it lightly in flour so it doesn’t stick, and press down on each ball to make that classic crisscross pattern on your cookie surface. Bake these beauties for about 8 to 10 minutes. They should just be barely golden around the edges. Let them sit on the hot pan for 5 minutes to firm up before transferring them gently to a wire rack to cool completely. They must be stone cold before we decorate!
Melting Chocolate and Decorating Your Peanut Butter Spider Cookies
This is where the magic happens, but you need perfectly cool cookies! While they chill out, melt your chocolate chips and that two tablespoons of shortening together. Put them in a microwave-safe bowl and give it 30 seconds at a time, stirring well between each interval until the mix is smooth and glossy. It thins it out perfectly for piping.
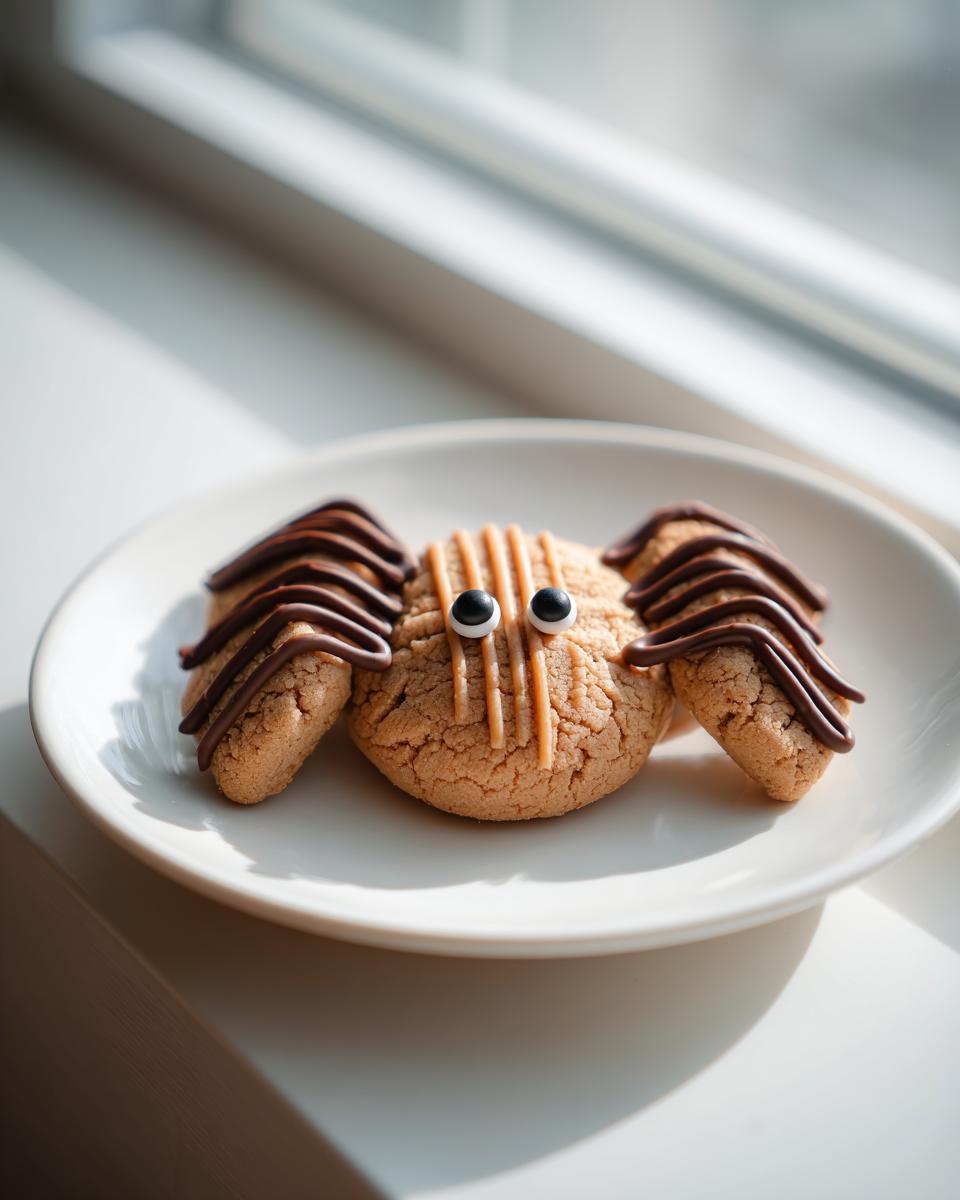
Transfer that melted chocolate into your piping bag—or just snip a tiny corner off a sturdy Ziploc bag if you don’t have one. On each cooled cookie body, pipe eight little legs radiating out from the center. Now, before that chocolate sets hard, quickly press two of those tiny candy eyes onto the center body of your spider. If you’re in a rush or don’t have a piping bag, you can use a toothpick to carefully drag or draw the chocolate legs instead. Let them set completely, and that’s it—spooky and delicious!
Tips for Making the Best Peanut Butter Spider Cookies
Even though these Peanut Butter Spider Cookies are super simple, a few little secrets will take them from cute to professional level. I’ve learned these the hard way over the years, usually involving sticky dough or chocolate smeared everywhere! You want the cookie body perfect, and you definitely want those legs to stay put.
Here are my must-follow tips:
- Don’t Skip the Shortening for the Chocolate: When you melt the chocolate for the legs, always add that two tablespoons of shortening. It won’t make the legs taste greasy, I promise! It just lowers the melting temperature and keeps the chocolate fluid for longer. It ensures you have enough time to pipe all eight legs and place the eyes without the chocolate stiffening up halfway through batch number two.
- Chill the Dough If It’s Too Warm: Peanut butter dough can get soft fast, especially if your kitchen runs hot. If you find the dough balls are flattening too much before you can press them with the fork, pop the whole bowl into the fridge for just 15 minutes. This makes rolling them into perfect little spheres so much easier.
- The Cool-Down is Everything: I mentioned this above, but I’m saying it again because it’s my number one rule for decorating! The cookie base absolutely HAS to be room temperature—or even slightly cooled down further—before you touch it with melted chocolate. If the residual heat melts the chocolate slightly, your legs will look fat and messy. Wait until they are totally cool to the touch.
- Use a Toothpick for Fine Details: If you are struggling with your piping bag, don’t try to force it. Grab a clean toothpick! After melting the chocolate and shortening, dip the tip of the toothpick in and draw the legs one by one. It gives you much more control over the delicate lines, just like when I’m working on decorating a tricky cookie cake. The toothpick technique is a lifesaver!
Peanut Butter Spider Cookies: Variations and Substitutions
Now, as amazing as these classic Peanut Butter Spider Cookies are, sometimes you want to jazz things up a little, right? We get bored making the same thing over and over, or maybe you just ran out of something! Don’t panic; this base dough is super flexible. Think of this recipe as your starting canvas for Halloween mischief.
The biggest substitution note is right there in the peanut butter. I already mentioned it, but it bears repeating: creamy works for a smooth spider body, but crunchy adds texture. If you’re out of standard PB, you can sometimes use low-sugar versions, though you might need to add a half teaspoon more sugar because they tend to make the dough a little softer. Definitely check out these Peanut Butter Banana Oat Bars for other ways to use up your jar!
For decoration creativity, you have so many options beyond just semi-sweet chocolate chips for those spindly legs. If you love intense flavor, switch out the semi-sweet for dark chocolate chips—it makes the spider look even creepier peering out from the dark goo! You get a richer, slightly bitter contrast against that sweet cookie base.
Want to add some extra sparkle? Before the legs go on, you can very lightly sprinkle some colorful or black sanding sugar onto the cookie body while the dough is still warm from the oven! That gives the spider a nice glittery glow. If you don’t want to use candy eyes, you can always use a dab of the melted dark chocolate mixed with a touch of powdered sugar mixed with water until it’s super thick, and use a toothpick to paint two tiny dots on instead. It’s a little extra work, but those little details really make your Halloween treats stand out!
Storage and Make-Ahead Tips for Your Peanut Butter Spider Cookies
Since these Peanut Butter Spider Cookies are such a great bake-ahead treat for parties, knowing how to keep them perfect is super important. The good news is that the cookie base itself lasts really well! You can store the plain cookie bodies for up to five days in an airtight container at room temperature. They stay soft and chewy, which is just how we like them. This recipe is great because the sweet cookie holds up well, unlike some fragile shortbreads.
Now, if you decorate them with the chocolate legs and candy eyes first, you need to treat them a bit more gently. Try not to stack them directly on top of each other right away! If you must stack them, put a small piece of wax paper between each layer. This keeps the chocolate legs from smearing onto the cookie above it.
For the freezer? Yes, you absolutely can freeze them! For the best results, freeze the UN-DECORATED cookie bases on a baking sheet until solid, then transfer them to a freezer-safe bag. They last great for about two months. Decorate them right after they thaw!
Serving Suggestions for Peanut Butter Spider Cookies
Once you have these spooky little guys ready, what are you going to serve them with? Peanut butter loves creamy flavors, so skip the super-sweet stuff for the drinks! A big glass of cold milk is always the absolute winner, letting that salty cookie flavor shine through.
For a grown-up treat worthy of All Hallows’ Eve, I love pairing them with something tart to cut through the richness. Try serving them alongside some themed drinks, maybe even check out some fun sour cocktails if you’re hosting a grown-up gathering! Otherwise, a big bowl of popcorn and these Peanut Butter Spider Cookies make the perfect movie night spread.
Frequently Asked Questions About Peanut Butter Spider Cookies
I know you probably have a few last-minute questions floating around before you dive into making these, so let’s tackle the most common things people ask me about their Peanut Butter Spider Cookies! It’s always better to know these little details ahead of time so your baking session is smooth and fun.
Can I make these without the candy eyes? They scare my toddler!
Oh, totally understandable! Not everyone loves the googly effect, and sometimes you just run out of those little things. If you don’t have candy eyes, don’t worry at all. You can use that leftover melted chocolate mixture (or make a fresh, thicker batch) and use a toothpick to paint two simple dots right where the eyes should go. You can even use teeny dots of white frosting if you have some around! They still look adorable, just maybe slightly less startled looking.
How do I prevent the melted chocolate legs from smearing when the cookies touch?
This is my biggest tip for success, honestly! The legs are delicate because the chocolate melts so easily. The key is cooling time. You must let the cookie bases cool completely before piping. Once the legs are piped, you only have two options to set them fast: either put the whole tray into the refrigerator for about 10 minutes, or—if you’re in a hurry—pop them into the freezer for 3 to 5 minutes. Just don’t leave them too long in the freezer, or the cookie itself might get hard.
Do I have to use shortening in the chocolate icing for the legs?
You don’t *have* to, but I really, really suggest it. Shortening is what keeps the melted chocolate runny enough for piping long, thin legs without seizing up immediately. If you skip it, your melted chocolate will start hardening almost as soon as it hits the cool cookie, forcing you to use a lot of pressure or making the legs thick and blobby instead of spindly. If you absolutely can’t use shortening, perhaps try using a drop of a neutral oil like canola oil, but the results won’t be quite as smooth.
Can I substitute the peanut butter with SunButter or almond butter?
Yes, you absolutely can swap the peanut butter out for another nut butter—SunButter (sunflower seed butter) works wonderfully, especially if you have a nut allergy situation going on! Just remember that nut-free or alternative butters often have a higher oil content than standard peanut butter. This means your dough might feel slightly stickier or greasier. If the dough feels too loose to roll when you mix it, just add a tablespoon or two of extra flour until it feels manageable before rolling it into balls.
Estimated Nutritional Information for Peanut Butter Spider Cookies
Okay, so these are definitely a treat, not a health food, but I always like knowing the rough calorie count when I’m trying to plan a party menu! Please remember that because the chocolate changes, and whether you use creamy or crunchy peanut butter, these numbers are just a general guide based on the recipe as written. They’re just estimates, so take them with a grain of salt (and maybe a sprinkle of sugar!).
- Serving Size: 1 cookie
- Calories: About 150
- Total Fat: 9g
- Carbohydrates: 15g
- Protein: 5g
- Sugar Content: Roughly 12g
It’s good to know that even though they are loaded with peanut butter, the protein content is pretty decent for a cookie! Enjoy responsibly!
Estimated Nutritional Information for Peanut Butter Spider Cookies
Okay, so these are definitely a treat, not a health food, but I always like knowing the rough calorie count when I’m trying to plan a party menu! Please remember that because the chocolate changes how much you use, and whether you use creamy or crunchy peanut butter, these numbers are just a general guide based on the recipe as written. They’re just estimates, so take them with a grain of salt (and maybe a sprinkle of sugar!).
- Serving Size: 1 cookie
- Calories: About 150
- Total Fat: 9g (with about 3g being saturated fat)
- Carbohydrates: 15g (Fiber is around 1g)
- Protein: 5g
- Sugar Content: Roughly 12g
- Cholesterol: Around 15mg
It’s good to know that even though they are loaded with peanut butter, the protein content is pretty decent for a cookie! Enjoy responsibly!
Print
Peanut Butter Spider Cookies
- Total Time: 30 min
- Yield: 2 dozen cookies 1x
- Diet: Vegetarian
Description
Simple peanut butter cookies shaped like spiders for a fun Halloween treat.
Ingredients
- 1 cup peanut butter
- 1 cup granulated sugar
- 1 large egg
- 1 teaspoon baking soda
- 1/2 teaspoon salt
- 1/2 cup semi-sweet chocolate chips
- 2 tablespoons shortening
- 12 small candy eyes
Instructions
- Preheat your oven to 350 degrees Fahrenheit. Line baking sheets with parchment paper.
- In a medium bowl, mix peanut butter, sugar, egg, baking soda, and salt until combined.
- Roll dough into small balls, about 1 inch in diameter. Place them on the prepared baking sheets.
- Use a fork to press down on each ball, creating a crisscross pattern typical of peanut butter cookies.
- Bake for 8 to 10 minutes, or until edges are lightly golden. Let cool on the baking sheet for 5 minutes before moving to a wire rack to cool completely.
- Melt the chocolate chips and shortening together in a microwave-safe bowl in 30-second intervals, stirring until smooth.
- Transfer the melted chocolate mixture to a piping bag or a small plastic bag with a corner snipped off.
- Pipe eight thin legs onto each cooled cookie, radiating from the center.
- Before the chocolate sets, press two candy eyes onto the center of the cookie.
- Allow the chocolate to set completely before serving.
Notes
- Use creamy or crunchy peanut butter based on your preference.
- If you do not have a piping bag, use a toothpick to carefully draw the legs with the melted chocolate.
- Prep Time: 20 min
- Cook Time: 10 min
- Category: Dessert
- Method: Baking
- Cuisine: American
Nutrition
- Serving Size: 1 cookie
- Calories: 150
- Sugar: 12
- Sodium: 90
- Fat: 9
- Saturated Fat: 3
- Unsaturated Fat: 6
- Trans Fat: 0
- Carbohydrates: 15
- Fiber: 1
- Protein: 5
- Cholesterol: 15
Keywords: peanut butter cookies, spider cookies, Halloween cookies, chocolate legs, easy cookies