
Okay, look, Halloween is fantastic, but between carving pumpkins and trying to figure out which kid is going as what, who has time for complicated baking? Trust me, that year I tried to make those gourmet ghost cupcakes? Disaster. Total sugar glaze everywhere! That’s why these Halloween Monster Brownies are my absolute go-to now. They come together so fast, mostly thanks to the boxed mix hack, but they look completely terrifyingly delicious. Seriously, my nephew thought I bought these from a bakery last year. They are so easy, fun, and perfectly fudgy—the ideal treat when you need something spooky on the table fast!
Why You Will Love Making These Halloween Monster Brownies
I really think this is going to be your new favorite fall tradition. You just can’t beat a treat that tastes like pure chocolatey happiness but doesn’t take up your entire afternoon. Here are the big reasons why folks always rave about these little guys:
- Super Speeds: Since we’re relying on a great boxed mix—don’t knock it ’til you try it when things get crazy busy!—we cut the prep time down to almost nothing. You’re looking at maybe 15 minutes of actual hands-on time.
- Zero Pressure Decorating: This is the best part! If your decorating skills involve a shaky hand and an expired bag of sprinkles, you’re still going to nail this. Monsters can look messy; that’s part of their charm!
- Kid-Approved Fudge Factor: Even before we slather those green faces on top, the base is rich and fudgy because we sneak in extra chocolate chips. Every square is deeply chocolatey, which is exactly what we want in a great brownie.
- The ‘Wow’ Factor Without the Work: They look complex and spooky enough for any Halloween bash, but really, they are just brownies with candy glued on. People always ask for the recipe, and I just smile and say, “It’s my secret!”
Ingredients Needed for Perfect Halloween Monster Brownies
Okay, grabbing the ingredients list really shows you how simple this is. It’s mostly stuff you probably already have around, plus a quick stop at the candy aisle. When I make these, I always keep the base things separate from the fun stuff we use to make them look like actual monsters. It keeps things organized, and you can’t mess up the flavor base!
For the Brownie Base
We need a fantastic, fudgy base before we can even think about eyeballs. The secret here is really bumping up the chocolate content before it even hits the oven. I love adding that extra cup of chips—it makes them so much richer. If you’re looking for some alternative dark chocolate recipes, check out these Christmas brownies (if you ever have leftovers!), but for now, stick with this classic.
- 1 box (18.3 ounces) of your favorite standard brownie mix. (Ghirardelli works beautifully here, if you want a splurge!)
- The components the mix requires—usually eggs, oil, and water. Just follow the box!
- 1 cup of semi-sweet chocolate chips. Don’t skip these! Stir them in right at the end of the batter mixing.
For the Monster Decorations
This is where the magic—and the chaos—happens! You need color, eyes, and maybe a few pointy bits for horns or teeth poking out. The vanilla frosting is the perfect blank green canvas for our little creatures.
- 1 tub (16 ounces) of vanilla frosting.
- Green food coloring. You’ll need a good amount to get that classic monster slime color, so don’t be shy with the drops!
- Assorted candy eyes. Get a few different sizes; variety makes them look more monstrous!
- Assorted small candies. I usually grab M&Ms for weird, bumpy skin spots, mini Reese’s Pieces for ears, or even some broken pretzel sticks if I want horns sticking out of the top.
Step-by-Step Instructions for Halloween Monster Brownies
We’re going to tackle this in two major phases: the baking part, which is super hands-off, and the decoration part, which is pure creative joy. Keep in mind, the total active time here is only about 15 minutes, and the baking takes roughly 30 minutes. Those times let you focus on costume details or handing out candy early!
Baking the Brownie Base
First things first, we need a solid chocolate foundation. Preheat your oven exactly as the box tells you to—don’t guess here! Mix up your batter following the package directions for a 9×13 inch pan. This is crucial for the right thickness, which helps them stand up to all that frosting later on.
Now for my favorite little addition: once the batter is just combined (don’t overmix, or they’ll get tough!), gently fold in that full cup of chocolate chips. You want to see streaks of the chips throughout. Pour the whole lovely, thick batter into your greased 9×13 pan.
Bake it according to the box for that size pan. When you test them—usually with a toothpick—you want moist crumbs clinging to it, not wet batter. If you’re into making things even easier later, check out these tips for using mix hacks, like in my cake mix cookies!
The most important part of this step? You must let them cool completely. I mean it! If you try to frost warm brownies, that pretty green frosting just turns into a soupy green mess, and your monsters will melt right off.
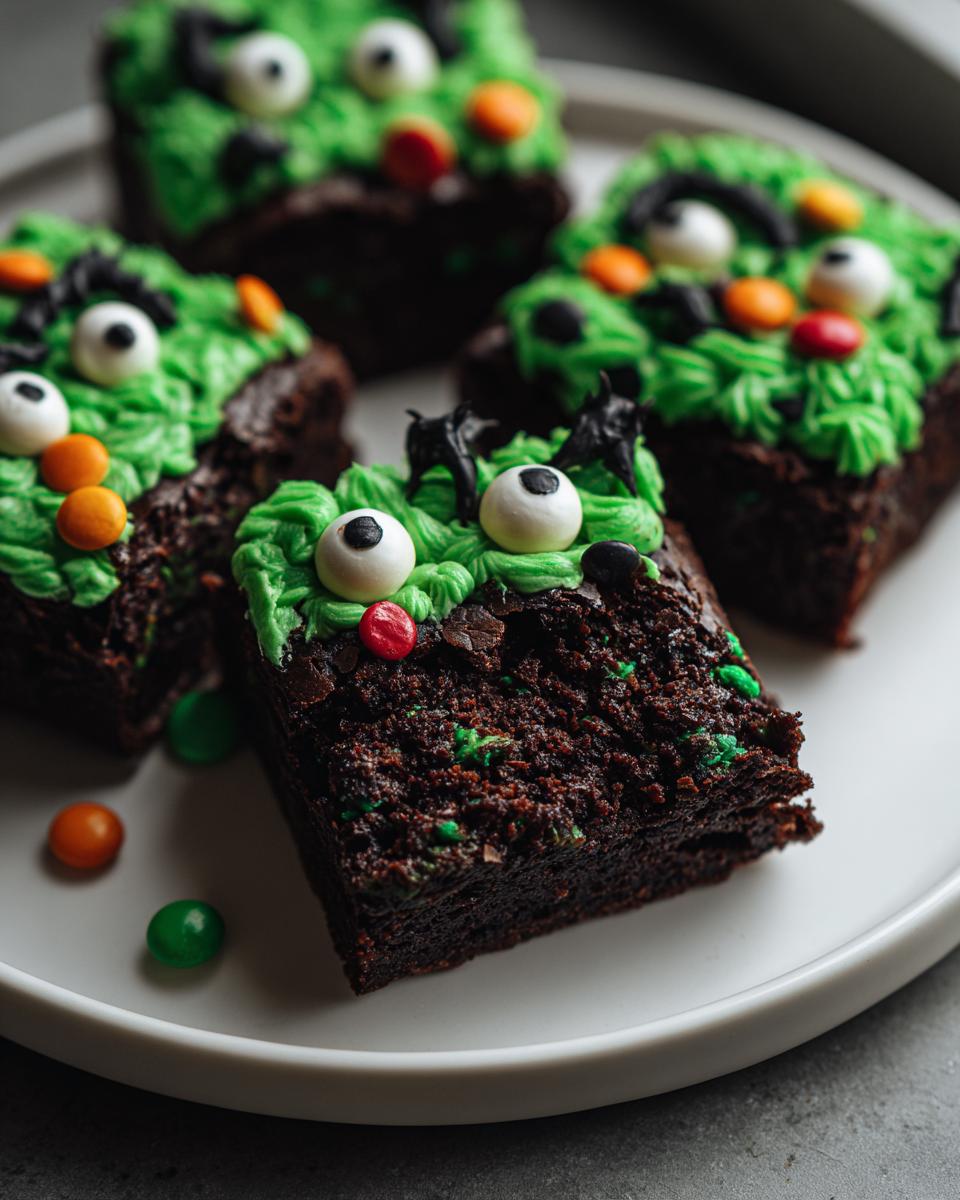
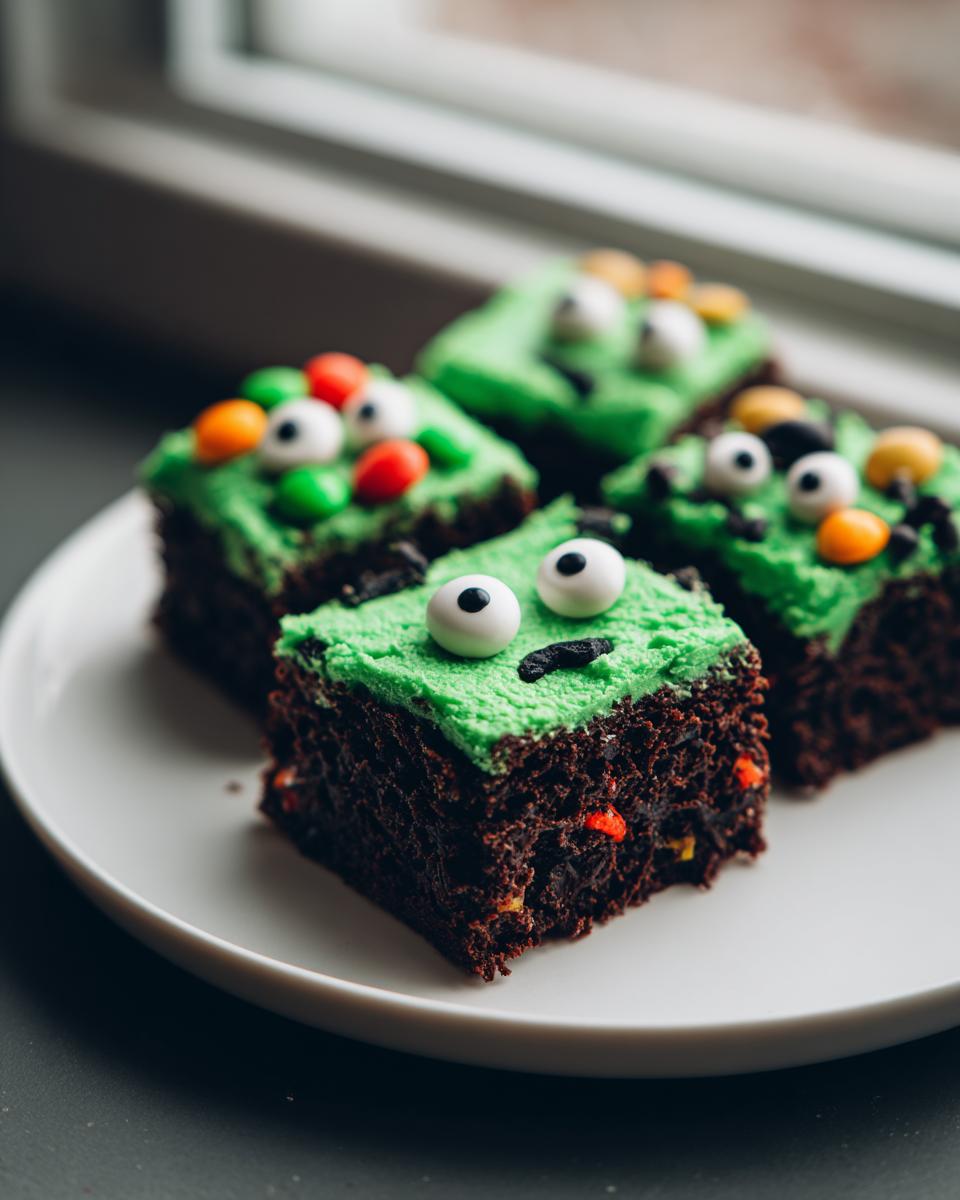
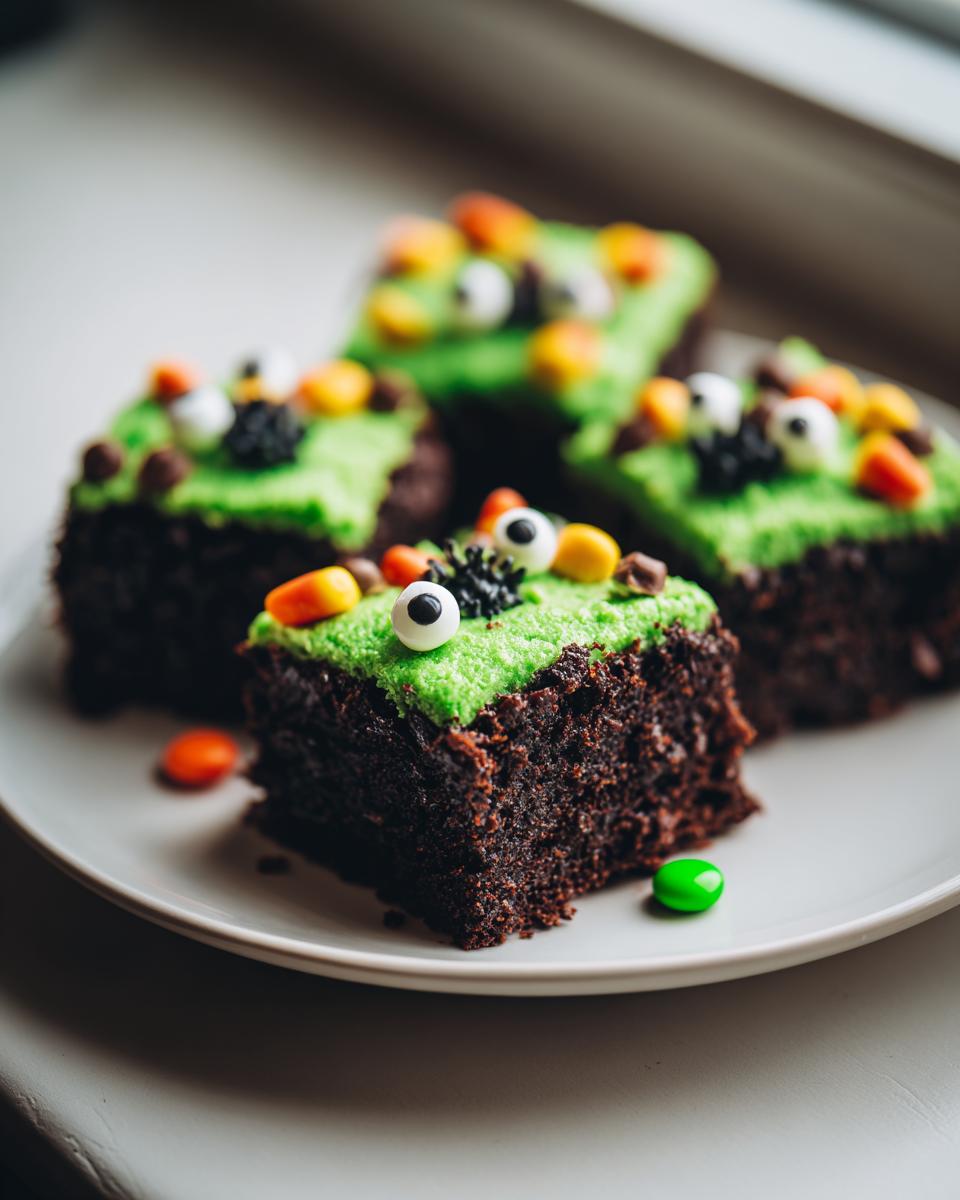
Creating the Monster Look on Your Halloween Monster Brownies
Once those brownies are totally cool—I usually let mine sit for an hour on the rack—we bring out the color wheel! Put that tub of vanilla frosting into a bowl, and slowly start adding your green food coloring. Mix it well until you get a vibrant or swampy green shade you like. Not just pale mint, we want true monster green!
Use an offset spatula or even the back of a spoon to spread that green frosting evenly across the entire surface of the brownies. Don’t worry about making it perfectly smooth; weird lumps and swirls look more authentic for a monster! Now, dive into the candy stash.
Place two candy eyes slightly tilted or far apart on each brownie square—this instantly gives them personality. Then, use your smaller candies for mouths or teeth. If you have those tiny candy corn pieces, stick one point up out of the top edge for a little horn. If you run out of horns, take a small knife, scoop a tiny bit of the green frosting onto the blade, and gently pull it upwards to make two small peaks that dry stiff. Instant monster features!

Tips for Success Making Halloween Monster Brownies
Even though these are simple, you still want them to look amazing when you serve them, right? I’ve definitely learned a few tricks over the years to move these from “nice chocolate treat” to “spooky centerpiece.” They are so easy, but these little details make the real difference, especially when you are using store-bought frosting!
First off, let’s talk about serving. If you try to cut these right after frosting them, everything smears, and you end up with brownie dust instead of clean squares. For cleaner cuts, chill the frosted brownies for about 15 minutes before slicing. Seriously, trust me on this! The frosting firms up just enough so your knife glides right through the brownie layer without dragging all the green goo. It keeps those candy eyes sitting perfectly on their little green beds.
My next big tip is about the frosting consistency. If your green frosting from the tub seems a little too stiff to spread nicely—which happens, especially if your kitchen is cold—don’t just add more coloring! Add a teaspoon of regular milk at a time until it’s smooth enough to float the candy eyeballs right on top. If you use too much milk, it’ll slide right off the brownie later. You want it spreadable, not runny!
Finally, when placing your decorations, work fast! I usually set out all my candies first, like setting a table. Frosting a whole 9×13 pan is big, and if you spend too long placing the first few eyes, the frosting underneath dries a bit, and the candy won’t stick well. Have your whole monster “face map” planned out before you even touch the spatula to the pan. It makes the whole decorating session fly by. If you want to see how I manage toppings in a different context, take a peek at how I handle chocolate chips in my chocolate chip tahini cookies—speed and placement matter there too!
Ingredient Notes and Substitutions for Halloween Monster Brownies
I know not everyone has every single supply on hand, especially when you’re trying to whip up something last minute for a spooky school event. The beauty of these Halloween Monster Brownies is their total flexibility! You don’t have to stick to green, and you certainly don’t have to feel guilty about using that trusty box mix—it’s the fastest path to fudgy perfection.
If you want to elevate this hack, you absolutely can use homemade brownies instead of the mix. Just use your favorite scratch recipe that yields well for a 9×13 pan. But honestly, once you cover it in green slime frosting, nobody can tell the difference between a box and scratch batch anyway! If you’re curious about other ways to trick out boxed mixes, I have a whole section on boxed mix hacks that might give you some other fun ideas.
Let’s talk about color. Are you out of green food coloring? No problem! These monsters aren’t restricted to one hue. Want spooky orange monsters instead? Grab some orange coloring! Or maybe you want a purple blob monster? Go wild! The color just gives a visual cue that it’s Halloween; the amazing chocolate flavor base is what matters most.
And those candies? Don’t feel locked into my suggestions of M&Ms or pretzel sticks. Use whatever small, hard candies you have left over from other holidays! Little dots of frosting can look like polka dots, or even crushed-up peanut butter cups can look like scary textured skin. It’s all about improvisation. The only thing I would caution against swapping is the vanilla frosting base for anything too tangy, like lemon or strawberry, because that bright fruit flavor clashes a bit with the rich chocolate underneath.
Storage and Reheating Instructions for Your Halloween Monster Brownies
These Halloween Monster Brownies are designed to be made ahead, which is honestly my favorite kind of party food! Because they are already quite rich and dense from the extra chocolate chips, they keep really well. But we have to be careful with those adorable candy faces we glued on top!
I always recommend keeping these on the counter at room temperature, not in the fridge. Putting them in the cold makes the brownie base go hard fast, and nobody wants a rock-solid monster brownie, right? Plus, putting them in the fridge can sometimes make the frosting sweat a bit when you bring it back out.
The best way to store them is in a single layer in an airtight container. If you absolutely have to stack them because your counter space is tight, take a piece of wax paper or parchment paper—that thin stuff works wonders—and place it gently between the layers. This stops the green frosting from sticking to the candy eyes of the layer above it. If you store them properly like this, they are totally good for at least three, maybe even four, days sitting right on your kitchen counter. They seem to taste even better the next day anyway!
And just to be clear, we absolutely do not reheat these fudgy friends. They are meant to be served at room temperature! Heating them up will melt all that hard work you put into the candy decorations, and you’ll end up with a sad, runny green puddle. Just let them sit out for about 20 minutes before a party if they’ve been sitting in a cooler spot, and they’ll be perfect!
Serving Suggestions for Halloween Monster Brownies
Once you have these spooky squares cooling and ready for their candy makeover, the next fun step is figuring out how to present them! These Halloween Monster Brownies are definitely the star of the dessert table, but everything looks better with a little themed context. I always think presentation makes even the easiest treats feel special.
First off, when you slice them, try to make the edges look a little jagged, like they were ripped apart by a small, hungry monster—that adds to the fun! Instead of just piling them on a plain white platter, line your serving tray with black parchment paper or even some bright orange paper napkins underneath. It makes that bright green frosting really pop!
For drinks, you absolutely need something festive to wash down all that chocolate. Since these brownies offer a deep, rich flavor, you want a drink that cuts through the sweetness a bit. I always pair mine with a big, bubbly punch. If you need a crowd-pleasing, non-alcoholic spooky drink, you really should check out my recipe for Hocus Pocus Halloween Punch—it’s bright, bubbly, and looks amazing next to green brownies.
If you want to surround them with other simple treats to round out the dessert bar, keep the theme spooky but easy. Think about serving them next to white powdered donuts dusted with cocoa powder to look like little ghosts, or maybe some pretzel rods dipped halfway in white chocolate and made to look like mummy fingers. The key is contrast: keep the other items simple so all that monster face detail on the brownies really grabs attention. Anything overly complicated will just get lost next to these amazing, easy-to-make chocolate creatures!
Frequently Asked Questions About Halloween Monster Brownies
I know you might still have a few little worries running through your head—maybe about crumb texture or if the candy will stay put. That’s totally fair! When you’re trying an easy recipe that looks this fun, you want to make sure it comes out right the first time. Here are the things I get asked most often about these fantastic monster treats.
Can I use homemade brownies instead of a box mix for these?
Oh yes, absolutely! While the box mix is the ultimate shortcut for when time is tight, you can certainly use your absolute favorite scratch brownie recipe. Just make sure whatever recipe you use yields about the right amount for a standard 9×13 pan. The main goal is getting that fudgy center that holds up to the frosting. If you’re looking for some other fun holiday baking ideas that might involve scratch recipes, have you seen my Halloween cookies recipe? That might give you some fun dough ideas!
How long do the candy decorations last on these Halloween Monster Brownies?
This is great news for party planners! Since we use shelf-stable vanilla frosting and hard candies, the decorations are surprisingly resilient. If you store them correctly—remember that single layer in an airtight container on the counter—the candy eyes and teeth should stay looking perfect for the full three or four days the brownies last. The only thing that might soften a tiny bit is if you used something gooey like soft caramel, but with hard candies, you’re golden!
Do these Halloween Monster Brownies need to be refrigerated?
Nope! And I really suggest you don’t refrigerate them. Brownies get dense and dry when they are cold, and the frosting will get a weird, tough skin on it. Since we’re using a standard box mix and shelf-stable frosting, they are happiest sitting right on the counter in a covered container. They stay perfectly fudgy at room temperature, making them super ready to grab for any sudden fright or sweet tooth!
What if the green frosting starts looking a little runny while I’m decorating?
I mentioned this in the tips, but it bears repeating because it happens all the time! Room temperature frosting can get too soft, especially if your hands are warm from mixing. If you notice the frosting just isn’t grabbing the candy eyes, stop what you’re doing and pop the whole frosted (but not decorated yet!) pan back into the fridge for about 10 minutes. That brief chill firms it up just enough so you can place the eyes firmly before they start to slide. It’s a lifesaver when you’re piping things or trying to make those little horn peaks!
Estimated Nutritional Details for Halloween Monster Brownies
Now, let’s talk numbers, even though I focus way more on the fun than the figures when it comes to my monster baking! Since these Halloween Monster Brownies are made using a standard box mix combined with extra chocolate chips and sweet frosting, the nutrition information is going to vary quite a bit depending on the brand of mix you grab and how many candies you decide to load onto each square. I always say, if you can’t look at the nutrition label on the box mix, you can’t accurately calculate this, but I wanted to give you a general idea.
Based on using a standard mix, adding the chips, and covering it with a reasonable amount of green frosting and a few small candy eyes, here is what the estimated breakdown looks like per brownie serving. But please take this with a huge grain of salt—candy is unpredictable!
- Serving Size: 1 brownie
- Calories: 250
- Sugar: 30g
- Sodium: 150mg
- Fat: 13g
- Saturated Fat: 5g
- Carbohydrates: 33g
- Protein: 3g
A strong word of caution here: This information is just an estimate based on averaged components. The actual nutritional content of your boxed mix, the type of oil you use, and especially the sugar load from those cute candy eyes will change these values rapidly. If you’re tracking things super closely for a big group, you’d need to calculate based on the exact products you use. For me? I just know they are delicious, chocolate-heavy, and perfect for a spooky sugar rush!
Print
Halloween Monster Brownies
- Total Time: 45 min
- Yield: 24 brownies 1x
- Diet: Vegetarian
Description
Simple brownies decorated to look like spooky monsters for Halloween.
Ingredients
- 1 box (18.3 ounces) brownie mix
- Ingredients listed on brownie mix box (usually eggs, oil, water)
- 1 cup semi-sweet chocolate chips
- 1 tub (16 ounces) vanilla frosting
- Green food coloring
- Assorted candy eyes
- Assorted small candies for teeth and horns (e.g., M&Ms, sprinkles)
Instructions
- Prepare the brownie batter according to the package directions.
- Stir in the chocolate chips into the batter.
- Pour the batter into a greased 9×13 inch baking pan.
- Bake the brownies according to the package directions for a 9×13 pan.
- Let the brownies cool completely on a wire rack.
- Tint the vanilla frosting green using food coloring.
- Spread the green frosting evenly over the cooled brownies.
- Decorate each brownie square to look like a monster face using candy eyes and small candies for features.
- Cut the brownies into squares.
Notes
- You can use any color frosting you prefer for a different monster look.
- Make sure the brownies are fully cooled before frosting them.
- Prep Time: 15 min
- Cook Time: 30 min
- Category: Dessert
- Method: Baking
- Cuisine: American
Nutrition
- Serving Size: 1 brownie
- Calories: 250
- Sugar: 30
- Sodium: 150
- Fat: 13
- Saturated Fat: 5
- Unsaturated Fat: 8
- Trans Fat: 0
- Carbohydrates: 33
- Fiber: 1
- Protein: 3
- Cholesterol: 25
Keywords: Halloween, brownies, monster, chocolate, dessert, party treat