
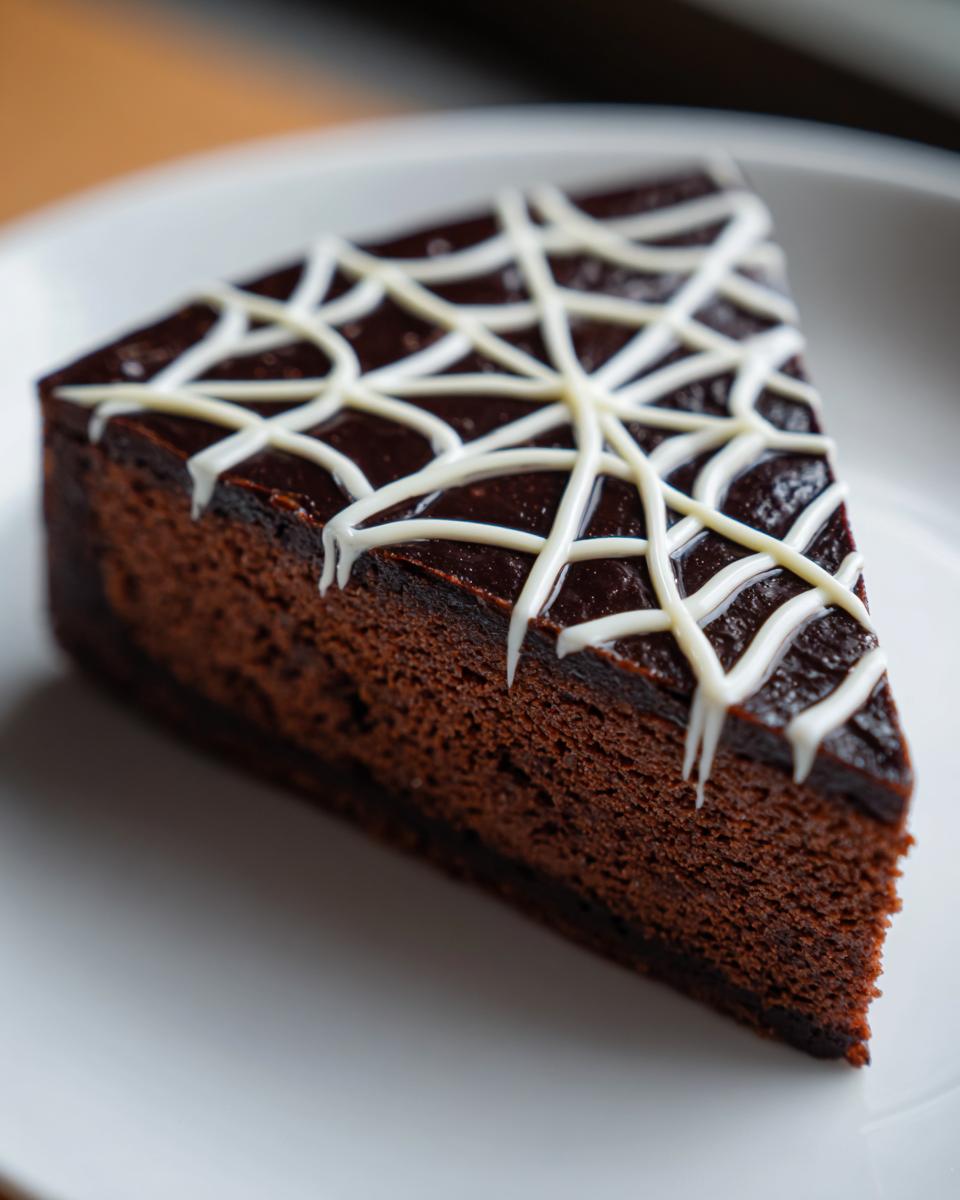
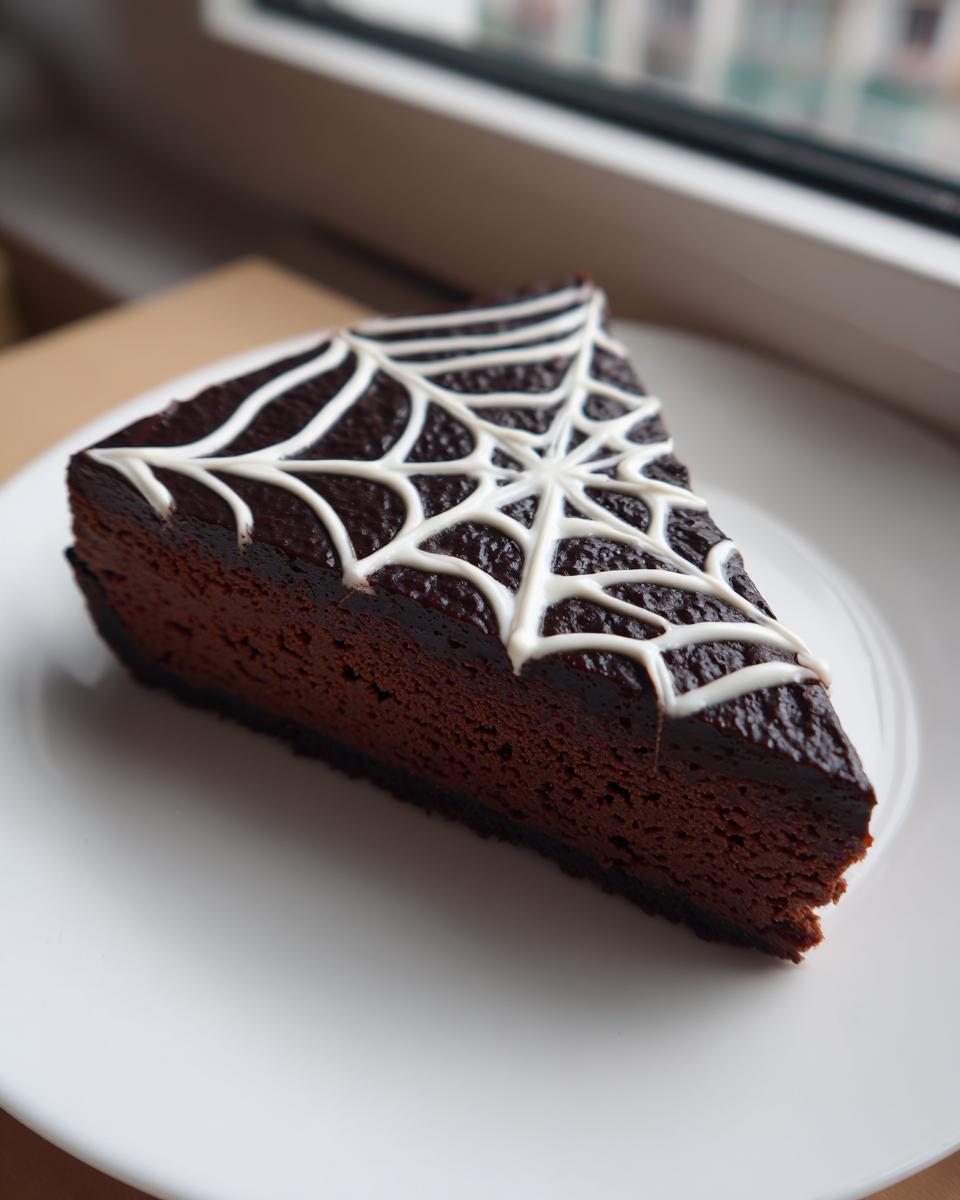
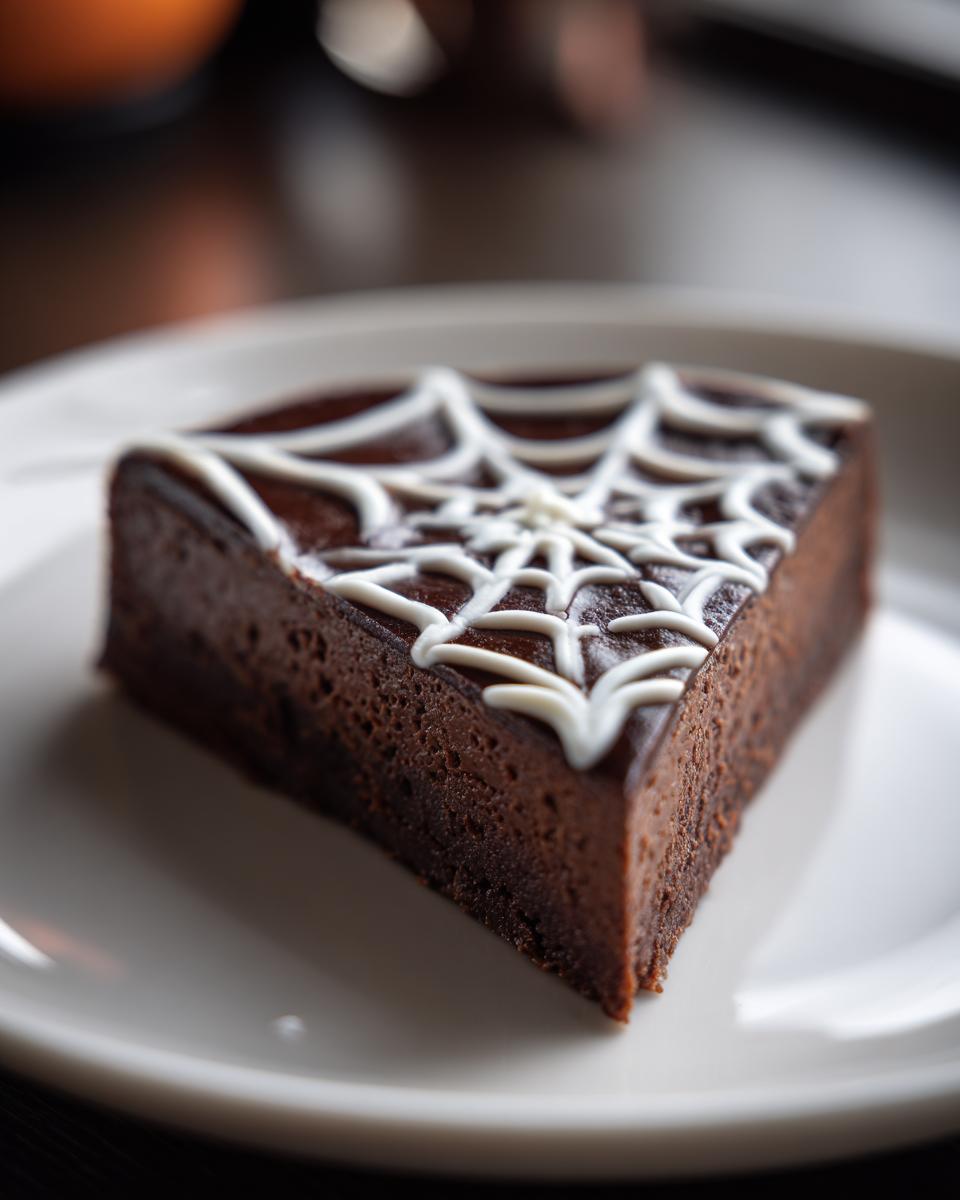
When the holidays roll around, or really, any time you need to absolutely wow a crowd, you need a centerpiece dessert that says, “Yes, I know what I’m doing in the kitchen!” Forget those fussy layer cakes for a minute; I want to talk about the showstopper that always brings gasps: the Chocolate Spiderweb Cheesecake. This isn’t just chocolate cake; it’s rich, it’s velvety, and that simple white chocolate web on top makes everyone think you spent three days perfecting it.
I used to be terrified of making cheesecake. Seriously. They cracked, they sunk, they tasted eggy—it was a disaster! But after years of tinkering with water baths and ingredient temperatures, I’ve finally cracked the code on this deeply flavored **Chocolate Spiderweb Cheesecake**. Trust me, nailing that creamy texture is way easier than you think once you know the secrets. Just follow my steps, and you’ll have a flawless, dramatic dessert ready to impress!
Why This Chocolate Spiderweb Cheesecake Recipe Works So Well
This **Chocolate Spiderweb Cheesecake** really shines because we take a few simple steps that make a huge difference in the final product. Don’t let the deep chocolate color fool you; this recipe is intentionally uncomplicated!
We nail that utterly smooth, creamy texture every single time because we respect the process. That means using ingredients that are perfectly softened and, most importantly, utilizing that water bath technique. The visual payoff with that stark white web on top is just the cherry on top!
Key Benefits of Our Chocolate Spiderweb Cheesecake
- Incredibly rich, dark chocolate flavor throughout the batter.
- The texture is unbelievably smooth and decadent, never grainy or cracked.
- The white chocolate spiderweb design is simple to execute but looks totally professional!
- We bake it low and slow in a water bath, which is the real secret to preventing any cracks on your beautiful surface.
Gathering Ingredients for Your Chocolate Spiderweb Cheesecake
Okay, ingredient prep is where we get serious! For this **Chocolate Spiderweb Cheesecake**, you can’t just rush this part. You need to make sure your cream cheese hits room temperature—like, truly soft, not just slightly warm—and the eggs need to be out warming up too. That’s the difference between a creamy dream and a lumpy mess, trust me.
We have three main groups here: the base, the dark, rich filling, and the decorative drizzle. Get everything measured out before you even think about turning on the oven!
Crust Components
- 1 1/2 cups graham cracker crumbs
- 1/4 cup granulated sugar
- 6 tablespoons unsalted butter, melted
Cheesecake Batter Ingredients
- 24 ounces cream cheese, softened
- 1 cup granulated sugar
- 1/2 cup unsweetened cocoa powder
- 1 teaspoon vanilla extract
- 4 large eggs
For the Spiderweb Decoration
This is simple but crucial for that dramatic look. You just need perfect white chocolate.
- 4 ounces white chocolate, melted
Step-by-Step Instructions for Perfect Chocolate Spiderweb Cheesecake
Alright, this is the part where the magic really happens! Don’t feel rushed; cheesecake is a marathon, not a sprint. We need patience here, especially when we get to the cooling part. But I promise, sticking to these steps will give you that restaurant-quality result we’re aiming for, which is way better than trying to rush it and ending up with a cracked disaster!
Preparing the Crust and Pre-Baking
First things first, crank that oven up to 350°F (175°C). Grab your 9-inch springform pan—this is super important—and wrap the outside bottom super tightly with heavy-duty foil. We need to keep that bath water out! Mix your graham cracker crumbs, the 1/4 cup of sugar, and those 6 tablespoons of melted butter right in a bowl. Press that mixture down firmly into the bottom of the prepared pan. You want a good, solid base! Then, pop it in the oven for just 10 minutes to set up. Once it’s done, pull it out and let it chill a little bit while you make the filling.
Mixing the Rich Chocolate Cheesecake Batter
Time for the creamy chocolate heaven! Get your softened cream cheese beating until it looks completely smooth—no lumps allowed! Then, slowly beat in your 1 cup of sugar and the cocoa powder until everything is just combined. Now, the eggs: add them one at a time. I mean it, one! Mix just until the yolk disappears before adding the next one. If you overmix this part, you’ll whip in too much air, and that’s how you get cracking later. Keep it smooth, keep it slow!
Baking the Chocolate Spiderweb Cheesecake with a Water Bath
This water bath is how we keep things beautiful! Pour your rich batter right over that cooled crust. Now, set your foil-wrapped springform pan inside a larger roasting pan. Carefully pour hot water into the *outer* roasting pan until the water comes about halfway up the sides of your cheesecake pan. Slide that whole setup into the oven. Bake it for about 50 to 60 minutes. You’re looking for the edges to be set firm, but the center should still have a tiny bit of wobble, like Jell-O.
When it looks good, turn the oven off completely. Do not touch it! Crack the oven door open just a bit—prop it with a wooden spoon if you have to—and let that cheesecake cool down slowly inside for a full hour. This gentle transition stops it from shrinking too fast.

Chilling and Creating the Spiderweb Design
Once it’s cooled to room temperature outside the oven, you need patience again! Remove the foil and get it into the fridge for at least 4 hours, but honestly, overnight is my favorite choice. Why? Because the cheesecake needs to be ice cold for the decoration.
When you’re ready to decorate, melt that white chocolate. Drizzle it quickly over that cold cheesecake surface in several even, concentric circles. Before the chocolate sets up, grab a toothpick and gently drag it from the very center straight out to the edge. Wipe the toothpick clean and repeat in a few different directions to make those beautiful web spokes. Pop it back in the fridge one last time to set that white chocolate before you slice into your masterpiece. You can see how amazing this technique is when you look at other baked desserts like chocolate caramel toffee cake!
Tips for Success with Your Chocolate Spiderweb Cheesecake
Look, I’m not going to lie; cheesecake can be temperamental. It’s like dealing with a very fancy houseguest—you have to treat it right, or it gets moody! But if you follow these two golden rules, you’ll never have a cracked, sad-looking chocolate cheesecake again. These are the things I learned the hard way so you don’t have to!
Getting the temperature right and using that water bath are non-negotiable for that perfect, silky texture we want in this **Chocolate Spiderweb Cheesecake**. When you get this right, the cleanup is almost as satisfying as the first bite, even more so than when I make my vanilla bean brown butter cheesecake!
Ingredient Temperature Matters for Smooth Chocolate Spiderweb Cheesecake
I know you want to just toss everything in the bowl at once, but please, fight that urge! If your cream cheese is cold, you are going to end up with little lumps of white cheese floating around in your beautiful chocolate batter. It’s awful! Your 24 ounces of cream cheese needs to be fully softened—you should be able to press your finger into it easily without much resistance.
The eggs are just as important. Cold eggs hitting room-temperature batter cause the mixture to seize up slightly, which can lead to tearing and texture issues when baking. Leave those four eggs out on the counter for at least an hour before you plan to start mixing. Happy warm ingredients mean a perfectly smooth, homogenous batter!
Mastering the Water Bath Technique for Chocolate Spiderweb Cheesecake
If you take only one thing away from this whole recipe, let it be this: always use a water bath! People skip it because they think it’s too much hassle, but it’s not a joke; it’s the secret sauce for a flawless top on your **Chocolate Spiderweb Cheesecake**.
What the water bath does is create this beautifully moist, steamy environment in your oven. Cheesecake is mostly egg and fat, and it bakes beautifully with gentle, even heat. Without the bath, the dry heat of the oven rushes to cook the edges first, which causes them to dry out and pull away from the center—hello, giant crack! The hot water acts like a temperature regulator, keeping everything cooking evenly and ensuring that the top stays beautiful and flat, ready for those stunning white chocolate webs.
Storage and Reheating for Your Chocolate Spiderweb Cheesecake
Now that you’ve made the most gorgeous **Chocolate Spiderweb Cheesecake** ever, you have to put it away properly so it stays perfect. Cheesecake is a cold dessert, pure and simple, and trying to reheat it is just asking for trouble! You’ll melt that stunning white chocolate pattern right off, and the texture will get all mushy and gross. Don’t do it to yourself!
The best way to store this beauty is exactly how we chilled it for setting: fully covered in the refrigerator. Keep it cool, and it lasts for days. Honestly, it tastes even deeper and richer on day two, which is why I always hope we have leftovers!
Here’s my routine for keeping those gorgeous webs intact and the chocolate flavor rich:
- Cover It Up: Once you’ve finished the final chill and the spiderweb design is set, gently cover the top of the springform pan with plastic wrap. Make sure the wrap doesn’t touch the white chocolate topping. If you’re worried about the plastic touching, tent it loosely over the top.
- Fridge Time: Keep it in the coldest part of your refrigerator. Remember, cheesecake is dairy-heavy, so keeping it well-chilled is essential for food safety and texture stability.
- How Long It Lasts: In the fridge, tightly covered, this **Chocolate Spiderweb Cheesecake** is wonderfully fresh for about five to seven days. The graham cracker crust might soften up slightly as time goes on, but the flavor stays fantastic.
Seriously, skip the oven once it’s done! If you find your slice is perhaps a little too cold straight out of the fridge for your liking—maybe you want the chocolate flavor of the batter to really pop—just pull the slice out onto your plate about 20 minutes before you plan to eat it. That little bit of time at room temperature brings the fat and chocolate molecules back to life without compromising the structure of the baked cheesecake.
Variations on the Classic Chocolate Spiderweb Cheesecake
Even though I think my version of the **Chocolate Spiderweb Cheesecake** is just about perfect for a special occasion, I get it—sometimes a cook needs to mix things up! Maybe you’ve made it three times now, or maybe you just don’t have graham crackers on hand. That’s fine! The structure of this recipe is totally forgiving, which is another reason I love it so much, despite being a baked cheesecake.
These little tweaks let you personalize the flavor profile without messing up that gorgeous, taut surface we worked so hard to achieve. Think of them as easy upgrades for your next try!
Crust Swaps for Chocolate Spiderweb Cheesecake
The crust is the easiest place to start swapping things out. If you want a darker, richer base that complements that deep chocolate filling, ditch the graham crackers! Seriously, try crushing up chocolate wafer cookies or even Oreos—just pull out the filling first! You just need about 1 1/2 cups of crumbs total, and you still use the same amount of sugar and melted butter.
It gives the bottom layer a fantastic texture boost! And hey, if you love Oreos as much as I love these chocolate chip tahini cookies, you just found your new favorite crust modification!
Adding Flavor to the Chocolate Spiderweb Cheesecake Batter
The baked cheesecake batter itself is wonderfully chocolatey, but if you want to lean into that deeper flavor profile, especially if you are serving this around Halloween where things can get a little moody, I have two favorite additions. Both work beautifully with cocoa powder and won’t interfere with the white chocolate web whatsoever.
First, try adding about a quarter cup of very strongly brewed, chilled coffee. Coffee deepens chocolate flavor—it doesn’t make it taste like coffee, promise! Second, I sometimes grab the dark rum extract and add just a teaspoon to the batter along with the vanilla. Those subtle molasses notes really match the richness of the cocoa. Remember, keep your additions small; we don’t want to change the wet-to-dry ratio too much just before baking!
Serving Suggestions for Chocolate Spiderweb Cheesecake
Once you’ve perfected that flawless, jiggly center and drizzled your dramatic white chocolate design, the last thrilling step is figuring out what gorgeous thing to set beside it when it hits the table. Since this **Chocolate Spiderweb Cheesecake** is already so rich and decadent on its own—it doesn’t really need much help!—we want accompaniments that enhance the chocolate without fighting that beautiful web pattern.
I always try to keep the sides simple. We spent all that time making the cheesecake look perfect, so we don’t want a pile of whipped cream hiding the best part! Think texture and a little bit of brightness to cut through the richness.
Here are a couple of my favorite ways to present this dessert. You might notice that these pairings work well for other deep chocolate desserts, too—it’s the same principle I use when deciding how to serve French silk chocolate pie!
- Simple Raspberry Coulis: A thin drizzle of tart raspberry sauce is magic against dark chocolate. It looks lovely just smeared artistically on the plate edge; it doesn’t need to touch the cake itself. The tanginess is the perfect counterpoint to the sweet cream cheese and cocoa.
- A Light Dusting of Cocoa: If you didn’t manage to chill your slice perfectly and the spiderweb got a little soft, don’t panic! Just dust the entire slice lightly with high-quality unsweetened cocoa powder. It adds another layer of chocolate flavor and hides any little imperfections.
- Fresh Berries: Grab some perfect, dark raspberries or even a few slices of ripe strawberry. Stick them right next to the slice on the plate. They add a beautiful, jewel-toned color contrast to the dark brown and white. Don’t pile them on top, though—let that web shine!
Honestly, though? If you’ve done everything right and the cheesecake is perfectly chilled, a thin slice on a plain white plate is often the most elegant presentation. Let the **Chocolate Spiderweb Cheesecake** do all the talking!
Frequently Asked Questions About Chocolate Spiderweb Cheesecake
It’s totally normal to have questions when tackling a showstopper like this **Chocolate Spiderweb Cheesecake**! Cheesecake baking has a couple of non-negotiables, and I want to make sure you feel confident tackling this famous spiderweb design come baking day. Knowing these little details is what separates a good cake from a spectacular one!
If you’re wondering about other chocolate bakes after this, check out my tips for chocolate chip tahini cookies—they’re nearly as addictive!
Can I skip the water bath when making this chocolate cheesecake?
Oh, sweetie, please don’t! I really advise against it for this **baked cheesecake**. The water bath feels like an extra chore, I know, but it’s the single most important thing you can do to guarantee a smooth top. Without that moist, steamy oven environment, the edges cook way too fast, and you’re just asking for a big crack right down the middle of your beautiful dark chocolate surface.
We wrap that pan tight for a reason! It keeps the heat gentle and even, ensuring the batter sets up without drying out or shrinking unevenly. A crack ruins the look, and nobody wants to try to cover up a huge fissure with more white chocolate drizzle!
How do I get the white chocolate spiderweb design perfectly sharp?
This is all about temperature contrast! When I say the cheesecake needs to be chilled, I mean *cold*. It needs to be totally firm, preferably overnight. If the cheesecake is even a little warm or soft when you pour that melted white chocolate on top, the heat difference will cause the white chocolate to melt right into the dark surface, turning your beautiful, defined web into a murky gray smudge.
So, chill, chill, chill! Once the circles are down, work quickly but carefully with your toothpick, dragging it through the circles just once or twice for each spoke before wiping it clean and moving to the next line. Sharp, clean edges happen when the base is rock solid!
Can I use milk chocolate instead of white chocolate for the spiderweb on the Chocolate Spiderweb Cheesecake?
You absolutely *could* use milk chocolate, but I wouldn’t recommend it if your goal is that classic, spooky spiderweb look! The secret to making that design pop is contrast. You have a very dark, rich chocolate surface, and the stark, bright white of the **white chocolate** stands out dramatically against it.
Milk chocolate would blend in too much, making the web look faint, kind of dull, and muddy. If you wanted a variation, you could try drizzling a dark chocolate ganache for a subtle, tone-on-tone effect, but for the classic spooky look, the white chocolate is truly the best choice for visibility!
Estimated Nutritional Profile for Chocolate Spiderweb Cheesecake
Now, I know many of us are trying to keep track of what we’re eating, even when we’re diving into rich desserts like this **Chocolate Spiderweb Cheesecake**. It’s important to remember that this is a decadent treat, and cheesecake always has a bit of richness packed in there!
These numbers are just estimates based on the ingredients listed and assume you get 12 perfect slices from the whole thing. Please don’t take this as medical advice or a strict diet plan, because honestly, when you’re eating something this delicious, calories kind of melt away, right?
Here’s a quick look at what you can expect in one generous slice. It’s a fairly high-sugar profile, which is typical for a creamy, **baked cheesecake** topped with chocolate!
- Serving Size: 1 slice
- Calories: 450
- Sugar: 35g
- Sodium: 250mg
- Fat: 30g
- Saturated Fat: 18g
- Unsaturated Fat: 12g
- Trans Fat: 0g
- Carbohydrates: 40g
- Fiber: 2g
- Protein: 8g
- Cholesterol: 90mg
See? All that creamy goodness comes with a bit of a price tag nutritionally! But that’s why we make this **Chocolate Spiderweb Cheesecake** only for special occasions. It is meant to be savored. If you’re whipping up a batch, try to get those slices as even as possible so everyone gets a fair share of rich chocolate and that beautiful spiderweb work!
Share Your Chocolate Spiderweb Cheesecake Creations
Okay, my friends, the moment of truth! You’ve navigated the water bath, you’ve chilled it properly, and you’ve created that stunning, gothic allure with the white chocolate spiderweb design. Now I need to see what you’ve done! Sharing amazing homemade desserts just makes them taste better, doesn’t it?
I absolutely live for hearing how recipes turned out for you all. Did the spiderweb look spooky enough for your Halloween party? Did your family gasp when you brought this **Chocolate Spiderweb Cheesecake** to the table? Don’t be shy!
Please, please, please give this recipe a rating down below. Five stars if you’re feeling inspired by that smooth chocolate texture! And if you managed to snap a picture of your finished masterpiece—especially if you tried one of the crust variations we talked about—tag me on social media! I love seeing your creations pop up on my feed. Seeing your success makes putting all these detailed notes together worth every minute.
- Leave a Comment: Tell me what you thought! Was the chilling time enough? Did you use the Oreo crust swap? I read every single comment.
- Rate the Recipe: If this smooth, dramatically decorated cheesecake made your gathering special, give it a star rating so others know it’s reliable!
- Share Your Photos: Tag me with your best shot of that **Chocolate Spiderweb Cheesecake**—let’s celebrate your baking skills!
Happy baking, and I can’t wait to see all those beautiful, perfectly set chocolate cheesecakes!
Print
Chocolate Spiderweb Cheesecake
- Total Time: 105 min
- Yield: 12 servings 1x
- Diet: Vegetarian
Description
A rich chocolate cheesecake decorated with a simple white chocolate spiderweb pattern.
Ingredients
- 1 1/2 cups graham cracker crumbs
- 1/4 cup granulated sugar
- 6 tablespoons unsalted butter, melted
- 24 ounces cream cheese, softened
- 1 cup granulated sugar
- 1/2 cup unsweetened cocoa powder
- 1 teaspoon vanilla extract
- 4 large eggs
- 4 ounces white chocolate, melted
Instructions
- Preheat your oven to 350°F (175°C). Wrap the bottom of a 9-inch springform pan in heavy-duty foil.
- Combine graham cracker crumbs, 1/4 cup sugar, and melted butter. Press the mixture firmly into the bottom of the prepared pan.
- Bake the crust for 10 minutes. Remove from the oven and let it cool slightly.
- In a large bowl, beat the cream cheese until smooth. Gradually beat in 1 cup sugar and cocoa powder until combined. Mix in the vanilla extract.
- Beat in the eggs one at a time, mixing just until incorporated after each addition. Do not overmix.
- Pour the batter over the cooled crust.
- Place the springform pan in a larger roasting pan. Carefully pour hot water into the roasting pan until it reaches halfway up the sides of the springform pan.
- Bake for 50 to 60 minutes, or until the edges are set but the center still jiggles slightly.
- Turn off the oven, crack the door open, and let the cheesecake cool in the oven for 1 hour.
- Remove the cheesecake from the water bath and cool completely on a wire rack. Refrigerate for at least 4 hours, or preferably overnight.
- To make the web, drizzle the melted white chocolate over the chilled cheesecake in concentric circles.
- Drag a toothpick from the center to the edge in several places to create the spiderweb design.
- Chill again before serving.
Notes
- Use room temperature ingredients for the cheesecake batter for a smoother texture.
- The water bath helps prevent cracking.
- Chill the cheesecake completely before attempting the spiderweb design.
- Prep Time: 25 min
- Cook Time: 60 min
- Category: Dessert
- Method: Baking
- Cuisine: American
Nutrition
- Serving Size: 1 slice
- Calories: 450
- Sugar: 35g
- Sodium: 250mg
- Fat: 30g
- Saturated Fat: 18g
- Unsaturated Fat: 12g
- Trans Fat: 0g
- Carbohydrates: 40g
- Fiber: 2g
- Protein: 8g
- Cholesterol: 90mg
Keywords: chocolate cheesecake, spiderweb, dessert, baked cheesecake, graham cracker crust