
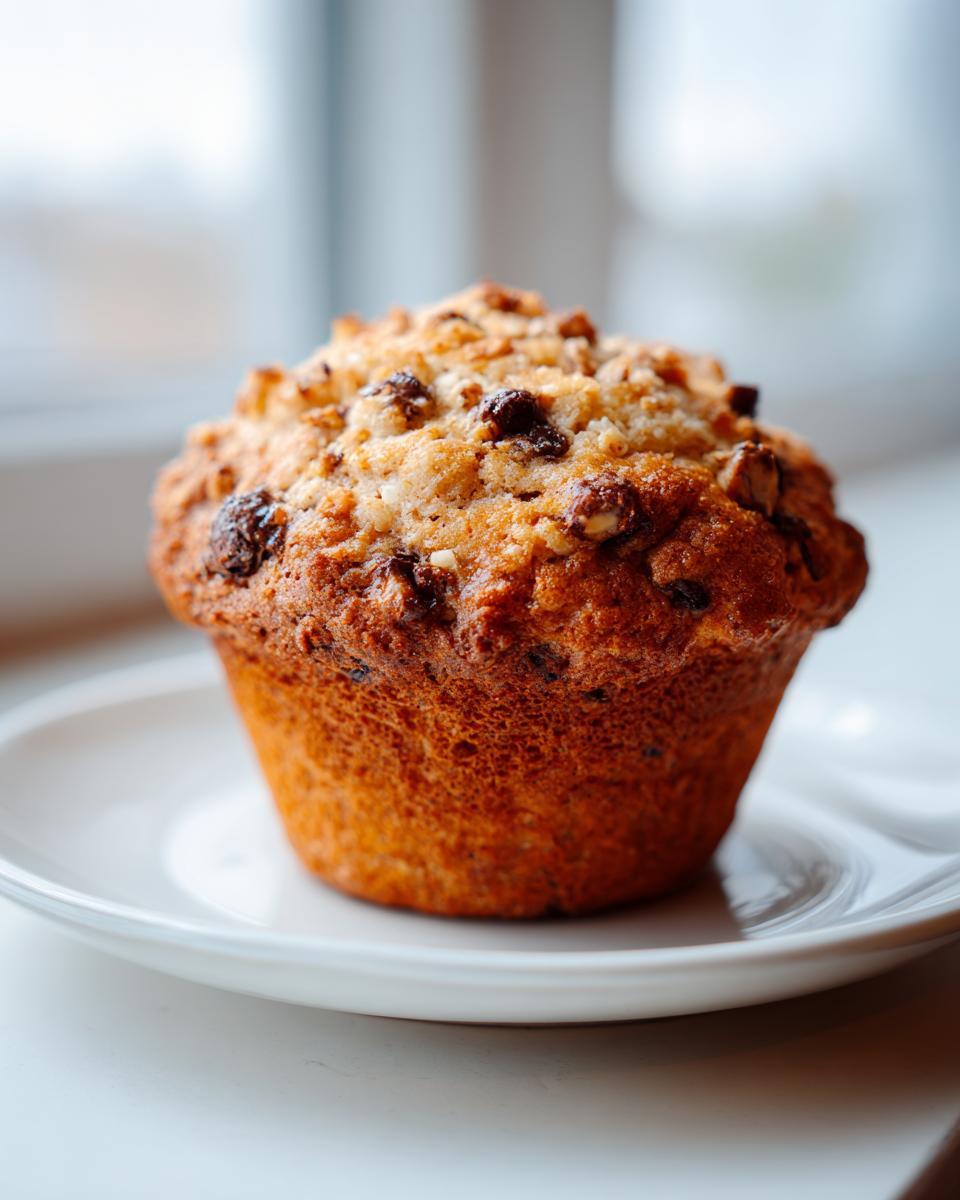
Are you tired of those tiny little muffins that disappear in two bites? Me too! When I bake, especially on a hectic Saturday morning, I want something substantial, something that actually feels like a meal. That’s why I perfected this recipe for what I affectionately call Monster Muffins. They are huge, hearty, and packed with whatever delicious things you happen to have grabbing your attention in the pantry.
I first came up with this recipe because my teenage son could eat an entire bakery box of regular muffins before I’d even finished my coffee. Seriously, those kids needed fuel! After years of tweaking ratios—I’ve been baking seriously for over a decade now—I locked down the perfect blend of wet and dry ingredients that ensure these monsters bake up high, golden, and wonderfully tender without drying out.
Trust me, once you try these giants, you won’t go back to standard size. They deliver maximum satisfaction!

Why You Will Make These Monster Muffins Again and Again
I know you’ve got countless muffin recipes floating around, but these Monster Muffins rise above the rest—literally! I keep coming back to this formula because it’s reliable, fast, and never disappoints when I need serious breakfast power. Here’s why I think you’re going to fall in love, too:
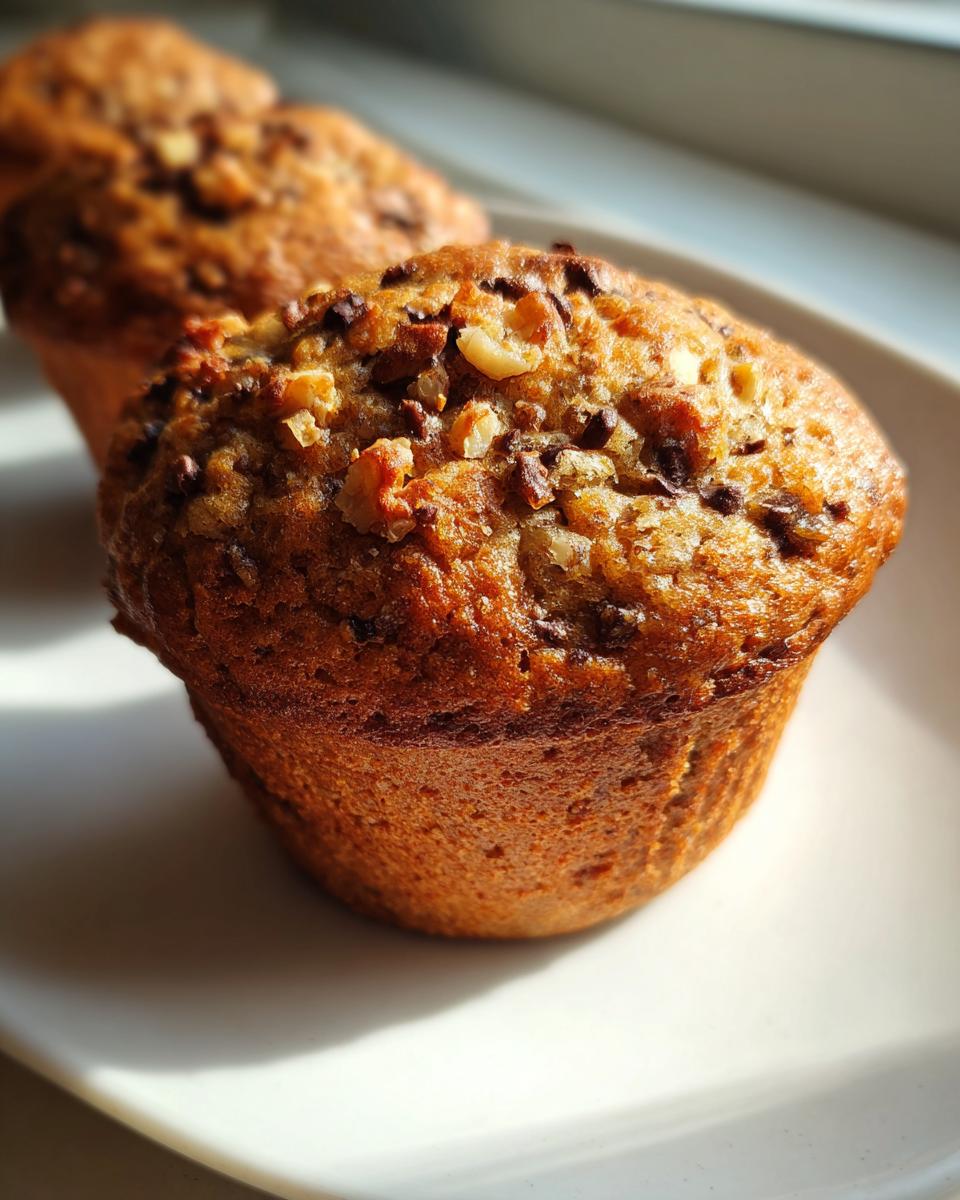
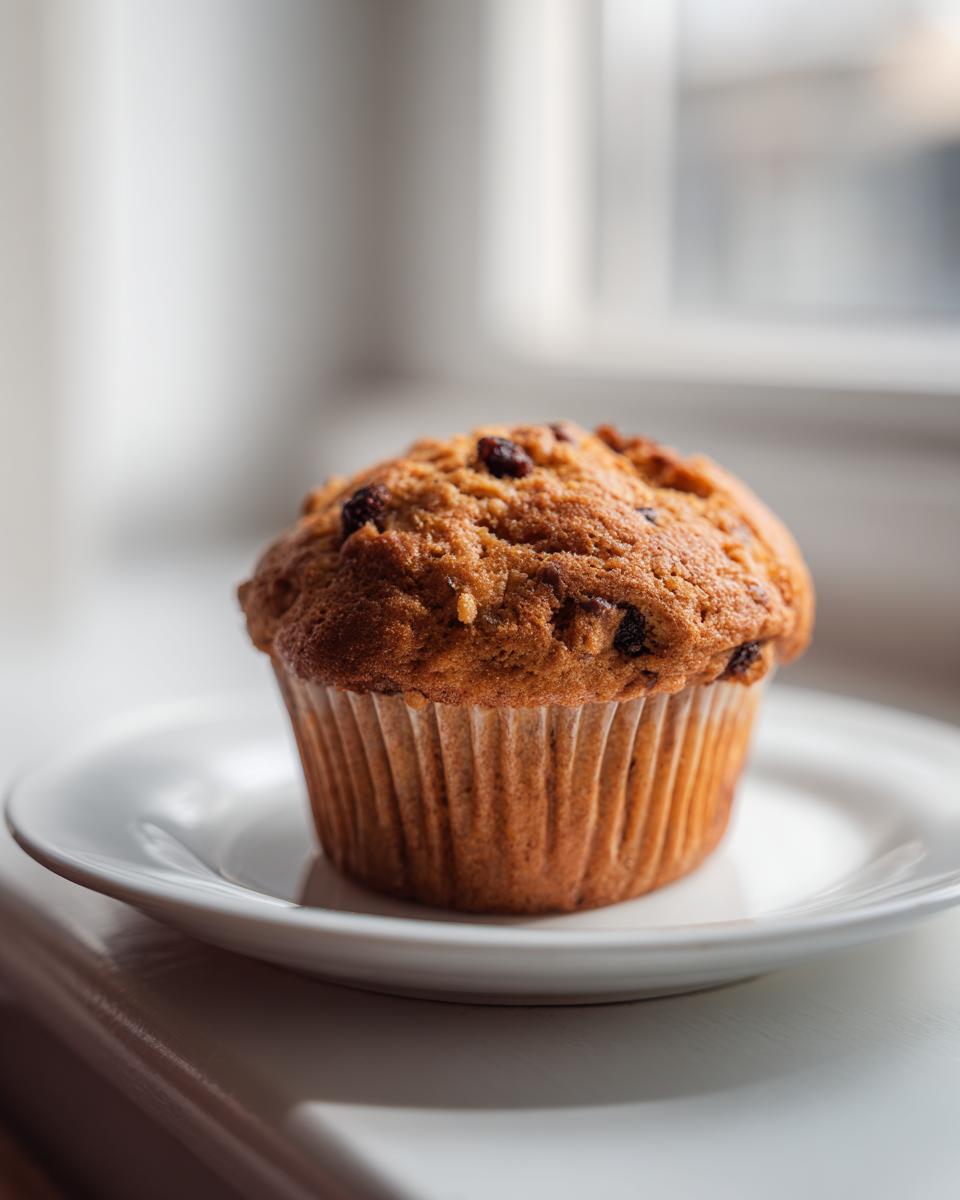
- They are Truly Monster Sized: We’re talking bakery-style height here. These muffins can stand in as a breakfast or a substantial snack. No more eating four tiny muffins to feel satisfied!
- Speedy Prep Time: Seriously, you mix the wet and dry stuff separately and dump them together. If you’re efficient, you can have the batter ready for the oven in maybe 15 minutes flat. Perfect for those rushed weekday mornings.
- Total Customization: This recipe is basically a fantastic, sturdy base ready for your favorite additions. Want chocolate? Throw in chips. Need texture? Add pecans. It’s your kitchen, make these muffins your own!
- The Texture is Unbeatable: Because we are careful not to overmix, these come out tender and moist inside, with that slightly crisp, sugary crown on top that feels so satisfying to bite into.
- Freezes Like a Dream: I always bake a double batch just so I can stock the freezer. Pull one out the night before, and you have a guaranteed perfect breakfast waiting for you.
Essential Ingredients for Perfect Monster Muffins
When you’re aiming for big results, you have to start with the right building blocks! These aren’t fussy muffins, but the quality and measurement of these few simple things make all the difference between a flat disappointment and a true *Monster* muffin. Don’t skimp on the leavening agent, that’s what gives them the lift they need to reach skyscraper status!
I broke down exactly what you need below. If you want even moister results, remember that little note I gave you about buttermilk? Look into that, because it really boosts the texture. For now, this is the rock-solid foundation:
- 2 cups all-purpose flour: This is your structure. Scooping and leveling is the way to go here, don’t pack it in!
- 1 cup granulated sugar: For sweetness and that lovely crispy edge on top. This amount is what keeps them tender despite their size.
- 1 tablespoon baking powder: This is crucial for the lift! Don’t worry, it won’t taste metallic; it just makes sure these babies grow tall.
- 1/2 teaspoon salt: Always necessary to balance out the sugar, trust me on this one.
- 1 cup milk: If you happen to have buttermilk on hand, definitely swap it for the regular milk—it adds amazing tang and moisture. If you’re curious about other creamy additions, take a look at how others manage moisture in recipes like healthy Greek yogurt blueberry muffins if you want to experiment later!
- 1/2 cup vegetable oil: Oil keeps things moist better than butter does in a quick bread like this, which is perfect for keeping these giants fresh for days.
- 2 large eggs: Just lightly whisk them before adding them to the wet ingredients. They provide richness and binding power.
- 1 teaspoon vanilla extract: The little flavor boost that makes everything taste like it came from a great bakery.
- 1 cup mix-ins: This is where the magic happens! Chocolate chips, chopped walnuts, raisins, or dried cranberries—whatever you choose, just make sure they are roughly chopped if necessary so they don’t weigh the batter down too much.
Equipment Needed to Bake Your Monster Muffins
Before you get that oven preheating, let’s make sure your kitchen is properly outfitted. Since we are making *Monster* Muffins, you need the right gear to support their growing ambition! Don’t worry, you probably have all of this stuff already. No need to run out and buy fancy specialist gadgets for this one.
The most important piece of equipment is your pan. Because these are big boys, they need plenty of room to rise up and get that bakery look. Here is what I always pull out:
- A Standard Muffin Tin: You need a regular 12-cup tin. These muffins are large, so filling them higher than usual will give you that dramatic dome shape we’re looking for.
- Paper Liners: I always use liners for easy cleanup, especially with sticky batters like this. If you don’t use liners, make sure you grease and flour your tin really well!
- Two Good Sized Mixing Bowls: You’ll need one big bowl for your dry ingredients—flour, sugar, everything that isn’t liquid—and one medium bowl for your wet ingredients. Keep them separate until the very last moment!
- A Whisk: You’ll whisk up the dry ingredients quickly to make sure the baking powder is evenly distributed. Then you’ll use it again for the wet ingredients. I like a balloon whisk because it incorporates air nicely when mixing the eggs and oil.
- A Rubber Spatula: This is your best friend for the final step! Once you add the wet to the dry, you need to use a spatula to gently fold everything together. That’s how you avoid overmixing and keep the texture perfect.
- A Toothpick or Skewer: You absolutely need this for testing doneness. Since these are so large, the center needs a thorough check before they come out of the oven!
That’s it! Get those things ready, and you’re halfway to delicious satisfaction!
Step-by-Step Instructions for Amazing Monster Muffins
Okay, now for the fun part! Getting these huge, beautiful Monster Muffins into the oven is surprisingly fast, maybe 15 minutes tops once you get organized. The biggest secret here, and I mean *the biggest*, is treating the batter gently once everything comes together. Overmixing is the enemy of a light, fluffy muffin, especially these big ones that need all the lift they can get!
First things first: Get your oven cranked up to 400 degrees Fahrenheit (that’s 200 Celsius). Make sure your 12-cup muffin tin is lined with those pretty paper cups—or if you skip the liners, give those cavities a good grease and flour treatment. You want these giants to be able to slide right out when they’re done!
- In your biggest bowl, grab your whisk and combine all the dry stuff: the flour, the sugar, the baking powder, and that tiny bit of salt. Give it a quick, energetic whisk just to distribute everything evenly.
- In your second, smaller bowl, mix up the wet ingredients. Whisk the milk, oil, vanilla extract, and those two lightly beaten eggs until they look fully incorporated.
- Here’s the moment of truth! Pour the entire wet mixture right into the bowl with the dry stuff. Now, slow down! Take your rubber spatula and mix everything until you just barely see streaks of dry flour remaining. I’m talking gentle folding, not aggressive churning. If you see anyone suggesting you mix until smooth, ignore them! We want it *just* combined.
- Gently—and I mean *gently*—fold in your chosen mix-ins. If fighting over the last bit of batter gives you any indication of how close it is to being done, that’s when you stop mixing. Seriously, a few lumps are totally fine.
- Spoon that glorious batter into your prepared cups. Fill each liner about two-thirds high; this encourages them to burst up and get that signature tall dome.
- Bake them for about 18 to 20 minutes. If you’re making standard-sized muffins (which I don’t recommend for this recipe, but hey, you do you!), they’ll be done faster. Keep an eye on them. When a toothpick inserted right into the center of the tallest part comes out clean, they are ready! You can check out tips on achieving bakery-style tops, which goes really well with the technique needed for bakery-style pumpkin muffins, if you’re curious about visual presentation for large bakes like this.
- Let them cool in that hot pan for just 5 minutes—this helps them settle so they don’t collapse when you move them. Then transfer them gently to a wire rack to cool down completely. Enjoy the smell!
Expert Tips for Next-Level Monster Muffins
So, you’ve got the basic technique down, but if you want to move these Monster Muffins from ‘really good’ to ‘the best muffin I’ve ever had,’ I have a few little secrets I’ve picked up over the years. It’s all about those tiny adjustments that make experts look like wizards. Never be afraid to experiment, but always start with the fundamentals!
Achieving the Perfect Dome Shape
Everyone wants that gorgeous, bakery-style muffin top that spills lovingly over the edge of the liner, right? It’s not just about filling the cup high, although that helps a ton. The key to getting a serious dome is the oven temperature at the start! You absolutely must preheat your oven to 400°F (200°C) as directed.
Why that high heat? It shocks the batter! The initial blast of heat causes the outer edges and the top surface to set up very quickly while the inside is still loose and rising rapidly. This traps the steam and forces the center mass up and out, creating that glorious eruption we call a dome. Don’t worry, we bring the temperature down later if necessary, but that hot start is non-negotiable for giants like these.
The Buttermilk Swap for Supreme Moisture
While the recipe calls for regular milk, I’m telling you—if you want to experience what peak muffin moisture feels like, you have to try buttermilk, even if it’s just once. Buttermilk is acidic, which reacts beautifully with the baking powder, giving you extra lift, yes, but more importantly, it tenderizes the gluten in the flour.
When you use buttermilk instead of regular milk (use a 1:1 ratio), the result transforms into a muffin that stays incredibly soft for days. If you loved the idea of maximizing moisture, you might want to compare notes with how folks keep things moist in recipes like chocolate zucchini muffins; they often deal with similar moisture challenges!
The Freezer Strategy: Better Than You Think
I mentioned these freeze well, but let me give you the exact game plan. Once the muffins are completely cooled—and I mean stone cold, otherwise they get soggy in storage—wrap each individual muffin tightly in plastic wrap. Then, pop them all into a large freezer bag. This prevents freezer burn.
When you want to eat one, don’t microwave it! Pop it straight from the freezer into a 350°F oven for about 8 to 10 minutes. This reheats them perfectly, crisps up the edges slightly, and makes them taste almost freshly baked. It beats a soggy microwave muffin any day of the week!
Don’t Fear the Mix-In Weight
Since these muffins are so large, they can support heavy mix-ins better than tiny ones. If you are adding things like nuts or dried fruit, make sure they are evenly distributed throughout the batter during that final fold. If you just dump them all in one scoop, you risk having one giant clump of chocolate chips at the bottom of a beautifully domed muffin. Mix them lightly until they look scattered—that’s what you want!
Customizing Your Monster Muffins: Mix-In Ideas
This is honestly my favorite part of the whole process! With a base so solid and delicious, you could eat these Monster Muffins plain, sprinkled with just a little turbinado sugar on top. But why would you, when you have the freedom to stuff nearly anything edible into them?
Because these muffins are big and sturdy—thanks to that oil and the perfect flour ratio—they can handle some serious weight. They won’t collapse into a sad, dense puddle when you toss in heavy chocolate or lots of nuts. It’s like having a giant, sweet canvas ready for your afternoon snack masterpiece. Think of this recipe like a great cookie base that’s waiting for some fun additions. If you’re looking for more ideas on how to mix in goodies, sometimes looking at how folks structure batter for things like cake mix cookies can give you inspiration for wild combinations, just remember to keep the wet/dry balance right!
Sweet & Salty Crunch Combinations
If you like that little kick of saltiness against all that sweet muffin batter, you have to try pairing up textures. These combinations stay fresh and crunchy even after a few days in the cupboard.
- The Pretzel Bomb: Use half mini chocolate chips and half crushed pretzels. The pretzels don’t absorb too much moisture, giving you a great salty snap with every bite of chocolate.
- Peanut Butter Power: Fold in peanut butter chips along with some roughly chopped peanuts. This tastes almost like a candy bar buried in a soft cake!
Fruity and Earthy Options
I love using dried fruit because it adds little pockets of intense sweetness that burst when you bite into them. Just make sure anything you use is relatively dry or quick-soaked so it doesn’t bleed too much color or moisture into the surrounding batter.
- White Chocolate Cranberry: A classic for a reason! Use dried cranberries for tartness and white chocolate chunks for creamy sweetness. It’s sophisticated but still totally fun.
- Tropical Sunshine: Try using dried pineapple chunks and shredded coconut. It gives the muffin a wonderfully chewy texture and a nice, bright flavor.
Double Chocolate Overload
If you *really* want to make them monstrous, you lean hard into the chocolate factor. This satisfies any serious chocolate craving, guaranteed.
- Mix in standard semi-sweet chocolate chips with a handful of small, dark chocolate shavings or chopped-up chocolate chunks from a good bar.
- For an extra depth of flavor, toss in half a cup of mini chocolate chips and half a cup of cocoa nibs. The nibs add a lovely, slightly bitter crunch that keeps the whole bite from being too sweet.
Honestly, you cannot go wrong. Whatever you choose, fold it in gently at the very last second, and enjoy the customization!
Storage and Reheating Instructions for Monster Muffins
These Monster Muffins are so amazing that you’ll want to make sure they stay delicious for days, or even weeks if you’re smart enough to double the batch! Because they are so rich with oil, they actually keep better than a standard muffin, but they still need a little attention to hold onto that fresh-baked tenderness.
Keeping Them Fresh at Room Temperature
If you plan on eating these giants within two or three days—which, let’s be honest, is optimistic—keep them on the counter. I never put them in the fridge because cold air dries out baked goods faster, even if they are sealed. Just place them in a large airtight container or a zip-top bag.
Make sure they are completely cool before you seal them up. If there is any residual heat trapped inside, it creates steam, and steam equals soggy tops! If you’ve ever struggled keeping a moist loaf like easy banana bread loaf from getting gummy in the airtight container, you know exactly what I mean. A paper towel placed underneath them in the container can sometimes wick away minor condensation.
The Freezing Game Plan for Long-Term Freshness
This is my personal favorite method because it means I always have a Monster Muffin ready when a craving hits! The trick here is preparation. You absolutely must let them cool down 100% on a wire rack first. If they are even slightly warm, they will frost over inside the plastic.
Once they are stone cold, wrap each muffin individually and tightly in plastic wrap. Then, put all those wrapped beauties into a heavy-duty freezer bag, press out as much air as you can, and slide them into the freezer. They hold up perfectly for up to three months this way! Sometimes I even label the bag with the flavor mix-in so I remember what I’ve got tucked away in there.
Reheating for That Fresh-From-the-Oven Experience
If you have a frozen muffin, do not—I repeat, DO NOT—go straight for the microwave first. The microwave is fast, yes, but it turns them spongy and weirdly chewy. If you are in a major rush, you can zap it for about 15 seconds just to take the chill off, but for the best experience, use dry heat!
For the ultimate revival, pop that frozen, plastic-wrapped muffin directly into a preheated 350°F oven. Let it bake/thaw for about 8 to 10 minutes. This warms the interior gently while crisping up that glorious, sugary crust you worked so hard to achieve. It comes out tasting like it just came out of the oven this morning!
Frequently Asked Questions About Monster Muffins
What if I don’t have vegetable oil? Can I substitute Greek yogurt in these Monster Muffins?
That’s a great question about substitutions! You absolutely can use Greek yogurt instead of oil, I often recommend it for a slightly tangier flavor and a boost of protein. Since the recipe calls for 1/2 cup of oil, you can substitute about 1/2 cup of plain Greek yogurt.
Just a heads up: Yogurt is thicker than oil, so the texture might lean slightly more toward a dense cake than a super-moist muffin. It won’t rise quite as dramatically as it does with oil, but it will still be delicious and tender, especially because we are using buttermilk sometimes to help things along. If you are interested in other dairy swaps for moisture, you might want to look into how people adapt recipes like homemade peach cobbler muffins where yogurt is already a key player!
I don’t want Monster Muffins! How do I make them in standard size?
That’s easy enough, but remember, the baking time will drop significantly! If you want to convert these into standard 12-cup, smaller muffins, you should get about 18 to 20 of them instead of 12. Fill the standard liners about 3/4 full.
Since the heat hits the smaller centers much faster, you’ll need to drop your baking time down considerably. Instead of the 18–20 minutes for the monsters, check them around the 14-minute mark. Use that toothpick test early, as they go from perfect to overdone surprisingly quickly when they are smaller!
What happens if I use cake flour instead of all-purpose flour?
Cake flour is fun because it’s much softer than regular AP flour, and it has a lower protein content, which results in a finer, more delicate crumb. If you use cake flour for these Monster Muffins, you definitely risk losing some of that structure we need to support all those heavy mix-ins!
Since these are quick breads that need structure and height, I honestly advise sticking to the all-purpose flour. If you really wanted to use cake flour, you would need to increase the eggs slightly or add more baking powder to compensate for the loss of structure, and at that point, you’re basically rewriting my recipe! Stick to the AP flour for the best results on these big bakes.
Can I skip the vanilla extract? It’s all out!
You *can* skip it, but I wouldn’t recommend it if you can help it! Vanilla extract doesn’t just add a vanilla flavor; it actually enhances all the other flavors in the batter—the sugar, the milk, the goodness of whatever nuts or chips you added in. It really rounds everything out so it doesn’t taste flat.
If you are totally out, you can substitute a tiny splash of almond extract if you have it, but use about half the amount since almond is much stronger. Sometimes a little bit of citrus zest, like orange or lemon, can also brighten the flavor profile in a pleasant way if you’re missing that depth!
Nutritional Estimates for Monster Muffins
Listen, baking with joy and flavor is my main goal here, not winning any health awards! These are Monster Muffins, after all—they are supposed to be satisfying and rich. Since we are loading them up with oil and whatever wonderful mix-ins you chose, the numbers can swing a little based on whether you used walnuts or just plain chocolate chips.
What I have listed below is a ballpark estimate based on a standard batch using simple semi-sweet chocolate chips as the mix-in. Please take these figures as a rough guide only! If you use buttermilk or add a ton of nuts, these values will definitely change. Bake happy, and don’t stress the details too much!
Here are the approximate nutritional breakdowns per single, giant muffin:
- Serving Size: 1 muffin
- Calories: 300
- Sugar: 18 grams
- Sodium: 250 milligrams
- Fat: 15 grams
- Saturated Fat: 3 grams
- Unsaturated Fat: 12 grams
- Trans Fat: 0 grams
- Carbohydrates: 38 grams
- Fiber: 1 gram
- Protein: 5 grams
- Cholesterol: 45 milligrams
See? Totally worth it for that amazing, towering bake! Enjoy every single bite; you earned it!
Print
Monster Muffins
- Total Time: 35 min
- Yield: 12 large muffins 1x
- Diet: Vegetarian
Description
A recipe for large, hearty muffins with mixed-in ingredients.
Ingredients
- 2 cups all-purpose flour
- 1 cup granulated sugar
- 1 tablespoon baking powder
- 1/2 teaspoon salt
- 1 cup milk
- 1/2 cup vegetable oil
- 2 large eggs
- 1 teaspoon vanilla extract
- 1 cup mix-ins (e.g., chocolate chips, nuts, dried fruit)
Instructions
- Preheat your oven to 400 degrees Fahrenheit (200 degrees Celsius). Line a large muffin tin with paper liners or grease well.
- In a large bowl, whisk together the flour, sugar, baking powder, and salt.
- In a separate medium bowl, whisk together the milk, oil, eggs, and vanilla extract.
- Pour the wet ingredients into the dry ingredients. Mix until just combined. Do not overmix.
- Gently fold in your chosen mix-ins.
- Divide the batter evenly among the muffin cups, filling each about two-thirds full.
- Bake for 18 to 20 minutes, or until a toothpick inserted into the center comes out clean.
- Let the muffins cool in the pan for a few minutes before transferring them to a wire rack to cool completely.
Notes
- You can use any combination of mix-ins you prefer.
- For moister muffins, substitute buttermilk for regular milk.
- These muffins freeze well for later consumption.
- Prep Time: 15 min
- Cook Time: 20 min
- Category: Breakfast
- Method: Baking
- Cuisine: American
Nutrition
- Serving Size: 1 muffin
- Calories: 300
- Sugar: 18
- Sodium: 250
- Fat: 15
- Saturated Fat: 3
- Unsaturated Fat: 12
- Trans Fat: 0
- Carbohydrates: 38
- Fiber: 1
- Protein: 5
- Cholesterol: 45
Keywords: muffins, breakfast, baked goods, large muffins, monster muffins