
You absolutely HAVE to make mornings special, especially when holidays are around! For me, Halloween isn’t just about the candy haul later; it’s about kicking the day off with something totally ridiculous and fun. I’ve made every goofy breakfast imaginable over the years, but nothing gets the kids this pumped up like these Witch Hat Waffles. Seriously, making breakfast look like a perfect, tiny witch’s hat—complete with the pointed brim—is just the best start to the spooky season.
The look on everyone’s face when I set this plate down is payment enough! It’s a recipe I’ve tweaked over a few Hallows’ Eves to make sure it’s not just cute but actually tastes amazing, too. We’re combining a classic, buttery waffle flavor with a rich chocolate filling, and turning the whole thing pitch black. Trust me, this novelty waffle setup tastes way better than it looks, and that’s saying something!

Why You Will Love Making Witch Hat Waffles
Okay, you might think making something this shaped takes hours, but that’s the secret! These are unbelievably easy once you have your iron hot. I promise you, this recipe is my go-to when I need a big “WOW” factor without much fuss.
- They look incredibly complex but come together fast. Seriously, Total Time is only 30 minutes!
- The deep black color is startling, but the taste is pure, satisfying waffle heaven underneath.
- The chocolate hazelnut filling melts just right, cementing the hat pieces together perfectly.
Quick Assembly for Themed Breakfast Fun
We’re talking about 15 minutes prep, 15 minutes cooking. That’s faster than getting everyone dressed for a costume party! Once the pieces are off the iron, it’s just stacking and spreading. You can even get the kids involved in spreading that delicious chocolate filling around.
The Perfect Base for Your Witch Hat Waffles
Don’t worry that going black affects the flavor! We use a decent amount of black food coloring, but the base batter is wonderful—your standard slightly sweet, buttery waffle mixture. This gives your Witch Hat Waffles that comforting, familiar taste we all love, hidden under the spooky facade. It’s the perfect combination of deliciousness and dressing up!
Essential Ingredients for Your Witch Hat Waffles
Gathering your gear for these Witch Hat Waffles is straightforward, but a couple of items really make the transformation happen. Don’t skimp on the good stuff here, especially that coloring! It’s all about getting that deep, dark black, which is key to the whole visual effect.
- 1 cup all-purpose flour
- 2 tablespoons sugar
- 2 teaspoons baking powder
- 1/2 teaspoon salt
- 1 large egg
- 1 cup milk
- 1/4 cup melted butter
- Black food coloring (gel recommended)
- Chocolate hazelnut spread for filling
- Powdered sugar for dusting
Ingredient Notes and Substitutions for Witch Hat Waffles
Listen, if you use liquid food coloring, you’ll end up needing way more, and that thins out your batter which messes up the texture. I highly recommend the gel colors—a little dab goes a long, dark way! For the chocolate filling, if you run out of your favorite chocolate hazelnut spread or you’re avoiding nuts, a good quality melted dark chocolate ganache works just as beautifully when you’re building your Witch Hat Waffles. You can toss some extra butter and cheese into a batch of plain waffles like the ones I use over here if you need another breakfast recipe!
Step-by-Step Instructions for Perfect Witch Hat Waffles
Alright, this is where the magic happens! It seems like a lot of steps, but I promise you, it flows really quickly once that waffle iron is hot. If you want to see my tried-and-true tips for making excellent Belgian waffles in general—which helps with these shapes—you can peep my notes right here. But let’s focus on becoming waffle sorcerers!
- First things first, handle your dry goods. Whisk together that flour, sugar, baking powder, and salt in your big mixing bowl until they look perfectly acquainted.
- In a separate bowl, gently whisk the egg, then add your milk and the melted butter. Don’t beat it to death; just get it incorporated.
- Now, pour the wet ingredients into the dry ones. And this is crucial: Mix until *just* combined. If you see a few little streaks of flour left, that’s fine! Overmixing makes tough waffles, and nobody wants a chewy witch hat.
- Time for transformation! Divide that smooth batter into two separate bowls. We want one half to stay the normal light color. To the second half, start adding your black food coloring. Add a little, stir, add a little more. You want it deep black, but be cautious not to add so much liquid coloring that it ruins the consistency we worked so hard to keep perfect.
- Get that waffle iron heated up! You’ll be cooking three different shapes for each hat, so keep it ready to go.
- Now, cook your black batter first. Carefully spoon the black batter in to make one large circle (this is the base), and one smaller circle (the crown of the hat) for every serving of Witch Hat Waffles you plan to make.
- Next, grab your plain batter to make the brims. For each hat, you need to cook small, pointed triangle shapes. If your iron makes big squares, you might need to carefully cook small sections and cut them into triangles, or use a piping bag if you have one handy!
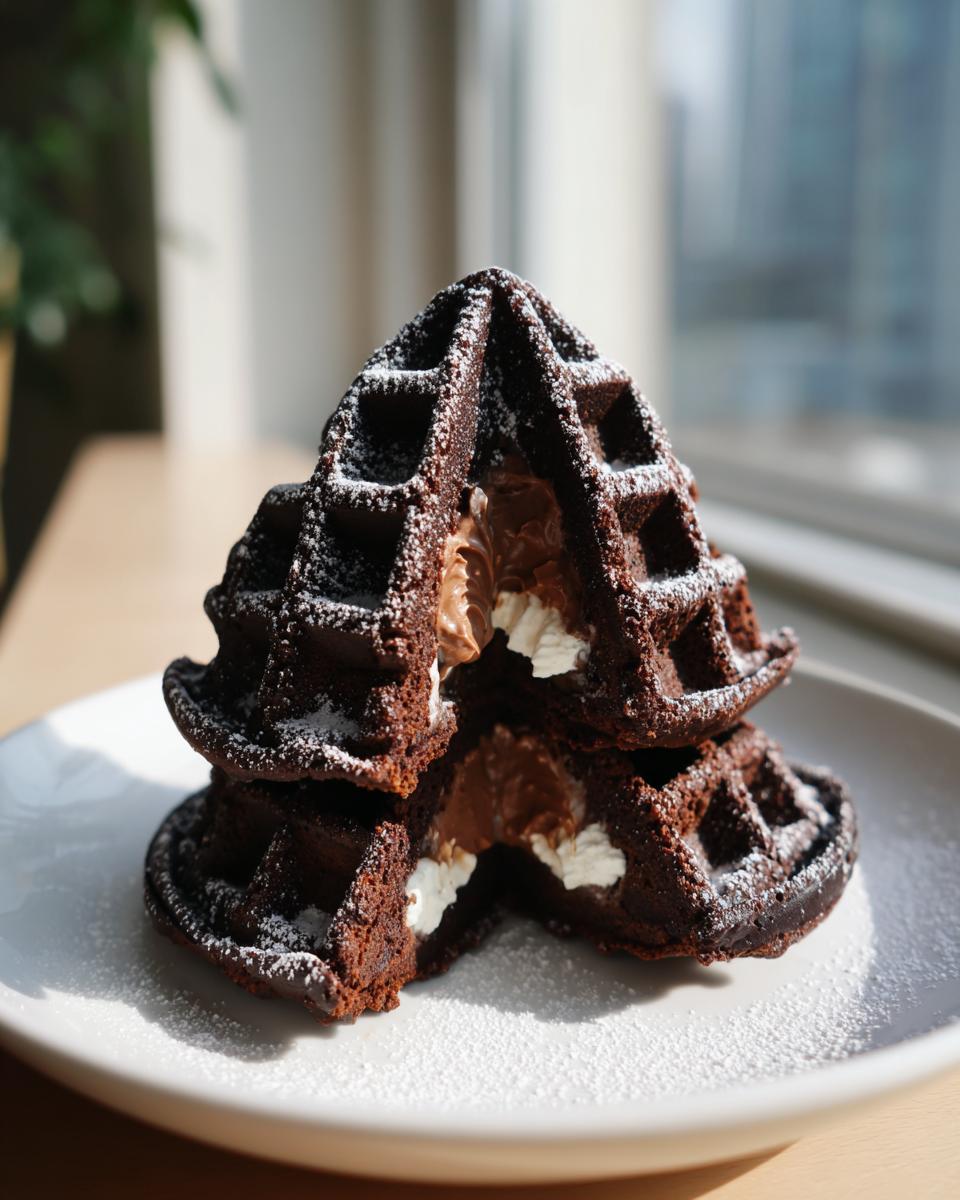
- Let’s assemble these Witch Hat Waffles! Take your large black circle and put it on the plate—that’s the base. Then, slather the top of that circle with a generous spoonful of your chocolate hazelnut spread.
- Place your smaller black circle right on top of the chocolate. Finally, take those black triangles and carefully press them around the bottom edge of that top circle to make the wide, floppy brim of the hat.
- The final touch that makes them look so spooky-cute? Dust everything lightly with powdered sugar right before serving, like a faint frost on a spooky morning.
Mixing the Batter for Black and Plain Witch Hat Waffles
When you combine your wet and dry groups, remember what I said: stop mixing early! You want to retain all those tiny air bubbles you’ve created; those are what give you that light, fluffy quality in your finished product. I typically pour the wet into the dry bowl, give it five gentle folds with a spatula, and then I stop. That’s it! Then, carefully spoon half the batter out before you even think about touching that black food coloring jar. For perfect Witch Hat Waffles, the batter needs respect at this stage!
Cooking the Shapes for Your Witch Hat Waffles
You need three pieces per hat, remember? Big circle, small circle, and the brim triangles. If your iron has deep, defined patterns, the black batter should hold its shape nicely. Cook the circles until they look done, but don’t overcook them—we need them soft enough to hug that chocolate spread! The triangles are quick because they are thin, so watch them closely so they don’t scorch. It’s all about creating distinct shapes for your Witch Hat Waffles.
Assembling the Final Witch Hat Waffles
This part is like edible LEGOs! The chocolate hazelnut spread acts as our glue. Put the big black circle down. Spread the chocolate thickly on top. Place the smaller black circle on the chocolate mound. Then, gently press the triangles (the brim pieces) onto the side of that top circle, making sure they stick out flatly to form the brim structure. They should sit nicely against the bottom circle too. A very light dusting of powdered sugar over the top of the crown completes your incredible Witch Hat Waffles!
Tips for Making the Best Witch Hat Waffles
Once you’ve mastered the basics of this recipe, you might want to play around a little, but these few tricks really separate the cute waffles from the show-stopping ones. I’ve learned these through trial, error, and one year where the brim kept sliding off—whoops! These small tweaks ensure your Witch Hat Waffles are structurally sound and look fantastic when they hit the table.
First off, temperature control is everything. Don’t rush heating up that waffle iron! If the iron isn’t piping hot before you drop the batter, you lose that immediate crispness on the outside, and your shapes might sag a bit. A properly hot iron gives you a better crust, which is essential for holding those three pieces together.
My second big tip is to use the chocolate hazelnut spread while the base waffle is still really warm, but not scorching hot. If the waffle is too fresh off the iron, the spread will just melt and run everywhere down the plate. You want it soft enough to spread, but firm enough to act like real mortar. Let the base circle cool for about sixty seconds before you spread the “glue.”
Also, for those triangles—if your waffle iron only makes big squares, don’t fret! You can cook the plain batter in long, thin strips instead of squares, and then cut those long strips into sharp triangles. It takes an extra minute of cutting, but it gives you those perfect pointed edges every time. These intentional steps make all the difference in turning great Witch Hat Waffles into gorgeous ones.
Finally, when you dust with powdered sugar, use a very fine-mesh sieve. Don’t dump it from a bag! A light, even coating looks like morning mist, which fits the theme perfectly. Too much powder and you cover up all that beautiful black color we worked so hard to achieve in your Witch Hat Waffles. Patience with the dusting pays off hugely!
Serving Suggestions for Your Themed Witch Hat Waffles
Now that you’ve mastered creating these amazing Witch Hat Waffles, we have to chat about what goes well beside them on the plate. Since the waffle itself is rich with that chocolate filling and a bit of sugar, we want accompaniments that either cut the richness a bit or lean right into the spooky theme. You don’t want to introduce another heavy recipe, so let’s stick to simple, fun sides!
First, you absolutely should have something bright on the side to counteract the deep black and brown colors. Think vibrant berries! A small pile of fresh raspberries or sliced mandarins gives you that lovely acidic zing. Plus, the bright red and orange look fantastic next to the black waffle—very Halloween chic, don’t you think?
For drinks, skip the plain milk this time. I usually whip up a batch of simple hot spiced cider; the cinnamon and cloves smell incredible and totally set the mood. If you’re serving older kids or adults, a simple cold brew with a swirl of whipped cream is divine. It pairs nicely with the chocolate in the middle of your Witch Hat Waffles.
If you need a bit more substance on the plate without making a whole new recipe, consider something savory on the side to balance the sweetness. A couple of crisp, plain bacon strips or maybe even some fruit skewers—think green grapes and melon cubes—work wonders. They add texture and let the main attraction, your beautiful Witch Hat Waffles, shine. If you were making a lot of breakfast items, you might enjoy my take on pancake poppers, but for these hats, keep the sides light!
Storage and Reheating for Leftover Witch Hat Waffles
Now, I know the goal is to have these eaten immediately, because the texture is just *chef’s kiss* when they are fresh and warm. But let’s be real, sometimes you can’t finish four hats in one go, or you want to prep for the next morning’s spooky rush. Handling leftovers for Witch Hat Waffles requires a little strategy, especially since we have that delightful chocolate filling tucked inside!
If you have assembly left—meaning you have cooked black circles, plain triangles, and the chocolate spread still separate—storage is easy. Keep the cooked waffle pieces stacked between sheets of parchment paper in an airtight container at room temperature for up to two days. Keep the chocolate spread somewhere cool but not refrigerated, maybe in the pantry.
If you have fully assembled your Witch Hat Waffles with the chocolate filling, things get a little trickier because of the fat content in the filling. It’s best to store them disassembled, as I mentioned above. If you can’t separate them without wrecking the hat, lay them flat on parchment and store them in the fridge for maybe one day maximum. We don’t want them getting soggy!
Best Way to Reheat Your Witch Hat Waffles
If you store them disassembled, reheating is a breeze, and you’ll get that fresh-off-the-iron texture back. You absolutely should avoid the microwave for reheating waffles; it turns them rubbery, and nobody wants a sad, limp witch hat. The toaster oven or a regular oven works miles better.
For the plain black waffle pieces, lay them directly on the rack in a single layer in your toaster oven set to about 350°F (175°C). Cook them for just 3 to 5 minutes until they look dry on the surface and feel warm through. If you are re-warming the triangles, they’ll be done in about three minutes flat!
If you must reheat an already assembled hat, be extremely gentle. Slide it onto a piece of foil first. Warm it in the oven at a low 300°F (150°C) for about 8 minutes. This gentle heat melts the chocolate filling just enough to refresh it without making a huge mess. Remember, these are best enjoyed the day they are made, but this method saves those day-old pieces of your Witch Hat Waffles!
Frequently Asked Questions About Witch Hat Waffles
Whenever I post pictures of these spooky treats, I always get a flood of questions! It makes sense; turning breakfast completely black is a little unusual. But don’t worry, I’ve answered the most common ones here so your first round of making these Witch Hat Waffles goes perfectly.
Can I make the batter for Witch Hat Waffles ahead of time?
That’s a great question, especially if you’re planning a big morning push for a fun Halloween breakfast. The answer is: sort of, but I don’t recommend it! Waffle batter really doesn’t like sitting around. As soon as the baking powder gets wet, it starts doing its job, and your batter will deflate, making heavy, flat waffles instead of the fluffy shapes we need. If you absolutely must prep, mix the dry ingredients one day and the wet ingredients (minus the coloring) the next, and only combine them right before cooking. For the best Witch Hat Waffles texture, mix everything right before you heat up the iron!
What food coloring works best for black waffles?
If you’re aiming for those deep, void-like black black waffles, you must reach for the gel food coloring. Seriously, don’t even bother with the liquid drops you use for Easter eggs! The liquid coloring is mostly water, and as I’ve mentioned a few times, adding too much liquid thins out your precious batter, and your shapes won’t set right. Gel coloring is super concentrated, so you only need a small toothpick-sized amount to get that intense, spooky black color required for iconic Witch Hat Waffles without messing up the leavening action!
Estimated Nutritional Snapshot for Witch Hat Waffles
I always feel a little weird putting numbers next to something this fun, but for those of you who track things (and I totally get it!), here’s a basic rundown of what goes into one of those fully assembled Witch Hat Waffles. Remember, this is just an estimate, based on standard measurements—if you load yours up with extra chocolate spread or use a different kind of milk, the totals will change!
We’re looking at one complete hat assembly here. I tried to account for the waffle, the chocolate filling, and that little dusting of powdered sugar we put on at the very end for charm!
- Serving Size: 1 hat assembly
- Calories: 350
- Sugar: 20g
- Sodium: 300mg
- Fat: 18g
- Saturated Fat: 5g
- Unsaturated Fat: 13g
- Trans Fat: 0g
- Carbohydrates: 40g
- Fiber: 2g
- Protein: 9g
- Cholesterol: 50mg
This is a fun breakfast, so it’s definitely a treat! I just wanted to give you a heads-up on where we land nutritionally. If you are making a double batch, just double up these numbers, though remember the sugar content will reflect the chocolate filling heavily. Enjoy the magic, and don’t stress too much about the tracking on a fun holiday like Halloween!
Share Your Fun Halloween Breakfast Creations
I am just so excited for you to try these Witch Hat Waffles! Honestly, the best part of sharing recipes isn’t just the cooking; it’s seeing what you all come up with in your own kitchens. I really hope this brings a huge smile to your family’s faces on Halloween morning.
Once you give this recipe a whirl, please do me a huge favor and come back here to leave a rating! Was the chocolate filling melting just right? Did your kids love the shape? Knowing what worked—or what maybe needed a little adjustment for your iron—helps me out tremendously! Don’t be shy about dropping a comment below; I read every single one.
And if you took pictures—which I *highly* encourage because these are so photogenic—tag me on social media! I’d love to see your stacks of black waffles, your perfectly pointed brims, and your tiny creations. It’s such a joy to see my favorite themed breakfast ideas becoming part of your family traditions. If you need another fun recipe to round out your holiday baking, you should check out my very favorite Halloween cookies recipe for when the sugar craving hits again later in the day!
Happy baking, and I can’t wait to hear all about your successful (and maybe slightly messy!) adventures making these Witch Hat Waffles!
Print
Witch Hat Waffles
- Total Time: 30 min
- Yield: 4 servings 1x
- Diet: Vegetarian
Description
A fun, themed breakfast shaped like a witch’s hat.
Ingredients
- 1 cup all-purpose flour
- 2 tablespoons sugar
- 2 teaspoons baking powder
- 1/2 teaspoon salt
- 1 large egg
- 1 cup milk
- 1/4 cup melted butter
- Black food coloring (gel recommended)
- Chocolate hazelnut spread for filling
- Powdered sugar for dusting
Instructions
- Mix flour, sugar, baking powder, and salt in a bowl.
- Whisk the egg, milk, and melted butter in a separate bowl.
- Combine wet and dry ingredients until just mixed. Do not overmix.
- Divide the batter in half. Add black food coloring to one half until deep black.
- Heat your waffle iron.
- Cook small, round waffles using the black batter. You will need one large circle for the base and one smaller circle for the top of the hat for each serving.
- Cook small, pointed triangles using the regular batter for the brim of the hat.
- Assemble the hat: Place the large black circle on the plate. Spread chocolate hazelnut spread on top. Place the smaller black circle on top of the spread.
- Attach the black triangle pieces around the base of the smaller black circle to form the brim.
- Dust the assembled hat lightly with powdered sugar before serving.
Notes
- Use a small amount of black food coloring to achieve a dark color without affecting the batter consistency.
- You can use a piping bag to carefully place the batter for the pointed brim sections if your waffle iron has large sections.
- Serve immediately while warm.
- Prep Time: 15 min
- Cook Time: 15 min
- Category: Breakfast
- Method: Waffling
- Cuisine: American
Nutrition
- Serving Size: 1 hat assembly
- Calories: 350
- Sugar: 20
- Sodium: 300
- Fat: 18
- Saturated Fat: 5
- Unsaturated Fat: 13
- Trans Fat: 0
- Carbohydrates: 40
- Fiber: 2
- Protein: 9
- Cholesterol: 50
Keywords: Witch Hat Waffles, Halloween breakfast, black waffles, novelty waffles, sweet breakfast