
Oh my goodness, are you scrambling for a last-minute Halloween contribution? I totally get it; sometimes the craving for spooky good treats hits way too close to the party time! Don’t panic—you don’t need to be a master baker to deliver some serious holiday cheer. That’s why I rely on my absolute favorite cheat code: using that trusty box of brownie mix we all keep hiding in the pantry.
When you mix that deep, fudgy base with the simplest ghostly decoration, magic happens. Seriously, even if you’ve never piped anything in your life, you can nail these. These Halloween Ghost Brownies are the perfect spooky dessert because they look impressive but take almost no real effort. These saved my friend’s annual potluck last year when I completely forgot I was supposed to bring dessert until 3 PM that afternoon. They were a massive hit!

Why Making Halloween Ghost Brownies is Your Best Holiday Decision
I’m telling you, these brownies just *work* every single time. If you’re on the fence about dedicating precious October weekend time to baking, let me talk you into it. You absolutely need these for your party table.
- They’re lightning fast! We’re talking minimal dishes because we’re starting with a box mix. Prep time is barely anything, trust me.
- The spook factor is huge, but the skill level required is basically zero—it’s all in the cute little ghost face we paint on.
- They travel like a dream. You can stack these in a container without worrying about delicate frosting getting ruined.
- They are infinitely customizable. You can add sprinkles, extra chocolate chips to the batter, or even try my dump cake recipe when you need something else fast! I love using that technique for summer parties, but these brownies are easier for Halloween chaos.
- Because they use a simple glaze instead of buttercream, they don’t need refrigeration, which is a lifesaver on a crowded party buffet.
- When you cut them into small squares, you get a huge yield, which means everyone gets a treat without you needing to bake four separate batches!
Gathering Ingredients for Your Halloween Ghost Brownies
The beauty of relying on a box mix is that half the heavy lifting is already done for you! We just need a few pantry staples to bring these fudgy squares to life and the right things to make our little ghosts pop. Make sure you have everything measured out before you even think about turning on the oven—it makes the assembly process so much smoother and prevents last-minute scrambles.
If you love working with cake mixes, you’ll find this process mirrors how I whip up my quick cookie recipes, too! Sometimes the simplest base is the way to go.
For the Box Mix Brownies
You’ll start with your standard box of chocolate brownie mix, usually around 18.3 ounces. The box will tell you what else to add, but generally, you’ll need the specified amounts of eggs, cooking oil, and water called for on the packaging. Now, here’s my little secret for taking that basic flavor up about ten notches: instead of using water, use cold, strong brewed coffee.
Trust me on this one! The coffee doesn’t make the brownies taste like coffee at all; it just deepens that rich chocolate flavor so intensely. It’s the same flavor boost I give my chocolate chip cookies when I want them to taste extra decadent.
For the Ghost Icing and Decoration
This is where our spooky friends come to life! For the icing, you’ll need about one cup of powdered sugar, two tablespoons of milk (room temperature is best here), and half a teaspoon of vanilla extract. We mix those together until they are smooth and lovely.
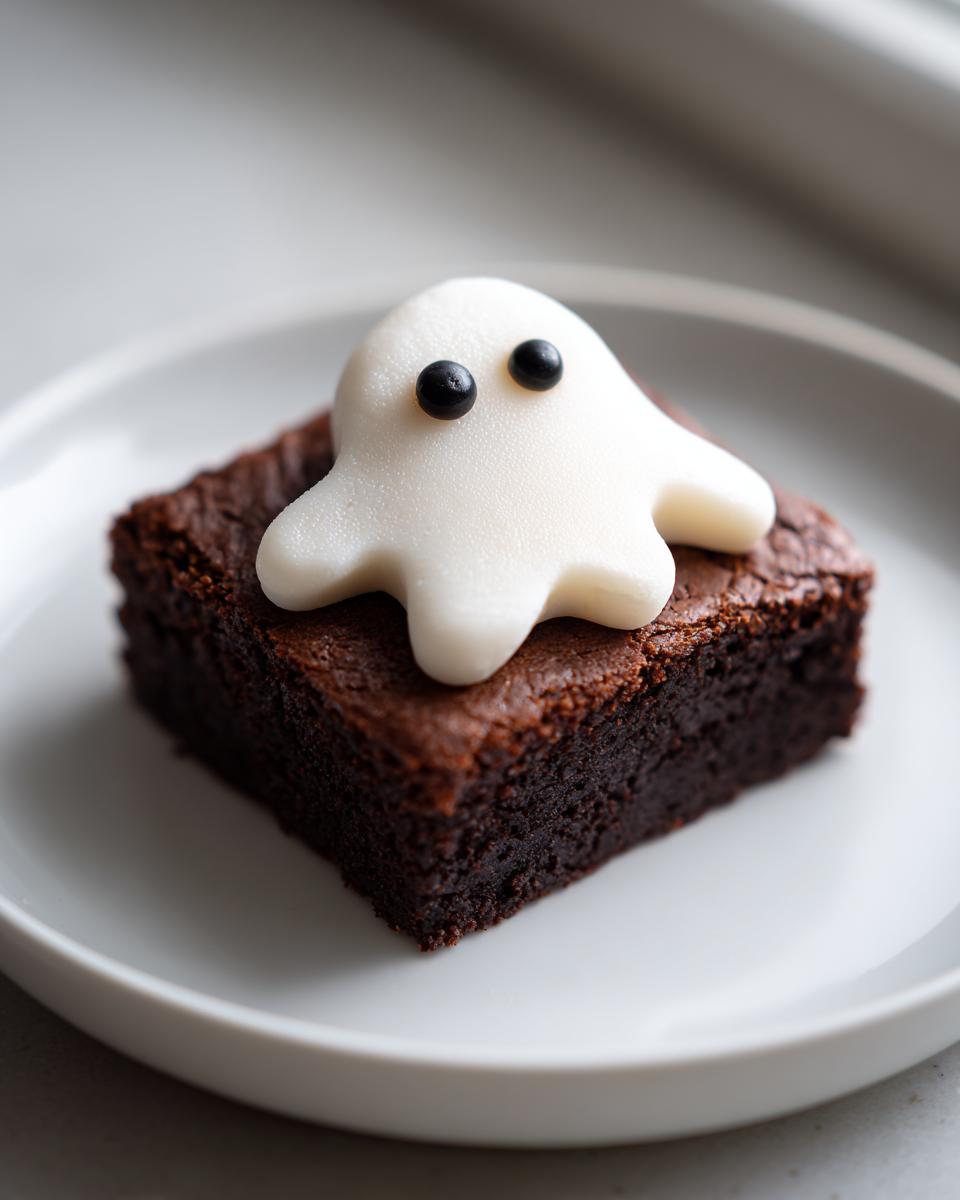
For that ghostly appearance we are aiming for, you absolutely need some food coloring. I strongly recommend getting a gel food coloring if you have one; it gives you much better control over the shade. We are going to add just a tiny, tiny drop of black gel coloring into the white icing base. You’re aiming for a very pale, light gray. Why gray? Because once it dries against the dark brownie, it sets to a stark, perfect white shade—whiter than if you just used the plain icing! But hey, if you’re in a rush, you can always make a tiny bit of black icing separately and just pipe two small dots for the eyes instead of using candy eyes.
Lastly, don’t forget the candy eyes! You’ll want a small bag of those edible plastic eyes because they bring the ghosts to life instantly. If you don’t have those, stick to the black icing substitution we talked about!
Step-by-Step Instructions to Create Perfect Halloween Ghost Brownies
Okay, we’ve got our incredible box mix ready, and we know the secret to making that icing look ghostly white. Now for the actual assembly! Don’t rush the cooling process, though, that’s where most people mess up brownie decorating. If you try to cut warm, gooey brownies, you’ll end up with a tray of chocolate crumbs, not perfect squares!
Baking and Cooling the Brownie Base
First things first: preheat your oven exactly as the box tells you to. Mix up your brownie batter using the eggs, oil, and our little coffee substitution if you went that route. Pour it evenly into your greased 9×13 inch pan—this gives us the ideal surface area for decorating.
You’re looking for a bake time around 30 minutes, give or take, depending on your oven. Remember, for that perfect fudgy center, you want to pull them out just shy of being completely done. Once they look set, take them out! Now comes the hard part: letting them cool completely. I usually bake them the night before and leave them on the counter covered with a clean tea towel. You need them totally cool to handle the icing, which may take a couple of hours.
Preparing the Light Gray Ghost Icing
While the brownies are cooling (or while you’re cleaning up that first bowl!), we tackle the icing. In a small bowl, whisk together the powdered sugar, the milk, and that vanilla extract. You want it smooth, shiny, and thick—if it seems too stiff, add milk just a tiny bit at a time until you can drizzle it off the whisk slowly. It’s similar to getting the right consistency when I make my tahini cookie dough, just sweeter!
Here is the expert part we talked about earlier: take your black gel food coloring and put in literally one tiny toothpick-dip amount. Mix it in until it becomes that faintest cloud-gray color. Seriously, start small! If you accidentally make it too dark, just whisk in a little more powdered sugar and a drop more milk until you get that perfect super-pale shade. This small bit of gray neutralizes the yellow tint from the sugar, making the final baked ghost look pure white.
Decorating Your Halloween Ghost Brownies
Once your brownies are chilled and cut into those beautiful squares, it’s decoration time! Transfer your light gray icing into a small piping bag. If you don’t have a piping bag, grab a sturdy zip-top bag, spoon the icing in the corner, and snip off just the tiniest tip of that corner. We don’t want a massive blob, we want control!
On the center of each brownie square, pipe out a small, soft oval shape. Picture a fluffy marshmallow ghost floating there—that’s the shape we’re going for! Work quickly because the icing sets fast, especially if your kitchen is cool. Immediately, while the piped oval is still wet, gently press two candy eyes onto the icing. They should sink in just a little bit, securing themselves for the ultimate spooky effect on your Halloween Ghost Brownies. Let these sit for about 15 minutes to firm up before moving them, and you’re done!

Tips for Success When Making Halloween Ghost Brownies
Even though these are super easy, there are a couple of little tweaks that will take your spooky squares from “cute” to “OMG, these look professional!” I always run into trouble when I rush the cooling or fight with the icing consistency, so let me save you that headache. Good preparation here means you won’t have any decorating disasters, which is always my goal when serving treats at a big party!
If you’re feeling ambitious later and want to bake something from scratch that still has a great texture, you might try my banana bread loaf sometime; the technique for achieving a moist crumb is surprisingly similar to getting an excellent brownie base!
Achieving the Perfect Ghost Shape on Your Halloween Ghost Brownies
The single biggest variable in how your Halloween Ghost Brownies turn out is the way you pipe that little body. If your opening is too wide, the ghost looks like a melted puddle rather than a floating specter, so control is key here.
First, let’s talk about the tip size. If you’re using a dedicated piping bag, use the smallest round tip you have—the kind usually reserved for writing fine script. If you’re just snipping a corner off a zip-top bag (which is what I do 90% of the time, let’s be real), you want to snip *the absolute minimum*. Seriously, start with a cut the size of a poppy seed and test it on a paper towel. If you can’t get the icing out, snip a hair more.
Once the hole is right, consistency is everything. Hold the bag straight up over the brownie square and apply firm, steady pressure until you reach the size you want the oval to be. Then, lift the bag straight up quickly without dragging the tip away. That little flick upwards is what seals the icing blob neatly—it stops the icing from forming a little tail that trails off toward the edge of the brownie. Steady hands make for the cutest ghosts!
Storage and Reheating Instructions for Your Halloween Ghost Brownies
Once you’ve poured your heart into making these cute little specters, you want them to look perfect right up until serving time! Because these Halloween Ghost Brownies use a simple powdered sugar glaze instead of a heavy, dairy-based buttercream, they are actually pretty easy to store, which is a huge plus for party planning.
The key thing to remember is that we have little candy eyes on top, and those are sensitive to temperature swings. Never stack the brownies directly on top of each other, especially if they are still slightly soft—you’ll end up with ghosts stuck to the bottom of the square above them, and that’s just sad!
For the best results, keep them in a single layer in an airtight container. If you absolutely must stack them (I know, we always make too many!), place a piece of parchment paper between each layer. This protects the cute little faces we worked so hard to pipe on.
Room temperature is their happy place. Keep the container away from direct sunlight or any major heat sources, just in case. While the glaze itself is stable, extreme heat can make the candy eyes get a little weepy or smudge their black centers. If you need to make them a few days ahead of time, they hold up beautifully at room temperature for about three days.
As for reheating? Don’t even think about it! These are best served at room temperature, or slightly cool since they came off the counter. Heating them will just melt that beautiful ghost icing right back into a puddle. If you chilled them for some reason, just let them sit on the counter for about 30 minutes before the party starts. Oh, and if you’re looking for other great make-ahead holiday bakes, you should definitely check out my pumpkin cream cheese swirl bread; it’s the perfect recipe for doing in advance!
Serving Suggestions for Your Spooky Treats
Now that you have these adorable, chocolatey ghosts haunting your kitchen, what should you serve next to them? Because these Halloween Ghost Brownies are so rich and fudgy, you want pairings that either cut through that richness with a little tartness or that lean into the cozy, dark chocolate vibe.
I always think holidays are better with a great drink option! If you’re hosting adults, a nice cup of strong, hot coffee is fantastic—it just enhances that deep chocolate flavor they already have. You could even rim the mug with a little crushed peppermint if you’re starting to get into the winter holiday spirit early!
For non-caffeine drinkers, especially kids who will be bouncing off the walls after trick-or-treating, I love offering something lighter. A really bright, fresh fruit smoothie cuts through the dense texture beautifully. I usually make a big pitcher of my strawberry, blueberry, and banana smoothie. The color contrast between the red/blue berries and the black and white ghosts is actually really festive, too!
If you want something else edible on the platter that isn’t quite as heavy as another brownie, try setting out bowls of salty snacks nearby. A little bowl of spiced nuts or some crunchy pretzels gives people a palate break between bites of fudgy goodness. It’s all about balance, right? You bring the spooky ghosts, and I’ll bring the salty crunch!
Variations on the Classic Halloween Ghost Brownies Recipe
Listen, while I stand by the classic chocolate box mix any day—it’s tried and true—we don’t have to stick to the script if you want to mix things up a little! Sometimes a party theme calls for something lighter, or maybe you just ran out of chocolate mix. No worries, these ghosts are adaptable little things, and they look amazing no matter what base you start with.
I’ve seen people try these ghosts on other things, and honestly, they all work out great. It’s all about that gorgeous, simple icing. If you want to try a different direction, check out how I use a similar base idea for my Christmas brownies when the holidays roll around—they use peppermint, but the decorating principle is the same!
Here are a few easy ways I like to give these Halloween Ghost Brownies a little makeover:
- Blondie Ghosts: If you happen to have a boxed vanilla or butterscotch blondie mix instead of chocolate, go for it! The pale blondie base makes the white ghost icing stand out even more starkly. It gives it a slightly chewier, richer, almost butterscotch-y flavor that is fantastic with the vanilla glaze.
- Sprinkle Attack: This is perfect for younger bakers who feel like the ghosts need *more* flair. Before the ghost icing dries, lightly scatter some Halloween-colored sprinkles (orange, purple, or even black nonpareils) around the edges of the brownie square. The sprinkles won’t stick to the ghost itself, but they frame it beautifully, making the whole square look festive.
- The Eyeball Upgrade: If you can find them, swapping out the generic candy eyes for edible eyeballs that have colored irises instantly makes your ghosts look a bit creepier, maybe like they’re staring right into your soul! Just make sure you press them in firmly before that thin icing layer sets up.
- Zest the Glaze: This is a super subtle change, but trust me, it elevates everything. When you mix up your ghost icing, toss in about 1/4 teaspoon of orange zest. The citrus oils brighten up that sweet vanilla flavor just enough to make the glaze less cloyingly sweet against the rich brownie. It sounds small, but it pairs so well with the chocolate base!
Honestly, even adding a few mini chocolate chips into the initial brownie batter before baking adds a surprise pocket of melted chocolate treasure when you bite into your ghost.

Frequently Asked Questions About Making Halloween Ghost Brownies
You’ve baked the brownies, you’ve piped the ghosts, but naturally, a few little questions pop up after you get started! Baking is all about troubleshooting on the fly, and I’ve collected the ones I get asked most often about this recipe. Whether you’re making spooky treats for a school party or just want to save time later, I’ve got the answers for you right here. If you’re interested in other fun, fast treats, you should definitely check out my guide on how to master cake pops next! They share that same element of fun decoration.
Can I make the ghost icing ahead of time?
Oh yes, you absolutely can! And I highly recommend it if you’re planning on decorating the day of the party. You can mix up that powdered sugar base—the powdered sugar, milk, and vanilla—and store it in an airtight container right on the counter. Don’t put it in the fridge; the cold can sometimes make it seize up into a hard lump. Just seal it up tight.
When you’re ready to decorate, you might notice it’s gotten a little stiff. That’s totally normal! Just grab a small whisk and give it a good stir for about 30 seconds until it’s smooth and pipe-able again. If it still seems a bit too thick for your piping bag, add just a half-teaspoon more milk until it’s flowing nicely before adding your single drop of black coloring.
How do I make the icing look perfectly white without food coloring?
This is such a common question, and honestly, trying to skip the black coloring always ends in disappointment! When you mix white powdered sugar with milk, the natural color of the milk (and sometimes the sugar itself) leaves the glaze looking slightly creamy or pale yellow. If you tried to pipe that creamy color onto a dark chocolate brownie, the ghost would look kind of dingy, not bright white and spooky.
The trick to creating that stark, bright white is using just a microscopic amount of black food coloring. It acts as a neutralizer! Think about color theory: adding a tiny touch of black ‘muddies’ the yellow tones out of the white base. You need so little that when you pipe it, it looks light gray—but by the time it dries on that dark brownie canvas, it reads as pure white. It’s like magic, but it’s just basic kitchen chemistry!
What if I don’t have candy eyes to finish my Halloween Ghost Brownies?
Don’t stress if you run out of candy eyes or can’t find them at the store—the ghosts will still be adorable! You have two very easy substitution options up your sleeve. The first is what I mentioned earlier: if you had enough black gel coloring to make your ghost base, reserve a few drops of pure black coloring in a tiny bowl.
Using a toothpick or the very tip of your smallest piping tip, simply dot two eyes onto the wet icing oval. Make sure you move fast, just like when placing the candy eyes, so they don’t sink in unevenly. The other option is to use two very small, neat dots of black melted chocolate, but that’s a little messier and takes longer to set, so I stick to the icing dots. Either way, your Halloween Ghost Brownies will be perfectly spooky!
Final Thoughts on Your Easy Halloween Ghost Brownies
Whew! Aren’t these Halloween Ghost Brownies just the best thing ever invented? I swear, every October someone asks me where I bought them, and I just grin and tell them I whipped them up in about 15 minutes of active time while the oven did the hard work! They always look so much more terrifyingly charming than an actual, complicated cookie ever could.
I really hope you give these a try, especially if you’re stressed about making something fun for a party or school event. Don’t forget to snap a picture of your gang of ghosts and tag me if you share them online! I absolutely love seeing how everyone’s decorations turn out—those candy eyes always have such fun, slightly maniacal expressions.
If you try these and love the box-mix-plus-a-trick method, you should totally check out my other simple holiday recipes, like my super easy Halloween cookies. They follow a similar philosophy: maximize fun, minimize fuss!
So, tell me, friend—what spooky flavor enhancement will you try next year? Are you going to stick with the coffee trick in the base, or are you going to try adding some orange zest to the icing? Let me know in the comments below what spooky decorations you’ll add next year!
Print
Halloween Ghost Brownies
- Total Time: 45 min
- Yield: 24 servings 1x
- Diet: Vegetarian
Description
Simple brownies decorated with a ghost design for Halloween.
Ingredients
- 1 box (18.3 ounces) brownie mix
- Ingredients listed on brownie mix box (usually eggs, oil, water)
- 1 cup powdered sugar
- 2 tablespoons milk
- 1/2 teaspoon vanilla extract
- Black food coloring (gel preferred)
- Small candy eyes
Instructions
- Prepare the brownies according to the package directions.
- Bake the brownies in a 9×13 inch pan. Let them cool completely.
- Cut the cooled brownies into squares.
- Make the ghost icing: Whisk together the powdered sugar, milk, and vanilla extract until smooth.
- Add one small drop of black food coloring to the icing and mix until you have a very light gray color. This will look white once dry.
- Place the icing in a small piping bag or a zip-top bag with a corner snipped off.
- Pipe a small oval shape onto the center of each brownie square for the ghost body.
- Gently press two candy eyes onto the piped icing before it sets.
- Let the icing set before serving.
Notes
- For a richer brownie flavor, substitute water with brewed coffee.
- If you do not have candy eyes, you can use small dots of black icing for the eyes.
- Prep Time: 15 min
- Cook Time: 30 min
- Category: Dessert
- Method: Baking
- Cuisine: American
Nutrition
- Serving Size: 1 square
- Calories: 180
- Sugar: 20g
- Sodium: 150mg
- Fat: 9g
- Saturated Fat: 3g
- Unsaturated Fat: 6g
- Trans Fat: 0g
- Carbohydrates: 25g
- Fiber: 1g
- Protein: 2g
- Cholesterol: 15mg
Keywords: Halloween, brownies, ghost, dessert, chocolate, easy, party