
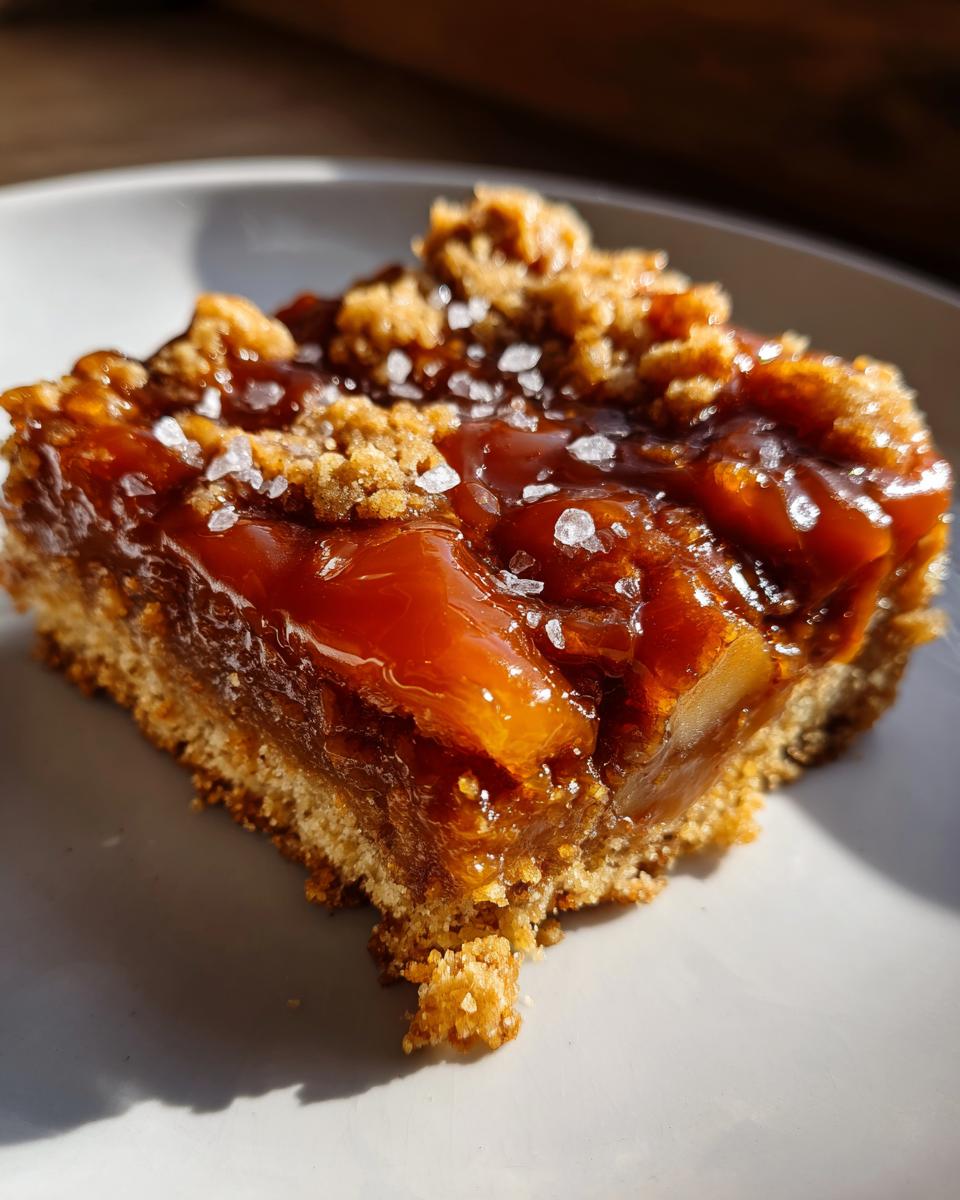
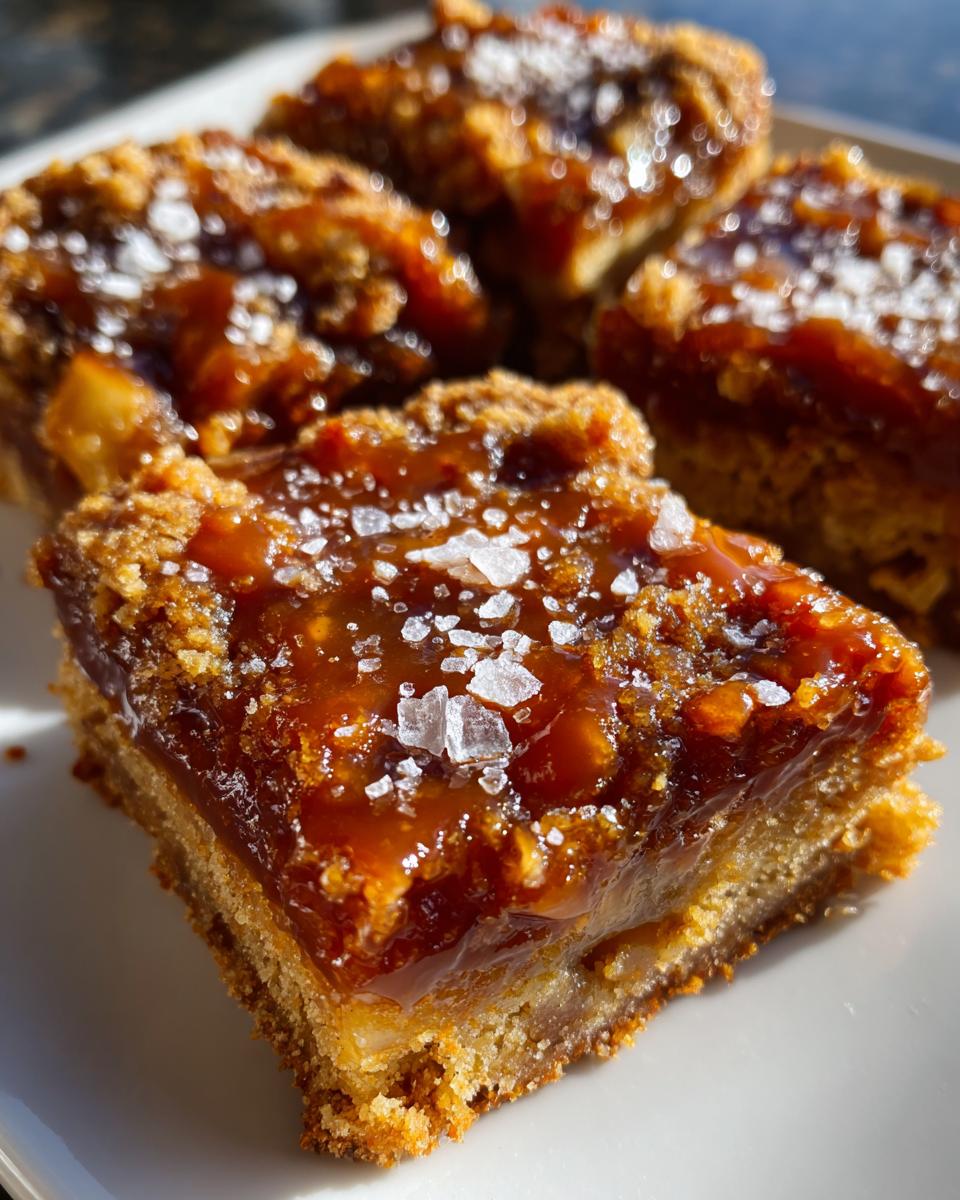
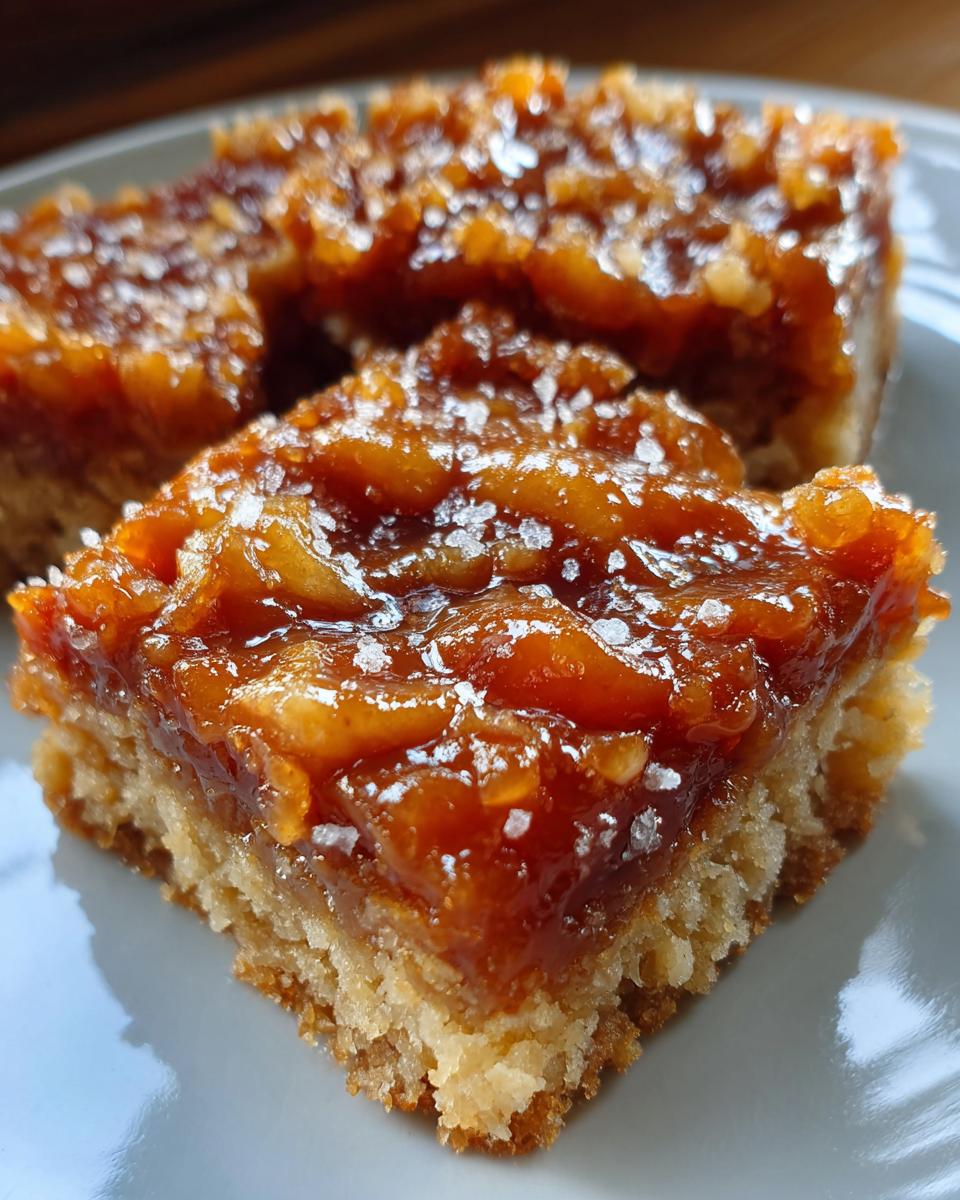
If you are looking for that incredible moment where rich, gooey caramel meets a crisp, salty finish, stop scrolling right now! Seriously, forget everything else you thought you knew about fall desserts because these Salted Caramel Apple Bars are about to change your life. I spent ages trying to get the balance right—too much salt and it tastes weird, too little and it’s just sweet goo. But when I finally drizzled that homemade caramel over the apples and everything came out of the oven perfectly golden, I knew that was *it*. These bars are the ultimate easy treat: they’re soft, they have that amazing crumble topping, and you don’t even need that fancy mixer—though I used mine because I’m lazy!
Why You Must Make These Salted Caramel Apple Bars
Forget fussy pies or complicated layered cakes; these bars are built for success, even if you’re having a chaotic baking day! Trust me, once you try this combination, you’ll be making them weekly. Don’t worry about presentation; they look rustic and amazing no matter how you cut them!
- The texture contrast is just divine—you get that wonderful, soft, buttery crust and crumble, moist spiced apples tucked in the middle, and then that perfect, slightly chewy caramel layer. It’s layers of joy!
- That sweet and salty moment when the flaky sea salt hits the warm caramel? Wow! It cuts through the sweetness perfectly, making you instantly want another bite. It’s addictive, I’m warning you!
- The cleanup is minimal! Since this all bakes up in one 8×8 pan, you aren’t wrestling with cake rounds or messy springforms. I love how easy it is to slide the whole thing out onto my cutting board using that parchment sling I bragged about making. It’s a fast win on a weeknight.
- They are surprisingly quick to pull together. Seriously, you spend maybe 20 minutes preparing the dough and layering everything up. You can check out how fast I whip up other one-pan wonders over here: my favorite cheesecake bars use a similar shortcut method!

Essential Ingredients for Perfect Salted Caramel Apple Bars
Okay, let’s talk about what goes into these beauties, because ingredient quality really does matter here, especially with only a few main players involved. Don’t skim this part! If you get the butter and apples right, the rest is just following directions. I’m not kidding when I say my success with these Salted Caramel Apple Bars hinges on two things: Granny Smith apples and softened butter. If you’re stocking up on apples for baking in general, I always recommend using Granny Smith because they hold their shape perfectly and offer that necessary tartness against all that sugar and caramel.
The recipe is simple, but pay attention to the state of your ingredients.
- 1 cup all-purpose flour
- 1/2 teaspoon baking soda
- 1/4 teaspoon salt (regular salt for the dough)
- 1/2 cup (1 stick) unsalted butter, softened – and I mean *softened*, not melted! We need that creaming power, so leave it out for at least an hour unless you’re using a warm kitchen!
- 1/2 cup packed light brown sugar – packing it in really gives that necessary molasses depth.
- 1/4 cup granulated sugar
- 1 large egg – it should also be room temperature so it incorporates smoothly with the creamed butter.
- 1 teaspoon vanilla extract
- 1 1/2 cups diced apples (about 2 medium Granny Smith, please folks, nothing mushy!)
- 1/2 cup caramel sauce – store-bought is fine if you’re in a rush, but oh boy, homemade is better!
- 1/4 teaspoon flaky sea salt (for topping) – This is non-negotiable! It’s what gives us that signature salty kick right at the end.
Seriously, using room-temperature butter and eggs is what lets you whip air into that sugar mixture, which gives our crumble topping its structure later on. If the butter is too cold, you’ll just mangle the sugar crystals instead of creaming them properly. It makes all the difference between a tender bar and something tough!
Step-by-Step Guide to Preparing Salted Caramel Apple Bars
This recipe is fantastic because even though it has layers—and trust me, layers mean flavor—it’s totally straightforward. We aren’t doing anything fancy here; it’s all about careful assembly and not messing up the mixing. The biggest thing you have to remember is patience when it comes to the cooling stage later on, but for now, let’s get this dough made! We start by getting the oven hot and making sure we prep that pan right so we don’t lose any glorious caramel to a sticky bottom. If you’re looking for other simple baking triumphs, check out my super easy dump cake guide for more one-pan magic!
Preparing the Pan and Dry Mix for Salted Caramel Apple Bars
First things first, turn your oven up to 350 degrees F. Don’t wait for it to preheat while you’re measuring—get it going! Next, grab that 8×8 inch pan. I swear by using parchment paper in here, making sure you leave an overhang on two sides. Think of it like little handles so when these bars are done, you can just lift the whole slab out easily. Do not skip this part, or you’ll be scraping hardened caramel off the bottom forever! While the oven is warming up, take a medium bowl and whisk together your flour, baking soda, and salt. Just a quick whisk to make sure everything is married up nicely before it meets the wet stuff. Set that aside.
Creating the Base Dough for Your Salted Caramel Apple Bars
Now for the good stuff! Get your softened butter and both types of sugar into a large bowl. Beat these together until they look light and fluffy. I usually turn my mixer on high for a minute or two until it lightens in color—that’s how you know you’re getting air in there for a tender crust. Once fluffy, mix in that egg and the vanilla extract, just until they disappear. Then, take your dry mixture and add it slowly to the wet ingredients while mixing on low speed. I cannot stress this enough: stop mixing as soon as no more flour streaks are visible! Overmixing builds gluten, and that makes these bars tough instead of crumbly. Remember that: just combined is perfect.
Assembling and Baking the Salted Caramel Apple Bars
Time to layer! Take about half of that dough mixture and press it evenly into the bottom of your prepared pan. Don’t try to make it flawless; it’s going to be a crumble anyway. Next up, scatter those diced apples evenly across that base layer. Now, open your caramel sauce jar and drizzle it generously over the apples. Don’t be shy! Then, take the remaining half of the dough and just crumble it loosely right over the caramel. Pop the whole thing into the oven for 30 to 35 minutes. You are looking for golden brown edges—that tells you the butter is doing its job and the apples are soft. The minute these come out of the oven, sprinkle that flaky sea salt right over the hot caramel. That instant heat makes it stick! Then, the hardest step: you must let them cool completely before you even think about slicing them. If you cut them hot, the caramel will just ooze out everywhere.
Tips for Making the Best Salted Caramel Apple Bars
Now that you’ve got the basic steps down, let me share a few little secrets I learned through trial and (okay, maybe one or two) errors. These aren’t in the main instructions, but they are what separates a good bar from one you’ll be famous for!
My biggest thing is always the apples. If you feel like your apples sometimes turn out a little crunchy even after baking, it’s usually because they were cut too big or weren’t tart enough! I always peel mine—the skin gets rubbery when baked like this. Then I dice them pretty small, about half an inch. If you want a little extra flavor boost in the apples themselves before layering, try tossing them in a tiny sprinkle of cinnamon right before you add them over the dough. It really wakes them up!
When it comes to the caramel sauce, consistency is king. If your caramel is too thick when you drizzle it, it doesn’t spread nicely over the apples, leaving you with big isolated blobs of pure sugar instead of a balanced layer. If that happens, just warm your caramel sauce for about 15 seconds in the microwave. You want it runny enough to drizzle nicely but still thick enough not to just soak straight into the dough underneath. Honestly, if you’re buying it jarred, you might need that little blast of heat!
And finally, cooling. I touched on this before, but it bears repeating because I’ve ruined perfectly good bars by being impatient! You MUST let these cool completely—I mean, until the pan is room temperature, or even slightly chilled—before you try to lift them out. If you cut them warm, that beautiful caramel layer acts like glue and smears all over your knife and doesn’t transfer cleanly to the plate. If you need them sooner, pop the whole pan (still on the rack!) into the fridge for about an hour. That sets the caramel fast. While you’re thinking about caramel deliciousness, you absolutely have to check out my recipe for the best caramel apple dip when apple season rolls around again!
Variations on Classic Salted Caramel Apple Bars
You know, while this recipe is absolutely perfect as is—the ideal sweet and salty dream—sometimes you just need to shake things up, right? Baking is the best when you can make it your own. Since these bars have a beautiful, simple base dough, they are begging for little tweaks and additions. I’ve tried a few things over the years, especially when I run out of one ingredient or another, and I’ve always ended up with something delicious!
Don’t feel locked into just apples, either! If you’ve got some leftover fruit, or maybe just want a warmer spice profile for autumn baking, you can easily adjust things. If you’re looking for other ways to bake up something cozy, you should definitely take a peek at my pumpkin cream cheese swirl bread recipe; it uses a similar rich base dough!
Here are a few easy ways I like to switch things up without breaking the bar structure:
- Spice it Up in the Dough: If the apples are tart, sometimes the dough itself needs a little warming up! Whisk in about 1/2 teaspoon of ground cinnamon and a tiny pinch of nutmeg right along with your flour in the dry ingredients. It gives the whole bar a much deeper, almost apple pie-like flavor once baked. It works wonders!
- The Nutty Crumble Upgrade: The topping is excellent plain, but adding texture never hurts. Before you crumble the second half of the dough over the caramel, fold in about 1/4 cup of finely chopped pecans or walnuts. They toast up beautifully against the caramel and give you a wonderful crunch that balances the soft apples underneath. Just make sure they are finely chopped so they crumble nicely with the dough.
- Switching the Fruit (Use Carefully!): While apples are the star, if you happen to have firm pears on hand, they make a surprisingly great swap for the apples. Pears are a little softer, so you might want to chop them a bit smaller than the apples, and honestly, they pair unbelievably well with the caramel. Just don’t try baking with anything too watery, or you’ll end up with a soupy mess in the bottom layer!
See? It’s so easy to customize! The key is to keep the butter, sugar, and flour ratios the same for the dough structure, and only add extras to the fruit layer or the final crumble mix.
Serving Suggestions for Your Salted Caramel Apple Bars
Okay, these bars are totally incredible all by themselves, right out of the pan once they’ve cooled down. But if you’re serving these up warm—and I highly recommend trying at least one bar warm, just for research purposes—you absolutely need a temperature contrast! It makes the entire experience next-level, trust me.
Because we’ve got that perfect salty-sweet thing going on, the best partners are usually creamy and simple. You don’t want anything too aggressively flavored competing with that gorgeous caramel and apple combo. If you’re looking for dessert inspiration that builds on simple tradition, you might want to check out how I approach a basic homestyle yellow cake—it proves the simplest recipes are often the best!
Here are my tried-and-true serving ideas:
- Vanilla Ice Cream: This is the classic, and for good reason! A big scoop of high-quality vanilla bean ice cream melts ever so slightly onto the warm, gooey caramel layer. You get hot, cold, salty, and sweet all in one perfect bite. I usually let the ice cream soften on the counter for about five minutes before serving so it droops over the edges nicely.
- Light Whipped Cream: If ice cream feels like too much, a simple dollop of unsweetened or lightly sweetened whipped cream works wonders. It adds airiness and just a little cooling creaminess without the heavy sweetness of frosting. A little dusting of cinnamon right on top of the cream looks gorgeous, too!
- A Glass of Milk: Don’t laugh! Sometimes, presentation isn’t the point; it’s about comfort. These bars are incredibly rich, and pairing them with a tall, cold glass of milk for dipping is pure childhood nostalgia. It washes down the sweetness perfectly.
Honestly, whatever you choose, serve them slightly warmed if you can manage it. That little bit of heat reactivates the caramel so it’s extra oozy. Enjoy!
Storage and Reheating Instructions for Salted Caramel Apple Bars
The best part about these Salted Caramel Apple Bars is that they taste just as good—maybe even *better*—on day two or three! They’ve had time for all those flavors, especially the caramel and apple, to really meld together. But because they are so gooey, storage is important to keep them from getting messy or molding.
The golden rule here, which I learned the hard way when I left a batch uncovered on the counter? You need an airtight container! Those bars will dry out or absorb weird smells from the fridge if you don’t seal them up properly. And remember that cooling instruction from earlier? That applies here too—make sure they are completely cool before you try to put them away, or condensation will make everything soggy!
Room Temperature Storage
If you think you’re going to devour the whole pan within two days—and honestly, I’ve done it—you can keep them right on the counter. Just place the cooled bars in a single layer in an airtight container. If you have to stack them, put a small square of parchment paper between each layer. They should happily sit on your counter for about 48 hours. After that, I worry about the apples, so it’s time to move them to the fridge or freezer if they are still hanging around!
Keeping Them Fresh in the Refrigerator
For longer storage, the fridge is your best friend. Again, containment is everything. Once totally cool, wrap the whole pan tightly in plastic wrap first, then cover it with a layer of aluminum foil for extra protection against humidity. This keeps the crust from getting hard while keeping the caramel from weeping out. You can easily get a good week out of them this way. When you pull them out of the fridge, they will be much firmer because the butter has set up hard, but that’s why we reheat them!
Freezing Your Salted Caramel Apple Bars for Later
These freeze like a dream, which is perfect for me since I make double batches every time! You can freeze the whole pan, or cut them into individual squares first (which is what I usually do so I can grab just one or two at a time). Wrap each square tightly in plastic wrap, and then put those wrapped bars into a zip-top freezer bag. Squeeze out all the air! They freeze perfectly for up to three months. When you want one, just pull it out of the bag and let it thaw on the counter for about an hour before reheating, or skip right to the reheating step if you’re ravenous!
The Best Way to Reheat Salted Caramel Apple Bars
If you’ve stored them in the fridge or freezer, you want to wake up that caramel and soften that buttery crumble again. Microwaving is fast, but you have to be gentle! If you zap them too long, the apples heat up and can get weirdly mushy fast. I prefer the oven when I have a few minutes. Wrap the bars you want to eat in a small piece of foil and heat them in a 300-degree oven for about 5 to 8 minutes until they are just warm through. If you must use the microwave, go in 15-second bursts. You want them warm enough for the caramel to be gooey again, but not hot enough to steam the crust! Remember, they taste best when they are slightly warm, not piping hot.
Frequently Asked Questions About Salted Caramel Apple Bars
I get so many questions after people try this recipe because everyone wants their batch to be as perfect and gooey as mine were the first time! It’s normal to have a few hiccups when you’re working with a new bar recipe, especially one that balances liquid apples with a buttery crumble. Don’t sweat it if your first attempt isn’t Instagram-perfect; we are talking about flavor here, not geometry!
If you’re curious about swapping ingredients or fixing common issues, check out the quick fixes below. And if you’re looking for other fantastic baking problem-solvers, I break down some great tips for my easy banana bread that readers always ask about!
Can I use a different size baking pan for these Salted Caramel Apple Bars?
Yes, you totally can! The recipe is written for an 8×8 inch pan because that gives us that super satisfying, thick, chewy bar. If you use a larger pan, like a standard 9×13 inch pan, you’re spreading the exact same amount of batter much thinner. That means they will bake *much* faster, probably in about 20 to 25 minutes instead of 30 to 35. You have to watch them like a hawk because they can go from golden to burnt extremely quickly when they’re thin. Conversely, if you use a smaller, deeper pan, they will take way longer, maybe 45 minutes or more!
Why are my Salted Caramel Apple Bars crumbly on top?
Oh, that’s the saddest sight when you realize the top layer of your crumble didn’t quite hold together! Usually, this happens for one of two reasons, and they are total opposites, which is annoying. If the crumble topping looks sandy or dry rather than clumpy, you probably over-mixed the dough when you added the flour. Remember, we want *just* combined! Over-mixing develops the gluten and makes the dough elastic instead of crumbly. The other reason is under-baking. Sometimes if you pull them out even five minutes too early, the butter hasn’t fully set up the topping structure, and it just falls apart when you try to slice it. Try baking until those edges are definitely golden brown, and you shouldn’t have this trouble again!
Can I skip the flaky sea salt on top?
Honestly, you *can*, but I really, really wouldn’t recommend it if you want the signature flavor profile! The flaky sea salt isn’t just for looks; it’s crucial for balancing the intense sweetness of the caramel and the brown sugar in the dough. Without it, these are just sweet apple bars. The salt crystals dissolve slightly while the caramel is still warm, giving you those perfect little bursts of savory goodness in every bite. If you don’t have flaky salt, use regular table salt, but sprinkle about half the amount, and maybe mix a tiny pinch into the caramel before you drizzle it on!
How thick should the caramel layer be?
When I say half a cup of caramel sauce, I mean spread it so you can visibly see about a quarter-inch layer across the apples. It needs to be thick enough that when you put the top crumble layer on, you can still see ribbons of caramel peeking out between the crumbles. If your caramel is too thin—say, you only used a quarter cup—it tends to completely soak into the apples and the bottom dough, and then you lose that distinct gooey middle layer when you slice the bars. Go big or go home with that caramel, I say!
Do I have to use brown sugar, or can I use all white sugar?
Please, stick to the recipe and use the light brown sugar called for! The brown sugar is essential because it brings that rich, buttery molasses flavor that pairs so perfectly with apples. White granulated sugar just isn’t as complex. If you only have dark brown sugar, you can substitute that, but go lightly, as it has more moisture and molasses flavor—you might need to reduce it by a tablespoon or two. But white sugar alone? That will make the entire bar taste flat and overly sweet. Don’t take the risk on your final product!
Nutritional Estimates for Salted Caramel Apple Bars
I always get asked about the nutrition because, let’s face it, these are decadent! While I focus more on the taste than the macros when these come out of the oven, I did run the numbers through a standard calculator so you know what you are getting into. Remember, these are just good estimates, and they change wildly depending on the brand of caramel sauce you use. This calculation assumes you cut the pan into 16 generous squares.
Please use these numbers just as a guideline. If you skip the caramel, you’ll save on sugar fast, but you skip the best part, so I don’t recommend it!
| Nutrient | Amount Per Serving |
|---|---|
| Serving Size | 1 bar |
| Calories | 190 |
| Sugar | 18g |
| Fat | 10g |
| Saturated Fat | 6g |
| Carbohydrates | 24g |
| Protein | 2g |

Salted Caramel Apple Bars
- Total Time: 55 min
- Yield: 16 bars 1x
- Diet: Vegetarian
Description
Simple recipe for sweet and salty apple bars with a caramel topping.
Ingredients
- 1 cup all-purpose flour
- 1/2 teaspoon baking soda
- 1/4 teaspoon salt
- 1/2 cup (1 stick) unsalted butter, softened
- 1/2 cup packed light brown sugar
- 1/4 cup granulated sugar
- 1 large egg
- 1 teaspoon vanilla extract
- 1 1/2 cups diced apples (about 2 medium)
- 1/2 cup caramel sauce
- 1/4 teaspoon flaky sea salt (for topping)
Instructions
- Preheat your oven to 350 degrees F. Line an 8×8 inch baking pan with parchment paper, leaving an overhang on two sides for easy removal.
- In a medium bowl, whisk together the flour, baking soda, and salt. Set aside.
- In a large bowl, beat the softened butter, brown sugar, and granulated sugar with an electric mixer until light and fluffy.
- Beat in the egg and vanilla extract until just combined.
- Gradually add the dry ingredients to the wet ingredients, mixing on low speed until just combined. Do not overmix.
- Press half of the dough evenly into the bottom of the prepared baking pan.
- Arrange the diced apples evenly over the dough layer.
- Drizzle the caramel sauce over the apples.
- Crumble the remaining dough over the caramel layer.
- Bake for 30 to 35 minutes, or until the edges are golden brown.
- Remove from the oven and immediately sprinkle the flaky sea salt over the top.
- Let the bars cool completely in the pan on a wire rack before lifting out and cutting into squares.
Notes
- Use firm, tart apples like Granny Smith for the best texture.
- You can make your own caramel sauce or use store-bought.
- Allow bars to cool fully before slicing to prevent sticking.
- Prep Time: 20 min
- Cook Time: 35 min
- Category: Dessert
- Method: Baking
- Cuisine: American
Nutrition
- Serving Size: 1 bar
- Calories: 190
- Sugar: 18
- Sodium: 105
- Fat: 10
- Saturated Fat: 6
- Unsaturated Fat: 4
- Trans Fat: 0
- Carbohydrates: 24
- Fiber: 1
- Protein: 2
- Cholesterol: 35
Keywords: salted caramel, apple bars, dessert, baked apples, sweet and salty