
Oh my gosh, if you’re anything like me, you wait all year for that magical window between September and November where you can justify making things orange and black! Holiday baking can feel so intense, but trust me, you don’t need an all-day project taking over your kitchen. This recipe is my absolute secret weapon: the simplest, most festive **Halloween Cookies** you could possibly imagine. They are basically glorified sugar cookies, but the secret is how easy they are to color and cut out! Every year, these cookies fill our house with that wonderful buttery scent, and we decorate them together while watching cheesy scary movies. They are the perfect quick holiday fun!
Why These Halloween Cookies Are Your Go-To Holiday Treat
I know what you’re thinking: cutout cookies are a nightmare, right? Not these! I promise these Halloween Cookies are built for speed and fun, not stress. They are the best way to get that holiday cheer without spending a million hours covered in flour.
- They pack a huge festive punch for minimal effort. We’re talking barely thirty minutes of active work!
- They hold their shape beautifully, which means those silly ghosts and pumpkins actually look like what you cut them out as.
- The decoration possibilities are endless, whether you want to get fancy or just let the kids smear on some colored icing.
Check out these quick links if you are looking for other easy baking ideas for parties, like some of those great Father’s Day treats, but trust the simplicity of this one for October!

Quick Prep Time for Maximum Fun
You only have about 30 minutes of actual hands-on time, which is my favorite part! Seriously, you mix it, color it, and then you walk away. That minimum one hour of chilling time is your reward for doing the hard work upfront. Go watch a movie, clean the kitchen, or scare the neighbors—the dough doesn’t care!
Simple Decorating for All Skill Levels
This recipe isn’t about intricate piping work; it’s about vibrant orange and black results. We use a very basic glaze here, so it’s completely perfect if your little helpers want to take over the decorating station. If you want perfect edges, grab my favorite sugar cookie recipe instructions for tips on getting super sharp shapes from the dough.
Essential Ingredients for Perfect Halloween Cookies
Okay, this list is super straightforward—that’s the beauty of it! We are sticking to the basics so the flour, butter, and sugar can really shine through before we start messing around with the spooky colors. You really only need a few items to get started, and I’ve linked to my go-to ultimate guide to sugar cookie ingredients if you ever want to dive deeper into that base dough.
Make sure that butter is truly softened—not melted, just soft enough to smash with a little pressure. That creaming step we talked about depends on it!
- Three cups of all-purpose flour—that’s the backbone.
- One teaspoon of baking powder and a half teaspoon of salt to make sure they bake up just right.
- One cup of unsalted butter, softened, and definitely a full cup and a half of granulated sugar.
- We need one big egg and a little splash of vanilla extract for flavor.
- And here’s the fun—your food coloring! I use gel coloring if I can get it because it’s way more concentrated. You’ll want a good orange, a nice deep black, and maybe a creepy green.
- Finally, have your royal icing or simple glaze ready to go for decorating later!
Expert Tips for Making Your Halloween Cookies Dough
Listen, getting the dough right is 90% of the battle with any good cutout cookie, especially when we are trying to make these spooky **Halloween Cookies** hold their shapes perfectly. If you take away only one thing from my kitchen, let it be this: don’t rush the chill!
If you pull it out too early, you’ll be fighting the dough the whole way through rolling. We want clean, crisp ghost and pumpkin edges, not melted blobs!
I also have a trick for the coloring. If you’re trying to get that really deep, saturated black or vibrant orange, try mixing the color into the dough right after you cream the butter and sugar, *before* you add the flour. It blends in much better when the dough is fattier! If you’re looking for other quick, festive cookie ideas that are just as easy, check out my post on no-bake pumpkin spice cookies, but this dough step matters most here.
Chilling the Halloween Cookies Dough Properly
That required one hour in the fridge? It’s not a suggestion, honey, it’s a necessity! Cookie dough that is too warm spreads out the second it hits the hot oven. By chilling it for at least an hour, you firm up all that butter you so nicely creamed in the beginning. When the fat is cold, it takes longer to melt, which means your cookie holds its beautiful, intricate shape instead of morphing into a puddle on the baking sheet.
Step-by-Step Instructions for Baking Your Halloween Cookies
Getting these **Halloween Cookies** baked is super straightforward once you’ve got that firm, colorful dough waiting for you. Remember how I said patience pays off in the chilling step? Well, now it’s time to see that payoff! Make sure your oven is hot—preheat it to 350 degrees F (175 degrees C) and put down some parchment paper on your baking sheets first. If you’re looking for even easier cleanup, I love using those silicone mats, kind of like the ones I recommended for my amazing carrot cake cookies.
Mixing and Coloring the Dough
First things first, whisk together your dry stuff: flour, baking powder, and salt in a bowl. Set that aside. Now, back to the main event: cream the butter and sugar until it’s light and fluffy. Beat in the egg and vanilla until everything looks happy together. When you slowly add the dry mix into the wet, you have to stop mixing just when you can’t see any more flour streaks. I really mean it, don’t overmix! That makes for tough cookies. After that, divide the dough into sections and get busy with the orange, black, and green food coloring!
Rolling, Cutting, and Baking
Once you wrap up the coloring, get those dough balls straight into the fridge for at least an hour. This makes rolling possible! When it’s time, lightly flour your counter and roll one color out to about a quarter inch thick. That’s the sweet spot for eating quality! Grab those fun Halloween cutters—pumpkins, bats, whatever you have—and place the shapes onto your parchment-lined sheets. Pop them in the oven for about 8 to 10 minutes. You’ll know they’re done when those edges turn just lightly golden. Let them sit right there on the pan for five minutes—don’t touch them! Then move them to a rack to cool completely before you even *think* about icing them!

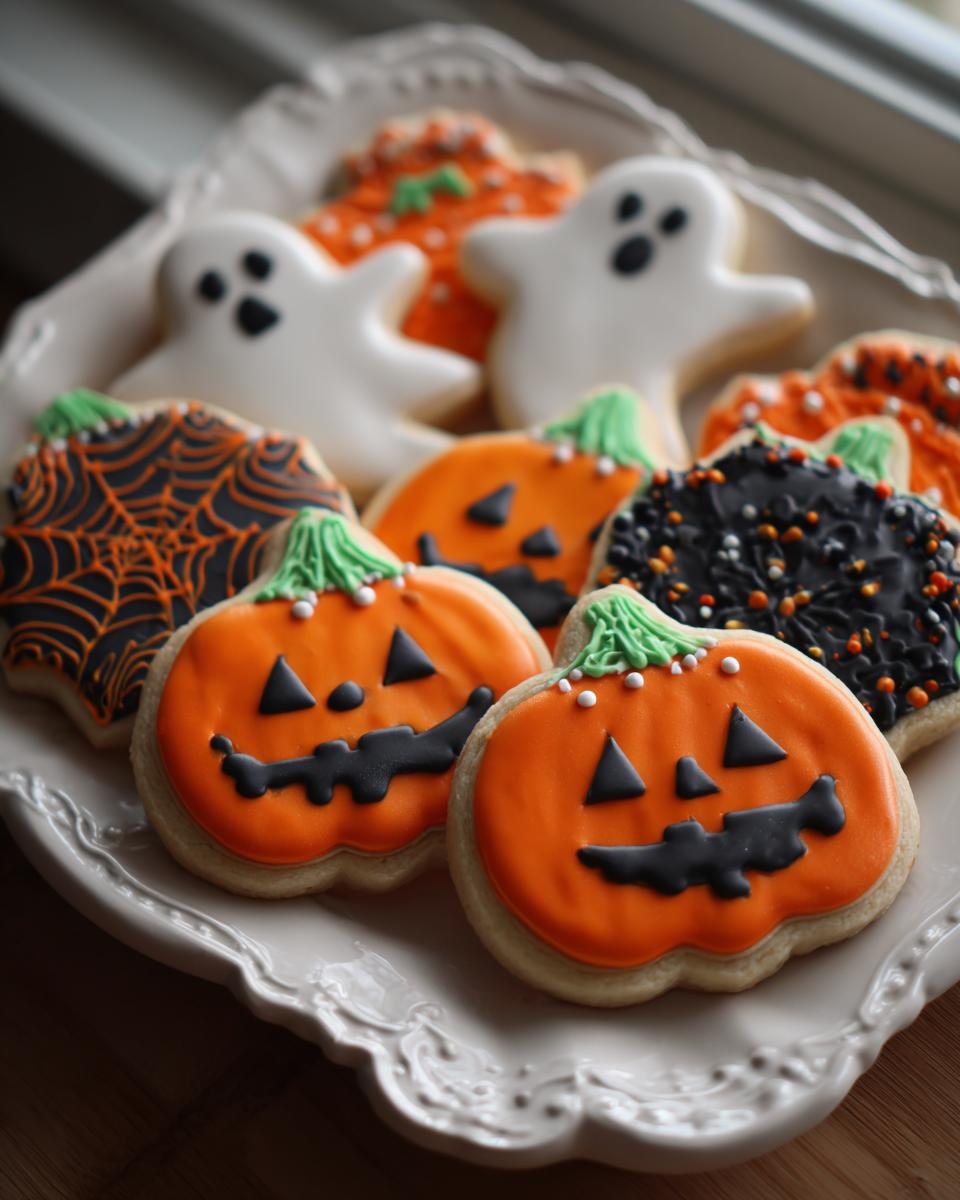
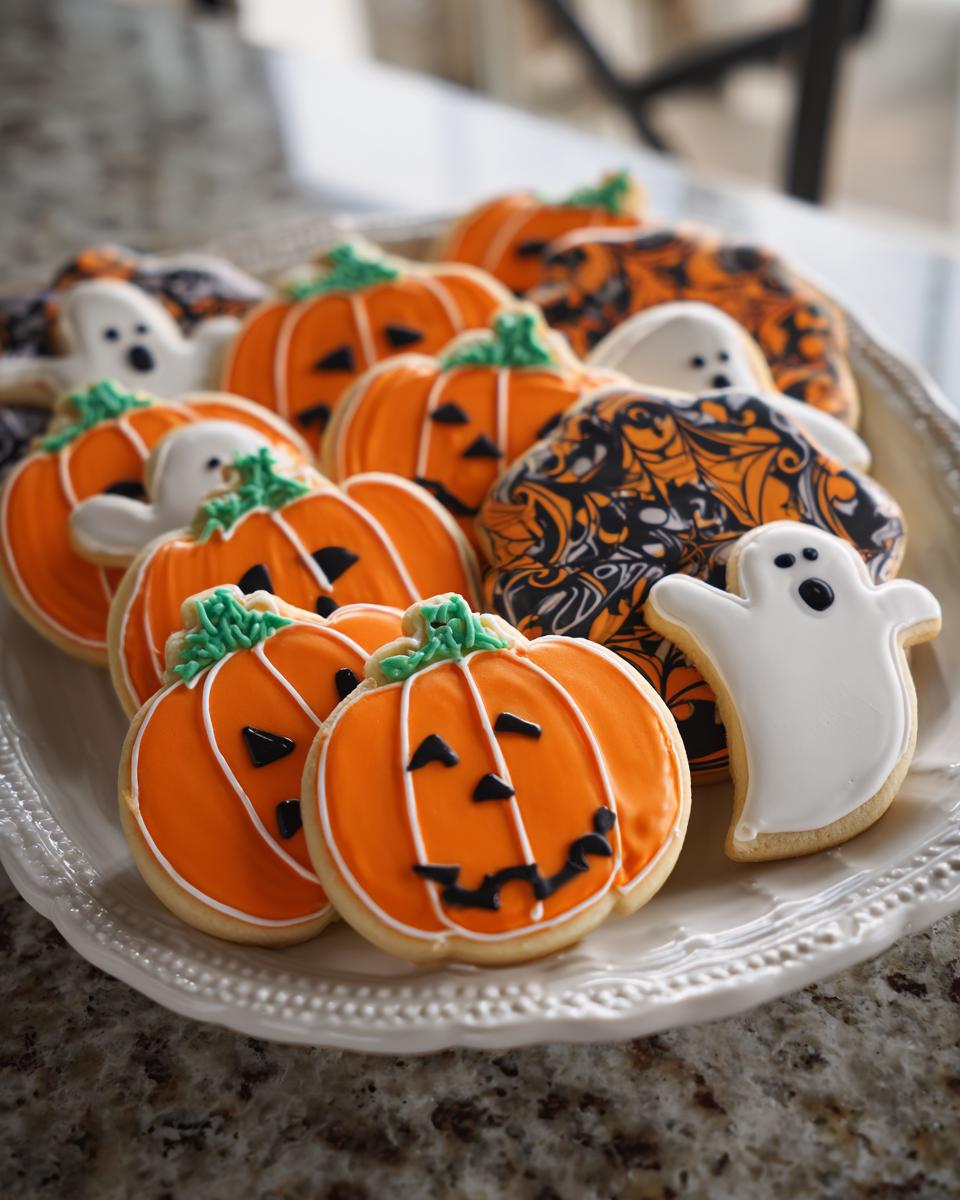
Decorating Your Festive Halloween Cookies
Once those cookies are stone cold—seriously, they must be totally cooled down or the icing will melt into a sticky mess—it’s time for the best part! This is where you turn a plain cookie into an actual scary-good treat. We need those **Halloween Cookies** to shine!
If you made the royal icing, just pipe away! But if you want something super quick, making that simple glaze is a breeze. Take a cup or two of powdered sugar, put it in a bowl, and slowly start adding milk or maybe just a tiny splash of water. You’re aiming for a consistency where it drizzles nicely off a spoon but doesn’t run right off the cookie. Use any leftovers from that glaze to make some quick orange or black colors for eyeballs or spider webs! If you need other speedy cookie ideas, my post on easy cake mix cookies has another great quick glaze idea!
Ingredient Notes and Substitution Ideas
I always try to bake in the most stress-free way possible, and that sometimes means tweaking the basic plan just a tiny bit based on what’s messy or what I have on hand. Since we talk about parchment paper up above, let me tell you about my favorite alternative for these cutout cookies: silicone baking mats. They are reusable, which is great, and clean-up is ridiculously easy—definitely consider them if you want to ditch the paper entirely!
Now, about the dough softening: if you’re rolling out a section and it starts getting sticky and refusing to be cut cleanly, don’t panic! Just slide that sticky piece back onto a piece of plastic wrap and stick it in the fridge for about 15 minutes. It firms right up again, and you can get back to cutting perfect shapes.
I know sometimes you just don’t have time to whip up a batch of glaze or royal icing after a long day. If you’re in a real pinch and just need the cookies done, there is no shame in grabbing a container of pre-made vanilla icing from the store. Just add a drop or two of orange or black food coloring into that canned icing, and you’re good to go! It dries a little softer than royal icing, but honestly, on a cookie this simple, nobody notices!
Storage and Reheating Instructions for Halloween Cookies
Storing these festive **Halloween Cookies** made with love is super important if you want them to last past the first day, right? If you’ve already iced them, wait until the icing is completely hard before you even think about stacking them. Place both iced or un-iced cookies into a sturdy, airtight container.
I find that if the cookies are stored correctly at room temperature, they stay perfectly fresh and tender for about five days. Seriously, they never last that long in my house! If you check out my tips on cake mix cookies, you’ll see that airtight storage is key there too. Don’t even bother trying to freeze decorated sugar cookies; the icing never comes out right!
Frequently Asked Questions About Making Halloween Cookies
It happens every time I share a recipe—I get a flood of the same questions! These simple sugar cookies are so easy, but there are always a few little doubts before you commit. Since you’ve put in the effort mixing and coloring that dough, you want the final **Halloween Cookies** to look fantastic, right? Here are the things people ask me most often about achieving cookie perfection.
Can I skip chilling the dough for these cutout cookies?
Oh, honey, please don’t skip the chilling! I know you want to get them baked right away, but if you try to roll out that dough when it’s warm, you are guaranteeing spread. The warm butter melts too fast in the oven, and instead of a crisp little ghost, you end up with a vaguely spooky, flat circle. It’s just not worth the mess, so stick to that one hour minimum!
What is the best icing to use for sharp edges on Halloween Cookies?
If you want edges that look super sharp and clean, you absolutely need to use royal icing, just like I listed in the ingredients! Royal icing is made with egg whites or meringue powder, which means when it dries, it dries hard and holds its shape perfectly. The simple glaze is great for flooding or quick sprinkles, but for drawing little black spider bodies, stick to the hard-setting royal icing. It handles detail so much better.
How long do these simple cookies stay fresh?
These are surprisingly robust cookies because they don’t have a ton of moisture-heavy add-ins like fruit or nuts. When stored in a good airtight container at room temperature, they stay perfectly tender for about five days. If you put them in a container sooner, you can usually stretch that to maybe seven days, but the texture is definitely best in that first week.
Estimated Nutritional Information for Your Halloween Cookies
I always include a little note about macros because I know some of you are tracking what you eat, even during holiday baking madness! Now, before you hold me to this, these numbers are just estimates based on the standard ingredients list—flour, butter, sugar, and a bit of glaze. Actual counts will change depending on how thick you roll your dough or how thick your icing layer is.
If you are curious about how these basic sugar cookies compare to others, I have a whole breakdown of my classic sugar cookie ingredients over here that might be interesting, you can check out how they stack up against my ultimate sugar cookie recipe!
For one standard cookie, you are looking at roughly this:
- Calories: Around 150
- Total Fat: About 8 grams (oops, that butter adds up!)
- Carbohydrates: Roughly 18 grams
- Protein: Just 2 grams
This is why we call them a treat, right? They’re simple comfort food! Just enjoy one or two while you watch the kids decorate their spooky creations. That’s my philosophy anyway!
Print
Simple Halloween Sugar Cookies
- Total Time: 1 hour 40 min
- Yield: 2 dozen 1x
- Diet: Vegetarian
Description
Basic sugar cookies cut into Halloween shapes and decorated simply.
Ingredients
- 3 cups all-purpose flour
- 1 teaspoon baking powder
- 1/2 teaspoon salt
- 1 cup unsalted butter, softened
- 1 1/2 cups granulated sugar
- 1 large egg
- 1 teaspoon vanilla extract
- Food coloring (orange, black, green)
- Royal icing or simple glaze for decorating
Instructions
- Whisk together flour, baking powder, and salt in a medium bowl. Set aside.
- In a large bowl, cream together butter and sugar until light and fluffy.
- Beat in the egg and vanilla extract until combined.
- Gradually add the dry ingredients to the wet ingredients, mixing until just combined. Do not overmix.
- Divide the dough into sections. Add food coloring to each section to achieve desired Halloween colors.
- Wrap each colored dough section in plastic wrap and chill for at least 1 hour.
- Preheat your oven to 350 degrees F (175 degrees C). Line baking sheets with parchment paper.
- On a lightly floured surface, roll out one dough section to about 1/4 inch thickness.
- Use Halloween-themed cookie cutters to cut out shapes. Place shapes on the prepared baking sheets.
- Bake for 8 to 10 minutes, or until the edges are lightly golden.
- Let cookies cool on the baking sheet for 5 minutes before transferring them to a wire rack to cool completely.
- Decorate with icing once completely cool.
Notes
- For easy cleanup, use silicone baking mats instead of parchment paper.
- If the dough becomes too soft while cutting, return it to the refrigerator for 15 minutes.
- Make a simple glaze by mixing powdered sugar with a small amount of milk or water until smooth.
- Prep Time: 30 min
- Cook Time: 10 min
- Category: Dessert
- Method: Baking
- Cuisine: American
Nutrition
- Serving Size: 1 cookie
- Calories: 150
- Sugar: 15
- Sodium: 50
- Fat: 8
- Saturated Fat: 5
- Unsaturated Fat: 3
- Trans Fat: 0
- Carbohydrates: 18
- Fiber: 0
- Protein: 2
- Cholesterol: 25
Keywords: Halloween Cookies, Sugar Cookies, Cutout Cookies, Holiday Baking, Simple Cookies