
Oh, you guys! It’s officially time to get your holiday baking game on, and I have found the absolute cutest, easiest little treats to make your party tables pop. Forget slaving over a giant cheesecake that needs hours to set; we are going straight for adorable, personalized perfection with these **Grinch Mini Cheesecakes**! I just *love* making individual desserts for parties, because honestly, who wants to cut a slice in a crowded kitchen? Plus, these little guys are tiny but pack a massive festive punch. Everyone gets their own perfect, perfectly grumpy, Grinch face. Trust me, these are going to be the star of your dessert tray this season!
Why This Grinch Mini Cheesecake Recipe is a Holiday Must-Make
We all love a showstopper dessert, but during the holidays? We need speed just as much as spectacular looks! These tiny treats are completely foolproof, which is exactly what I need when juggling cookies and cocktails. Everyone gets their own perfect little tart, meaning cleanup is easier, too!
- They are absolutely adorable—instant conversation starters!
- Portion control is built right in (if you can stop at one, good for you!).
- The baking time is shockingly fast.
If you’re looking for recipes that let you spend more time sipping eggnog and less time worrying about cracks, you need to look into making 12 mini cheesecakes at once. It’s a game-changer for holiday baking, and you can find some great general tips right here if you want to make a giant batch!
Quick Assembly for Festive Grinch Mini Cheesecake
This is why I swear by this recipe when the calendar gets hectic. Because we use those pre-made mini tart shells, the actual active prep time is barely anything—maybe 20 minutes tops before they go into the oven. That means you can whip up a batch of **Grinch Mini Cheesecake** faces before your guests even arrive. Seriously, you can mix the filling while your coffee brews!
Essential Ingredients for Perfect Grinch Mini Cheesecake
Okay, let’s talk about what we need to bring this slightly grumpy little face to life. Since we are keeping things fast, we’re starting with 12 graham cracker crusts—the mini tart shells are a lifesaver!
For the filling, you need 8 ounces of cream cheese that’s nice and soft, 1/4 cup of regular sugar, one large egg, and just a half teaspoon of vanilla. Then comes the magic color! You’ll need a good amount of green food coloring. We also whip up a tiny bit of white frosting using powdered sugar and milk for the face area. Don’t forget the facial features: red candy melts for that famous mouth and little black candies for the eyes!

For anyone looking for flavor inspiration outside the Grinch theme, I recently made some marvelous savory cupcakes that used a cream cheese swirl, and they were amazing. You can check out the recipe over here!
Ingredient Notes and Substitutions for Your Grinch Mini Cheesecake
If you somehow don’t have those pre-made crusts, don’t panic! Just blend up some graham cracker crumbs with melted butter until it looks like wet sand, then press that mixture into a mini muffin tin. That works like a charm every time. The most important thing for that vibrant, almost cartoonish green on the **Grinch Mini Cheesecake** is the food coloring. Seriously, use the gel kind if you have it! Liquid coloring tends to thin out the creamy filling too much, and we want that thick, decadent texture to hold the shape.
Step-by-Step Instructions to Make Grinch Mini Cheesecakes
Getting these ready is like following a simple baking blueprint, but you have to respect the cooling time—that’s where the trust comes in! We are mixing until *just* combined, because overbeating cheesecake batter is the fastest way to get those little cracks we absolutely want to avoid on our **Grinch Mini Cheesecakes**.
If you’re looking for a heavenly, quick dessert hack, you should definitely peek at this marshmallow whip recipe I found; it’s amazing how fast you can get soft desserts!Check it out here!
Baking and Cooling the Grinch Mini Cheesecake Base
First thing’s first: Preheat your oven to 350 degrees Fahrenheit (175 Celsius). While that heats up, mix your cream cheese, sugar, egg, and vanilla until smooth. Be gentle here! Now, add in the green food coloring until you get that perfect, slightly naughty shade. Spoon that batter evenly into your 12 crusts. They only need about 12 to 15 minutes. Watch them closely! When the edges look set, pull them out of the oven. They simply must cool down completely on a rack. If you try to decorate a warm cheesecake, you’ll end up with a green, melty puddle, and that’s not the Grinch we are aiming for!
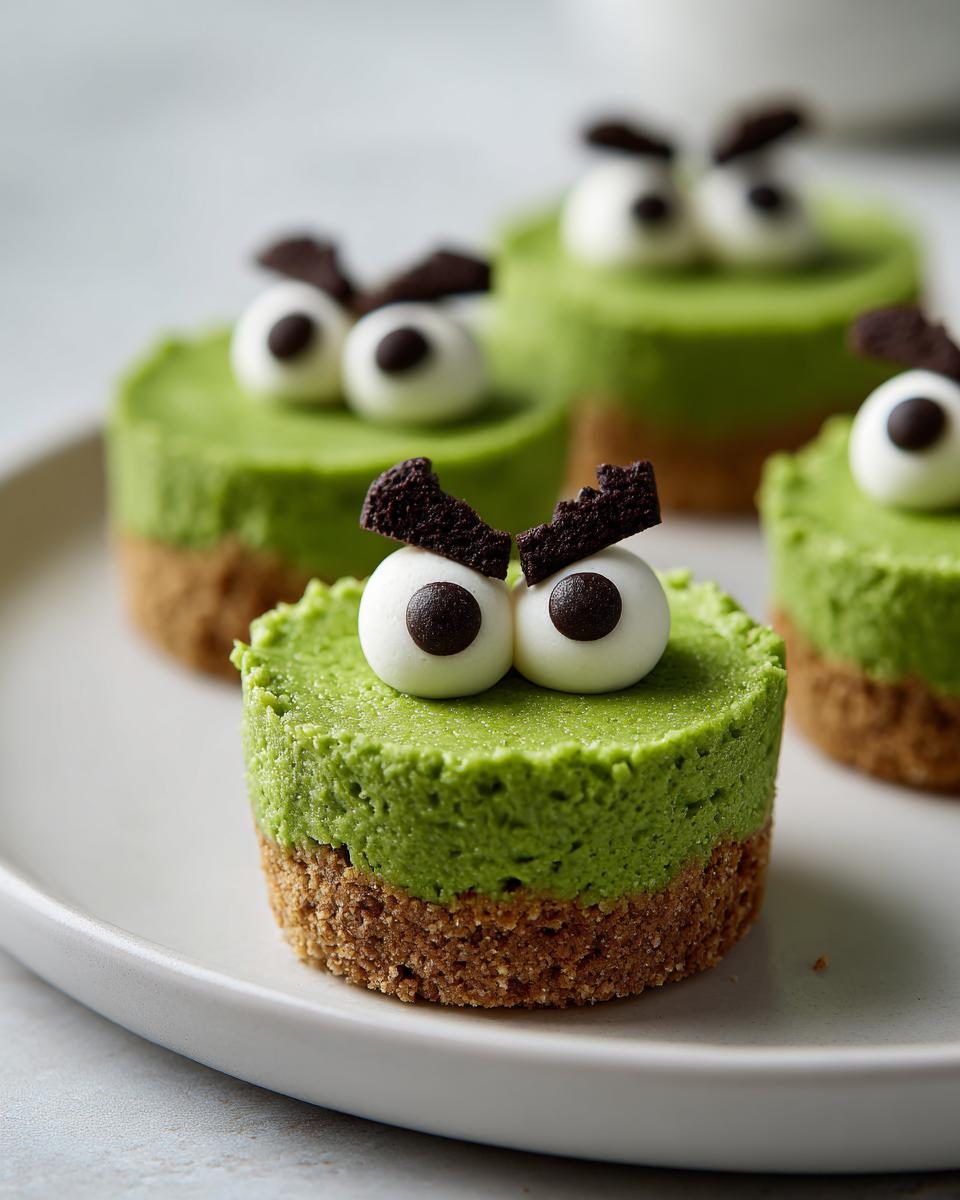
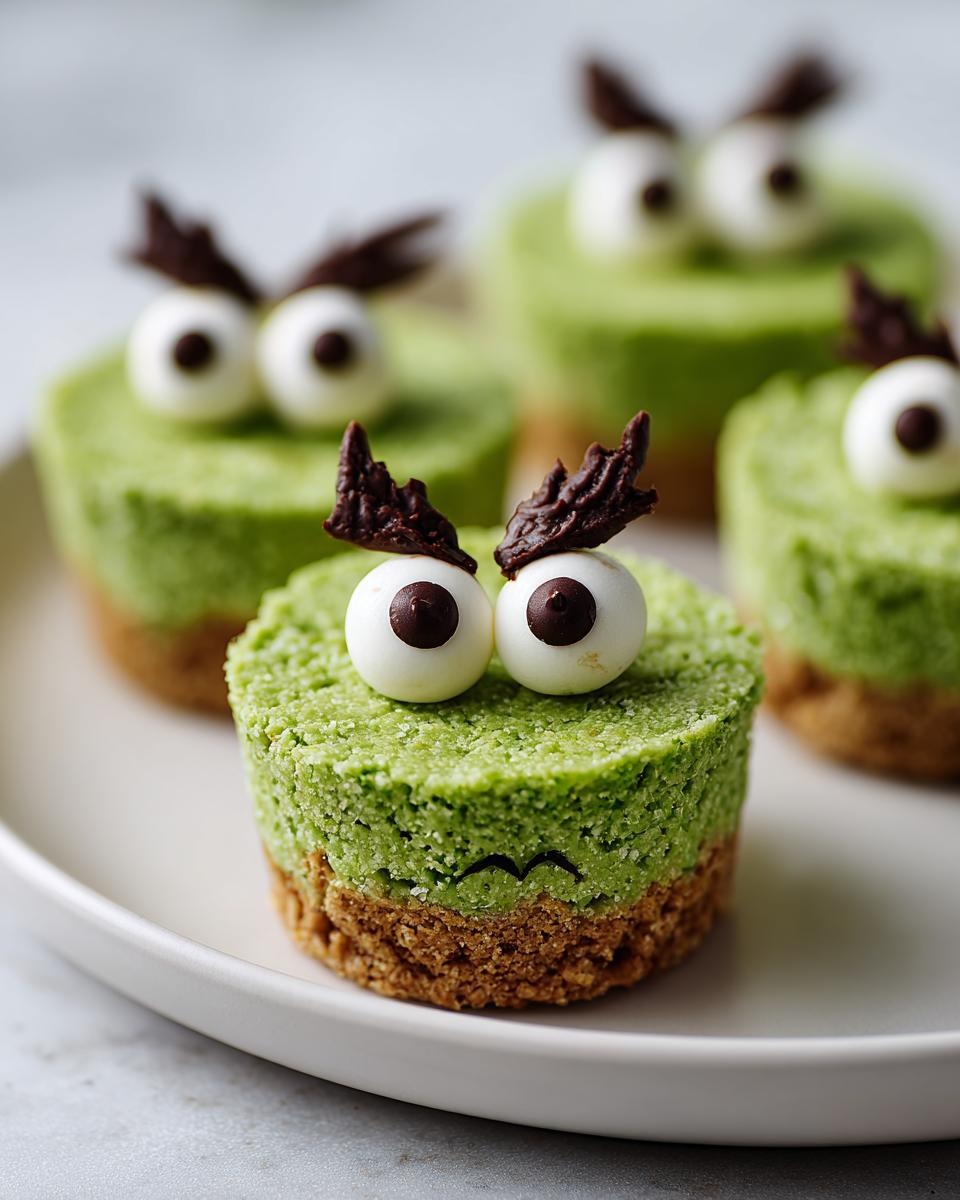
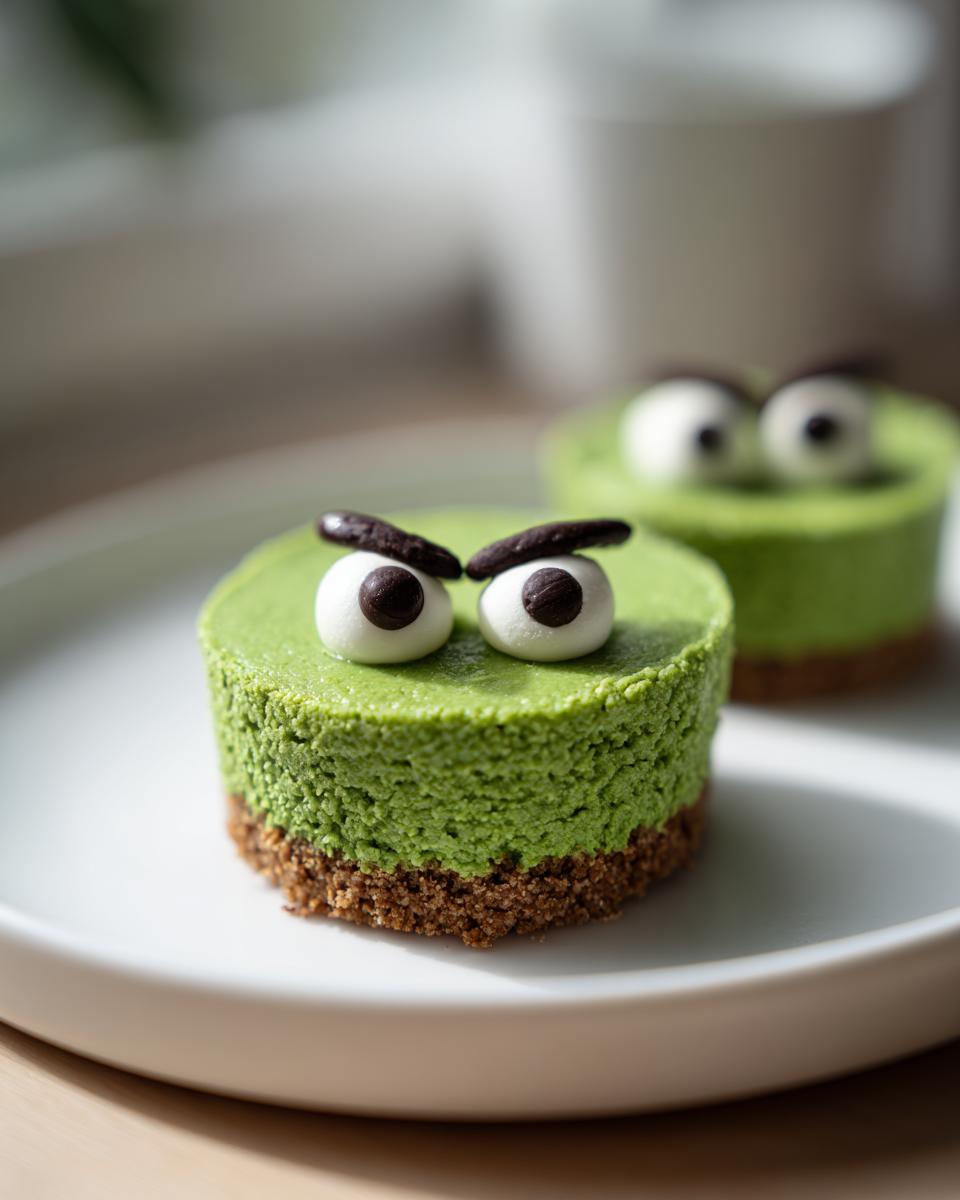
Decorating Your Festive Grinch Mini Cheesecake Faces
Once they are totally cool—and I mean totally—we start the fun! Whisk your powdered sugar and milk to make a simple white frosting for the face area. Dab a nice circle on the top center of each green cheesecake. Now, use a tiny bit of the leftover frosting or a dab of melting chocolate to stick those two chocolate chip eyes onto the white part. Then, take your red candy melts or frosting and pipe that signature little frown underneath the white area. Finish by sprinkling those tiny red candies along the top edge of the white mask to look exactly like a Santa hat trim. Pop them in the fridge for an hour to set before serving!
Tips for Achieving the Best Grinch Mini Cheesecake Results
I’ve learned a few tricks over the years to make sure these adorable little desserts come out perfect every single time. First, and this is huge for any cheesecake: don’t overmix the batter after you add the egg! Overmixing whips in too much air, and that air escapes during baking, which leads to cracks. We want smooth faces, not cracked mountains!
Also, when you are chilling them after decorating, make sure they are covered lightly. Cheesecake hates air exposure. My personal trick to avoid the frosting running is actually chilling the cheesecakes for 30 minutes *after* they bake and cool down *before* I even start the white face frosting. It firms up that green base just enough. If you’re looking for a totally different flavor profile but still need that cheesecake goodness, you absolutely have to check out this divine lemon version with Oreo secrets I found—it’s unreal! You can check that one out here.
Storage and Make-Ahead Options for Grinch Mini Cheesecakes
One of the greatest things about these individual desserts being little sturdy cheesecakes is that they are fantastic for planning ahead. Holiday schedules are brutal, right? You don’t want to be decorating tiny green faces the morning everyone shows up.
You can absolutely bake the green cheesecake bases one day and then let them cool completely, popping them covered into the fridge overnight. They hold up wonderfully! Then, the next day when you have a quiet moment, you can tackle the white frosting, the eyes, and the little red mouths. This two-day approach saves so much last-minute stress.
Once they are fully decorated, they must stay chilled, of course. Just make sure they are covered tightly—I usually use a large plastic container with a lid rather than plastic wrap directly on top, just to keep that frosting safe from accidental squishing. They stay perfectly fresh and delicious for about three to four days in the refrigerator. That’s huge when planning a party menu!
Speaking of decadent chilled desserts, if you ever need a different kind of treat that also stores well, I found an absolutely amazing recipe for strawberry cheesecake bars that uses a similar process for crust stability. You can find the recipe if you want to switch things up next week!
Serving Suggestions for Your Grinch Mini Cheesecake Display
Alright, now that you have perfected the grumpy little faces, how do you show them off? These individual servings are begging to be displayed beautifully! My favorite way to serve these **Grinch Mini Cheesecakes** is on a plain white platter or, even better, using a tiered serving tray.
When you stack them up on a tiered stand, it really draws the eye, and it looks like you spent hours fussing over them—even though we know we barely spent any time at all! I like to use green and red paper liners underneath them if I didn’t use the full tart shell, just to double down on the theme.
As for what to serve them with, you can’t go wrong with a classic pairing. Because these are rich and tangy, they cut through richness really nicely. Think about serving them alongside a nice hot cup of something comforting. If you want to get really cozy, you absolutely have to try this Italian-style hot chocolate recipe I found; it’s pure velvet! You can find the directions right here—it makes the whole spreading process feel extra festive!
If you are having an afternoon party, strong coffee or espresso is the perfect companion to cut through that cream cheese tang. Honestly, with how cute these **Grinch Mini Cheesecakes** are, people will be taking pictures before they even take a bite!
Frequently Asked Questions About Grinch Mini Cheesecakes
It’s natural to have questions when trying a new recipe, especially one that involves decorating tiny faces! I’ve gathered up the ones I hear most often about the **Grinch Mini Cheesecakes** to make sure your batch turns out perfect. We want smooth, green goodness, not guesswork!
Can I make the Grinch Mini Cheesecake filling without baking?
That’s a great question, especially when you’re trying to save oven space during the holidays! While you technically *could* try to make a no-bake version for these **individual holiday desserts**, this specific recipe relies on that quick bake to set the egg and give the filling that classic, dense cheesecake texture we want. A no-bake filling would require a different ratio of gelatin or whipped cream, so if you aren’t baking them, you’d actually need a whole different recipe base. Stick to the bake time for this one—it’s so fast, you barely notice it!
What is the best way to get the Grinch’s hat color?
Oh, achieving that perfect, slightly villainous green is key here! You really want to use gel food coloring, not the liquid kind you find in the little plastic dropper bottles. The liquid coloring adds too much water, which slightly thins out your rich cheesecake batter, and we don’t want runny filling. A few tiny drops of quality green gel coloring will give you that intense, rich color needed for a fantastic **Grinch Mini Cheesecake** face without messing up the texture one bit.
How long do these individual holiday desserts need to chill?
Chilling is just as important as baking when it comes to cheesecake! Once you’ve finished decorating those adorable little mouths and eyes, the recipe calls for a minimum of one hour in the refrigerator before serving. I actually prefer to let mine chill for at least two hours if I can manage it. That time lets the cream cheese base firm up completely, and it lets the flavors settle. Plus, it really helps make sure the chocolate chip eyes stick firmly in place! By the way, if you ever want a fantastic tang in your desserts that isn’t Grinch-related, you might want to check out this Key Lime Cake recipe for something bright and zesty next time right over here.
Estimated Nutritional Snapshot for Grinch Mini Cheesecakes
Okay, so we need to talk a little bit about what’s going into these adorable little **Grinch Mini Cheesecakes**. While I am definitely not a nutritionist—I’m a cook, through and through!—I like to have a general idea of the estimates, especially when serving them at bigger gatherings.
Keep in mind that these numbers are based on the ingredients listed and will change a bit depending on your specific brand of graham crackers or if you use heavy cream instead of milk in your little white frosting batch. These figures are just a nice guideline for everyone!
- Serving Size: 1 mini cheesecake
- Calories: About 200 per serving—perfect for a holiday party treat!
- Fat: Roughly 12 grams total (about 7 grams of that is saturated fat, thanks to the lovely cream cheese!)
- Carbohydrates: Around 20 grams.
- Protein: About 4 grams.
- Sugar: We’re looking at about 18 grams of sugar, remember most of that is coming from the crust and powdered sugar.
- Cholesterol: Around 45 mg.
See? Nice and portable! Just remember—these are estimates based on the standard ingredients. If you’re adding extra chocolate chips or an extra thick layer of red icing, those numbers are going to shift just a tiny bit. But nobody is counting too closely when facing down a mini Grinch face, am I right?
Share Your Grinch Mini Cheesecake Creations
Now that you’ve baked, decorated, and hopefully tasted your batch of **Grinch Mini Cheesecakes**, I absolutely need to hear about it! Don’t just bake them up and hide them away—these deserve some spotlight!
Please, please, please leave a comment below letting me know what you thought. Did the green turn out perfect? Did your little red mouths curve just right? Tell me about your decorating wins or any hilarious little mishaps! Every rating helps other bakers feel confident trying this recipe, and I truly read every single one.
And if you put these on social media—and I hope you do because they’re too cute not to share—tag me! I love seeing your holiday baking come to life. Seriously, the biggest compliment you can give me is seeing your festive treats!
If you’re already thinking about what other make-ahead desserts you can conquer next, I have a fantastic recipe for strawberry cheesecake bars that I think you’ll love for a different kind of individual serving dessert. You can find those delicious bar instructions when you click here. Happy baking, and I can’t wait to see those grumpy little faces!
Print
Grinch Mini Cheesecakes
- Total Time: 35 min
- Yield: 12 mini cheesecakes 1x
- Diet: Vegetarian
Description
Small, individual cheesecakes decorated to look like the Grinch’s face.
Ingredients
- 12 graham cracker crusts (pre-made mini tart shells)
- 8 ounces cream cheese, softened
- 1/4 cup granulated sugar
- 1 large egg
- 1/2 teaspoon vanilla extract
- Green food coloring (gel preferred)
- 1/4 cup powdered sugar
- 1 tablespoon milk
- Red candy melts or frosting for the mouth
- Small red candies or sprinkles for the hat trim
- Chocolate chips or small black candies for the eyes
Instructions
- Preheat your oven to 350 degrees Fahrenheit (175 degrees Celsius).
- In a medium bowl, beat the softened cream cheese and granulated sugar until smooth.
- Beat in the egg and vanilla extract until just combined. Do not overmix.
- Add several drops of green food coloring to achieve a bright green color. Mix well.
- Spoon the green cheesecake batter evenly into the 12 mini crusts.
- Bake for 12 to 15 minutes, or until the edges are set.
- Remove from the oven and let the cheesecakes cool completely on a wire rack.
- While cooling, prepare the white frosting: Whisk together the powdered sugar and milk until smooth.
- Once cooled, spread a small amount of white frosting on the top center of each cheesecake to create the Grinch’s white face area.
- Use a small dab of frosting to attach two chocolate chips for eyes.
- Use red candy melts or frosting to create a curved line for the mouth below the white area.
- Place small red candies or sprinkles along the top edge of the white frosting to mimic the hat trim.
- Chill the cheesecakes for at least 1 hour before serving.
Notes
- Use gel food coloring for a more intense green color without thinning the batter.
- If you do not have pre-made crusts, you can press a mixture of graham cracker crumbs and melted butter into a mini muffin tin.
- Allow the cheesecakes to cool fully before frosting, or the frosting will melt.
- Prep Time: 20 min
- Cook Time: 15 min
- Category: Dessert
- Method: Baking
- Cuisine: American
Nutrition
- Serving Size: 1 mini cheesecake
- Calories: 200
- Sugar: 18
- Sodium: 150
- Fat: 12
- Saturated Fat: 7
- Unsaturated Fat: 5
- Trans Fat: 0
- Carbohydrates: 20
- Fiber: 0
- Protein: 4
- Cholesterol: 45
Keywords: Grinch, mini cheesecake, holiday dessert, Christmas, individual serving, green dessert