
There is just nothing that screams ‘elegant treat’ louder than a perfectly puffed pastry shell, and I’ve finally cracked the code on making them consistently at home! Forget those flat, sad things you sometimes see; we’re making true, hollow, golden shells ready to burst with joy. These classic French choux puffs, when filled with cloud-like whipped cream and the brightest sliced strawberries, become the most glorious Strawberry Cream Puffs you’ve ever tasted.
I remember the first few batches I tried—they deflated faster than a sad balloon! But please don’t be intimidated. Once you understand the dough, it’s almost like magic. You bring butter and water to a boil, dump in the flour, cook it until it screams at you, and then beat in the eggs. Trust me, once you get these light shells baked correctly, filling them with that fresh, sweet cream is the easiest part of the recipe.
Why You Must Make These Strawberry Cream Puffs Today
- They are unbelievably light—truly airy shells that practically melt in your mouth!
- The filling is pure heaven: real whipped cream mixed with fresh vanilla. You can read more about perfecting your cream filling in my ultimate guide to pastry cream, even though we are using whipped cream here!
- Visually stunning! These pastries look like they came straight from a fancy Parisian bakery.
- Once the pastry is baked, assembly is ridiculously fast. Perfect for last-minute entertaining.
Seriously, this recipe is about maximizing enjoyment with minimal fuss once that tricky choux dough is cooled. You won’t believe how quickly these disappear!
Essential Ingredients for Perfect Strawberry Cream Puffs
When making choux pastry, ingredients matter, but simplicity is key. For the shells, you need the basics: water, butter (I always use unsalted, cut into cubes), and flour. Then come the four large eggs.
This is crucial, so listen up: those eggs absolutely *must* be at room temperature before you beat them in! Cold eggs shock the hot dough and prevent that beautiful, glossy texture we’re aiming for. For the filling, make sure your heavy whipping cream is seriously cold, just like you’re whipping up standard heavy cream. We’ll also need powdered sugar and vanilla for flavor, plus two cups of the freshest strawberries you can find, sliced beforehand!
Equipment Needed for Making Strawberry Cream Puffs
Okay, let’s talk tools! Making these Strawberry Cream Puffs is straightforward, but you need the right setup for the choux pastry part. Don’t try to skimp here; having the right gear makes the dough cooperative instead of a sticky nightmare.
First, you absolutely need a sturdy medium saucepan for bringing the liquid and butter up to a boil. You’ll be stirring that dough rapidly, so a solid base is smart!
For mixing the dough after it cools slightly, grab a good-sized mixing bowl. Whether you use a stand mixer with the paddle attachment or a trusty hand mixer, you need power to beat those eggs in one by one. Trust me, mixing just won’t get right with a wooden spoon!
Next up: baking supplies. You’ll want two reliable baking sheets lined with parchment paper. Always use parchment; it’s a life-saver, especially when dealing with choux. You’ll also need a small bowl for your whipped cream filling.
Finally, for portioning the dough onto the sheet, you can use a piping bag with a large round tip if you’re feeling fancy, but honestly, two spoons work perfectly well for dropping that dough into mounds. For filling, grab a small offset spatula or a sharp paring knife to carefully slice the cooled puffs open!
Step-by-Step Guide to Baking Choux Pastry for Strawberry Cream Puffs
This is where the magic—and the potential panic—happens! Making choux pastry, that famous dough for our beautiful Strawberry Cream Puffs, requires confidence, but I promise you, once you nail the texture, you’ll be making these all the time. Remember, this dough needs high heat to puff up quickly before setting properly.
I remember the first few batches I tried—they deflated faster than a sad balloon! But please don’t be intimidated. Once you understand the dough, it’s almost like magic. You bring butter and water to a boil, dump in the flour, cook it until it screams at you, and then beat in the eggs. Trust me, once you get these light shells baked correctly, filling them with that fresh, sweet cream is the easiest part of the recipe. If you’ve already read my thoughts on pastry cream bases, you know how crucial temperature control is, and this is definitely one of those times you need to respect heat! Check out my tips on perfecting pastry bases for more insight.
Preparing the Base Dough
First things first, get that oven heating up to 400°F (200°C) and prep those baking sheets with fresh parchment paper. In your saucepan, bring the water and butter together over medium heat until it all boils happily. Once it hits that rolling boil, take it off the heat immediately! Dump in all your flour at once and get after it with a strong spoon or spatula. You must stir vigorously until everything scrambles together into a smooth, cohesive ball of dough. That’s the *pané*. Return this ball to low heat and keep stirring for just one minute. This little bit of cooking drives off excess moisture, which is super important for a tall puff!
Incorporating Eggs and Baking the Puffs
Transfer the dough to your mixing bowl now—it needs to cool slightly so it doesn’t scramble those beautiful room-temperature eggs! Start beating them in one at a time. Don’t even think about adding the next egg until the previous one is completely absorbed and the dough looks smooth and glossy again. It might look separated at first, but keep mixing; it comes together, I promise! Drop rounded tablespoons of dough onto your prepared sheets, spacing them about 2 inches apart.

Bake at 400°F (200°C) for exactly 15 minutes. Then, here’s the essential second stage: drop the heat to 350°F (175°C) and bake for another 15 to 20 minutes. The golden rule of choux: DO NOT OPEN THE OVEN DOOR during this whole time. Seriously, don’t even peek! Once they seem golden and firm, turn the oven completely off, prop the door open just a crack with a wooden spoon, and leave them in there for 15 minutes to dry out. This final drying prevents them from collapsing into sad little pancakes. When they are done, they sound hollow when you tap them lightly!
Crafting the Whipped Cream Filling for Strawberry Cream Puffs
Now that our choux shells are perfectly cool and hopefully sitting upright like little golden hats, we move on to the best part: the filling! This recipe calls for a simple, pure whipped cream, which truly lets the fresh strawberries shine through. Anything too heavy would wreck the delicate shell structure we fought so hard to create.
You’ll take your very cold heavy whipping cream, powdered sugar, and that lovely vanilla extract into a clean, chilled bowl. I mean it—cold cream whips up faster and holds its shape much, much better. If you’re new to whipping cream, start slow! You can always increase the speed, but speeding up too fast can sometimes turn beautiful cream into butter if you aren’t paying attention!
Whip everything together until you reach stiff peaks. When you lift the whisk, the cream should stand straight up without curling over. That’s your cue to stop! If you’re looking for some fun variations on creamy fillings, I’ve got some neat ideas for lighter, fluffier desserts over in my post on four delicious fluff recipes, but for these puffs, classic whipped cream is king.
My biggest tip here for stability? Put the whipped cream right back into the fridge until the absolute last minute before you start assembly. The warmer the cream gets, the looser it becomes when you’re trying to pipe or spoon it into the shells.
Assembling Your Delicious Strawberry Cream Puffs
We’ve baked the shells until they’re light as air, and we’ve whipped the cream until it looks like fresh snow! Now comes the grand finale for these Strawberry Cream Puffs. This is the step where many people rush it, and honestly, that’s how you lose the crunch factor, so slow down just for a moment!
If you plan on having guests or serving these more than 30 minutes after you fill them, I strongly suggest you keep the cream and the sliced strawberries separate from the shells until the second you are ready to serve. Seriously, moisture is the enemy of crisp pastry! Choux shells go soggy faster than you can believe once that creamy filling touches them.
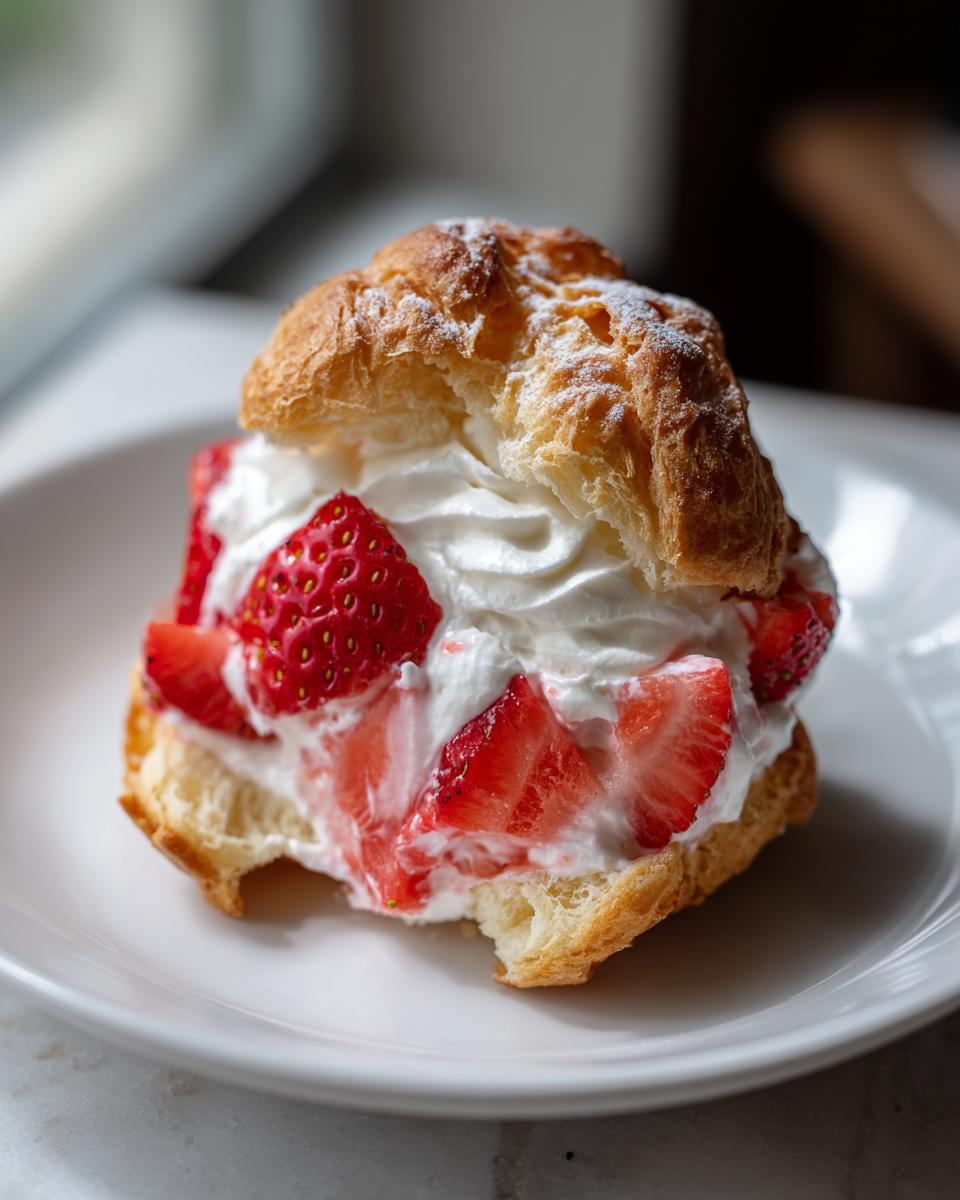
When you are ready to go, take your completely cooled puff shells. Using a small, sharp paring knife or perhaps a serrated knife, carefully slice the puff horizontally, like you’re carving a little door into the top of a baked UFO. You want to separate the top half neatly from the bottom half.
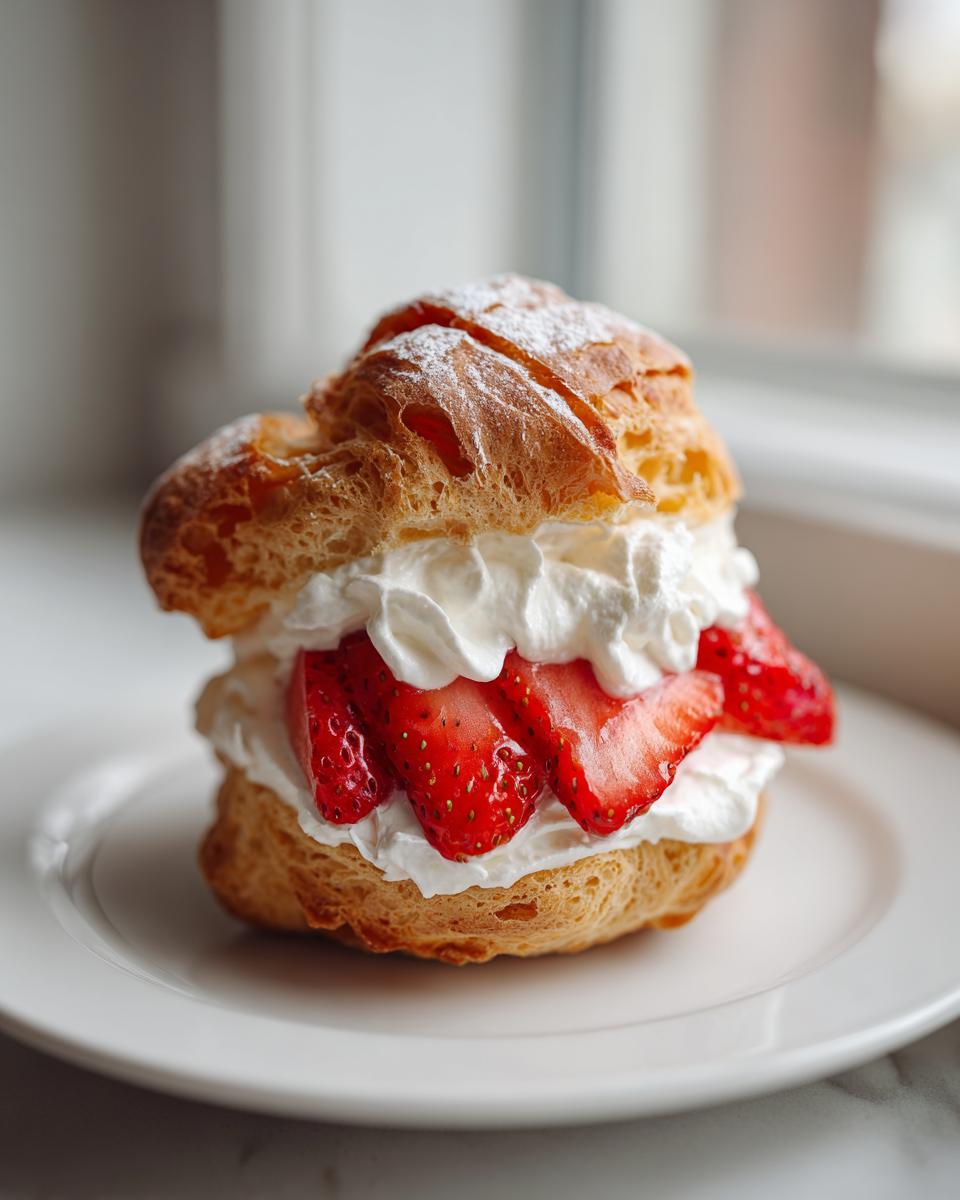
Now, layer it on! Spoon a generous dollop of that homemade whipped cream onto the base of the lower shell. Don’t be shy—remember, these puffs are meant to welcome a big mouthful of creaminess. Then, arrange a few slices of those vibrant red strawberries right on top of the cream. They add that essential tart burst that cuts through the sweetness.
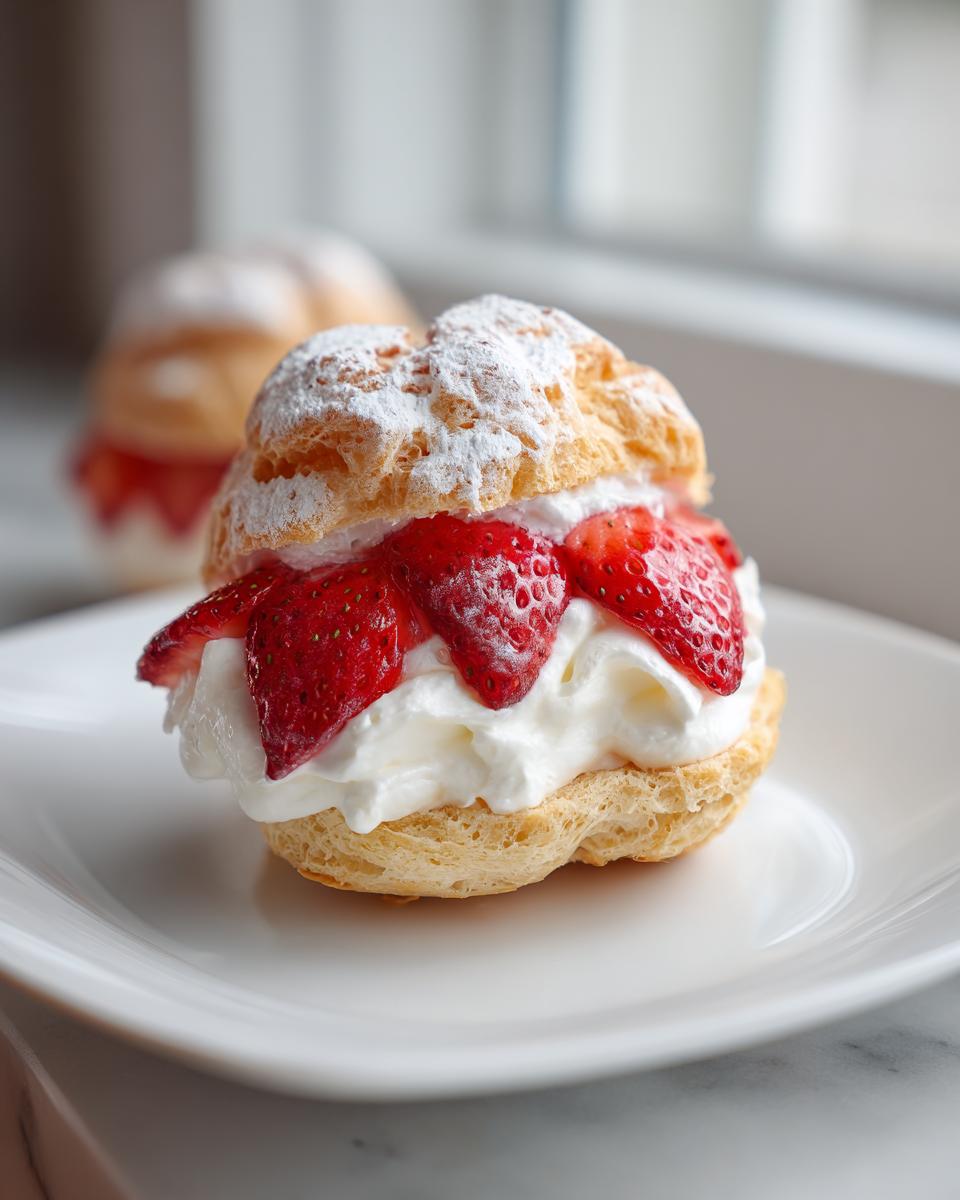
Finally, gently place the top half of the puff back on. If you dusted the tops of your baked shells lightly with powdered sugar beforehand, that dusting will look lovely sticking to the whipped cream peeking out the sides. That’s it! You have created a perfect Strawberry Cream Puff. Try not to eat the whole batch before serving them!
Tips for Success with Strawberry Cream Puffs
I’ve learned a few tricks over the years, mostly the hard way, watching perfectly good pastry sink into a sad puddle. The key to these light beauties isn’t just the recipe, it’s respecting the chemistry happening inside that hot oven! Master these three concepts, and you’ll never buy store-bought puffs again.
First, let’s talk temperature again, because it’s non-negotiable. For the choux dough to come together correctly (that glossy, beautiful mix after adding the eggs), your eggs must be relatively room temperature. If they are straight from the fridge, they cool the dough down too fast, and you won’t get that necessary gluten development for a strong structure. On the flip side, for the filling, your heavy cream needs to be ice cold. If it’s even slightly warm, it takes forever to whip, and whatever peaks you get won’t hold for more than five minutes. It’s a balancing act!
Next up is the dreaded oven peek—the number one killer of cream puffs everywhere. When you’re baking these Strawberry Cream Puffs, the first 15 minutes at the high temperature is when they steam themselves into existence. If you open that door, the rush of cool air makes them immediately collapse because the structure hasn’t set yet. They need that blast of heat to create enough steam inside to puff them up large. Don’t even hover near the oven until that initial time is up!
So, how do you know they’re truly done when you turn the heat down? You’re looking for two signs that tell you the interior is dry enough: color and sound. They should be a deep, rich golden brown, not pale yellow. Then, gently touch one. Does it spring back slightly? Perfect. The ultimate test, though, is picking one up carefully. If it feels very light and sounds noticeably hollow when you tap it, the inside is dry, and you’ve created a perfect pocket for cream. If you’re still struggling with puff perfection, make sure you read my thoughts on the one mistake everyone makes in baking—it might just solve your issue!
Lastly, remember that final drying step with the propped-open door. That step is vital for pulling residual moisture out so that when they cool on the wire rack, they stay shatteringly crisp on the outside, which is exactly what you want before adding your soft cream and fruit.
Storing and Serving Your Strawberry Cream Puffs
Listen to me on storage because this is where potentially amazing Strawberry Cream Puffs can turn into mushy disappointments! Once you combine the crisp choux shell with that lovely, moist filling of cream and strawberries, you’ve got a very short window of perfection. Honestly, try to eat these within just a couple of hours of assembly.
If you are making them ahead of time, the best approach is separating everything. Bake your shells up to three days early and keep them in an airtight container on the counter—they’ll stay wonderfully crisp. Keep the whipped cream tightly covered in the fridge, and only slice your strawberries right before serving. This keeps every component at its peak quality.
When you are ready to serve, just slice, fill, and enjoy immediately. If you must serve them slightly later, you can dust the *unfilled* tops of the shells with powdered sugar right before filling just for that extra pretty touch. If you’re craving more strawberry delights later, check out this recipe for a luscious no-bake strawberry cream pie!
Frequently Asked Questions About Strawberry Cream Puffs
Why did my Strawberry Cream Puffs deflate immediately after coming out of the oven?
Oh, that’s the saddest thing, isn’t it? It almost always comes down to not drying the pastry enough. The high heat creates steam, which makes them puff up beautifully, but if you pull them out into cooler air too soon, that steam condenses, and *poof*—they collapse!
The solution is that final, crucial step listed in the instructions: turning the oven off, propping the door open slightly, and letting them sit in that residual heat for at least 15 minutes. This gradual cool-down sets the structure so they stay light and hollow, ready for that airy whipped cream.
Can I substitute the whipped cream with a store-bought filling or heavier pastry cream?
You certainly can use pastry cream if you prefer, but be aware that it’s much heavier than the simple whipped cream called for in this recipe. A heavier filling will absolutely weigh down those delicate choux shells, causing them to compress sooner. If you do use pastry cream, I highly recommend making a very light version or adding whipped cream to stabilize it, which is basically making a diplomat cream!
If you’re interested in making a stable, luxurious cream filling, check out my detailed instructions on how to make the best homemade pastry cream. Remember, lighter filling equals a lighter, longer-lasting Strawberry Cream Puff!
How far ahead of time can I bake the choux shells for these cream puffs?
This is one of my favorite time-saving hacks! The shells themselves are quite durable if you dry them out properly during baking. You can bake your choux shells up to three days in advance. Keep them stored in an airtight container at room temperature—never the fridge, as cold air can draw moisture into them.
The key is to keep them waiting patiently while you handle the fresh strawberries and the whipped cream filling right before you plan to serve them. Assemble them just an hour or two before eating, if possible, to guarantee that beautiful, crisp exterior.
Do the eggs really need to be room temperature for the dough?
Yes, absolutely! I listed this earlier, but it bears repeating because it’s fundamental to smooth choux pastry. Hot dough mixed with cold eggs leads to a stiff, separated mixture that won’t bake evenly, and you’ll end up with weirdly shaped, dense puffs instead of airy ones.
The warm dough needs the room-temperature eggs to properly emulsify and create that perfectly glossy, pliable texture that holds its shape when you pipe or spoon it onto the tray. A quick dip in warm water for 10 minutes usually works if you forget to take them out early!
Print
Strawberry Cream Puffs
- Total Time: 75 min
- Yield: 12 servings 1x
- Diet: Vegetarian
Description
Light pastry puffs filled with fresh whipped cream and sliced strawberries.
Ingredients
- 1 cup water
- 1/2 cup unsalted butter
- 1 cup all-purpose flour
- 4 large eggs
- 1 cup heavy whipping cream
- 1/4 cup powdered sugar
- 1 teaspoon vanilla extract
- 2 cups fresh strawberries, sliced
Instructions
- Preheat your oven to 400°F (200°C). Line two baking sheets with parchment paper.
- In a medium saucepan, bring the water and butter to a boil over medium heat.
- Remove the pan from the heat and add the flour all at once. Stir vigorously until the mixture forms a smooth ball.
- Return the pan to low heat and cook, stirring constantly, for 1 minute.
- Transfer the dough to a mixing bowl. Beat in the eggs one at a time, mixing well after each addition until the dough is smooth and glossy.
- Drop rounded tablespoons of dough onto the prepared baking sheets, spacing them about 2 inches apart.
- Bake for 15 minutes at 400°F (200°C). Reduce the oven temperature to 350°F (175°C) and bake for an additional 15-20 minutes, or until the puffs are golden brown and firm. Do not open the oven door during baking.
- Turn off the oven, prop the door open slightly, and let the puffs dry out in the oven for 15 minutes. Remove and cool completely on a wire rack.
- In a separate bowl, whip the heavy cream, powdered sugar, and vanilla extract until stiff peaks form.
- Slice the cooled puffs in half horizontally. Fill the bottom half with whipped cream and top with sliced strawberries before placing the top half back on.
Notes
- For best results, do not open the oven door while the puffs are baking.
- You can prepare the cream filling just before serving to keep the puffs crisp.
- Prep Time: 25 min
- Cook Time: 50 min
- Category: Dessert
- Method: Baking
- Cuisine: French
Nutrition
- Serving Size: 1 puff
- Calories: 250
- Sugar: 15g
- Sodium: 120mg
- Fat: 15g
- Saturated Fat: 9g
- Unsaturated Fat: 6g
- Trans Fat: 0g
- Carbohydrates: 25g
- Fiber: 1g
- Protein: 5g
- Cholesterol: 100mg
Keywords: strawberry cream puffs, choux pastry, dessert, sweet pastry, whipped cream