
If you are anything like me, you believe food must look just as exciting as it tastes! Forget those sad, plain breakfast pancakes; we are aiming for showstoppers. That’s why I’m absolutely obsessed with these Spiderweb Crepes. They look incredibly intricate, like something you’d only find in a fancy Parisian patisserie, but trust me, making them is pure fun. I’ve spent years perfecting the lacy appearance, and the secret is all in the layering technique. Grab your favorite toppings because these thin pancakes are about to become your new favorite way to start the weekend!
Why These Spiderweb Crepes Are a Must-Try Dessert
I know what you’re thinking when you see the final product: “No way I can make that!” But honestly, these crepes are kitchen magic hiding in plain sight. Once you master the simple batter, the web design is just a fun, quick artistic flourish. Believe me, it takes less time than flipping a standard pancake if you’re quick!
- They look like you spent all day getting them perfect, but you really didn’t take that long at all.
- The flavor is classic perfection—light, delicate crepe paired with that hint of cocoa.
- They completely elevate any brunch or dessert situation. I love looking at my stack before I serve them!

Visual Impact of Spiderweb Crepes
The visual is the whole reason we make these! They are absolutely show-stopping. Forget serving them plain; these are for impressing someone special or just making Tuesday feel like Saturday. The contrast between the light pale batter and the dark chocolate lines makes the web pattern pop perfectly. We totally serve these for holidays now instead of fussy pastries!
Simple Batter, Stunning Results
Don’t let the looks intimidate you. The base batter itself is so streamlined—just whisk, mix, and rest. Seriously, once that batter rests, pouring those fine lines of chocolate batter is surprisingly easy. If you want another show-stopping chocolate treat after these, you have to check out my recipe for a delicious chocolate caramel toffee cake. But for today, let’s focus on the webs!
Gathering Ingredients for Perfect Spiderweb Crepes
Getting everything ready before you start is half the battle, especially since the decorating part happens so fast! You need quality basics because these crepes are so gloriously thin; there’s nowhere for mediocre ingredients to hide. Don’t worry, you probably have 90% of this stuff in your pantry right now. If you have ever struggled to keep a loaf moist, then you know how important the right mix is, and we apply that same care here!
Light Batter Components
For the foundation, the main batter is super straightforward. We’re talking one cup of all-purpose flour and just a quarter teaspoon of salt to balance everything out. For the liquid, you need half a cup of milk and half a cup of water mixed with two large eggs. The crucial part here is the fat: make sure you melt two tablespoons of butter and stir that in right at the end. That melted butter is what gives the finished crepe that delicate, rich flavor.
Creating the Dark Spiderweb Batter
Now for the artistic side! You need to divide your main batter exactly in half. Take one of those halves and stir in two tablespoons of unsweetened cocoa powder. This creates our dark batter—the one we use for drawing the webs. You want it smooth, so mix that cocoa in thoroughly. Don’t forget we need a tiny dusting of powdered sugar later, but that’s just for serving, not for the batter itself!
If you feel like your chocolate batter is a little too thick after adding the cocoa, don’t panic! A tiny trick I learned is adding just a teaspoon of water extra to this dark portion to keep it runny. It helps those lines flow nicely. Anyone who loves a moist bake should check out my easy banana bread while you’re waiting for your batter to rest!
Expert Tips for Making Flawless Spiderweb Crepes
Honestly, the difference between a *good* crepe and a *flawless* one always comes down to sneaky little steps that recipes sometimes skip over. I learned these tricks the hard way—mostly by ending up with thick, rubbery pancakes when I was tired! But once you follow these two rules, you’ll be making restaurant-quality spiderweb crepes every single time. Consistency is everything, whether I’m making thin crepes or my next favorite easy pita bread.
The Critical Batter Rest Time
Listen up, this is the most important piece of advice I can give you for crepes in general: You absolutely cannot skip the 30-minute rest time after you mix everything together! When you whip flour, eggs, and liquid quickly, you develop gluten, which makes your crepes tough and chewy. Letting it rest lets that gluten relax. Trust me, if you rush this step—even by five minutes—your crepes will be sad and rubbery. Don’t do it to yourself; walk away from the bowl for half an hour!
Tools for Precision Spiderweb Crepes
We need that lacy look, right? We want thin, delicate lines of cocoa batter that spiderweb out beautifully. Pouring directly from a whisked bowl just doesn’t give you the control you need—you’ll end up with blobs, not webs. My biggest game-changer was using a simple squeeze bottle for that dark, chocolatey batter. You load up the cocoa portion in the bottle, and control over the drizzling becomes instantaneous. You can draw those perfect, even circles right before the light batter sets up. It takes the stress right out of the decorating loop!
Step-by-Step Instructions for Spiderweb Crepes
Alright, now that we’ve got our gorgeous, rested batter (remember that 30-minute wait!), it’s time to get cooking. These crepes cook up incredibly fast, so make sure your pan is hot and you have your squeeze bottle full of dark cocoa batter ready to go before you even pour the first scoop of light batter. This is a performance piece, so be ready! If you love these fun breakfast treats—and if you are looking for another fun bake, check out my recipe for coffee cake recipe for later!
Mixing the Base Batter
We start super simple. Take your flour and salt and whisk them together in a nice big bowl—that’s our dry team. In a separate bowl, gently combine the two eggs, the milk, and the water. Now, here comes the part where you want to be gentle. Slowly, little by little, pour the wet ingredients directly into the dry ingredients while whisking steadily. You want this smooth, not lumpy! Once it looks mostly combined, stir in those two tablespoons of melted butter. That’s it for the base! Then, quickly divide it in half, add the cocoa to one side, and let them both chill out for that crucial 30 minutes we already talked about.
Creating and Cooking the Spiderweb Crepes
Get your non-stick crepe pan heating up over medium heat. You just need a tiny swipe of butter on the pan to start—don’t overdo it, or the batter won’t spread! Once the pan is properly hot, pour about a quarter cup of your light batter into the center. This is where you have to be quick! Immediately take your dark batter—which hopefully is in a squeeze bottle—and drizzle thin lines over the top in a circular motion, like you are drawing a messy spiderweb. Move fast because the light batter will start setting!
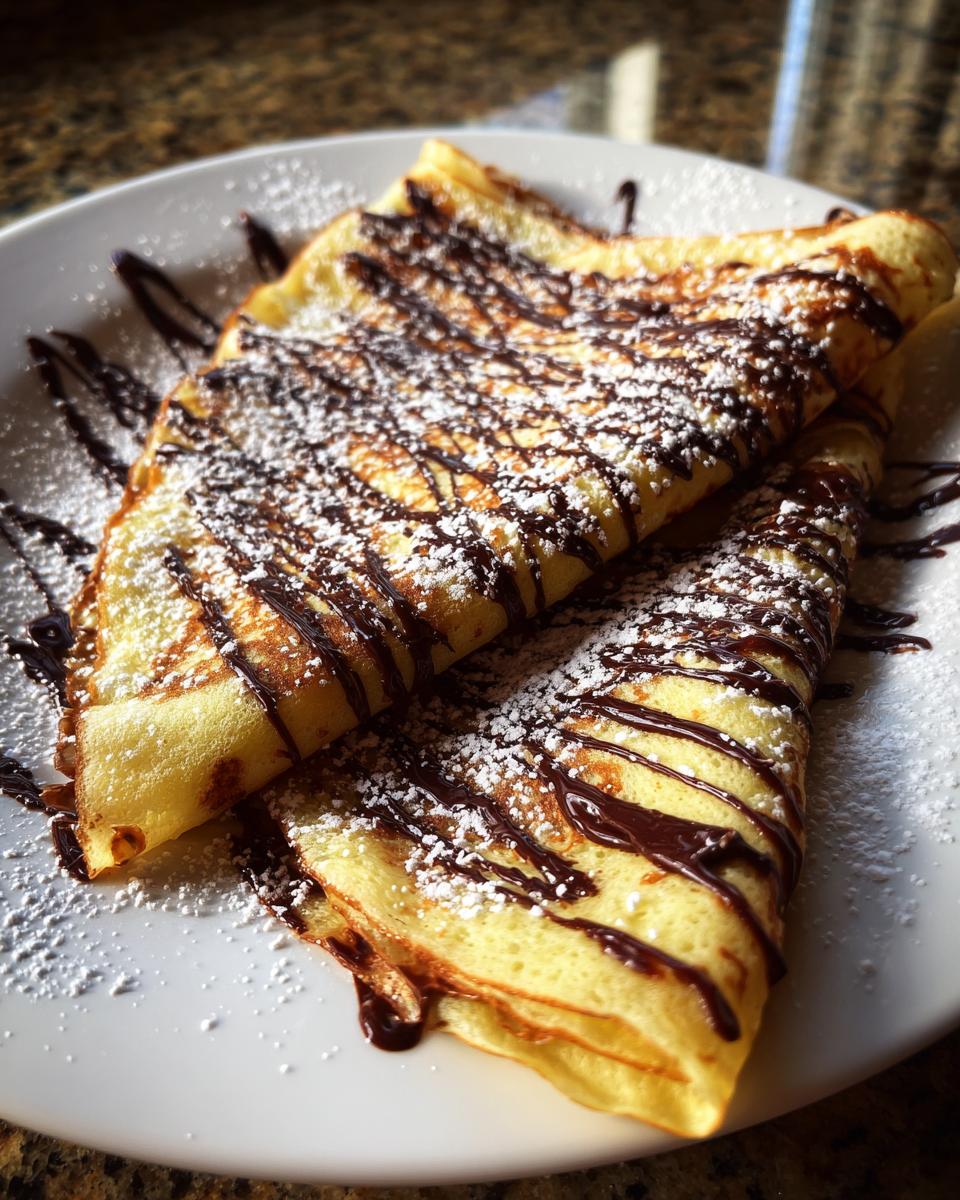
Let that cook for about one to two minutes. You know it’s ready to flip when the edges are turning lovely and brown. Flip it carefully—they are fragile—and let the second side cook for maybe 30 seconds, tops. Slide that beautiful, lacy creation onto a plate and keep going until all the batter is used up. Make sure to dust them lightly with powdered sugar right before you serve them!
Serving Suggestions for Your Spiderweb Crepes
Honestly, these spiderweb crepes are gorgeous enough to stand alone, but if you want to take them over the top, I have a few ideas! Since the cocoa batter gives us that beautiful dark contrast, keep the fillings bright and simple. A beautiful topping is just a dollop of fresh whipped cream—it melts perfectly into those dark chocolate grooves. Fresh raspberries or sliced strawberries look amazing against the pattern, too.

And remember that final, necessary step: a light, feathery dusting of powdered sugar over the top right before you serve them. It just makes the whole presentation look professionally finished. If you’re looking for something sweet and tart to cut through the richness, maybe try one of my go-to desserts, like this lemon icebox pie, for the next night!
Storage and Reheating for Spiderweb Crepes
These spiderweb crepes are best enjoyed the minute they come off the pan, but leftovers happen! You can stack them up, separated by parchment or wax paper, and keep them in an airtight container in the fridge for maybe two days. They freeze beautifully too! Just stack them with paper in between each one, wrap them tightly, and they keep well for about a month. When you want one later, just pop it in the toaster oven for a minute or two to warm it right up!
Frequently Asked Questions About Spiderweb Crepes
I always get questions once people try this recipe because making those little web patterns can sometimes be tricky the first couple of times! Don’t sweat it if your first one looks more like abstract art than a spiderweb. That’s totally normal, and you just use that one for quality testing!
Can I make the dark batter thicker for bolder lines in my Spiderweb Crepes?
Oh, I know why you’d ask, because sometimes you want that boldness, right? But resist the urge to thicken it! If the dark cocoa batter gets too thick, it won’t drizzle out in those super fine, lacy lines characteristic of the spiderweb look. You want it thin enough to flow easily off your squeeze bottle. Remember, the beauty here is in the delicate contrast, not heavy chocolate lines. If you happen to be looking for a way to use up extra batter that isn’t quite spiderweb-ready, you could whip up some of my easy zucchini fritters later in the week!
What is the best pan to use for these thin crepes?
This is key! For crepes this thin—and especially for the visual effect we are going for—you absolutely need a quality non-stick pan. A dedicated crepe pan works wonders because they are usually shallow, but any good 8-inch or 10-inch non-stick skillet will do the job just fine. Make sure it gets evenly heated before you start cooking, too. If your pan sticks even a little bit, the web pattern will tear when you try to flip it, and we can’t have that delicate design getting ruined!
Nutritional Snapshot of Spiderweb Crepes
I always try to keep things realistic when we talk about what we eat, even when it’s a decadent dessert like these spiderweb crepes! Since these are so thin and we only make about eight, the portion size is actually quite reasonable. I always tell people to load them up with fresh fruit to help balance things out. Remember, these numbers are estimates based on the ingredients listed, so if you use heavy whipping cream instead of a dusting of sugar, things will definitely change!

For one single crepe, you’re looking at about 120 calories, which isn’t too bad for a treat! The fat content is low, coming mostly from that butter in the batter, sitting around 6 grams total per serving. Carbohydrates hover near 14 grams, and you get a decent little protein boost from the eggs and milk, about 4 grams. It’s a fantastic, light way to enjoy a rich chocolate flavor without feeling weighed down. If you’re pairing these with greens later, I have a great idea for a healthy tomato zucchini pasta that’s perfect for dinner!
Share Your Stunning Spiderweb Crepes Creations
Now that you’ve mastered the art of the lacy, webbed effect, I absolutely *need* to see what you came up with! Seriously, scrolling through your beautiful creations is my favorite part of running this site. Did you get those dark lines perfectly spaced? Did you top yours with fresh cream or maybe some sliced bananas?
Please, please, leave a comment right below this section and tell me how it went. Hearing from you helps me know I’m explaining things clearly, and I love getting feedback, especially on tricky visual techniques like the web drizzling. Did you use a squeeze bottle like I recommended, or did you find a secret method?
If you took a picture—and I sure hope you did because these crepes deserve to be shown off—tag me on social media! Use our favorite hashtag so I can find it. If you ever have questions, or just want to chat about recipes (especially if you need to reach out about a technical issue), don’t hesitate to head over to my contact page. Happy cooking, and show off those gorgeous webs!
Print
Spiderweb Crepes
- Total Time: 50 min
- Yield: 8 crepes 1x
- Diet: Vegetarian
Description
Make thin, lacy crepes arranged in a spiderweb pattern.
Ingredients
- 1 cup all-purpose flour
- 2 large eggs
- 1/2 cup milk
- 1/2 cup water
- 1/4 teaspoon salt
- 2 tablespoons melted butter, plus more for the pan
- 2 tablespoons cocoa powder (for dark batter)
- 1 teaspoon powdered sugar (for dusting)
Instructions
- Whisk together flour and salt in a bowl.
- In a separate bowl, whisk eggs, milk, and water until combined.
- Gradually add the wet ingredients to the dry ingredients, whisking until smooth.
- Stir in the melted butter. Let the batter rest for 30 minutes.
- Divide the batter in half. Mix the cocoa powder into one half to create dark batter.
- Heat a non-stick crepe pan over medium heat. Lightly brush with butter.
- Pour about 1/4 cup of the light batter into the pan. Immediately drizzle thin lines of the dark batter over the light batter in a circular or web pattern before the batter sets.
- Cook for 1-2 minutes until the edges are brown. Flip and cook the other side for about 30 seconds.
- Slide the crepe onto a plate. Repeat with remaining batter.
- Dust the finished crepes lightly with powdered sugar before serving.
Notes
- For a thinner dark batter, add a teaspoon of water to the cocoa batter.
- Use a squeeze bottle for precise dark batter lines.
- Prep Time: 30 min
- Cook Time: 20 min
- Category: Dessert
- Method: Pan Frying
- Cuisine: French
Nutrition
- Serving Size: 1 crepe
- Calories: 120
- Sugar: 3
- Sodium: 110
- Fat: 6
- Saturated Fat: 3
- Unsaturated Fat: 3
- Trans Fat: 0
- Carbohydrates: 14
- Fiber: 1
- Protein: 4
- Cholesterol: 45
Keywords: crepes, spiderweb, chocolate, dessert, breakfast, thin pancakes