
Oh my gosh, are you craving that sticky, savory-sweet flavor that makes restaurant takeout so addictive? Me too! That’s why I’ve put in the work so you don’t have to test endless versions. Forget those weird, watery sauces you sometimes get; I have cracked the code to the absolute best, easiest **Teriyaki Chicken** you’ll ever make right in your own kitchen.
Seriously, this recipe is my weeknight hero. I spent years trying to replicate that perfect balance of sweet, salty, and umami from my favorite local spot, and this is it. It comes together faster than delivery, and the flavor is miles better because you control everything!
We’re talking tender chicken pieces, coated in a sticky glaze that’s ready in just about 30 minutes. Trust me on this one; you’re going to want to make this batch after batch!

Why This Simple Teriyaki Chicken Recipe Works (Expert Tips)
The reason this recipe nails the takeout flavor every single time comes down to a couple of small, non-negotiable choices I make. First, I always lean toward using boneless, skinless chicken thighs. Yes, breasts work fine, but thighs stay juicier and absorb the sauce better when we cook this dish fast on the stovetop.
Next up is the sauce depth. Don’t skip the mirin and sake! The mirin holds a gentle sweetness, and the sake helps tenderize the chicken and adds a crucial background complexity that water just can’t replicate. If you really need a substitute, you can check out my quick rundown on making a full homemade teriyaki sauce base, but honestly, this shorter recipe is built around quality ingredients.
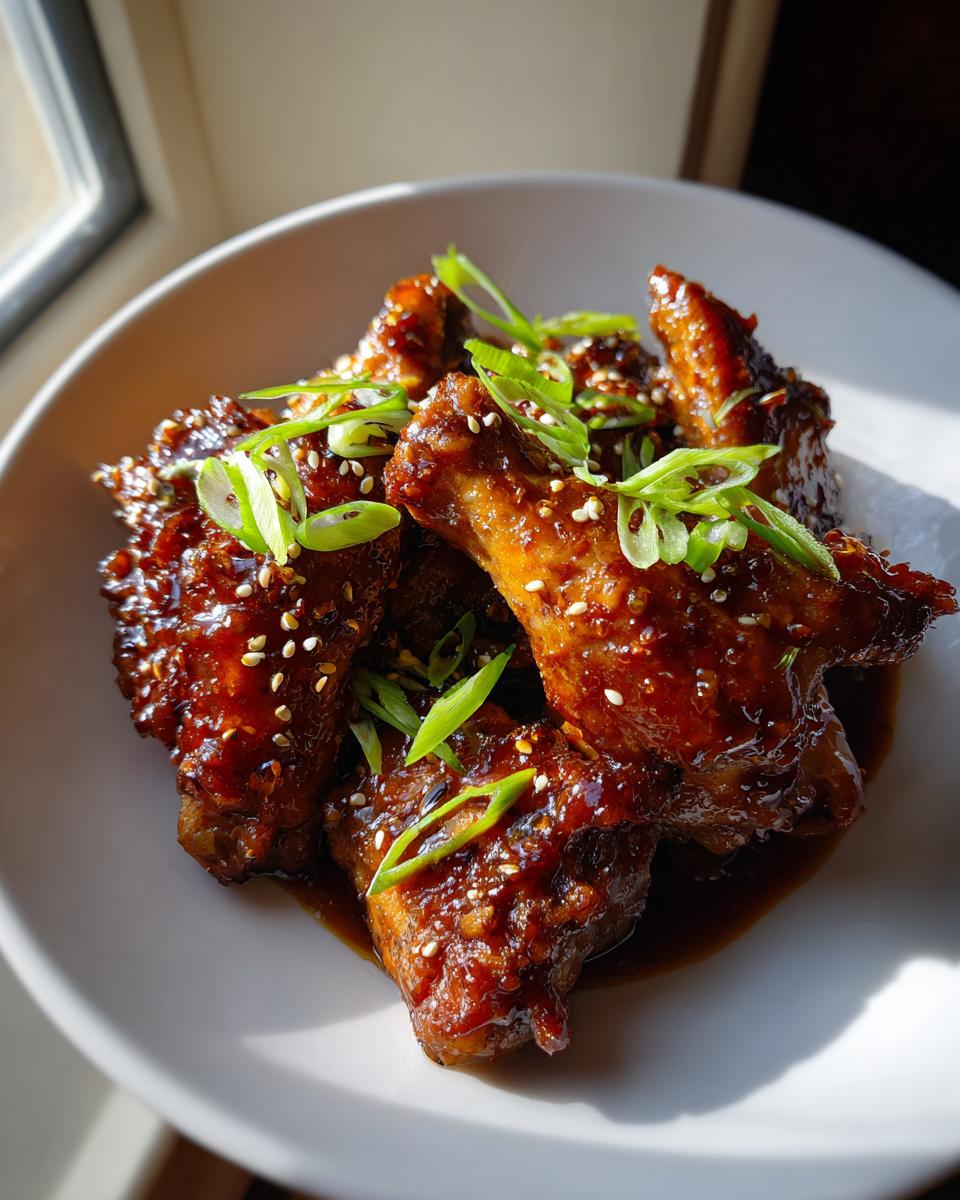
Finally, that amazing, shiny glaze you see in the pictures? That’s all thanks to the cornstarch slurry added right at the end. It transforms the thin liquid into that thick, clingy coating that makes perfect **Teriyaki Chicken**.
The Essential Ingredients for Perfect Teriyaki Chicken
When putting this together, I try to have everything prepped before the heat goes on because things move fast once the chicken hits the pan. That means your ginger must be freshly grated—no jarred stuff here, please! Minced garlic adds that essential aromatic punch that you just can’t skip.

Remember, the cornstarch slurry is a team effort: just one tablespoon of cornstarch mixed with two tablespoons of cold water. Whisk that slurry until it’s completely smooth before you even think about adding it to the simmering sauce. That careful prep ensures you get that perfectly smooth, thick glaze on your **Teriyaki Chicken** without any annoying lumps.
You’ll need the soy sauce for saltiness, brown sugar for richness, and that sesame oil right at the beginning to toast slightly and wake up the nutty flavor profile.
Gathering Your Ingredients for Homemade Teriyaki Chicken
Alright, let’s talk about what you need. This recipe is shockingly short on prep time because it uses pantry staples! I measured everything out precisely—you don’t want to eyeball your soy sauce if you want that perfect, balanced flavor in your final Teriyaki Chicken.
The chicken itself is simple: about a pound and a half of thighs or breasts, cut into nice bite-sized pieces so they cook evenly and pick up lots of that glaze. Everything else goes straight into a bowl to make the sauce—super fast!
Ingredient Notes and Substitutions for Teriyaki Chicken
Okay, here’s where you can cheat a little, but know that it changes the authentic taste. If you simply cannot find mirin or sake, water works in a pinch, but you’ll lose some of that subtle depth. Adding equal parts water will work if you substitute both mirin and sake.
My expert quality tip? Always try to use low-sodium soy sauce. Because the sauce reduces down so much, using regular soy sauce can make your final **Teriyaki Chicken** aggressively salty. It’s easier to add a pinch of salt later than it is to take it away!
Step-by-Step Instructions for Amazing Teriyaki Chicken
This is where the magic happens, and honestly, it’s so fast you’ll wonder why you ever ordered takeout. First things first: don’t crowd your pan! I learned this the hard way; if you cram all the chicken in at once, it steams instead of browning, and we won’t get that beautiful color on our **Teriyaki Chicken**.
Cook the chicken pieces in batches over medium-high heat until they are nicely browned on all sides—this usually takes about 5 to 7 minutes total for a good sear. Once it’s mostly cooked, you can toss it all back into the skillet together. Then, drizzle that amazing sauce right over the top and let it simmer for about five minutes so the chicken really soaks up all that flavor. Check out my guide for more cooking times if you’re trying a different cut, like what I used when making Hawaiian-style teriyaki.
Making the Flavorful Teriyaki Sauce Base
Step number one is mixing your sauce base! Grab a medium bowl and whisk together your soy sauce, mirin, sake (or water), brown sugar, fresh ginger, minced garlic, and that teaspoon of sesame oil. You have to whisk this really well until that brown sugar is completely dissolved. If you leave clumps of sugar in there, they won’t break down later, and you’ll end up with gritty spots in your glaze. Keep whisking until it feels smooth!
Glazing the Chicken to Achieve Perfect Teriyaki Chicken Consistency
Once your chicken has simmered in the sauce for five minutes, it’s time for the grand finale! You absolutely must stir your cornstarch slurry right before you use it—it settles fast. Now, pour that slurry in slowly, stirring constantly while you do it. Pouring slowly prevents the dreaded lumps and gives the sauce time to thicken evenly around every piece of chicken.
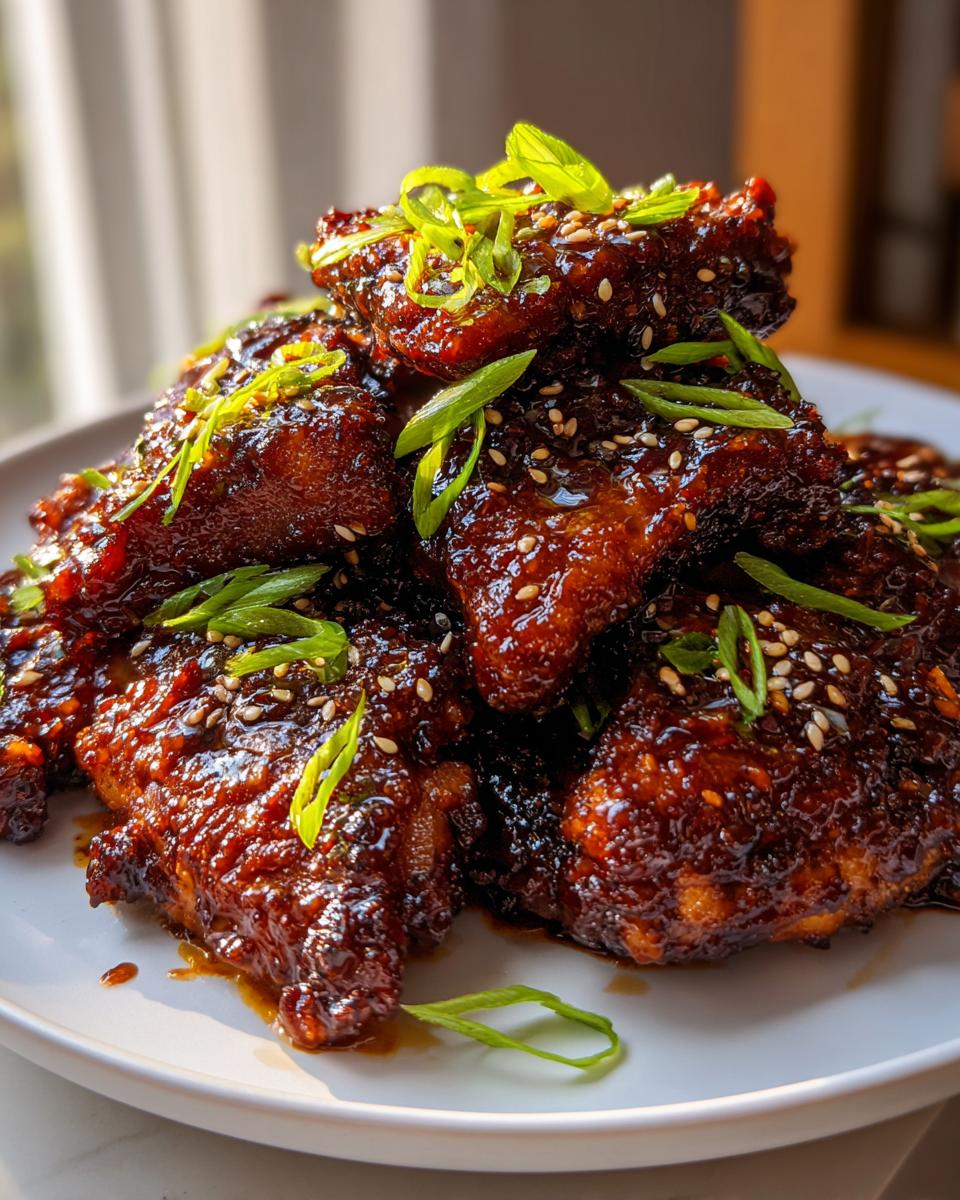
Keep cooking for just another minute or two until you see that glossy, thick glaze clinging perfectly to the chicken. Take it off the heat right away—this stuff thickens fast! A quick garnish of sesame seeds and green onions, and boom. Dinner is served!
Serving Suggestions for Your Teriyaki Chicken
So you’ve got this gorgeous, sticky, flavor-packed **Teriyaki Chicken** sizzling in the pan, and now the most important question: what are we eating it with? You can’t just eat it straight from the skillet—though, trust me, I have been tempted!
The absolute classic pairing, and what I always revert to when I’m short on time, is a big mound of perfectly steamed white rice. The rice soaks up any extra glaze that drips off, and honestly, it’s heaven. For veggies, you can’t go wrong with crispy steamed or lightly blanched broccoli florets. They offer a nice pop of green and a slight bitterness that cuts through the richness of the sauce beautifully.
But if you’re feeling a little fancier, or maybe you’re trying to sneak in a few more nutrients, try serving this over fluffy quinoa instead of rice. It gives the whole meal a great texture change. Or, for a lighter, super fresh take, scoop that amazing **Teriyaki Chicken** mixture into crisp lettuce cups, maybe add some shredded carrots and cucumbers, and enjoy them as lettuce wraps! If you’re looking for more inspired bowl ideas, I have a great way to switch this up over at my Greek Chicken Bowl recipe that might give you some inspiration for future meals!
Storage and Reheating Tips for Leftover Teriyaki Chicken
Okay, the only thing better than making fresh **Teriyaki Chicken** is having leftovers because that means lunch tomorrow is already handled! This glazed chicken keeps really well, but how you store and reheat it makes all the difference.
First, make sure it cools down completely before you put it away. Once cool, tuck it into a good airtight container. It’ll last nicely in the fridge for about three to four days. Don’t sweat it if the sauce looks a little gelatinous when you pull it out; that’s just the nature of a good glaze thickening up once it chills!
When it’s time to reheat, my secret is always to add a splash of liquid—even just a teaspoon of water or broth—before microwaving. This helps reintroduce steam and keeps the chicken from drying out. A quick 60 seconds usually does the trick. If you have more time, gently reheating it in a skillet over medium heat is even better because it brings that sticky glaze right back to its former glory!
Troubleshooting Common Teriyaki Chicken Issues
Listen, cooking is wonderful, but sometimes things go a little sideways right when you think you’re done. Don’t panic if your **Teriyaki Chicken** isn’t looking exactly like the picture right away! We’ve all been there, staring at a pan thinking, “Why is this so watery?!”
The most common hang-up is usually the glaze thickness. If you’ve added your slurry and the sauce is still too thin—meaning it just rolls right off the chicken pieces instead of clinging—you’ve got two quick options. First, make a half-batch more of your slurry (just half a teaspoon of cornstarch mixed with one tablespoon of cold water). Add that in slowly, stirring, and let it bubble for a minute. If you’re out of cornstarch, I sometimes just let the sauce simmer uncovered on low heat for an extra three or four minutes.
Now, what if you went too far? If your sauce turns into super-thick, glue-like goo? That usually happens because we’re all excited and add too much slurry at once! Don’t fret; just grab a splash of water or plain chicken broth and stir it in until you get that perfect, luscious texture back. You can find one thing I always forget to check when making similar sauces over at this little guide.
The last big issue is sometimes texture, not sauce. If your chicken seems dry, it probably cooked too long. Always rely on a meat thermometer for those thicker pieces—you’re aiming for 165°F internal temperature. Once it hits that number, take it OFF the heat immediately, especially once that sauce starts thickening up around it! That residual heat will keep cooking it just enough for perfect **Teriyaki Chicken**.
Frequently Asked Questions About Teriyaki Chicken
I know you probably have a few burning questions after diving into this recipe—I did when I first started making my own **Teriyaki Chicken**! These are the things I hear most often from friends trying it out for the first time.
Can I use honey instead of brown sugar?
You absolutely can, and honestly, it’s a great substitution when you want a slightly different sweetness to your glaze! Honey tends to be a bit sweeter than brown sugar, so I usually recommend knocking the honey amount down just a touch from what the recipe calls for in brown sugar. It works beautifully with the fresh ginger. Just remember that honey can also caramelize faster than brown sugar, so keep an eye on the heat when you simmer the sauce so it doesn’t burn.
Can I bake this Teriyaki Chicken instead of pan-frying?
Yes, baking is a wonderful hands-off method, especially if you are making a HUGE batch! If you want to bake it, I suggest tossing the chicken pieces with the sauce (minus the cornstarch slurry) and baking them on a parchment-lined baking sheet at about 400°F (200°C) until they are nearly cooked through, usually around 18 to 20 minutes. Then, you pull them out, stir in that cornstarch slurry, and pop them back in for just 3 to 5 minutes until the sauce thickens up. It keeps the clean flavor of the **Teriyaki Chicken** intact!
How do I make my Teriyaki Chicken spicier?
I love heat, so I usually think about this! There are a few easy ways to spice things up without messing with the core balance. The cleanest way is to add a very small dash of Sriracha or chili garlic sauce right into your sauce mix when you whisk everything together. Another trick is thinly slicing a fresh bird’s eye chili (seeds removed for less fire) and sautéing it right along with your minced garlic. If you’re into that spicy veggie kick too, you might love checking out my tips for a great chicken stir-fry with veggies!
Why are chicken thighs better than breasts for this recipe?
It all comes down to fat content and moisture retention. Chicken breasts are lean; they dry out quickly, especially when simmered down in a reduction sauce like this teriyaki glaze. Chicken thighs have more fat marbled throughout, which keeps them incredibly moist and tender even after they spend extra time in the pan absorbing all that fantastic flavor.
Estimated Nutritional Snapshot for Teriyaki Chicken
Now, let’s talk numbers. I know some folks are watching what they eat, so I wanted to give you a quick look at what you’re roughly getting with a serving of this simple **Teriyaki Chicken**. This recipe comes out surprisingly lean while still packing a punch on the protein front, which is why I love it for post-workout meals!
Based on my estimations for a standard 4-serving yield, here’s the breakdown per serving:
- Calories: Around 350
- Protein: A hearty 45 grams (hello, thighs!)
- Total Fat: About 10 grams (most of that is the good, unsaturated kind)
- Carbohydrates: Roughly 20 grams (mostly from the sugar in the glaze)
Just a little heads-up: these numbers are based on using the ingredients listed and dividing the recipe into four equal portions. If you use a lot more sauce, or if you serve a much larger portion of rice underneath it, your totals will change, of course! Also, remember that the sodium content can vary wildly depending on how salty your specific soy sauce is, so keep that in mind if you’re monitoring salt intake. These are just good ballpark figures to show you this sticky, flavorful meal is definitely a weeknight winner!
Share Your Homemade Teriyaki Chicken Success
Wow, we made it! I hope you’re already smelling that amazing, sweet, soy-infused aroma filling your kitchen. Now that you’ve mastered the stickiest, easiest **Teriyaki Chicken** around, I genuinely want to hear all about it! Cooking is all about sharing, right?
Did the glaze turn out perfectly clingy? Did the ginger really make a difference for you? Don’t be shy! Drop a rating down below—even a simple five-star rating tells me this recipe is worth keeping on my rotation.
More than anything, I love seeing your results! If you snapped a picture of that beautiful, shiny chicken served over rice or tucked into a lettuce wrap, please share it! Tag me on social media or send me a direct message. I get such a charge out of seeing my family recipes making memories in your kitchens. It’s seriously the best part of running this site!
If you have any lingering questions that I missed, or maybe you tried a fun variation—did you add honey? Did you use sambal oelek for extra heat? Let me know! You can always reach out directly through my contact page, too. Happy cooking, and thanks for trusting me with your weeknight dinner!
Print
Simple Teriyaki Chicken
- Total Time: 30 min
- Yield: 4 servings 1x
- Diet: Low Fat
Description
A straightforward recipe for making flavorful teriyaki chicken at home.
Ingredients
- 1.5 lbs boneless, skinless chicken thighs or breasts, cut into bite-sized pieces
- 1/2 cup soy sauce
- 1/4 cup mirin (sweet rice wine)
- 1/4 cup sake (or water)
- 3 tablespoons brown sugar
- 1 tablespoon grated fresh ginger
- 2 cloves garlic, minced
- 1 teaspoon sesame oil
- 1 tablespoon cornstarch mixed with 2 tablespoons cold water (slurry)
- Sesame seeds for garnish
- Chopped green onions for garnish
Instructions
- In a medium bowl, whisk together the soy sauce, mirin, sake, brown sugar, ginger, garlic, and sesame oil. This is your teriyaki sauce.
- Place the chicken pieces in a large skillet or wok over medium-high heat. Cook until the chicken is browned on all sides and mostly cooked through, about 5-7 minutes.
- Pour the prepared teriyaki sauce over the chicken in the skillet. Bring the sauce to a simmer.
- Reduce the heat to medium-low and let the chicken cook in the sauce for 5 minutes, allowing the flavors to meld.
- Stir the cornstarch slurry one more time and slowly pour it into the simmering sauce while stirring constantly.
- Continue to cook for 1-2 minutes until the sauce thickens to a glaze consistency.
- Remove from heat. Garnish with sesame seeds and chopped green onions before serving over rice.
Notes
- For thicker pieces of chicken, you may need to increase the simmering time slightly before adding the slurry.
- If you do not have mirin or sake, you can substitute with an equal amount of water, though the flavor profile will change slightly.
- Prep Time: 10 min
- Cook Time: 20 min
- Category: Main Course
- Method: Stovetop
- Cuisine: Japanese
Nutrition
- Serving Size: 1 serving
- Calories: 350
- Sugar: 15
- Sodium: 850
- Fat: 10
- Saturated Fat: 2
- Unsaturated Fat: 8
- Trans Fat: 0
- Carbohydrates: 20
- Fiber: 1
- Protein: 45
- Cholesterol: 120
Keywords: teriyaki chicken, easy chicken recipe, Japanese chicken, glazed chicken, quick dinner