
If you think you have to spend hours wrestling with complicated ingredients to get that intensely dark, melt-in-your-mouth chocolate experience, let me stop you right there! Forget the delicate layers and the endless mixing bowls. When I need real, decadent chocolate comfort, I skip the flour completely. This Simple Flourless Chocolate Cake recipe is my absolute go-to answer for rich, genuine chocolate flavor. Honestly, making this cake is pure magic because it relies on just a handful of pantry staples to create something that tastes utterly gourmet. I love it because even on a crazy Tuesday night, I can pull together this stunning dessert with minimal fuss. Trust me, you haven’t had real chocolate intensity until you’ve tried one of these simple Flourless Cakes.
Why This Simple Flourless Cakes Recipe Stands Out
I know, I know, chocolate cake usually means work. But this recipe completely changes the game when it comes to super rich desserts. It’s the ultimate secret weapon in my baking arsenal because it delivers on pure, unadulterated chocolate flavor without any fuss. You get all the drama of a fancy dessert with almost none of the effort. I can get this ready faster than I can talk myself out of eating the whole thing!
Here’s why you absolutely need to try this recipe next time you need a showstopper:
- It has an intensely rich flavor that only comes from premium chocolate melting down beautifully.
- It’s naturally gluten-free, which is wonderful for serving guests with sensitivities.
- We are talking minimal ingredients—you probably have most of them right now!
- The presentation is stunning; a deep, dark color that just screams elegance.
If you’ve tried my chocolate caramel toffee cake and loved the decadence, this flourless version takes that intensity up a notch. It’s just pure, gorgeous chocolate goodness.
Gathering Ingredients for Your Flourless Cakes
Okay, so the ingredient list here is short and sweet, which is exactly what I love about this recipe. You don’t need a pantry full of specialty flours or hard-to-find gums; you just need good chocolate. Seriously, this is where you don’t want to skimp! Since there’s no flour to hide behind, the quality of your chocolate makes or breaks this entire dessert. For the best results for your Flourless Cakes, grab the highest quality bittersweet chocolate you can find. I’m talking about something with at least 60% cocoa content.
Here’s the quick lineup you need ready to go:
- 8 ounces of bittersweet chocolate, and make sure you chop it up small so it melts evenly!
- 1/2 cup of unsalted butter—that’s one full stick, folks.
- 3 large eggs, but listen closely, they have to be separated.
- 1/4 cup of regular granulated sugar.
- 1 teaspoon of vanilla extract for warmth.
- Just a tiny pinch of salt to boost all that chocolate flavor.
Specific Ingredient Notes and Substitutions
The separation of the eggs is critical here; don’t try taking shortcuts and adding them whole! The yolks go into the base to add richness, but the whites are our structure, and they need that special whipping treatment we’ll discuss in a minute. And that bittersweet chocolate? Stick to it. If you try using sweet milk chocolate, you’ll end up with something far too sugary and it won’t achieve that deep, profound, almost fudgy flavor profile that makes these Flourless Cakes so addictive. Higher cocoa percentages mean a deeper, more sophisticated chocolate hit—you won’t regret using the good stuff!
Step-by-Step Instructions for Perfect Flourless Cakes
This is where we turn simple ingredients into that heavenly, dense chocolate dream. You’ll notice right away that we aren’t using any fancy mixers for the main batter, just good old-fashioned elbow grease at the start! Remember to preheat that oven to 350 degrees F (175 degrees C) right away, and get that 8-inch pan greased and lined with parchment on the bottom. If you skip the parchment lining the bottom, I promise you’ll be swearing at me when you try to get it out later!
The process feels methodical, but that’s what keeps these Flourless Cakes so impressive. We move in stages, and timing that cooling step right is just as important as the baking time. I remember the very first time I tried this; I rushed the cooling and tried to flip it out quickly, and the middle just slumped into a pile. Whoops! Now I know to let it cool completely in the pan, no rushing allowed.
Melting Chocolate and Butter: Getting the Base Right
First up is melting that beautiful bittersweet chocolate and butter together. The best way to do this without burning the chocolate is using a makeshift double boiler—that’s just a heatproof bowl sitting over a pot of gently simmering water. Stir that mixture until it’s a smooth, glossy river of dark goodness. When it’s all melted, pull that bowl right off the heat source. This next part is crucial: you have to let it cool down just a little bit. If you dump the hot chocolate into the egg yolks, you’ll end up with chocolate scrambled eggs, and nobody wants that! A slight cooling prevents curdling.
Achieving Stiff Peaks for Your Flourless Cakes Batter
While the chocolate cools, grab a separate bowl—and I mean CLEAN, dry bowl, or the whites won’t whip up right! Beat those three egg whites with just a tiny pinch of salt. You’re aiming for what bakers call stiff peaks. What does that mean? When you lift the whisk out, the peaks should stand straight up without flopping over at the tip. If they look like soft, sad waves, they need more beating. This trapped air is what gives your Flourless Cakes the lift they need since we aren’t using any baking soda or powder.
Folding Technique: The Secret to Light Flourless Cakes
This is the most important moment! We don’t want to deflate all that hard work we just put into the egg whites. Take just one-third of those stiff whites and stir them vigorously into your cooled chocolate/yolk mixture. Yes, stir it in—this is called ‘sacrificing’ the first batch; it lightens the heavy chocolate base so it’s ready for the rest. Once that first bit is incorporated, gently, gently, add the remaining whites. Use a big spatula and cut down the middle, sweep along the bottom, and fold over. Stop stirring the second you don’t see any major streaks of white left. Overmixing here means dense, flat Flourless Cakes, and we worked too hard for that!
Once it’s just barely combined, pour that beautiful batter into your prepared pan. If you want to see how I manage my chocolate toppings after baking, check out my guide for the perfect French silk chocolate pie—the topping philosophy is similar!
Baking and Cooling Your Rich Flourless Cakes
Alright, the tricky folding is done, and your batter should be gently settled into that prepared pan. Now comes the waiting game, which, honestly, is the hardest part when you smell this much dark chocolate brewing! Pop that pan into the 350-degree oven and set a timer for 25 minutes. You are looking for a specific visual cue here: the edges should look nicely set and firm to the touch, but the very center should still have just a little bit of wobble. It shouldn’t be liquid, mind you, just slightly soft. Remember, this isn’t your typical cake; it’s basically a dense, chewy cloud of dark chocolate.
If you pull it out and it looks perfectly flat and matte all over, you’ve probably baked it a little too long, and it might turn out a bit dry. We want that slight softness in the middle because that’s where the magic happens later on. This cake relies on residual heat to finish setting up—this is key to achieving that fudgy texture that makes great Flourless Cakes famous!
Now for the part that always makes new bakers panic: the cooling! Once you take it out, you need to let it cool completely in that pan on a wire rack. I know, you want to dig in immediately, but resist! As this cake cools down, it is going to sink right in the middle, sometimes dramatically. Don’t freak out! That sinking action is completely normal, and honestly, it’s how you know you did the folding right. That depression in the middle is actually perfect because it catches all the beautiful toppings later, like powdered sugar or fresh berries. I learned that lesson the hard way when I tried to cool one too quickly on a cold counter—it was a beautiful, albeit cracked, disaster!
If you’re looking for other amazing chocolate experiences that skip gluten entirely, you should check out my chocolate chip tahini cookies. They have a texture surprise you won’t expect!
Serving Suggestions for Classic Flourless Cakes
So, your gorgeous, dark, rich chocolate cake has finally cooled down, and you’re ready for the presentation! This cake is so intensely flavored that honestly, it begs for simplicity. My grandmother always said, “Don’t dress up perfection; just give it a little wink.”
In fact, the easiest finishing touch she taught me was just a simple dusting of powdered sugar right before serving. Just sift it gently over the top—it creates such a beautiful, stark contrast against that deep, dark surface, making it look like a snowy mountain top. It’s fast, and it works every single time, especially since the cake has sunk a little in the middle, creating a natural little basin for the sugar to settle.

If you feel like you need *one* extra element, please don’t reach for heavy fudge frosting! That would just be too much chocolate squared. Instead, think fresh and bright to cut through that richness. A few fresh raspberries or some sliced strawberries sprinkled around the base are just divine. Their tartness plays against the bittersweet chocolate so perfectly. You could also dust it with a little cocoa powder instead of sugar for an even darker, more dramatic look. I sometimes throw on a few toasted, slivered almonds, but only if I’m feeling extra fancy!

And remember this crucial tip from the recipe notes: this cake tastes best when served at room temperature. When it’s chilled, that high fat content makes it tough and dense, almost like chilled fudge. But when it warms up a bit on your plate, it softens beautifully, and you get that gorgeous, slightly gooey center. It pairs wonderfully with a hot cup of coffee or maybe even a slice of my raspberry almond tea bread alongside it for a contrast in texture!
Storage and Make-Ahead Tips for Flourless Cakes
One of the best things about these incredibly rich Flourless Cakes is that they actually taste better the next day. I know, that seems counterintuitive for a fresh-baked treat, but that high chocolate and butter content means the flavors really meld together beautifully overnight. If you’re planning a dinner party, you can totally make this cake the day before! Just wait to dust it with powdered sugar until right before serving, or it will absorb the moisture from the cake and look dull.
When it comes to storing leftovers, you just need an airtight container or a cake carrier. Because it’s so dense and doesn’t rely on yeast or flour, it stays incredibly moist at room temperature for about three days. I usually just keep it covered lightly on the counter. If your kitchen happens to be super warm, though, you might want to pop it in the fridge. Just remember to take it out about an hour before you plan to eat it so it can come back up to room temperature—that’s when it gets that perfect, melt-in-your-mouth texture again.

Now, let’s talk about freezing. Honestly, I usually discourage freezing this particular recipe. The texture change is pretty dramatic. When you freeze something so dense and delicate, the high moisture content can cause ice crystals to form, and when you thaw it, that lovely, velvety crumb can sometimes turn just a little crumbly or gritty. I prefer making a fresh one rather than dealing with freezer burn!
However, if you *must* freeze it (maybe you accidentally made two? I’ve been there!), here is the trick: wrap the completely cooled cake very tightly in plastic wrap first, then wrap it again in a layer of aluminum foil. That double layer protects it best. When you thaw it, let it thaw overnight in the refrigerator while still wrapped, and then let it sit on the counter for that final hour to warm up. It won’t be *quite* as perfect as fresh, but it’ll still be a rich chocolate treat!
If you enjoy making baked goods ahead of time, you might also want to try my recipe for date and walnut cake, which holds up wonderfully for several days, too!
Troubleshooting Common Issues with Flourless Cakes
Listen, baking is fun, but sometimes things go sideways, right? Especially when you’re working with delicate batters like these Flourless Cakes where there’s no flour buffer to save you. Don’t panic if your first attempt doesn’t come out looking like the photo! Usually, any issue just comes down to realizing that the oven temperature or the folding technique was a little off. These little mishaps are just opportunities to learn how this specific type of cake behaves. I’ve certainly made my share of dense, cracked messes before I mastered this one!
Let’s go through the two biggest worries I hear about when people try making their first rich chocolate **flourless cake**.
Cake Cracked Wide Open? Likely an Oven Issue
If you pull your cake out and the top looks like the surface of the moon—all cracked and dry—it almost always means one of two things: your oven was too aggressive, or you just left it in too long. Because this batter is so moist due to all that chocolate and butter, it sets up like a tiny custard. If the heat is slamming it from the outside too fast, the edges set hard before the middle has a chance to steam and rise slightly. That rapid setting causes a tearing crack across the top.
My fix is simple but requires patience. First, check your oven temperature with an independent thermometer if you haven’t already; maybe it runs 25 degrees hotter than the dial says! Second, try reducing the baking time by about five minutes and check for doneness. You want those edges firm, but the center should still look slightly soft and jiggly when you nudge the pan. Remember, it keeps cooking outside the oven! If you bake it until the center is completely solid, it *will* crack.
Why Is My Flourless Cake So Dense? The Folding Factor
This is the most common hurdle when moving from traditional cakes to **flourless cakes**. If your cake has cooled and it’s flatter than you anticipated, and it feels heavy instead of airy and fudgy, you deflated those precious air bubbles! Remember how much time we spent whipping those egg whites into stiff peaks? They are the structure; they are the lift!
When you fold them into that heavy chocolate base, you have to be incredibly gentle. My best advice (and what I had to repeat to myself for years) is to go slow and stop as soon as the ingredients look *just* combined. That means you might still see a tiny streak or two of white chocolate mixture near the bottom when you pour it into the pan. That’s okay! Those remaining streaks will incorporate themselves during the baking process, and you’ll end up with a cake that melts in your mouth instead of one that sits like a chocolate frisbee on your plate. Practice that gentle folding motion; it’s the key to success!

Frequently Asked Questions About Flourless Cakes
I get so many emails asking for clarification on this recipe, which just shows how much people love making a truly rich chocolate dessert! It’s simple, but because it relies on technique instead of flour, the specifics matter. Here are the most common things I hear from folks trying this recipe for the first time.
Can I use milk chocolate instead of bittersweet chocolate?
Oh gosh, please don’t, at least not if you want that deep, intense flavor profile these Flourless Cakes are famous for! Milk chocolate has way more sugar and way less cocoa solids. If you swap it out, the cake will be entirely too sweet, and it just won’t set up with the same dense, fudgy texture we are aiming for. Stick to bittersweet (60% cocoa or higher) for the truest flavor experience in this gluten free dessert.
How do I know exactly when this specific flourless cake is done baking?
This is the trickiest spot, but I covered it in detail above! Since the center is supposed to remain soft, you can’t rely on the toothpick coming out perfectly clean. You want the edges to look firm, and when you gently shake the pan, the outer quarter should be set. The center, maybe a two-inch circle right in the middle, should still look slightly moist or jiggly. When you pull it out, that residual heat finishes the job, ensuring you get that amazing, melt-in-your-mouth finish rather than a dry hockey puck.
Can I make this rich chocolate cake recipe ahead of time?
Yes, absolutely! This is what makes it such a fantastic make-ahead option for parties. As I mentioned before, the flavors actually deepen overnight. You can bake it completely, let it cool fully in the pan, then invert it onto your serving plate and cover it tightly. Keep it at room temperature for up to two days. Just wait to dust it with powdered sugar until about 15 minutes before guests arrive so the sugar stays crisp and pretty on top!
Why did my cake sink so much after cooling?
If your cake sank dramatically in the middle, congratulations—that means you successfully incorporated tons of air into those egg whites, and that’s exactly what we want! The initial rise in the oven happens because the air is being heated and expanding. Once you remove it from the heat source, that air cools down, contracts, and the cake collapses right along with it. That lovely dip creates the perfect place to dust on the powdered sugar or nestle some fresh raspberries. It’s a sign of success!
If you’re interested in other simple, impressive single-layer cakes, you really need to check out my key lime cake recipe next! It’s totally different but just as simple.
Estimated Nutritional Information for Flourless Cakes
Look, I’m not a nutritionist, so please take this information with a massive grain of salt—or maybe a tablespoon of powdered sugar! Since this Simple Flourless Chocolate Cake relies so heavily on butter and high-quality chocolate, it is definitely a rich treat. We are not trying to fool anyone into thinking this counts as a light snack; this is pure, decadent joy!
The recipe yields 8 generous slices, and these numbers are based on standard ingredient calculations divided by that yield. If you sneak a bigger piece (and trust me, resisting is hard!), your numbers will look different, obviously. Just think of this as a helpful guide rather than gospel.
For one slice of this deep, gorgeous **flourless cake**, you are looking at numbers roughly like this:
- Calories: Around 300 calories.
- Fat: About 22 grams. Hey, that’s mostly the good stuff from the chocolate and butter!
- Carbohydrates: Roughly 25 grams.
- Protein: About 6 grams.
It’s certainly not a low-fat dessert, but honestly, when you are hitting that deep chocolate craving, this is worth every single bit of richness. It’s a simple ingredient list done right, which is why it tastes so much better than things loaded with fillers. If you plan on adding a big dollop of whipped cream on top, you’ll want to factor that in separately, of course!
Share Your Simple Flourless Cakes Experience
I’ve poured my heart out telling you all the secrets of folding those egg whites and why you must use the good bittersweet chocolate for these magnificent Flourless Cakes. But the best part of baking is sharing the results! I truly want to know how this one turned out for you.
Did you dust it elegantly with the powdered sugar, or did you go wild with raspberries? Did you sneak a taste while it was still slightly warm? Seriously, I love hearing all the little details! Please take a moment below to leave a star rating for the recipe. Knowing how you rated it helps other folks who are looking for that perfect, simple gluten free dessert feel confident diving in.
Also, did you try any fun variations? Maybe you added a tiny bit of espresso powder to intensify the chocolate notes, or perhaps you used a different type of salt? If you experimented and found an amazing tweak, share it in the comments! You might just inspire my next batch—maybe even for my homestyle yellow cake recipe later this month!
If you snapped a picture of your shiny, perfectly sunken, rich chocolate creation, please tag me on social media! Seeing your success stories really makes my day. Happy baking, and enjoy that decadent chocolate bliss!
Print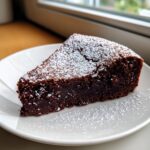
Simple Flourless Chocolate Cake
- Total Time: 45 min
- Yield: 8 servings 1x
- Diet: Gluten Free
Description
A rich, dense chocolate cake made without any flour.
Ingredients
- 8 ounces bittersweet chocolate, chopped
- 1/2 cup (1 stick) unsalted butter
- 3 large eggs, separated
- 1/4 cup granulated sugar
- 1 teaspoon vanilla extract
- Pinch of salt
Instructions
- Preheat your oven to 350 degrees F (175 degrees C). Grease and line the bottom of an 8-inch round cake pan with parchment paper.
- Melt the chopped chocolate and butter together in a heatproof bowl set over a saucepan of simmering water, stirring until smooth. Remove from heat and let cool slightly.
- In a separate bowl, whisk the egg yolks with the sugar until pale and thick. Stir in the vanilla extract and the cooled chocolate mixture.
- In a clean, dry bowl, beat the egg whites with the pinch of salt until stiff peaks form.
- Gently fold one-third of the beaten egg whites into the chocolate mixture to lighten it. Fold in the remaining egg whites until just combined. Do not overmix.
- Pour the batter into the prepared cake pan.
- Bake for 25 to 30 minutes, or until the edges are set and the center is slightly soft.
- Let the cake cool completely in the pan on a wire rack. The cake will sink as it cools.
- Invert the cake onto a serving plate before serving.
Notes
- Dust the cooled cake with powdered sugar before serving for a simple finish.
- This cake tastes best when served at room temperature.
- Prep Time: 15 min
- Cook Time: 30 min
- Category: Dessert
- Method: Baking
- Cuisine: American
Nutrition
- Serving Size: 1 slice
- Calories: 300
- Sugar: 20
- Sodium: 50
- Fat: 22
- Saturated Fat: 14
- Unsaturated Fat: 8
- Trans Fat: 0
- Carbohydrates: 25
- Fiber: 2
- Protein: 6
- Cholesterol: 120
Keywords: flourless cake, chocolate cake, gluten free dessert, rich chocolate