
Oh, the holidays! You know that feeling when the house smells like pine needles and cinnamon, and you realize you forgot to make something truly decadent for the cookie swap? Don’t panic! I have the absolute lifesaver recipe for you today:
These are hands-down the easiest, fudgiest Christmas Brownies you will ever pull out of the oven. Honestly, when I get swamped wrapping gifts or dealing with crazy family schedules, I turn to this recipe every single year. It’s my secret weapon because it comes together with melted butter and simple stir-ins in under 15 minutes of active time. Forget those complicated layered desserts; we want something rich, dense, and purely chocolatey right now.
Why These Christmas Brownies Are Essential Holiday Baking
When the holiday calendar gets packed, you need reliable recipes that deliver massive flavor without demanding hours in the kitchen. That’s why I swear by these fudgy chocolate squares. They’re my go-to when I need something impressive on short notice because they tackle all the holiday dessert demands at once.
Seriously, these are the reason my baking tray is always the first one emptied at gatherings. If you’re looking to impress without the fuss, you’ve found your champion. You can see how they stack up against fancier desserts in my post about chocolate caramel toffee cake—they hold their own!
- They come together faster than you can find your favorite Christmas sweater: only 15 minutes of prep!
- The texture is pure bliss—dense, deeply chocolatey, and wonderfully fudgy, never cakey.
- They look perfectly festive, especially when you add a little sparkle on top.
Quick Prep for Busy Holiday Schedules
This is the best part about these Christmas Brownies! You aren’t waiting around for ingredients to soften or whipping things to airy peaks. We melt the butter, stir in sugar, dump in the rest, and we’re done. Fifteen minutes, tops, standing at the counter. You can easily whip up a batch while the kids are decorating cookies or while you’re waiting for the oven to preheat for the main dish.

Achieving the Perfect Fudgy Texture in Your Christmas Brownies
If you hate dry, crumbly brownies, you need this recipe in your life because we’re aiming for the goo factor! The secret to truly fudgy Christmas Brownies is intentionally keeping the flour ratio low compared to the fat and sugar. We aren’t using a leavener here, so we’re relying on that perfect melted butter and sugar base to create that dense, moist structure that just melts in your mouth. Trust me, this ratio is non-negotiable for that incredible fudginess!
Gathering Ingredients for Your Christmas Brownies
Okay, so because these brownies are so simple, every single ingredient steps up to do important work. We aren’t hiding behind fancy extracts here; it’s pure chocolate goodness! When you’re pulling everything out, make sure your butter is ready to melt down smoothly. We are using pantry staples, but how you treat them matters, just like in my favorite banana bread recipe.
Here is what you’ll need to gather before you even turn on the stove. Don’t skip measuring correctly, especially the dry stuff!
- One cup of unsalted butter—it needs to be melted completely.
- Two cups of granulated sugar. Yes, it’s a lot, but that sugar helps create the super fudgy crust!
- Four large eggs, beaten slightly before you drop them in.
- A teaspoon of good vanilla extract.
- Three-quarters of a cup of unsweetened cocoa powder. This is crucial for that deep chocolate flavor!
- One cup of all-purpose flour.
- Half a teaspoon of salt—don’t leave this out, it brings the chocolate forward!
- And finally, a full cup of your favorite chocolate chips.
Key Ingredient Notes and Substitutions
Let’s talk about those chocolate components because they make or break the fudginess factor. For the cocoa powder, you absolutely must use unsweetened. Dutch-process or standard baking cocoa is perfect, but make sure it’s not sweetened hot chocolate mix; we are controlling the sugar here!
As for the chocolate chips, use whatever makes you happiest—semi-sweet or milk chocolate work great. If you want them extra dense, remember that note from my testing: take out just one tablespoon of that flour. It makes a noticeable difference in preventing that cakey texture from creeping in on these Christmas Brownies. If you happen to have a gluten sensitivity in the house, you can swap that cup of flour for a good quality 1:1 gluten-free baking blend, but watch your mixing time extra closely!

Step-by-Step Instructions for Fudgy Christmas Brownies
Alright, deep breath! We’re moving from the ingredients list to the actual magic. This process is so straightforward, you’ll be amazed at the results. My baking philosophy always leans toward simplicity, especially when I’m juggling a dozen other holiday tasks. Follow these few steps exactly, and you’ll have that perfect deep chocolate layer that everyone craves from these Christmas Brownies.
Once you’ve got your ingredients lined up, it’s time to work fast—but gently!
Preparing the Pan and Oven
First things first: we need to get heat ready and the pan prepped so we don’t have any sticking drama later. Preheat your oven to exactly 350 degrees Fahrenheit, which is 175 degrees Celsius for anyone using the metric setting. Next, grab that 9×13 inch pan. You really want to grease it well, and then dust it lightly with flour. That dual protection ensures a clean release for your beautiful brownies later. Don’t skip this step, or you’ll be scraping the bottom!
Combining Wet and Dry Ingredients for Christmas Brownies
This is where we make the fudge happen! Start by melting your butter in a saucepan over low heat until it’s completely liquid. Take it off the burner—important! Now, stir in all that sugar while it’s warm. Next, whisk in the eggs one by one until they are fully incorporated, followed by that vanilla extract.
In a separate bowl, whisk the dry stuff—cocoa powder, flour, and salt—together just to combine them evenly. Now, the warning you’ve heard a million times but is gospel for fudgy texture: gradually add the dry mixture into the wet mixture. You are mixing only until you see *just* combined streaks disappear. Stop mixing! If you overmix, you develop gluten, and suddenly your beautiful fudge turns into a less exciting cake. You can look at my guide on troubleshooting chocolate chip cookies; overmixing is the enemy of moistness everywhere!
Finally, gently fold in those chocolate chips. Just a few turns with your spatula until they are spotted throughout the batter.
Baking and Cooling Times
Pour that glorious batter evenly into your prepared pan. It should spread out pretty easily. Pop it into that 350°F oven for 25 to 30 minutes. You need to test it carefully around the 25-minute mark.
Forget the clean toothpick test; we are aiming for moist crumbs clinging to the tester, not wet batter, but also not bone dry. If it comes out dry, you’ve baked too long, my friend! Once they look done, pull them out. The absolute hardest part is next: they must cool completely in that pan before you try to cut them. Seriously, patience is mandatory here! Cutting them warm guarantees a messy disaster.
Tips for Making the Best Christmas Brownies
We’ve mastered the baking part—achieving that unbelievably fudgy center is half the battle! But since these are specifically Christmas Brownies, we can’t just cut them into plain old squares and serve them, right? We put a little extra love into the presentation during the holidays. These little tips, which I’ve picked up after years of holiday baking chaos, make these brownies look as spectacular as they taste.
I always think about how they look next to my spiced cranberry loaf, which you can find the recipe for here. A little visual appeal makes all the difference when you’re short on time!
Festive Presentation Ideas
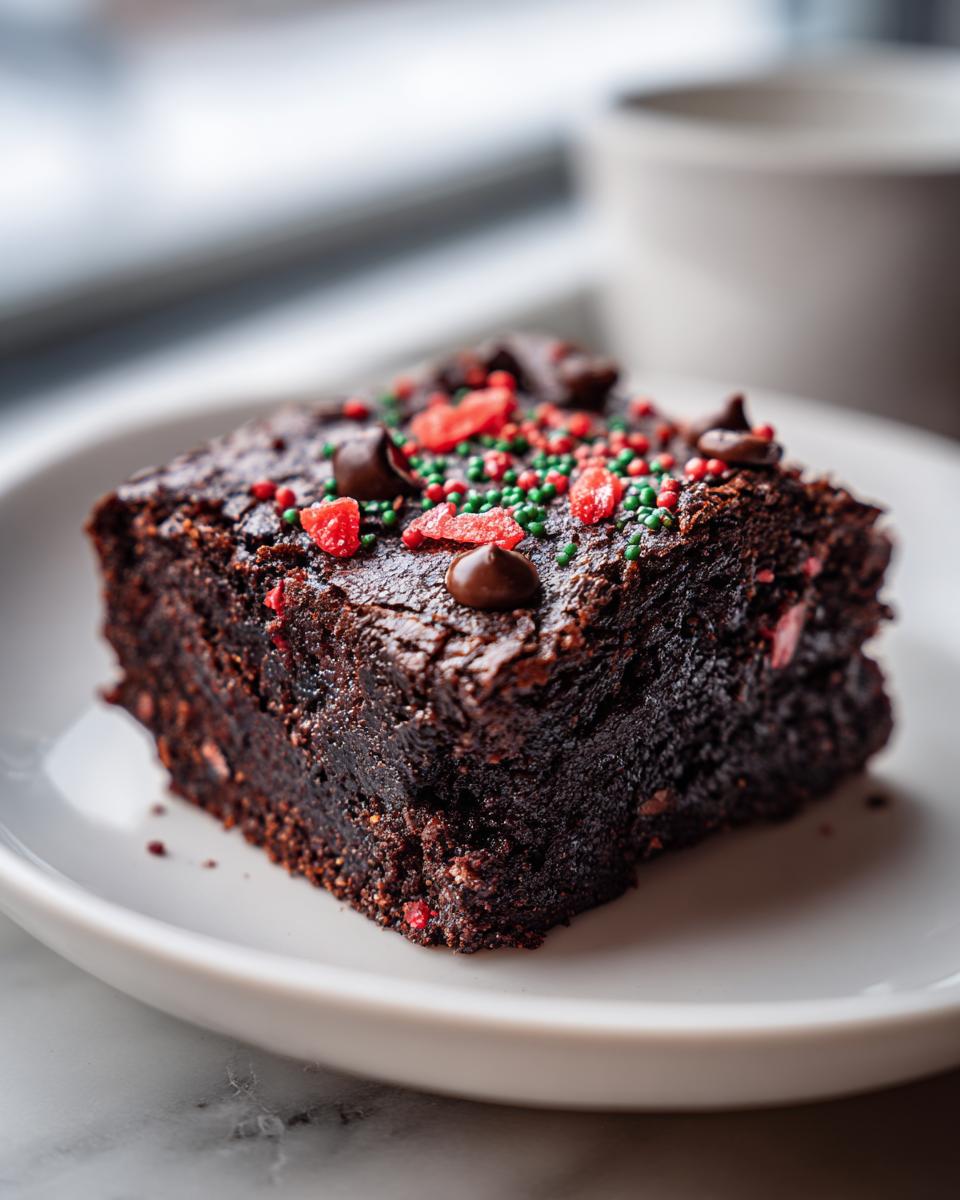
The easiest way to transform these rich chocolate squares into holiday magic happens right before they go into the oven. I take my favorite red and green nonpareils—the tiny little balls—and just sprinkle them lightly all over the batter. Don’t go crazy drowning the top, just enough so you get those festive pops of color when they bake.
If you are making the brownies the day before, you can skip the pre-bake sprinkles. Instead, wait until they are completely cool, and then dust the entire surface lightly with powdered sugar. You can use a little sieve for this, and it looks just like a light, pretty dusting of snow!
Here are a few other ways I dress mine up:
- A Chocolate Drizzle: Melt a few extra semi-sweet chips with a tiny splash of coconut oil until smooth. Drizzle back and forth across the cooled blocks for a professional look.
- Peppermint Crunch: If you smash up a couple of candy canes, folding in half the crumbs just before baking and sprinkling the rest on top when they are warm gives you a wonderful texture and incredible minty flavor.
- Salt Finish: For a complex flavor that cuts through all that sugar, sprinkle a few flakes of good quality sea salt over the top right after they come out of the oven. The heat helps it stick, and trust me, salty chocolate is heavenly!
Following these simple presentation tricks ensures your Christmas Brownies look ready for a holiday magazine, even though they took practically no effort!

Storage and Reheating Your Fudgy Dessert
Brownies this rich and fudgy don’t really last long in my house, but if you manage to keep some leftovers—which is impressive after the holidays—you need to know how to store them right so they stay decadent and don’t get weirdly sticky.
Since these bars rely so much on that moisture content we worked so hard to achieve, we have to be careful about air exposure. If you don’t cover them completely, the exposed edges get dry and chewy, and nobody wants a dry brownie edge! I’ve seen some people just wrap them loosely, but trust me, that’s a recipe for air infiltration.
Keep them airtight. I usually stack them in a container, but I put a sheet of wax paper or parchment paper between the layers. This prevents the gooey tops from sticking to the bottoms of the next layer. They are best kept at room temperature because chilling them too much can make that buttery texture a little too firm for my liking. If your kitchen is really warm, though, airtight in the fridge is better than leaving them melting on the counter.
If you’ve stored them in the fridge and they feel a touch hard the next day, don’t stress! You can refresh them slightly just by letting them sit on the counter for about 30 minutes, or you can give them a quick 10-second zap in the microwave. That little bit of warmth brings that fudgy texture right back to life! I learned this lesson the hard way when I tried to sneak an already cold piece the day after I made my famous dump cake—warm it up, always!
Serving Suggestions for Your Christmas Brownies
Okay, your glorious, fudgy squares of chocolate deliciousness are perfectly cooled, cut, and sitting pretty on the platter. Now what? While they are absolutely divine standing alone, the holidays are about abundance, right? We pair these intense chocolate treats with things that either cut through the richness or just lean into the cozy factor.
These brownies are honestly so rich that they pair well with almost anything simple, much like my recipe for a classic coffee cake that needs only a simple glaze. Don’t overcomplicate the serving!
Since you’ve done all the hard work making the perfect Christmas Brownies, here are my favorite ways to serve them up:
- The Classic Milk Chaser: You can’t go wrong. A tall, cold glass of milk—whole milk, almond milk, whatever your family prefers—is the perfect foil to that rich, sweet chocolate. It just washes it down perfectly.
- A Cup of Warm Coffee: Especially after a big holiday meal, nothing beats dunking a tiny corner of that brownie into hot, strong coffee. The heat of the coffee slightly melts the chocolate chips inside, making them even gooier.
- Vanilla Ice Cream: This is my go-to for when I want to turn these brownies into a proper dessert. Serve a warm-ish brownie square (just 10 seconds in the microwave!) topped with a scoop of good vanilla bean ice cream. When the cold cream hits the warm fudge, it’s pure heaven.
- Peppermint Hot Chocolate: Lean into the theme! Serve these alongside mugs of rich hot chocolate, maybe topped with crushed candy canes for extra festive cheer. It’s chocolate overload, but hey, it’s Christmas!
Seriously, even just serving them slightly warm on a festive plate is enough to make everyone declare you the baking champion of the season!
Frequently Asked Questions About Christmas Brownies
I know you’ve got questions, because when you’re dealing with something this fudgy, sometimes you need reassurance! The questions I get most often are about getting that perfect, dense texture and how to cut them neatly for gifting. Trust me, I’ve made enough batches of these Christmas Brownies to answer everything for you!
Can I make these brownies ahead of time for Christmas?
Absolutely, yes! In fact, I highly recommend it, if you can manage to keep your hands off them. Brownies taste even better the next day once all those chocolate and sugar flavors have completely melded together. If you make them the day before, just make sure they are completely cool—and I mean room temperature cool—before you seal them up tight in an airtight container with parchment paper layers, as I mentioned earlier.
They are perfectly fine stored like that on the counter for two or maybe three days. If you’re making them way ahead, wrapping them well and freezing them works like a charm too. Just let them thaw on the counter for a few hours before slicing.
How do I get perfectly clean cuts on my Christmas Brownies?
This is the absolute trickiest part of working with a super fudgy chocolate dessert! If you try to cut warm brownies, you’re just going to drag all that gooey goodness across the pan, and the result looks more like chocolate mud than neat squares. So, my non-negotiable rule is: wait until they are completely, totally cool—like, hours later cool!
Once they are set, grab your sharpest, thinnest knife. Before each cut, dip that knife into hot water, wipe it completely dry with a paper towel, and then make your cut. That little bit of heat and slickness helps the knife glide right through cleanly without sticking to the rich chocolate, giving you those beautiful, sharp edges worthy of a holiday platter. Repeat that warm-and-wipe process for every single line you make!
And if you’re curious about using a substitute for that much sugar, hop over and check out my thoughts on using different sweeteners in my cookie recipe guide; sometimes small swaps aren’t worth the risk when it comes to super fudgy textures like this!
Estimated Nutritional Information
Now, I have to be totally honest with you all: I’m a baker, not a nutritionist! When I’m whipping up these treats for the holidays, I’m more focused on how soft the batter is or if the chocolate chips are evenly folded in than I am counting macros. But because I know some of you ask, I ran the standard ingredient list through a calculator to give you a general idea of what’s in a generous square of these fudgy chocolate delights.
Please remember, this is just a rough estimate based on standard ingredient amounts. If you swap the sugar for a sweetener or use super dark chocolate instead of semi-sweet, that number is going to shift! Consider this your handy guide for serving size planning, not a precise scientific breakdown.
Here is the standard nutritional breakdown per square for these Christmas Brownies:
- Serving Size: 1 square
- Calories: 220
- Sugar: 25g
- Fat: 12g (with 7g of that being saturated fat)
- Protein: 3g
- Carbohydrates: 28g
- Sodium: 80mg
See? Pure indulgence, which is exactly what a holiday chocolate dessert should be! Just grab a napkin and enjoy knowing you’ve made something truly spectacular without spending all day in the kitchen!
Share Your Holiday Baking Success
Phew! We made it! You have successfully navigated the waters of quick holiday baking and now you have the very best, fudgiest Christmas Brownies sitting cooling on your counter. Now, don’t keep this magic to yourself!
Baking is supposed to be a shared joy, isn’t it? I always feel so much pride when I hear that one of my recipes made someone else’s holiday gathering a bit sweeter. I’d absolutely LOVE to see how yours turned out! Did you go for the festive sprinkles or the elegant powdered sugar dusting?
Head down to the comments section and give these brownies a rating—let me know if they hit that deeply fudgy mark you were hoping for. If you snapped a picture of your beautiful batch, please share it on social media and tag me! It tells me I’m doing something right in the kitchen, and I can show off your amazing work!
If you ever run into any questions while baking (even about storage or cutting techniques!), or if you just want to chat about holiday baking in general, feel free to reach out through my contact page. Happy holidays, and enjoy every single fudgy bite!
Print
Simple Christmas Brownies
- Total Time: 45 min
- Yield: 24 servings 1x
- Diet: Vegetarian
Description
A straightforward recipe for rich, fudgy brownies perfect for the holidays.
Ingredients
- 1 cup unsalted butter
- 2 cups granulated sugar
- 4 large eggs
- 1 teaspoon vanilla extract
- 3/4 cup unsweetened cocoa powder
- 1 cup all-purpose flour
- 1/2 teaspoon salt
- 1 cup chocolate chips
Instructions
- Preheat your oven to 350 degrees F (175 degrees C). Grease and flour a 9×13 inch baking pan.
- Melt the butter in a saucepan over low heat. Remove from heat.
- Stir the sugar into the melted butter. Mix well.
- Beat in the eggs one at a time, then stir in the vanilla extract.
- In a separate bowl, whisk together the cocoa powder, flour, and salt.
- Gradually add the dry ingredients to the wet ingredients, mixing until just combined. Do not overmix.
- Fold in the chocolate chips.
- Spread the batter evenly into the prepared pan.
- Bake for 25 to 30 minutes. A toothpick inserted near the center should come out with moist crumbs attached, not wet batter.
- Let the brownies cool completely in the pan before cutting into squares.
Notes
- For a festive look, sprinkle the tops with red and green sprinkles before baking.
- If you prefer a denser brownie, reduce the flour by one tablespoon.
- Prep Time: 15 min
- Cook Time: 30 min
- Category: Dessert
- Method: Baking
- Cuisine: American
Nutrition
- Serving Size: 1 square
- Calories: 220
- Sugar: 25
- Sodium: 80
- Fat: 12
- Saturated Fat: 7
- Unsaturated Fat: 5
- Trans Fat: 0
- Carbohydrates: 28
- Fiber: 1
- Protein: 3
- Cholesterol: 45
Keywords: Christmas Brownies, fudgy brownies, chocolate dessert, holiday baking, easy brownies