
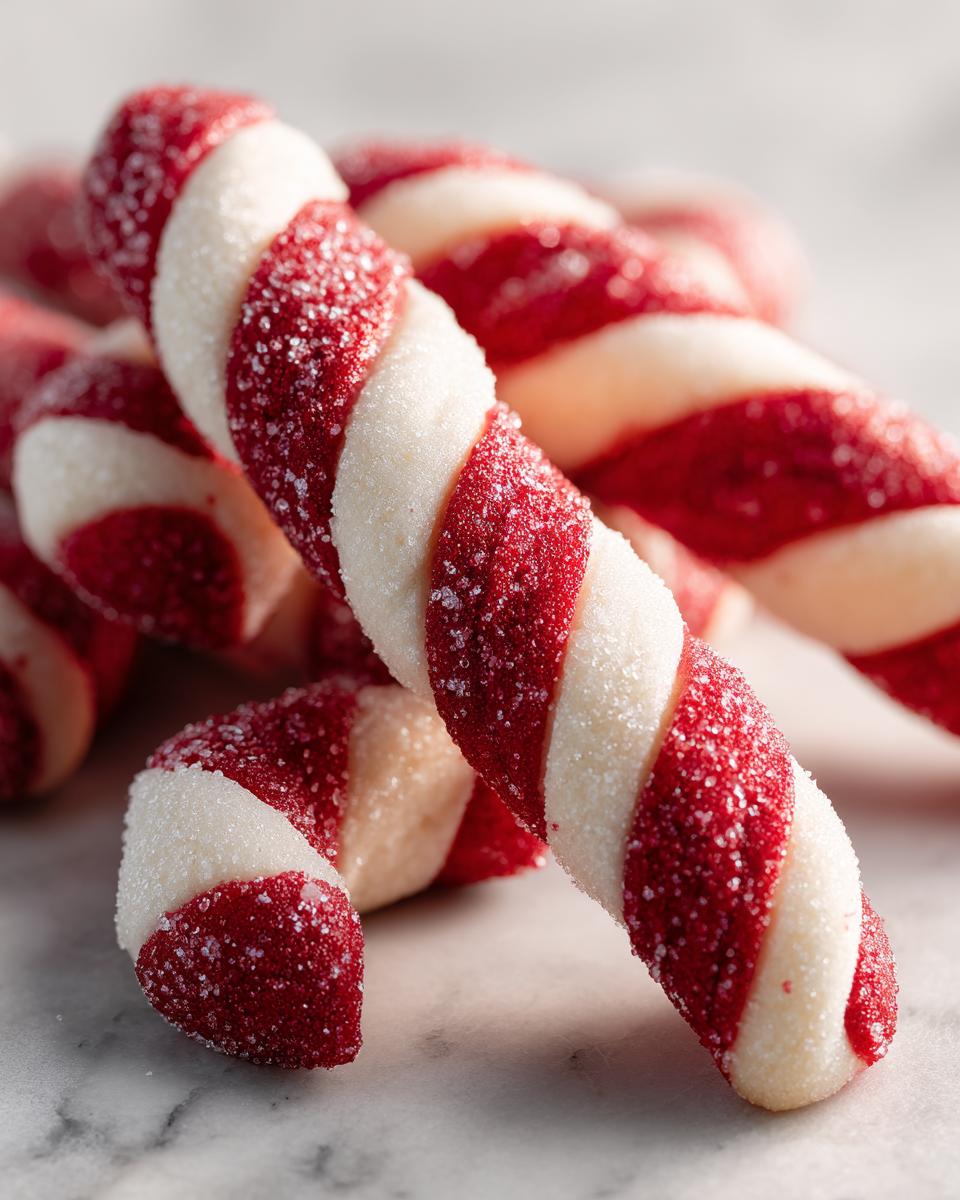
Oh, the holidays! Nothing smells like Christmas to me more than that bright, sharp scent of peppermint hitting warm sugar. Truly, the whole house just changes! Every year, I have my go-to recipes, but these delightful **Candy Cane Cookies** are non-negotiable. They look fancy, like you spent hours twisting little ropes, but honestly, they are secretly just modified sugar cookies.
I’ve been baking these since I was old enough to hold a cookie rope without squashing it flat—which took a while, trust me! They are so festive, perfectly peppermint-flavored, and they freeze beautifully too, once they’ve cooled completely. If you’re looking for that showstopper cookie that tastes as amazing as it looks, you’ve found it. Forget complicated cutout shapes this year; we are twisting our way to holiday baking stardom!

Why You’ll Love These Easy Candy Cane Cookies
I know everyone has their list of must-make holiday cookies. These just have to stay on yours, and here’s why! Once you get the hang of the twisting, they fly together faster than you’d think. Also, the flavor payoff is huge for the little effort required.
- Spectacularly Festive: Nothing screams Christmas cookie platter like red and white stripes, right? They look stunning, and people always ask if they were difficult to make!
- Bold Peppermint Kick: We use real peppermint extract, not that weak mint stuff. That sharp, cool flavor cuts right through the sweetness of the sugar cookie dough perfectly. It’s the real deal.
- Surprisingly Simple Shaping: The secret isn’t fancy cutting tools; it’s just rolling ropes. Once you see how easy it is to twist two different colors together, you’ll be hooked on this technique.
- Great for Baking Ahead: Since they are sturdy sugar cookies, they hold up really well. Make a batch one weekend and save them for the next—they stay fresh!
Essential Ingredients for Perfect Candy Cane Cookies
Okay, before we dive into the fun part—the twisting and turning—we need to make sure the base cookie is absolutely rock solid. These aren’t intricate shortbreads; they are sturdy sugar cookies that need to hold their twist shape, so the ingredient ratios here are super important. I’ve written down exactly what I use below. Don’t skip the chilling step later; that’s what keeps everything workable!
- 1 cup unsalted butter, softened (you want it soft, but not oily!)
- 1 cup granulated sugar
- 1 large egg
- 1 teaspoon vanilla extract
- 2 3/4 cups all-purpose flour
- 1 teaspoon baking powder
- 1/2 teaspoon salt
- 1/2 teaspoon peppermint extract
- Red food coloring (a few drops are all you need)
- White sanding sugar for coating (this gives the crunch!)
Ingredient Notes and Substitutions for Candy Cane Cookies
Listen, the flavor of these cookies hinges on what you pick for the extract. You absolutely must use peppermint extract here, not spearmint or general mint flavoring. Peppermint has that crisp, cool bite that mimics a real candy cane. If you use basic mint, it’ll taste heavy and almost medicinal compared to what we are aiming for.
When it comes to the color, I strongly suggest using gel food coloring if you happen to have it. Liquid coloring can sometimes thin out the dough just a tiny bit, and since we need a very stiff dough for twisting, gels pack a color punch without adding extra moisture. If you only have liquid, just be careful adding it slowly to that half of the dough. Also, ensure your butter is actually room temperature soft; trying to cream cold butter is what makes people over-mix later trying to force things smooth!
Equipment Needed for Making Candy Cane Cookies
Luckily, you don’t need a whole specialty bakery setup for these. If you have basic cookie-making tools, you are totally set! The dough gets a bit sticky before chilling, and then you need something sturdy for rolling and shaping, so keep these items handy:
- A stand mixer or good electric hand mixer (for creaming the initial butter and sugar—your arms will thank you!).
- Two medium mixing bowls (one for the main dough, one for the dry ingredients).
- Measuring cups and spoons, naturally.
- Plastic wrap—you’ll need plenty to wrap up those two dough balls for their important nap in the fridge.
- Baking sheets (at least two, if you want to maximize oven time!).
- Parchment paper—this is non-negotiable for easy cleanup and safe cookie release.
- A small rolling surface or cutting board.
- Your hands! Seriously, shaping these ropes feels the best when you just use your hands, not a rolling pin.
Step-by-Step Instructions for Twisting Candy Cane Cookies
Alright, here is where the magic happens! We start with the basics, making sure we don’t rush the mixing, and then we get to the fun part where everything turns peppermint-red. I always set up my ingredients first so I’m ready to move quickly once the base dough is mixed.
- First things first, grab that mixer! Beat the softened butter and the granulated sugar together until they are properly creamy and light. This usually takes a few minutes, but don’t rush it; we are building structure here!
- Next, add in the egg and that teaspoon of vanilla extract. Mix it up until it’s all combined smoothly.
- Now, grab a separate bowl. Whisk together your flour, baking powder, and salt. You just want these dry guys nicely married before they meet the wet stuff.
- Gradually add those dry ingredients into your wet mixture. Mix slowly! I have to remind myself constantly: do not overmix the dough once the flour is added, or you’ll end up with tough cookies. Mix only until you don’t see white streaks anymore.
- Time to divide! Take all that dough and split it exactly in half. One side stays exactly as it is—that’s our white rope dough.
- For the second half, stir in the 1/2 teaspoon of peppermint extract and a few drops of that red food coloring. Mix it gently until the color is uniform across the dough. Don’t go overboard trying to make it super dark red right away!
- Wrap both dough halves up tightly in plastic wrap. They need a good deep chill—at least 1 hour in the fridge. This is crucial so they don’t spread everywhere or stick to your fingers later.
- When that hour (or more!) is up, preheat your oven to 375 degrees F (190 degrees C). Line those baking sheets with parchment paper right now so you’re ready to go once they are shaped.
- Now for the fun part: take small, manageable pieces of the white dough and small pieces of the red dough. Roll each individual piece into a rope that is about 4 inches long. Keep the ropes relatively even in thickness!
- Gently twist one red rope and one white rope together. Try not to pull too hard so they don’t snap or stretch too thin.
- Carefully bend that twisted rope right into a classic candy cane shape.
- Once bent, roll the shaped cookie in that glorious white sanding sugar so the stripes get coated nicely.
- Place your gorgeous cookies on the prepared baking sheets, making sure they have about 2 inches of space between them.
- Bake them for 8 to 10 minutes. You are looking for the edges to just barely turn lightly golden. They won’t look overdone!
- Crucial last step: Let the cookies cool on the baking sheet for about 5 minutes. They are fragile right out of the oven! Then, move them carefully to a wire rack to finish cooling completely.
Achieving the Perfect Candy Cane Cookies Shape
This twisting part used to give me fits when I was learning because I could never get the ropes the same thickness. If you find your dough is super stiff straight out of the fridge—which sometimes happens if your kitchen is chilly—just leave the whole wrapped dough ball on the counter for about 5 minutes. When it’s slightly less rock-hard, it’s much easier to roll out those ropes without snapping them. Remember, if you’re worried about fingerprints, you can actually use the plastic wrap on your hands like a thin glove to help guide the twist without squishing the pattern!
Tips for Success When Baking Your Candy Cane Cookies
Even though this recipe is pretty straightforward, a few little habits can take your **Candy Cane Cookies** from “pretty good” to “OMG, you HAVE to give me the recipe!” My biggest piece of advice, which I learned the hard way after making one batch that was just a little too chewy, involves respecting the mixing order.
Seriously, don’t even think about overmixing once that flour goes in. When you see the last streaks of white flour disappear, stop the mixer immediately. If you keep going, you’re activating gluten, and that’s what turns a tender, melt-in-your-mouth cookie into something that fights back a little when you bite it. We want tender, not tough!
Another non-negotiable step? That chilling time! I know you want to bake cookies *right now*, but that hour for the dough to rest is essential. It lets the flour fully hydrate, and it firms up the fat, which prevents those beautifully twisted ropes from melting into sad, flat puddles in the oven—especially with all that peppermint oil floating around. Trust me on this one; patience pays off here. If you are looking for another sturdy cookie that chills wonderfully, you might want to try my crinkly, crackly butter toffee cookies recipe for variety!
When it’s time to check for doneness—this is important—don’t just rely on the timer alone. While 8 to 10 minutes is the usual range, ovens are moody beasts. You are looking specifically for edges that are only *lightly* golden. If you wait until they are deeply browned, the center will be dry. They should still look fairly pale on top, but touch the bottom gently underneath with a thin spatula; if it feels firm and the edges show that faint color change, pull them right out. They finish setting up beautifully on that warm baking sheet while they cool.

Storing and Keeping Your Candy Cane Cookies Fresh
We want these babies to last past Christmas Day, right? That’s the final hurdle! Luckily, because these are sturdy, low-moisture sugar cookies with a sugar coating, they are incredible keepers, much better than soft, gooey ones.
The cooling process matters a lot for longevity. Remember how I told you to let them sit on the baking sheet for five minutes after they come out? That brief rest is crucial. If you try to move them when they’re piping hot, they might bend weirdly or even snap because the butter hasn’t fully set up yet. Once those five minutes are up, gently move them over to a wire cooling rack. They need air circulation all around them to stop the bottom from getting soggy while they finish cooling down to room temperature.
Once they are completely, totally cool—and I mean room temperature, no residual warmth—it’s time to store them. The key here is an airtight container. Seriously, find the best one you have. You can layer them between sheets of parchment paper if you’re making big batches, or just stack them carefully if you have a big enough container. Keep them on the counter or in a cool pantry, but avoid the fridge.
Why no fridge? Condensation! When you take cold cookies out into room temperature air, that moisture settles on them, and suddenly your beautifully crisp sugar cookie is a little soft. Kept airtight on the counter, these **Candy Cane Cookies** will taste just as freshly baked for a good week, easily. If you need them to last longer, they actually pack and freeze really well, too! Just make sure they are fully cooled, wrap the container tightly in a layer of plastic wrap before sealing the lid, and they’ll be perfect for up to three months.
Variations for Festive Candy Cane Cookies
You know how much I love following a recipe to the letter the first time, just to honor the original baker, but after that? It’s time to experiment! If you’ve made these **Candy Cane Cookies** once or twice and are ready to shake things up for the holidays, I have a couple of super simple swaps that keep the spirit of the cookie alive but offer a fresh flavor profile.
The dough structure is so reliable—it loves playing around with extracts! Swapping out that classic peppermint is the easiest change you can make. Next time, try using almond extract instead. It gives you that wonderful, warm, slightly marzipan flavor that is just divine with sugar cookie flavor. You’ll end up with beautiful, striped almond cookies instead of peppermint ones.
Or, if you are feeling really bold, you could even try a blend! Use just 1/4 teaspoon of peppermint and mix in 1/4 teaspoon of vanilla or orange extract. It softens that sharp mintiness just enough. Honestly, the orange pairs surprisingly well if you happen to have any orange zest lying around—just add a tiny bit when you mix the white dough!
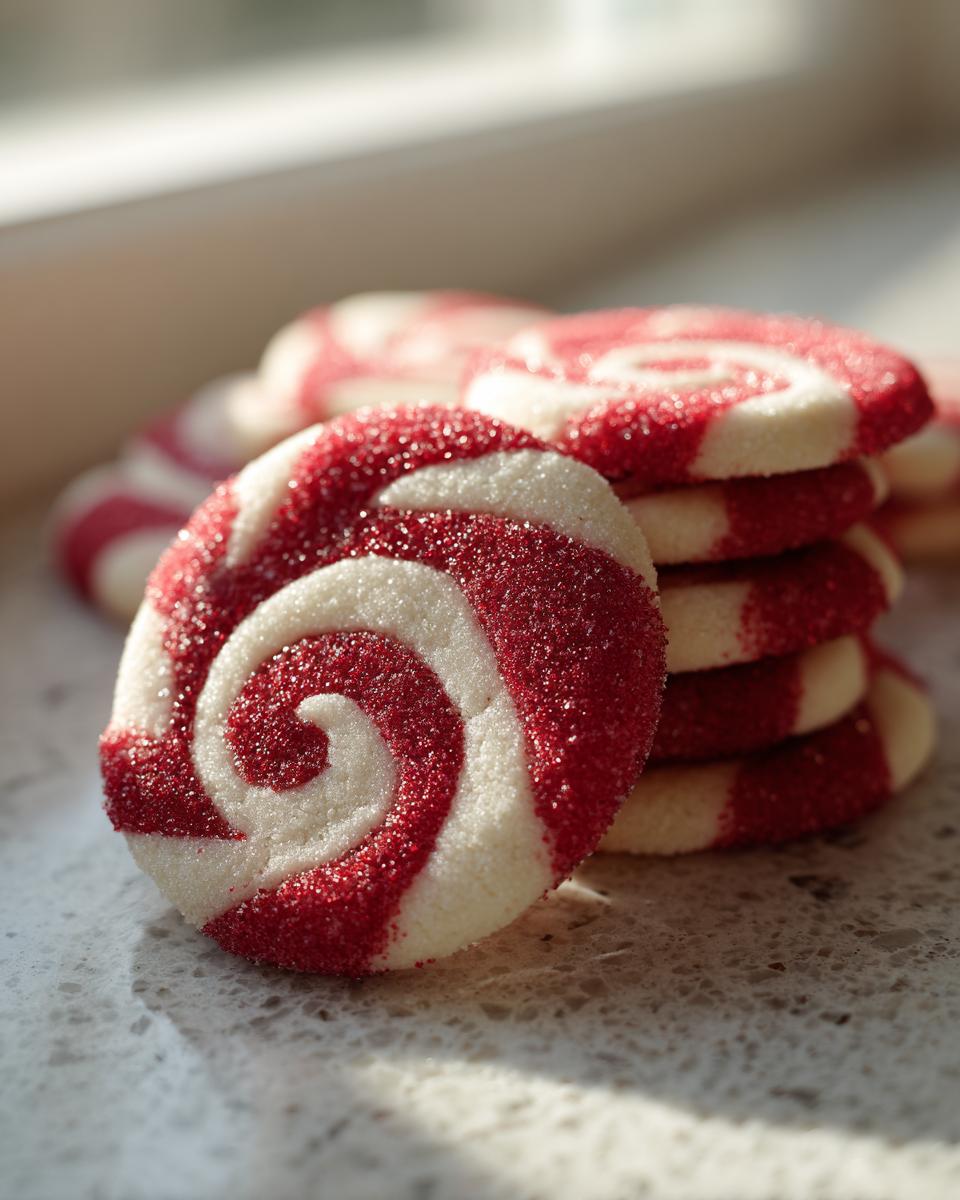
Shaping variations are fun too. If you’re tired of twisting, you don’t have to! You can still divide the dough and color one half red, but instead of making ropes, just roll out the whole batch of white dough and the whole batch of red dough separately. Then, just layer them together before cutting out circles or squares, giving you a lovely swirl effect when you bake them. It’s that lovely striped look without the twisting arm workout!
For a chocolate twist—which is always welcome in my kitchen—you can divide the dough into thirds. Leave one white, color one red, and then mix cocoa powder into the third batch. Then you can twist white, red, and chocolate together for a triple-striped, really interesting look. I haven’t tried that with chocolate yet, but I think those chocolate chip tahini cookies taught me that chocolate and sugar doughs are usually compatible! Let me know if you try any wild color combinations; maybe we can whip up some tie-dye candy canes!
Frequently Asked Questions About Candy Cane Cookies
Can I use butter substitutes like margarine or oil in these cookies?
I really wouldn’t recommend it for these specific Candy Cane Cookies. Since this recipe is based on a sturdy sugar cookie that needs to hold its shape during twisting and baking, the structure relies heavily on real butter. Margarine or oil doesn’t cream up the same way, and it can make the ropes too greasy and soft, leading to a flat, oily cookie instead of that nice, crisp one we want. If you must substitute, use a high-quality stick shortening in place of half the butter, but homemade butter cookies are definitely superior here!
How do I prevent the red and white colors from bleeding together too much in the dough?
This is a common worry, especially if you’ve colored the dough a while before you’re ready to twist! If you find the red dye seems to be seeping into the white dough, it usually means one of two things: either you used too much liquid food coloring, or the dough wasn’t chilled long enough. If you see any color bleed while they are waiting to bake, pop the whole tray into the fridge for 15 minutes. The cold stops the color migration dead in its tracks. Using gel coloring, as I mentioned before, also severely cuts down on this issue because it’s less water-based!
Can I skip the chilling time for the dough? I want Christmas cookies baking right now!
Oh, I hear you—the urge to bake immediately is strong, especially when we think about those amazing peppermint cookies filling the kitchen with scent! But seriously, don’t skip the chill time, please. That hour (or even longer) is what keeps your dough firm enough to roll into those thin ropes without sticking to everything and stretching out of shape. Skipping the chill means your candy canes will spread wide and lose their cute striped definition. It’s just 60 minutes; maybe use that time to clean up the mixing bowls!
How long do these peppermint cookies stay fresh?
These are surprisingly resilient cookies! Since they have a lower moisture content than, say, a rich chocolate chip cookie, they hold up really well. Stored properly in an airtight container at cool room temperature, they easily stay delicious for about 7 to 10 days. If you need them to last longer like I do for holiday cookie boxes, they freeze beautifully for up to three months, just make sure they are totally cooled before bagging them up!
What is the best way to roll the rope so it doesn’t look lumpy?
The trick to a smooth rope isn’t muscle; it’s consistency! Before you start rolling the red and white ropes, take a small piece of *each* color and roll it into a uniform 4-inch piece. You want the thickness about the size of a standard pencil. Once you have two matching ropes, lay them next to each other and start twisting them together *gently*. You want just enough contact for them to stick, but not so much pressure that you flatten the dough balls. When you bend it into the cane shape, hold the twist firmly with one hand while curving the top gently with the other.
Estimated Nutritional Data for Candy Cane Cookies
Now, while I certainly don’t bake these festive treats thinking about macros—they are for joy, after all!—I know some folks like to see the numbers, especially when packing these up for neighbors or family. I’ve pulled together the approximate nutritional breakdown based on my recipe ratios. Remember, this is just a guide because what kind of butter you use or how thick you roll those peppermint ropes can change things slightly!
This estimate is based on the full recipe yielding 24 cookies. If you happen to get 26 or 28 cookies out of the batch because you rolled your ropes a little thinner, then of course, the numbers per cookie will drop a bit. Think of this as your general ballpark for these sweet, crunchy **Candy Cane Cookies**.
- Serving Size: 1 cookie
- Calories: Roughly 150
- Sugar: Around 12g
- Fat: About 8g (with 5g of that being saturated fat from the butter, the good stuff!)
- Sodium: Typically 60mg
- Carbohydrates: About 18g
- Protein: 2g
- Cholesterol: About 30mg per cookie
This is what I get every time I run the numbers in my head! It gives you a good idea of what you’re dealing with. If you’re swapping in margarine or using less sugar overall, you’ll definitely see these figures shift, so take this data with a grain of salt—or maybe a little extra sanding sugar, you know the drill!
Print
Candy Cane Cookies
- Total Time: 1 hour 40 min
- Yield: 24 cookies 1x
- Diet: Vegetarian
Description
Simple sugar cookies flavored with peppermint and shaped like candy canes.
Ingredients
- 1 cup unsalted butter, softened
- 1 cup granulated sugar
- 1 large egg
- 1 teaspoon vanilla extract
- 2 3/4 cups all-purpose flour
- 1 teaspoon baking powder
- 1/2 teaspoon salt
- 1/2 teaspoon peppermint extract
- Red food coloring
- White sanding sugar for coating
Instructions
- Beat the butter and sugar together until creamy.
- Add the egg and vanilla extract; mix well.
- In a separate bowl, whisk together the flour, baking powder, and salt.
- Gradually add the dry ingredients to the wet ingredients. Mix until just combined.
- Divide the dough in half. Leave one half white.
- Add the peppermint extract and a few drops of red food coloring to the second half of the dough. Mix until the color is uniform.
- Wrap both dough halves in plastic wrap and chill for at least 1 hour.
- Preheat your oven to 375 degrees F (190 degrees C). Line baking sheets with parchment paper.
- Take small pieces of white dough and small pieces of red dough. Roll each piece into a rope about 4 inches long.
- Twist one red rope and one white rope together gently.
- Bend the twisted rope into a candy cane shape.
- Roll the shaped cookie in white sanding sugar.
- Place cookies on the prepared baking sheets, about 2 inches apart.
- Bake for 8 to 10 minutes, or until the edges are lightly golden.
- Let the cookies cool on the baking sheet for 5 minutes before moving them to a wire rack to cool completely.
Notes
- You can use a stand mixer or a hand mixer for creaming the butter and sugar.
- Do not overmix the dough once the flour is added.
- If the dough is too sticky after chilling, let it sit at room temperature for a few minutes before shaping.
- Prep Time: 30 min
- Cook Time: 10 min
- Category: Dessert
- Method: Baking
- Cuisine: American
Nutrition
- Serving Size: 1 cookie
- Calories: 150
- Sugar: 12
- Sodium: 60
- Fat: 8
- Saturated Fat: 5
- Unsaturated Fat: 3
- Trans Fat: 0
- Carbohydrates: 18
- Fiber: 0
- Protein: 2
- Cholesterol: 30
Keywords: Candy Cane Cookies, peppermint cookies, Christmas cookies, holiday baking, sugar cookies