
Oh, the holiday table. It’s supposed to be magical, right? But let’s be honest, between the endless sides and the sheer panic that grips you when you look at that giant, frozen bird, it can feel like a battlefield. I used to dread turkey day! I’ve served up dry, sad messes that tasted like cardboard. Seriously, I’ve been there, sweating over the oven, only to pull out something that needed industrial amounts of gravy just to be chewable.
But I cracked the code, my friend! This version isn’t fussy. It’s my recipe for the **Best Roast Turkey** because it focuses on two things that actually matter: keeping it incredibly moist and keeping the process simple. We’re ditching the craziness and focusing on butter, salt, and good aromatics. Trust me, even if you’re a total beginner, you are going to pull a perfectly golden, juicy turkey out of your oven this year.

Why This is the Best Roast Turkey Recipe You Will Ever Make
Look, you don’t need complicated brines or hours spent basting every fifteen minutes to get a showstopper bird. This recipe is about smart seasoning and flavor layering. I promise you, once you try this method, you won’t look back! It’s my absolute secret for making sure the breast meat stays tender while the outside gets that gorgeous, crackly brown skin.
Key Benefits of Our Simple Roast Turkey
- Guaranteed Moisture: We use the butter rub *under* the skin, which is crucial for keeping that breast meat juicy right through the cook time.
- Simple Seasoning: A straightforward salt, pepper, and thyme blend means you aren’t hunting for twenty exotic spices.
- Aromatic Infusion: Stuffing the cavity with whole onion, lemon, and garlic naturally steams flavor into the meat from the inside out.
- Minimal Hands-On Time: Once the butter is on, you mostly just let the oven do the heavy lifting!
Ingredients Needed for the Best Roast Turkey
Okay, getting the ingredients right is half the battle! Don’t eyeball the salt here; we need precision so that turkey comes out perfectly seasoned, not bland. This recipe is naturally straightforward, but you must use butter that is actually soft—room temperature soft, not melted soft. That distinction makes a huge difference when you’re rubbing it everywhere!
Turkey and Aromatics
You’re aiming for a bird between 12 and 14 pounds. If yours is bigger or smaller, don’t panic, just adjust the cook time later! You will also need:
- One onion, cut into quarters.
- A whole head of garlic, cut right in half across its middle.
- One whole lemon, halved.
- A few good sprigs of fresh rosemary. These go right inside the cavity for that amazing smell.
Herb Butter Rub for the Best Roast Turkey
This is what gives you that deep seasoning right into the meat. Make sure you soften about half a cup of unsalted butter beforehand. It needs to be spreadable!
- The softened butter, obviously.
- Two tablespoons of kosher salt—no table salt here, please!
- One tablespoon of good, freshly cracked black pepper.
- One tablespoon of dried thyme.
Essential Equipment for Roasting Your Best Roast Turkey
Before you even think about preheating the oven, let’s make sure your kitchen arsenal is ready. Getting the right tools out now saves you from that frantic “Where is my thermometer?!” moment when the turkey smells perfect but you have no idea if it’s safe to eat.
You absolutely need a good roasting pan, and honestly, make sure it has a rack! The rack is important because we need air circulating underneath that bird. We don’t want the bottom getting steamed and soggy.
And pay attention to these three non-negotiables:
- A sturdy roasting pan (the deeper, the better for catching drippings).
- A roasting rack that fits comfortably inside that pan.
- The most vital tool: A reliable meat thermometer. Seriously, don’t try to guess. We need to hit that 165 degrees in the thigh, and that little gadget is the only way to know for sure!
- Aluminum foil. This is our heat shield, ready to swoop in if the skin starts looking too dark before the meat is cooked through.
Having these things ready makes the prep time fly by, and you can focus on drizzling some butter instead of scrambling for tools!
Step-by-Step Instructions for the Best Roast Turkey
You’re going to be shocked at how easy this is, especially considering the result. We aren’t aiming for a complicated, multi-day process here. We want simple, maximum flavor, and meat that doesn’t taste like sawdust! Make sure you have your ingredients mixed and your oven warmed up before you start messing with the bird itself.
Preparation and Seasoning
First thing’s first: preheat that oven to 325°F. Low and slow is the game for moisture. Take everything out of the cavity—the neck, the giblets, save those for stock later! Now, grab your paper towels. I mean *really* dry the skin. Damp skin steams; dry skin crisps! Wow, what a difference that makes!
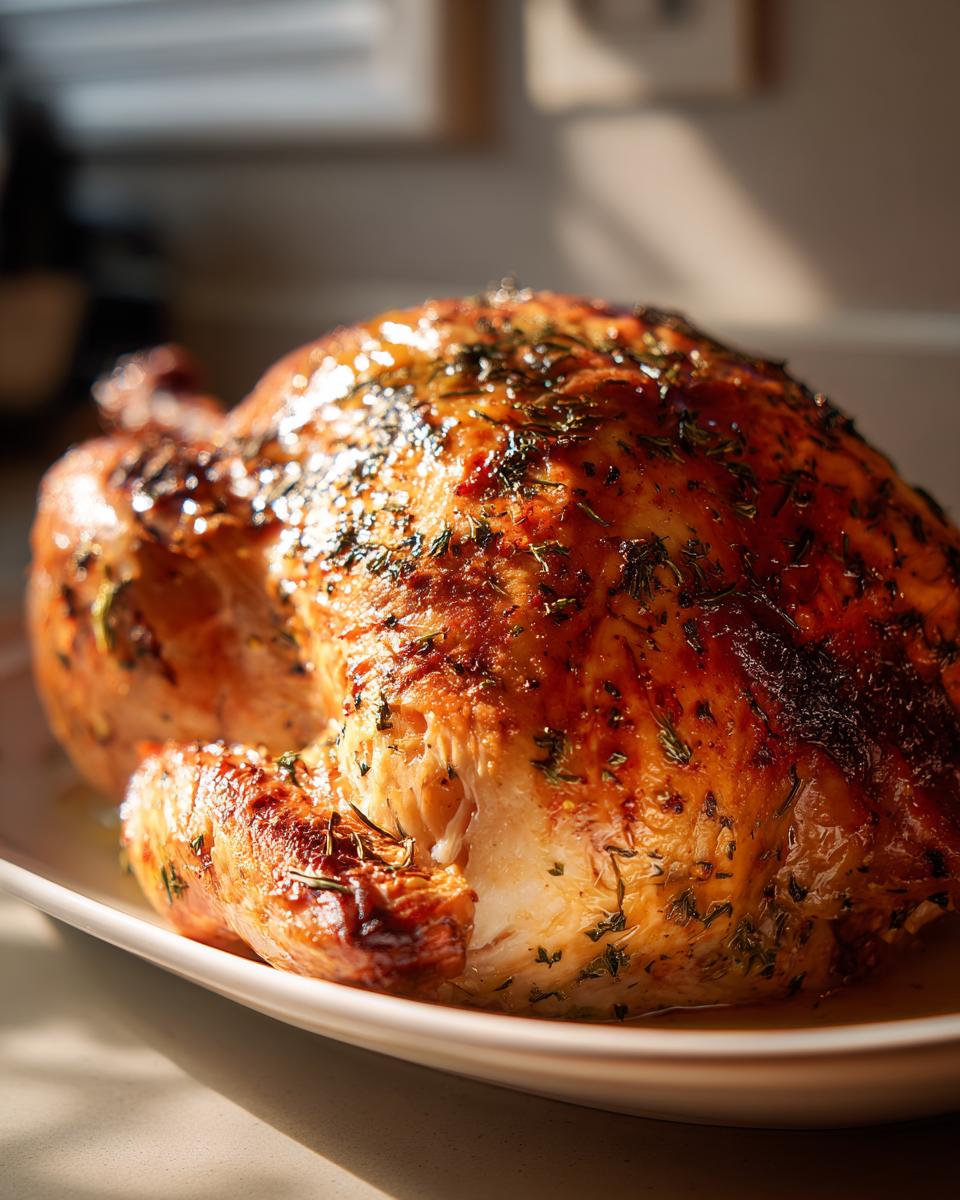
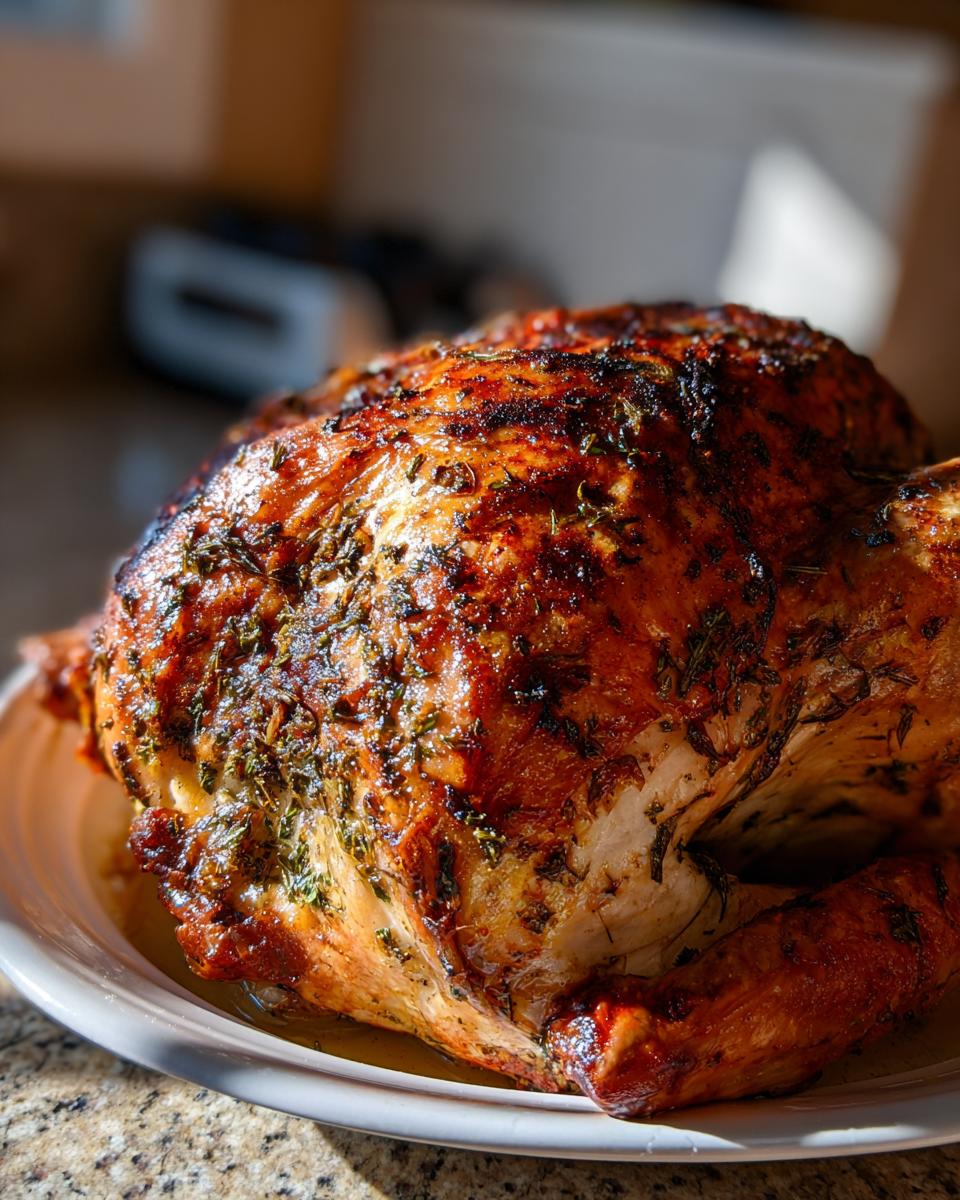
Mix your softened butter, salt, pepper, and thyme together until you have a lovely herb paste. Here’s my big tip: don’t just slather it on the outside. Gently work your fingers under the skin right over the breast meat and rub half of that butter deeply right against the meat. Then, use the rest of the butter to coat the entire exterior skin. It’s like wrapping the meat in a flavor blanket!
Stuffing the Cavity and Initial Roast
Now for the aromatics. You don’t want stuffing in there for food safety reasons, but you definitely want the flavor! Toss your quartered onion, the halved head of garlic, the lemon halves, and those fresh rosemary sprigs into the cavity. Don’t pack it tight; we need airflow.
Place that seasoned bird onto your roasting rack inside the pan. It goes straight into the hot oven. We keep it at 325°F for most of the journey because we are concentrating on the meat staying tender.
Roasting Time, Basting, and Foil Tent
The estimated time is roughly 3 to 3.5 hours for a 12-14 pounder, but always trust the thermometer over the clock! You’re looking for that thickest part of the thigh to hit exactly 165°F. Start basting around the 45-minute mark, spooning those delicious pan drippings over the top every three-quarters of an hour. If the skin starts looking too dark or crunchy too soon—maybe around the two-hour mark—just place a large piece of aluminum foil loosely over the top. It acts like a little hat to protect the skin while the inside finishes cooking.
The Critical Resting Period for Your Best Roast Turkey
This step is non-negotiable, so don’t even think about carving early! When you pull that turkey out at 165°F, move it to a clean cutting board, tent it loosely with foil again, and let it rest for at least 20 minutes. Twenty minutes! If you cut it now, all those lovely juices you worked so hard to keep inside will just run out onto the board. Resting allows the meat fibers to relax and reabsorb all that moisture. This is the secret that makes the difference between good turkey and THIS turkey. While you wait, you can get those sides ready, like my creamy mashed potatoes with gravy!

Tips for Success When Making the Best Roast Turkey
Once you master the basic technique above, you can add a couple of small twists that make this the absolute Best Roast Turkey every single time. Listen, even though we roast low and slow, nobody wants soft skin—nobody! So, here’s a trick to get that final crisp.
If your turkey is cooked through (165°F in the thigh) but the skin is still a little pale, crank that oven up to 400°F for the last 15 to 20 minutes only. You have to watch it like a hawk during this part because it can go from crisp to burnt in about sixty seconds. Seriously, don’t walk away!
Also, think about cleanup! I always line my roasting pan with heavy-duty aluminum foil before I even put the rack in. When you’re done, you just lift the foil out, and most of the cooked-on bits go with it. A little scrub is infinitely better than scraping solidified turkey fat for twenty minutes, right?
Serving Suggestions to Complement Your Best Roast Turkey
So you have this incredible, juicy roast turkey sitting on the counter, resting beautifully. Now what? You can’t serve perfection naked! A truly memorable holiday meal is all about those stunning accompaniments that soak up all those glorious pan drippings running off the bird during carving.
My family insists on having a few non-negotiable sides, and honestly, I can’t argue with them. You absolutely need something creamy to balance out the savory roast flavor. You simply must have my recipe for creamy mashed potatoes with gravy right next to that plate. They are essential for catching every single drop of juice!
Besides the mash, I like to keep things classic but bright. A big bowl of stuffing baked separately (remember, don’t stuff the bird itself!) is a must. And you need something green or tart to cut through all that richness. I usually go for roasted Brussels sprouts with balsamic drizzle, or maybe a simple green bean casserole, though I sneak extra crispy onions on top.
Keep the plate balanced, keep the flavors complementary, and most importantly, keep the gravy boat full. That turkey is just the star; the sides are the supporting cast making the entire show a smash hit!
Storage and Reheating Instructions for Roast Turkey Leftovers
You pulled off the Best Roast Turkey, and now you have that glorious mountain of leftovers. We need to treat this precious meat right so it lasts! Nobody wants to reheat turkey only to find it tastes like shoe leather three days later. The key here is speed and low heat—we are warming it up, not cooking it again.
First, carve everything immediately after resting. Don’t leave the turkey whole overnight! The sooner you get the meat off the bone, the sooner you can seal in the moisture. Wrap the carved white meat and dark meat separately in plastic wrap, or place it in an airtight container. This meat should disappear within three to four days in the fridge. You should aim to get it cooled down quickly; don’t just leave it sitting on the counter while you all nap after dinner!
Best Way to Store Carved Turkey
Seriously, airtight containers are your absolute best friend here. If you just toss a big piece of breast meat into a standard container without wrapping it first, the edges are going to dry out just sitting there. So, my standard setup is:
- Wrap portions tightly in plastic wrap first—this is the moisture barrier.
- Place those wrapped portions into an airtight storage container.
- Keep in the coldest part of your refrigerator.
If you happen to have boatloads of meat (which is the best problem to have!), slice it up and freeze it right away. It freezes perfectly well for up to three months. Just make sure you use freezer-safe bags and squeeze all that air out before sealing!
Reheating for Maximum Moisture
If you’re reheating slices for sandwiches or just a plate the next day, you must use moisture. Don’t microwave that turkey slice naked in the middle of the plate—that’s a one-way ticket to dry-land!
The best trick is to use liquid! When reheating slices, lay them in a microwave-safe dish and pour just a tiny splash of chicken broth or, even better, some of those pan drippings you saved over the meat. Cover the dish tightly with a lid or plastic wrap. The steam trapped inside warms the meat gently and keeps it incredibly tender. Heat it in short bursts, maybe 30 or 45 seconds at a time, until it’s steaming hot again.
If you’re reheating a whole leftover breast, treat it more like a slow roast. Put it in a baking dish with about half an inch of broth in the bottom, cover it tightly with foil, and warm it at about 300°F until heated through. Trust me, that little bit of broth in the bottom of the pan will save your leftovers!
Frequently Asked Questions About Achieving the Best Roast Turkey
I know big holiday birds can bring out the nervous baker in all of us! People send me so many questions after Thanksgiving about their whole turkey adventures. It’s totally normal to worry about food safety or timing when you’re cooking something this big. Here are the three top questions I get asked all the time about getting that perfect roast turkey result.
Can I stuff the turkey with bread stuffing before roasting?
Oh, trust me, it’s tempting! Stuffing a turkey cavity seems like such a traditional move, but honestly, I strongly advise against it if you want the safest, juiciest outcome. Putting stuffing inside means the center of the bird takes way longer to heat up and reach that safe 165°F internal temperature. By the time the stuffing is safe, the breast meat is usually bone dry!
My recommendation? Cook your stuffing entirely separately in a casserole dish. You still get all the flavor soaking up the turkey goodness, but you ensure that your whole turkey cooks evenly and quickly. Plus, you can make a bigger batch of stuffing that way!
How do I know if my roast turkey is done without overcooking?
This is where that meat thermometer becomes your absolute best friend. Forget the calendar, forget the clock; we only trust the temperature reading. You need to check the internal temperature in the thickest part of the thigh, making sure you are deep in the meat but not touching the bone. If your thermometer reads exactly 165 degrees Fahrenheit, it is done! Pull it out immediately.
Remember, that post-roast rest we talked about? That time lets the temperature creep up just a little bit more, which is called carryover cooking, and it’s crucial for evenness. So, 165°F when it comes out, and it will be perfect after those 20 minutes of rest.
What if my turkey is smaller or larger than 12-14 lbs?
Don’t sweat the size too much, but you do have to adjust your general timing! The 12–14 lb bird is usually a sweet spot, but if you have a smaller one or a monster bird, you can use a rough guideline. Generally, you want to plan for about 13 to 15 minutes of roasting time for every pound of turkey.
So, if you have a tiny 10-pounder, it might only take 2 hours and 15 minutes. If you have a huge 18-pound bird, you might be looking closer to 4 hours. But here is the golden rule for any size: Start checking your temperature around the estimated time, but don’t stop cooking until that thigh hits 165°F. The lower temperature we use (325°F) allows for slightly longer roasting without drying out the exterior, so the extra time is usually safe!
Nutritional Estimates for Simple Roast Turkey
So, everyone asks me about the nutrition when I share this recipe. It’s great because, without all the heavy bread stuffing inside, this roast turkey is actually a surprisingly clean meal! This is great news if you’re counting macros for the big holiday feast.
Keep in mind that these numbers are just estimates based on a standard 6-ounce serving of that delicious, lean cooked meat. If you are scraping every bit of skin off, or if you are loading up on the gravy (which is totally fine!), the final count will change. But just to give you a baseline:
- Calories: Around 350 per serving.
- Protein: A powerhouse at 45 grams! You’ll be full and happy.
- Total Fat: About 18 grams. Remember, some of that fat is the healthy stuff!
- Carbohydrates: Zero! Since we aren’t stuffing the bird, the turkey itself is completely carb-free.
- Sodium: About 450mg, mostly coming from the kosher salt we rubbed all over for seasoning.
I always say, treat these numbers as a general guide. They reflect the turkey meat itself, flavored by our simple butter and herb rub. Go ahead and enjoy the sides, but know that the main event, this beautiful roast turkey, is providing amazing lean fuel!
Share Your Perfect Roast Turkey Experience
I poured my heart, salt, pepper, and herbs into making sure this recipe for the Best Roast Turkey gives you the juiciest results without the stress. But honestly, the best part about sharing recipes is hearing back from you folks! Did you manage to get that skin super crispy? Did your carving go smoothly? I want to know *everything*!
Please, if you gave my simple roast turkey a try this season, don’t leave without letting me know how it went down. Either drop a comment below—tell me if you stuck totally to the script or if you added your own little twist. I love reading about your holiday triumphs!
And if you really loved how moist and easy this turned out, give the recipe a high five! Clicking the rating stars right under this section helps other nervous cooks find this foolproof method. It means the world to me that you trust my recipe for your big dinner. If you need to reach out privately, you can always check in on my contact page!
Rate This Amazing Roast Turkey
Five stars gets my heart singing! Tell me I made your holiday dinner less stressful—that’s my ultimate goal here!
Questions? Leave Them Below!
If you ran into any snags, or maybe you’re wondering if this method works on a huge 20-pound bird, drop those questions right here. I try my best to get back to everyone who reaches out through the comments or my contact page. I’m happy to troubleshoot any roast turkey hiccups!
Happy cooking, and thank you so much for trusting this recipe with your big holiday meal!
Print
Simple Roast Turkey
- Total Time: 4 hr 0 min
- Yield: 10 servings 1x
- Diet: Low Fat
Description
A straightforward recipe for roasting a whole turkey until it is moist and fully cooked.
Ingredients
- 1 whole turkey (12–14 lbs)
- 1/2 cup unsalted butter, softened
- 2 tablespoons kosher salt
- 1 tablespoon black pepper
- 1 tablespoon dried thyme
- 1 onion, quartered
- 1 head of garlic, halved crosswise
- 1 lemon, halved
- Fresh rosemary sprigs
Instructions
- Preheat your oven to 325 degrees Fahrenheit. Remove the giblets and neck from the turkey cavity. Pat the turkey skin completely dry with paper towels.
- In a small bowl, mix the softened butter with salt, pepper, and thyme. Rub this mixture all over the turkey, including under the skin over the breast meat.
- Place the onion, garlic, lemon halves, and rosemary sprigs inside the turkey cavity.
- Place the turkey on a roasting rack set inside a roasting pan.
- Roast for approximately 3 to 3.5 hours, or until a meat thermometer inserted into the thickest part of the thigh reads 165 degrees Fahrenheit. Baste the turkey with pan drippings every 45 minutes.
- If the skin browns too quickly, loosely tent the turkey with aluminum foil.
- Once cooked, remove the turkey from the oven. Tent loosely with foil and let it rest for at least 20 minutes before carving.
Notes
- For easier cleanup, line the roasting pan with aluminum foil before placing the rack inside.
- If you prefer a crispier skin, increase the oven temperature to 400 degrees Fahrenheit for the last 20 minutes of cooking, watching carefully to prevent burning.
- Prep Time: 30 min
- Cook Time: 3 hr 30 min
- Category: Main Course
- Method: Roasting
- Cuisine: American
Nutrition
- Serving Size: 6 oz cooked meat
- Calories: 350
- Sugar: 0
- Sodium: 450
- Fat: 18
- Saturated Fat: 7
- Unsaturated Fat: 11
- Trans Fat: 0
- Carbohydrates: 0
- Fiber: 0
- Protein: 45
- Cholesterol: 150
Keywords: roast turkey, whole turkey, holiday dinner, simple roast, poultry