
Halloween is my absolute favorite when it comes to quick, fun treats! Forget the complicated decorations; when I need something spooky but guaranteed to thrill the trick-or-treaters (and the adults!), I turn straight to these **Halloween Cake Pops**. Honestly, these are the simplest, most reliable cake pops you will ever make, and they use hardly any effort.
I love that they come together so quickly. I can bake the cake in the afternoon, roll them while I’m waiting for water to boil, and decorate them before bed. They’re miniature bundles of joy that scream “holiday fun” without demanding a ton of precision. Trust me, if you’re intimidated by dipping, this recipe is your friendly gateway drug to confectionery greatness!

Why You Will Love Making These Halloween Cake Pops
Seriously, what’s not to adore about these little round wonders? They are my go-to for last-minute fright night preparations because they nail the fun factor without stressing me out. You’ve got to try them!
- We start with a simple boxed mix! No need to fuss over sifting flour; that’s why I love my yellow cake mix hack for a base.
- They are unbelievably beginner-friendly. If you can crumble cake and roll a meatball, you can do this!
- They stay perfect for parties because they are individually coated and sealed.
- The dipping process lets you get super creative with spooky decorations.
- They require almost zero ‘actual’ baking time once the cake is done!
Essential Ingredients for Perfect Halloween Cake Pops
Okay, let’s talk supplies! The beauty of these Halloween Cake Pops is that they don’t require a million fussy things. You just need the basics, plus a few things to get that perfect chocolate shell. I always keep these stashed away for sudden spooky cravings.
First up, you need the cake itself. Grab one box of your favorite cake mix—I usually go chocolate or vanilla, but honestly, pick whatever your heart desires! Pair that with one whole can of frosting, 16 ounces worth. Don’t use the cheap stuff; a decent frosting makes a huge difference in texture here.
For the outside magic (the Halloween look!), you’ll need about 12 ounces of melting chocolate or candy wafers. Pro tip: If you use wafers, skip the oil, but if you use standard melting chocolate, have about a quarter cup of vegetable oil ready to thin it out. And naturally, don’t forget your cake pop sticks and whatever spooky sprinkles you plan on tossing on right away!
Step-by-Step Guide to Making Your Halloween Cake Pops
This is where the magic happens, but honestly, it’s super straightforward! Once the cake is done, it’s all assembly. Remember, timing is everything here, especially with getting things cold. You can check out my general cake pops guide, but these specific chilling times are important for our Halloween fun.
Baking and Crumb Preparation
First things first: bake that cake mix according to the box! Let it cool down completely—and I mean completely! If it’s even slightly warm, it’ll just smear the frosting everywhere. Once it’s cool, grab your biggest bowl and crumble that cake up. You want the fine crumbs, so press it between your fingers until there aren’t any big dry chunks left. Side note: Day-old cake is actually best for this because it crumbles much cleaner than super fresh cake!
Forming and Chilling the Cake Balls
Now, add that can of frosting to your crumbs. You need to mix this thoroughly. I usually start with my hands once it gets too sticky for a spoon. Keep kneading until the mixture sticks together perfectly, like cookie dough you can roll without it cracking. Roll these into little balls, about an inch across—try to keep them all the same size so they dip evenly later. Pop them onto parchment paper and stick them in the fridge for at least 30 minutes. They must be seriously chilled!
Preparing the Coating and Setting the Sticks
While those balls are hardening up, melt your chocolate wafers or candy melts. If you are using regular melting chocolate, stir in that quarter cup of vegetable oil—this is vital for getting that smooth, thin consistency that coats nicely without globbing up! Now, take your cold balls out. Dip the very tip of your cake pop stick into the melted chocolate and insert it halfway into a cake ball. Stick them upright in a piece of foam or a mug and chill them again for ten minutes. Setting that stick first prevents the dreaded wobble when you dip the whole thing!
Dipping and Decorating Your Halloween Cake Pops
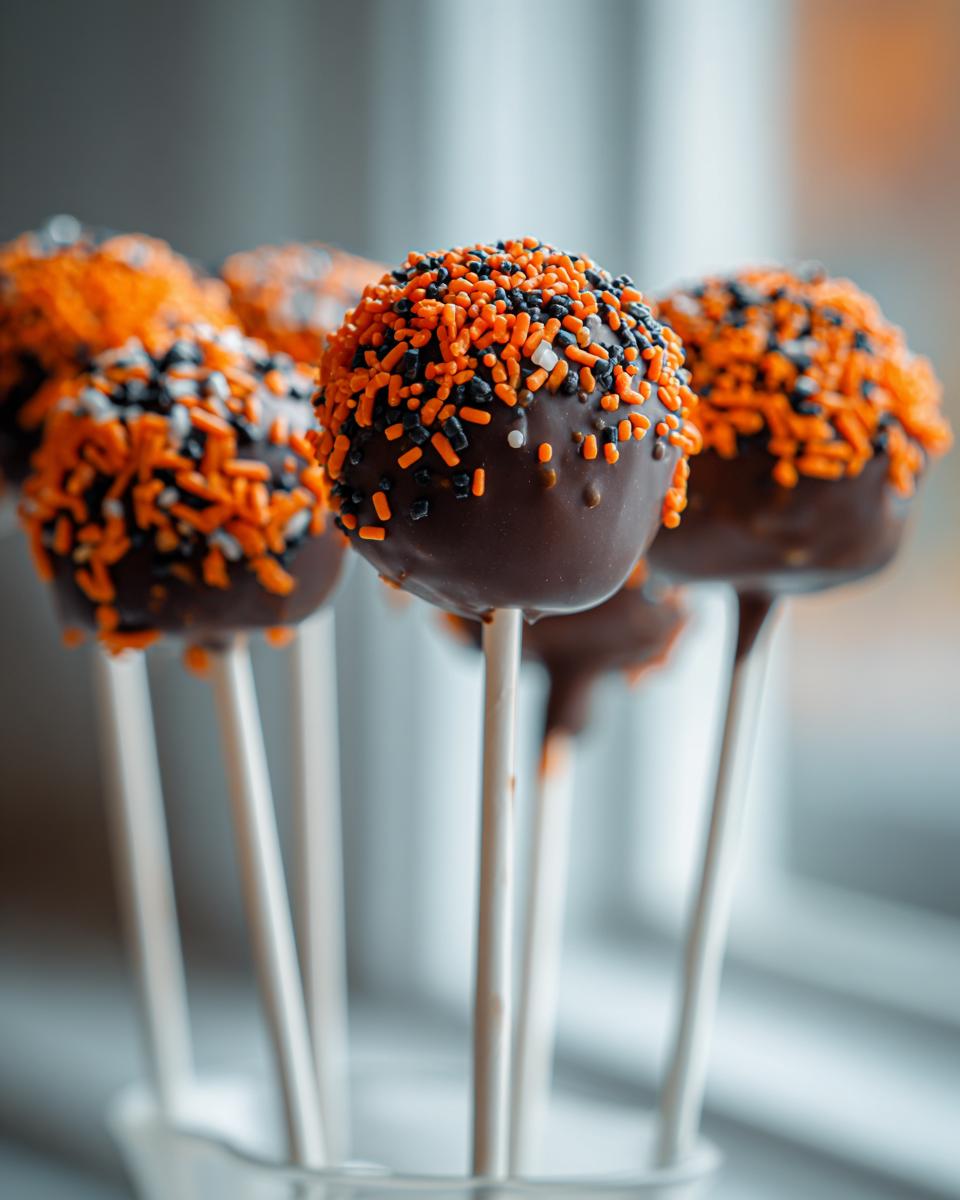
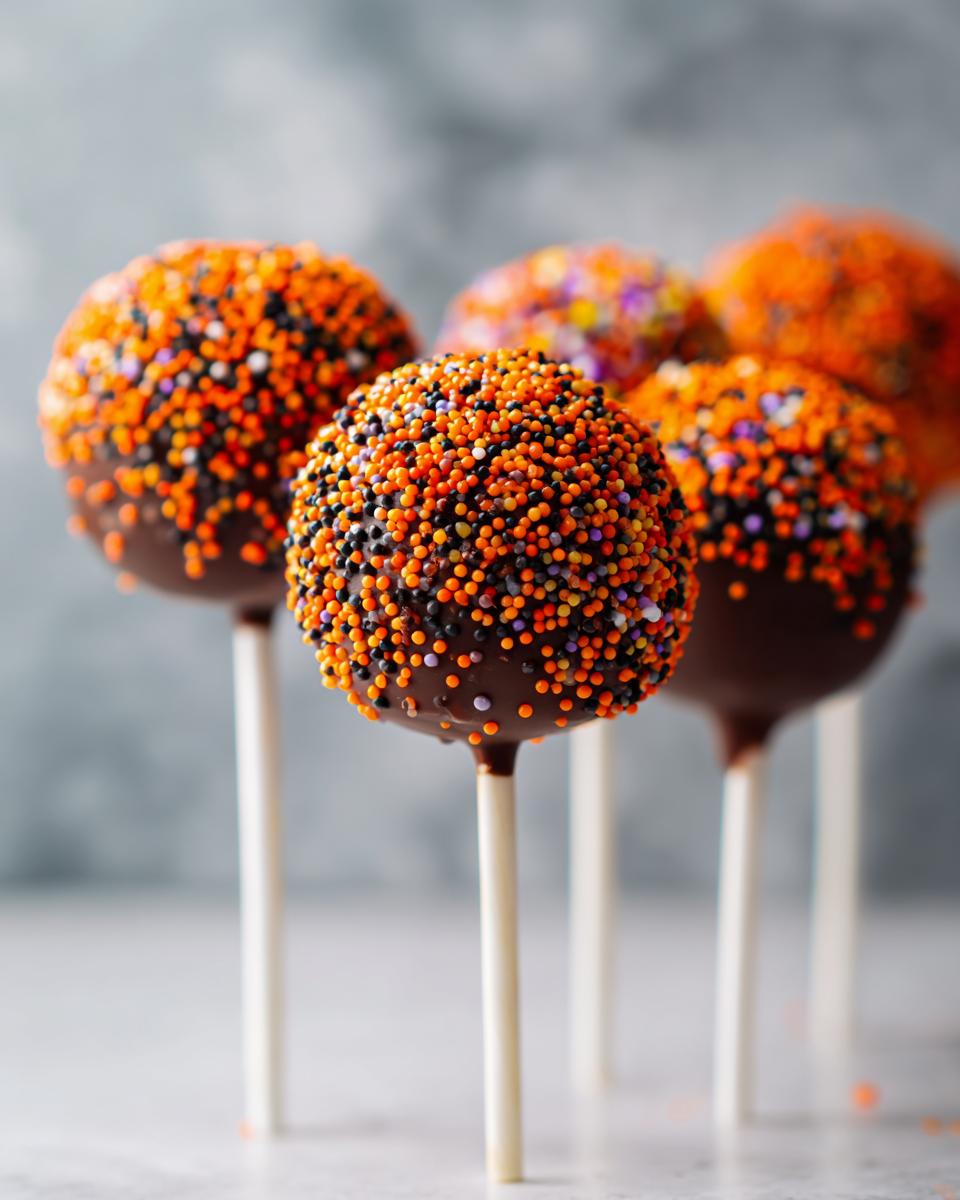
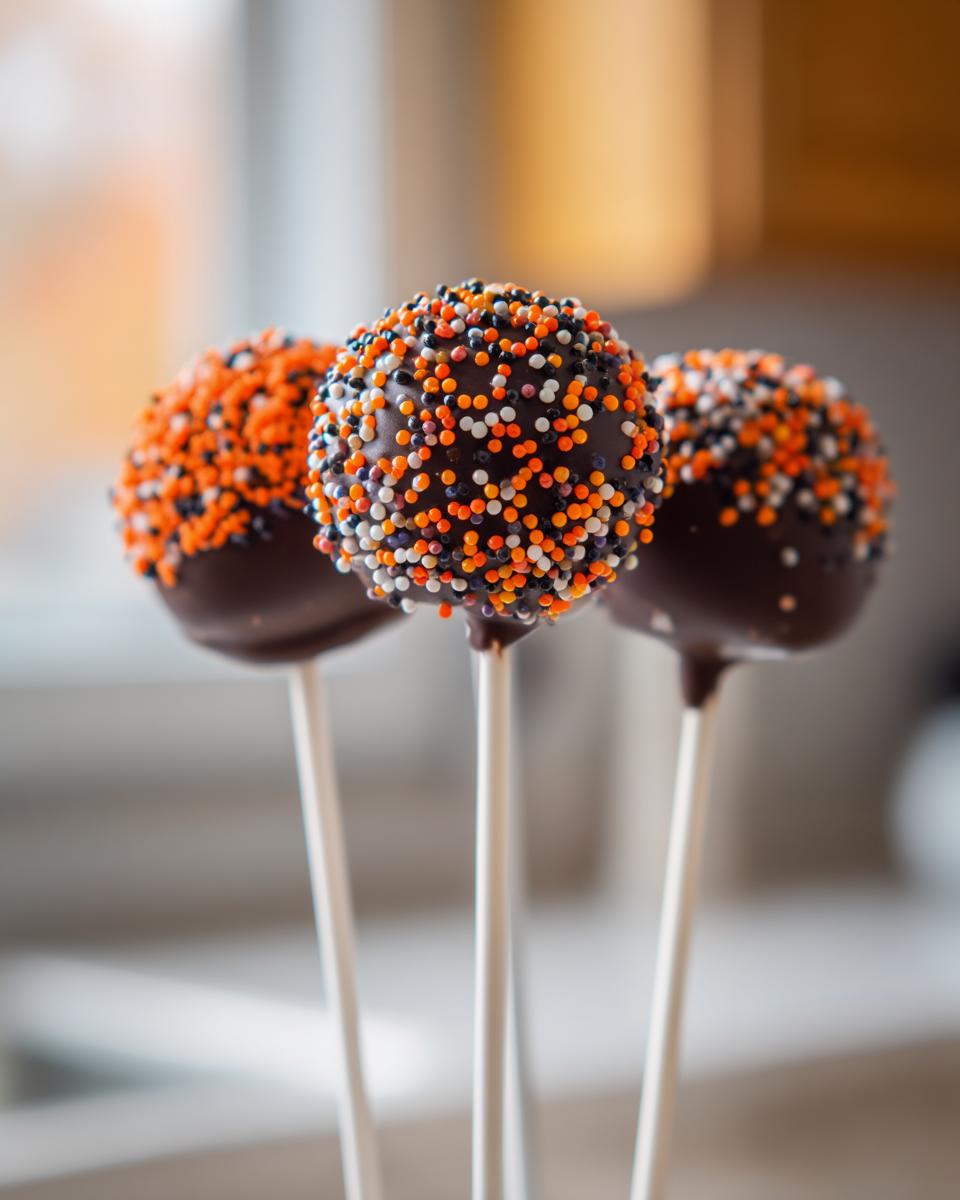
This is the exciting part! Grab a chilled ball, dip the stick end first into the chocolate, then swirl the whole ball under. Get it fully submerged, pull it out slowly, and gently tap the stick against the side of your bowl to let the excess drip off. You need to move fast here! While the coating is still wet, immediately add your Halloween sprinkles or grab those edible markers to draw little ghosts or pumpkin faces. Set them upright again until that spooky shell is totally hard.
Expert Tips for Flawless Halloween Cake Pops Coating
I swear, the coating is where most people get nervous, but I’ve got a few secrets that make dipping almost zen-like. It all comes down to temperature and consistency. If you followed the recipe above using wafers, great, but if you’re using standard chocolate chips or melting chocolate, you absolutely must treat it right!
The key thing here is thickness. If your chocolate is too thick—you know, like peanut butter—it won’t glide off the ball when you tap it, leaving you with fat, ugly domes, and you waste so much chocolate! If this happens, don’t panic. You can thin it out. I usually add a tiny spoonful of vegetable oil or even some shortening, stirring it slowly until it flows like silk. I found some great advice on adjusting chocolate coatings when I was testing out my chocolate caramel toffee cake, and those principles really apply here.
Temperature management is the other big hurdle for a smooth finish. First, that oil addition helps a ton. Second, the cake balls *must* be freezing—or at least very cold—when they hit that warm chocolate. That temperature shock makes the coating set almost instantly, trapping a perfect, thin shell around the cake. If your chocolate starts getting too stiff while you’re dipping, just give it 15 seconds in the microwave (stirring well!) to loosen it up again. A perfectly tempered shell is what makes these Halloween Cake Pops look professionally done!
Creative Variations for Your Halloween Cake Pops
Now, once you’ve nailed the basic black or orange spooky coating, you might want to jazz things up a bit! These aren’t called *Simple* Halloween Cake Pops for nothing, but that doesn’t mean we can’t have a little fun with flavor and color. You don’t need to overhaul the whole process to change the vibe!
I always love experimenting to see what works best for the vibe of the party. Think about how you could switch flavors if you need something lighter than chocolate, sort of like how I adapted my usual heavy recipes when trying out that bright key lime cake recipe!
Here are a few simple twists that keep the dipping process exactly the same:
- Switch the Cake Base: Instead of plain vanilla, try baking with a box of Red Velvet mix for an awesome, deep crimson color inside! Or, if you love spice, try a yellow cake mix but stir in just a teaspoon of pumpkin pie spice before you mix in the frosting.
- Funky Coating Colors: Sure, orange and black are the standards, but why not go for spooky purple and slime green candy melts? Keep the base cake neutral (vanilla) so the outside colors really POP. Melt the colored wafers by themselves; they usually have enough stabilizer that you don’t need to add any oil, making dipping even cleaner!
- Flavor Boosters in the Dough: Before you chill the balls, try adding a tiny splash of extract right into the crumbled cake mix. A half teaspoon of almond extract works wonders for vanilla cake, or even a touch of peppermint extract if you’re aiming for a witchy green theme!
- Texture Toppings: Beyond sprinkles, think textures! Try crushing up chocolate sandwich cookies (like Oreos) and rolling the dipped balls in those for a gritty, graveyard texture. Or, use sanding sugar in silver or deep purple for a creepy metallic sheen that catches the light.
See? Instant upgrade without adding any extra chilling or baking steps. That’s the beauty of mastering the coating first. You can change the inside and outside flavors endlessly!
Serving Suggestions for Your Festive Halloween Cake Pops
Now that you have these perfect little spheres of cake goodness, the real fun begins: presentation! These Halloween Cake Pops deserve a stage, not just a boring plate shoved in the corner. The way you display them can turn a simple dessert into the centerpiece of your spooky spread. It’s all about visual impact, right?
When I’m planning my table, I always think about height and drama. Even quick treats look ten times fancier when they aren’t lying flat. If you are looking for some general inspiration on making a spread look amazing, I recently looked at how people set up their brunches for Father’s Day ideas, and many of those presentation tips translate perfectly to Halloween!
Here are a few ways I like to show off my finished pops:
- The Classic Styrofoam Block: This is the easiest! Just take a block of styrofoam, cover it completely with black or orange fabric or crinkled paper, and poke your finished pops in standing straight up. It gives you that classic lollipop shape display.
- Tiered Stand Terror: If you have a cute tiered serving tray, alternate your black, orange, and maybe even green pops on each level. It gives people easy access and looks really professional. Make sure the coating is fully set first, or you’ll have a sticky mess!
- The Spooky Fog Effect: This takes a little more effort, but wow, does it impress people! Place your cake pops standing up on a platter. Then, very carefully, set a small, heat-safe container of dry ice (don’t touch it directly!) off to the side or tucked underneath the platter. Pour a tiny bit of warm water over the dry ice right before guests arrive. You’ll get that eerie, low-lying fog curling around the base of your treats. So dramatic!
- Individual Favor Bags: If you’re sending guests home with goodies, slide each pop into a clear cellophane bag. Tie the top with some black and orange curling ribbon, and maybe add a little paper tag that says “Thanks for Bumping a Ghoul!” They work great as easy party favors.
Honestly, no matter how you serve them, just make sure they are displayed where everyone can see them! These little Halloween Cake Pops are too cute to hide.
Storage and Make-Ahead Instructions for Halloween Cake Pops
One of the best things about making these Halloween Cake Pops is that they are fantastic for prepping early! Seriously, you can get 90% of the work done the day before your big party, which gives you so much breathing room. I rarely decorate mine until the very last minute, but the rolling and chilling process? That’s a great make-ahead project.
You can absolutely roll your cake balls days ahead of time! Just make sure they are rolled tightly and kept in an airtight container in the refrigerator. If you just roll them and leave them out on the counter, they might dry out a little too fast, and we spent time making them perfectly moist, right?
Storing Once They Are Coated
Once you dip those babies and they are decorated, they just need a place to set up completely. My first step, just like I mentioned, is sticking them upright into a foam block while the coating hardens. After that, you have a choice: room temperature or the fridge.
If you’re using standard candy melts or good quality coating chocolate, they will usually hold just fine at a cool room temperature for about 24 hours, provided your house isn’t super warm. Keep them away from direct sunlight!
However, for maximum freshness, especially if you are making them more than a day ahead, the refrigerator is safer. When you put them in the fridge, make sure you put that foam block (or whatever stand you are using) inside a large, sturdy container with a lid. You need to protect them from getting bumped around, as that can crack the shell!
How Long Do Homemade Cake Pops Last?
Because these are mostly cake and frosting—and most store-bought frostings have preservatives—they hold up surprisingly well. If they are refrigerated tightly sealed, I find they taste best within three to four days. If you need them to last longer, you can freeze them, but I usually avoid that unless I have to! Freezing can sometimes affect the texture of the coating when it thaws.
If you freeze them, wrap the set cake pops tightly in plastic wrap first, placing the wrapped pops in a freezer-safe zip-top bag. When you pull them out to thaw, let them come up to room temperature *while still sealed* for several hours. This stops condensation from forming all over your pretty Halloween coating. Nobody wants sweaty, cracked cake pops!
Best Practices for Making Ahead of Time
If you are using these for a big event, here’s my personal schedule. Day One: Bake and crumble the cake. Mix with frosting and roll out all the balls. Keep them covered tightly in the fridge overnight.
On the morning of the party (like Day Two): Take the balls out about 20 minutes before you start popping the sticks in. Once the sticks are set (after that second chill), melt your chocolate, and do all your dipping and decorating! That way, the sprinkles look fresh, and the coating is crisp when people start eating them. It’s all about breaking the job into manageable, less stressful chunks!
Frequently Asked Questions About Making Halloween Cake Pops
I get so many messages after people try making these pops, usually because they run into a little snag dipping them! It’s totally normal, especially when dealing with melting chocolate. Don’t worry, we’ve all been there. Here are the top things people ask me when they are trying to get that perfect coating for their spooky treats.
Can I skip chilling the cake balls?
Oh, please don’t try this! If you skip chilling, you are setting yourself up for absolute heartbreak. When you try to dip a room-temperature cake ball into warm chocolate, the ball just starts to disintegrate, and you end up with chocolate soup mixed with crumbled cake. Plus, the coating melts right off! Chilling them makes them firm so they can handle the heat of the coating. That first 30-minute chill, and the ten minutes after setting the stick, are non-negotiable for sturdy **Halloween cake pops**.
Can I use regular chocolate chips instead of candy wafers?
Yes, you absolutely can, but you have to treat them differently! Candy wafers (like Ghirardelli or Wilton Candy Melts) are designed to melt thinly and set up hard without much fuss. Regular chocolate chips—even semi-sweet ones—have oil content that separates when melted down, making them thick and seize easily.
If you use chips, you *must* add oil or shortening, just like in the main instructions. The trick is using shortening or coconut oil instead of just vegetable oil for a slightly cleaner set, or if you’re feeling fancy and want true chocolate flavor, you might want to look into adding a tiny bit of cocoa butter. For simplicity, stick to the wafers if you can, but chips work if you treat them right!
How do I stop the coating from cracking when it sets?
Cracking almost always comes down to temperature shock. This happens when the cake ball is too cold compared to the melted coating, or when the coating is too thick. If the coating is too thick, it shrinks too much as it dries, pulling itself apart.
Make sure your chocolate can flow nicely—if it’s stiff, add that tiny bit of oil or shortening until it drips smoothly. Secondly, I always let my cake balls sit on the counter while I’m melting and oiling the chocolate (about 10 minutes) before the final dip. I want them cold, but I don’t want them freezer-solid hitting the warm chocolate. A slightly warmer ball means a slower set and less tension as the shell hardens. You can find more coating trouble-shooting tips over on my main cake pops tutorial page!
Do I need to fully bake the cake?
You do! You need the structure that comes from baking. You aren’t making truffles; you are using baked cake crumbs mixed with frosting as a binder. If you try to bake only the crumb/frosting mix, it won’t set up correctly. Bake the cake fully, let it cool, then crumble. That step is the difference between dense, perfect **Halloween cake pops** and a sticky mess!
Nutritional Snapshot: Estimated Values for Halloween Cake Pops
Now, I know what you’re thinking: all that chocolate and cake can’t possibly be good for you, right? Well, these are treats, not diet food! But for those of you who like to keep track, I pulled together the estimated numbers for one single cake pop. Remember, these are rough guesses because the exact values depend entirely on the brand of cake mix and frosting you decide to use. I always say it’s best to view this as just a fun little gauge for your holiday feast!
This information is based on approximately 24 pops using standard yellow cake mix, canned chocolate frosting, and basic melting wafers. If you swap out for dark chocolate or use a huge amount of heavy sprinkles, your numbers will shift a bit. Treat this as a general idea rather than strict medical data!
- Serving Size: 1 pop
- Calories: 200
- Sugar: 20g (Yes, they are sweet! That’s why we only eat one… maybe two.)
- Fat: 12g (This includes the delicious coating!)
- Saturated Fat: 6g
- Trans Fat: 0g (Hooray for no trans fat!)
- Carbohydrates: 22g
- Protein: 3g
- Cholesterol: 15mg
- Sodium: 150mg

Simple Halloween Cake Pops
- Total Time: 60 min
- Yield: 24 pops 1x
- Diet: Vegetarian
Description
A straightforward recipe for making festive Halloween-themed cake pops.
Ingredients
- 1 box cake mix (any flavor)
- 1 can frosting (16 oz)
- 12 oz melting chocolate or candy wafers (orange or black)
- 1/4 cup vegetable oil
- Cake pop sticks
- Food coloring (optional, for cake)
- Sprinkles or edible markers for decoration
Instructions
- Prepare the cake according to the box directions. Bake and let it cool completely.
- Crumble the cooled cake into fine crumbs in a large bowl.
- Add the frosting to the cake crumbs. Mix until the mixture holds together like dough.
- Roll the mixture into small, uniform balls (about 1 inch diameter).
- Place the balls on a baking sheet lined with parchment paper and chill in the refrigerator for at least 30 minutes.
- Melt the chocolate or candy wafers according to package directions, stirring in vegetable oil for smoother dipping.
- Dip the tip of a cake pop stick into the melted coating and insert it about halfway into a chilled cake ball. Return to the refrigerator for 10 minutes to set the stick.
- Dip the entire cake ball into the melted coating, rotating to cover completely. Tap the stick gently against the side of the bowl to remove excess coating.
- Immediately apply sprinkles or use edible markers to decorate before the coating hardens.
- Place the finished cake pops upright in a styrofoam block or stand until the coating is fully set.
Notes
- Use leftover cake scraps or day-old cake for the best texture.
- If the coating is too thick, add a small amount of shortening or coconut oil to thin it slightly.
- For cleaner dipping, ensure the cake balls are very cold before coating.
- Prep Time: 30 min
- Cook Time: 30 min
- Category: Dessert
- Method: No-Bake Assembly
- Cuisine: American
Nutrition
- Serving Size: 1 pop
- Calories: 200
- Sugar: 20
- Sodium: 150
- Fat: 12
- Saturated Fat: 6
- Unsaturated Fat: 6
- Trans Fat: 0
- Carbohydrates: 22
- Fiber: 1
- Protein: 3
- Cholesterol: 15
Keywords: Halloween, cake pops, chocolate coating, dessert, party treat, easy