
Oh my gosh, fall baking is the coziest, but sometimes you just don’t have hours for fussy ovens! That’s why I’m completely obsessed with easy, festive treats that look way fancier than the effort they take. If you’re looking for the ultimate showstopper that requires zero actual baking, you’ve hit the jackpot. Seriously, these Pumpkin Patch Dirt Cups are our family’s go-to for Halloween parties.
The magic here is pure assembly—pudding, crushed cookies, and a few fun candies! It’s simple, but the payoff is huge because they look absolutely adorable layered up in clear cups. I usually make a double batch because my kids (and their friends) devour them before I can even finish setting out the candy pumpkins. Trust me, these are winners, and you can whip up a whole batch faster than you can preheat your oven!
Why You Will Love These Pumpkin Patch Dirt Cups
Honestly, when the weather starts turning crisp, I don’t want to stand over a hot stove. These treats are my secret weapon for quick holiday prep! They hit all the right notes: they’re fun, they taste like rich chocolate comfort food, and they disappear almost instantly. I keep coming back to them year after year because they just *work*.
- They are ready in about 15 minutes of active work—seriously!
- You don’t have to turn on the oven, which is a huge win in my book.
- The layering effect makes them look incredibly impressive when you serve them up.
- Kids absolutely adore having a hand in assembling their own spooky treats.
No-Bake Simplicity of Pumpkin Patch Dirt Cups
If you are new to the kitchen, grab your rolling pin and get ready to shine because these Pumpkin Patch Dirt Cups require zero baking skill whatsoever! It’s all mixing, crushing, and layering. I let my youngest help crush the cookies, and it’s such a fun sensory activity for them, minus the burnt sugar risk. It’s stress-free fun, guaranteed.
Perfect for Fall Celebrations
Who doesn’t love creepy-crawly graveyard vibes? These cups instantly turn any dessert table into a mini autumn wonderland. That dark, crumbly topping looks just like rich soil, and those little candy pumpkins sitting on top? Pure gold. They are the perfect visual centerpiece for a class party or a casual family get-together without demanding hours of decorating time.

Gathering Ingredients for Your Pumpkin Patch Dirt Cups
Okay, getting the ingredients together is half the fun because it means the assembly is right around the corner! What I love about this recipe is that it uses things I usually have on hand anyway. We’re keeping this rich and chocolatey, so the quality of that pudding and those cookies actually makes a difference, trust me.
You’ll need the pudding mix (we’re using chocolate), cold milk, the whole container of thawed whipped topping, a full package of those chocolate sandwich cookies—you know the ones—some gummy worms, and those adorable tiny candy pumpkins. That’s it! Six simple things to make six stunning Pumpkin Patch Dirt Cups.
Ingredient Notes and Substitutions for Pumpkin Patch Dirt Cups
Let’s talk specifics, because technique starts with the ingredients! For the cookies, I’m loyal to the classic sandwich cookie brand—the filling helps keep the ‘dirt’ just a little bit creamy when it mixes with the pudding later. However, any chocolate cream-filled wafer will do.
If you can’t handle gummy worms—maybe they’re too wiggly for your taste—you can totally skip them or swap them for some chopped chocolate shavings mixed in with the top layer. Also, for that deep chocolate punch in these Pumpkin Patch Dirt Cups, I sometimes use chocolate milk instead of regular milk when mixing the pudding. Gives it such a lovely, intense flavor!
And remember, the whipped topping absolutely *must* be thawed completely before you fold it in so you don’t deflate all that lovely air we create!
Step-by-Step Instructions to Make Perfect Pumpkin Patch Dirt Cups
Now for the fun part—actually putting this masterpiece together! Since this is a no-bake recipe, we need to respect the setting times for the pudding, or things get awfully soupy, and nobody wants liquid dirt cups! Read through these steps before you start, especially regarding when to incorporate that fluffy topping. It’s a quick process, but timing is everything.
Preparing the Pudding Base for Pumpkin Patch Dirt Cups
First things first, let’s make the chocolate base that forms the ‘soil’s’ foundation. You’ll mix up that instant chocolate pudding powder with your cold milk exactly as the box tells you. Don’t get fancy here; just stick to the measurements. After mixing, it needs about five minutes to start thickening up. While it’s setting, get your whipped topping ready—make sure it’s soft and fully thawed, not icy at all!
Once the pudding has that initial five-minute head start, gently fold in the thawed whipped topping. I mean *gently*. You want everything combined until you have one homogenous, fluffy, chocolate cloud mixture. We aren’t whipping it again; we are just marrying the two textures while keeping all the air in the whipped topping. This lovely mixture is the heart of your Pumpkin Patch Dirt Cups.
Assembling the Layers of Pumpkin Patch Dirt Cups
Time to make the actual dirt! Take your chocolate sandwich cookies—I usually pull out the vanilla filling first, just because it gets mushy faster, but you can leave it in if you’re in a rush. Put them into a heavy-duty zip-top bag. Grab a rolling pin and start pounding until you have crumbs ranging from fine powder to slightly chunky bits. This texture variation is what makes the ‘dirt’ look real!
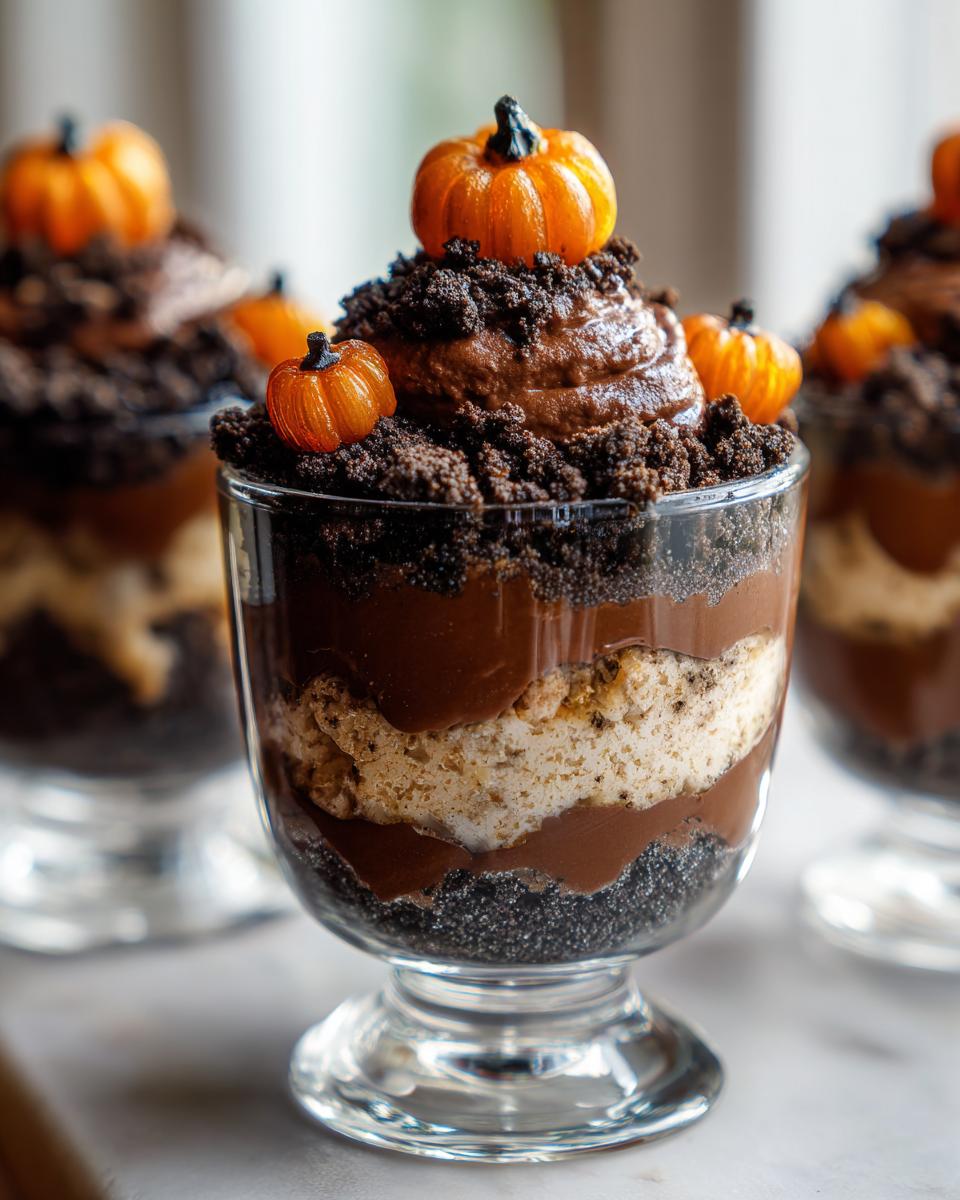
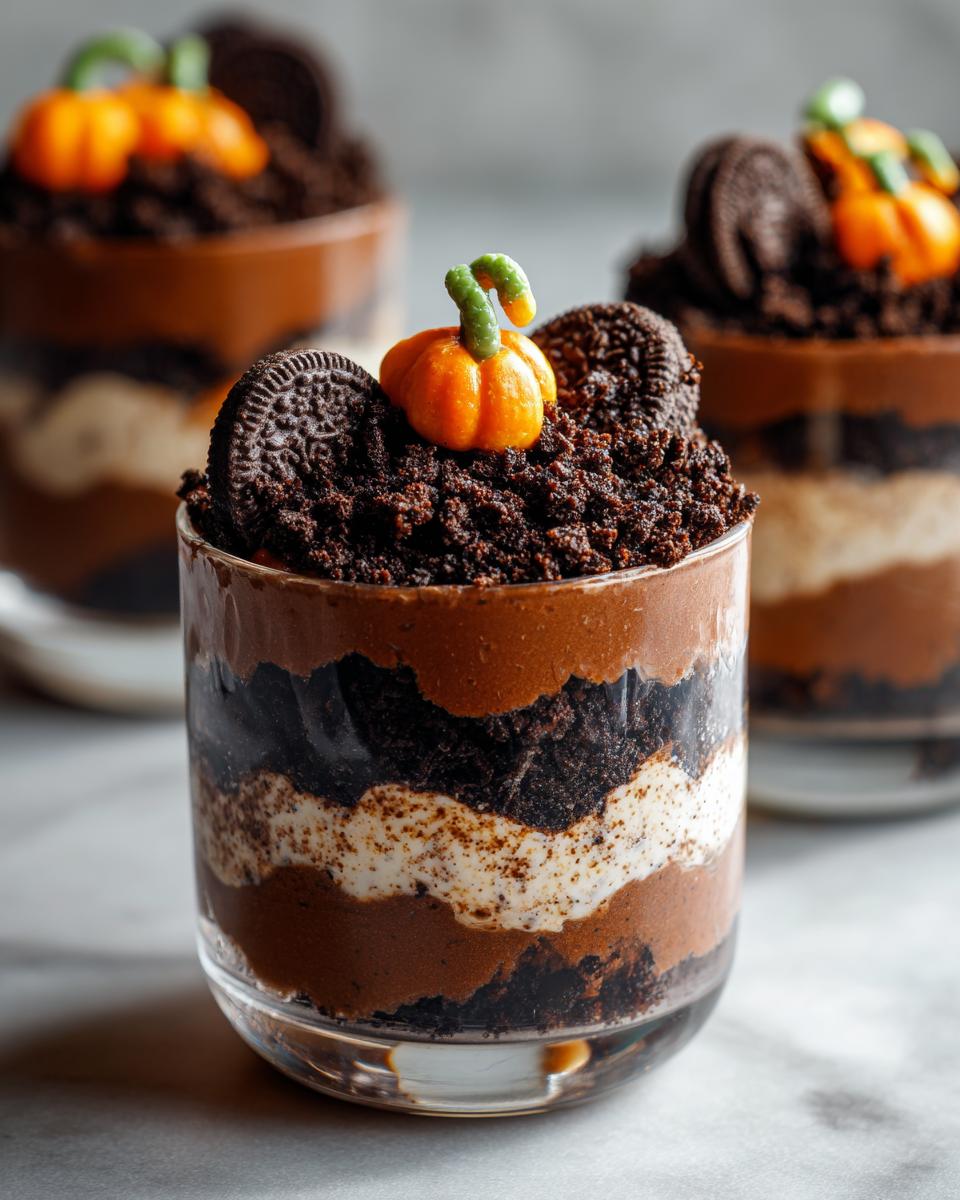
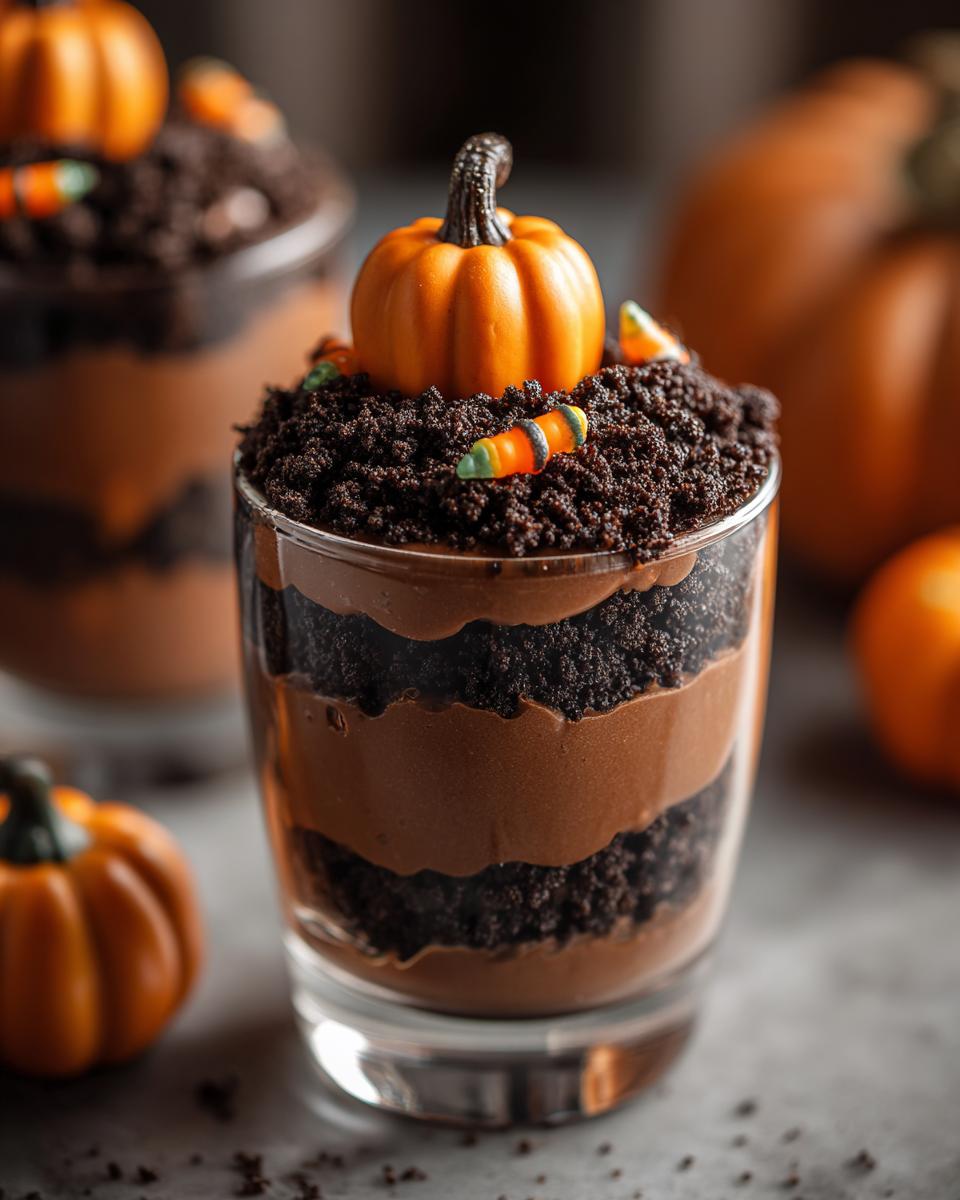
Now we layer! Grab your clear cups or little mason jars. Spoon a nice layer of that chocolate pudding mixture into the bottom. It should fill up about a quarter of the cup. Then, top that generously with your homemade cookie ‘dirt.’ Repeat the layering process once more: pudding, then a thick layer of those crushed cookies. Try not to let the cookie crumbs get too deep into the pudding layer—we want nice distinct bands!
Adding the Final Touches to Your Pumpkin Patch Dirt Cups
This is where the magic happens and your dessert starts looking like a miniature garden! Take your gummy worms and press a few of them right into that top layer of cookie crumbs. Make sure they look like they are bravely trying to crawl out of the earth—that always gets a giggle from the kids. If you need more details on fun cookie decorating, you can check out some of my ideas for other no-bake cookie treats here.
Finally, place one small candy pumpkin right on top of the cookie surface in each cup. These look like the harvest bounty popped right up from the soil! Here’s the most important part for structural integrity so your layers don’t slide around: chill everything for at least 30 minutes before serving. This lets the pudding firm up nicely and helps those flavors really meld together in your perfect Pumpkin Patch Dirt Cups.
Expert Tips for the Best Pumpkin Patch Dirt Cups
Once you nail the basic assembly—and the pudding is set—you can really start having fun taking these simple desserts up a notch! I’ve learned a few tricks over the years from making these for huge crowds. These little tips make a big difference in texture and presentation for your dirt cups.
First, if you want the richest possible chocolate flavor that complements the sweetness of the candy, try using chocolate milk when you mix your instant pudding, just like for that amazing chocolate caramel toffee creation I shared last month. It adds depth!
Second, texture control is huge. If you want your ‘dirt’ to look truly authentic and not just like crushed cookies, crush about 90% of the cookies into a fine powder, but leave the remaining 10% in slightly bigger chunks. When you sprinkle those bigger pieces on top of the final layer, it gives the illusion of fresh clumps of earth. It’s a small visual trick that pays off!
Also, don’t underestimate the power of the cup choice! While little jars are cute, if you use wider, shallower clear plastic bowls, you can layer more dramatically, which makes it look like there is a super deep patch of dirt in each serving. You see more worms and more pumpkin peeking through that way!
Storage and Make-Ahead Options for Pumpkin Patch Dirt Cups
One of the absolute best things about these Pumpkin Patch Dirt Cups is that they are fantastic for making ahead of time! Since they are totally no-bake, they actually *improve* overnight in the fridge. The cookies absorb just a tiny bit of moisture from the pudding without getting totally soggy—it’s the perfect texture balance, in my opinion.
I usually assemble them completely, right down to putting the worms and the pumpkins on top, up to about 6 hours before I need to serve them. If I’m prepping for a big Halloween bash, I can even do them the morning of! Just make sure they are covered tightly once assembled.
If you need to store leftovers (which rarely happens in my house!), cover them and pop them in the fridge. They stay perfectly delicious for about two to three days. Any longer, and the cookies start getting a little too soft for my liking. So yes, planning ahead for your Pumpkin Patch Dirt Cups routine is totally doable!
Serving Suggestions to Complement Pumpkin Patch Dirt Cups
Since these cups are rich, creamy, and chocolatey, you want to serve them alongside something that cuts through that richness a bit, or something that just screams ‘Cozy Fall!’ My first thought is always pairing them with coffee, so maybe you can have some amazing crumbly coffee cake available for the grown-ups.
For a party spread, I love setting out small bowls of colorful fall fruit—think crisp apple slices or bright orange mandarin oranges—so people have a fresh bite between cups. If you’re doing a savory appetizer beforehand, keep it light! Nothing heavy, or no one will have room for dessert!
Frequently Asked Questions About Pumpkin Patch Dirt Cups
I get so many questions after posting this recipe! It’s one of those ones where people want to customize it for allergies or just adjust the fun factor. I’ve rounded up some of the common things I hear in my inbox to save you some time!
Can I make these Pumpkin Patch Dirt Cups vegan?
That’s a great question, and yes, you absolutely can pivot these Pumpkin Patch Dirt Cups to be completely vegan! The easiest swaps are using vegan chocolate sandwich cookies—most major brands have one available now, or you can find store brands that are accidentally vegan. When it comes to the pudding, look for a plant-based instant pudding mix, which is often made with cornstarch instead of dairy.
For the whipped topping, there are fantastic coconut or soy-based whipped toppings on the market now that whip up just beautifully. Just make sure whatever topping you choose is the *whipped topping* kind, not just liquid cream, otherwise folding it in won’t work the same way. It takes just a few swaps to make your dirt cups cruelty-free!
What is the best way to crush the cookies?
Oh, the cookie crushing—this is where the mess happens if you aren’t careful! My absolute favorite method is the zip-top bag and rolling pin combination. Put the cookies in a good, sturdy, freezer-weight bag—the thin sandwich bags always seem to split right at the worst moment!
Lay the bag flat on a clean, sturdy surface, maybe even line it with a towel so it doesn’t slide around. I start by gently pressing down on the bag to get the air out, seal it up, and then use the smooth side of a rolling pin (or even a heavy sauce pan!) and roll over them firmly. You’ll get those nice varied crumbs—powdery and chunky—that look just like real soil. If you want them super fine with absolutely no chunks, a food processor works in about ten seconds, but watch carefully so they don’t turn into a paste!
How long do the Pumpkin Patch Dirt Cups need to chill?
This is non-negotiable, folks! If you serve them right after assembly, you’ve essentially got chocolate pudding soup with cookie floaties. We really need that time for the dessert to set up properly so that when you dig your spoon in, you get a nice, clean bite through the distinct layers.
The recipe calls for a minimum of 30 minutes in the fridge just to firm up the pudding mixture so it holds its shape. If you can swing it, 45 minutes to an hour is even better because it lets the flavor of the chocolate and the slight vanilla from the cookies really marry together. Don’t skip that chill time; it’s what separates a sloppy dessert from a perfectly structured cup!
Estimated Nutritional Overview for Pumpkin Patch Dirt Cups
Now, I have to give you the big disclaimer right up front: I’m a baker, not a certified nutritionist! When you’re working with instant pudding mixes and cookies, the numbers can definitely vary based on what brand of sandwich cookie you sneakily decide to use. However, based on the standard components you see in the ingredient list, I’ve put together a general estimate for one serving. This should just give you a ballpark idea of what you’re digging into!
We are definitely leaning into the treat category here, which is totally fine because this is special occasion food! But here’s the breakdown for one of those lovely cups based on the recipe proportions:
- Calories: Around 350 per cup. Worth every single one, trust me!
- Total Fat: Approximately 16 grams. Remember that includes the fat from the cookie cream filling!
- Carbohydrates: This one is higher, around 50 grams, which makes sense when you factor in the sugar from the pudding and the cookies.
- Protein: You get a little boost from the milk and pudding mix, usually around 5 grams.
It’s important to remember that these are rough estimates for one of the six servings. If you pack your layers extra high—which, let’s be honest, I totally do—your numbers will creep up a bit. But seriously, nobody is counting calories when they are reaching into the dirt for a gummy worm!
Share Your Pumpkin Patch Dirt Cups Creations
Alright, now that you have your own little edible pumpkin patches ready to go, I absolutely *need* to see them! This is the best part of sharing recipes with you all—seeing your amazing spin on things. Did you use bright orange gummy worms? Did you arrange your candy pumpkins just so?
Please, if you make these, snap a photo. Tag me on social media—I promise I check my notifications! It means the world to me when I see my family-tested favorites popping up in your kitchens. And please, don’t be shy about leaving a rating right here on the page.
A quick star rating helps other bakers know this recipe is tried, true, and delicious. If you make any tweaks, I’d love to hear about them in the comments too! Your feedback helps everyone get better in the kitchen. If you ever have a burning question about this recipe or anything else baking-related, you can always reach out to me through my contact page. Happy scooping!
Print
Pumpkin Patch Dirt Cups
- Total Time: 15 min
- Yield: 6 servings 1x
- Diet: Vegetarian
Description
A simple, no-bake dessert resembling a pumpkin patch made with chocolate pudding and crushed cookies.
Ingredients
- 1 package (3.4 oz) instant chocolate pudding mix
- 2 cups cold milk
- 1 container (12 oz) frozen whipped topping, thawed
- 1 package (14.3 oz) chocolate sandwich cookies (like Oreos)
- 1/2 cup gummy worms
- 12 small candy pumpkins
Instructions
- Prepare the chocolate pudding according to package directions using the cold milk. Let it set for 5 minutes.
- Gently fold the thawed whipped topping into the prepared pudding until combined.
- Place the chocolate sandwich cookies in a large zip-top bag and crush them finely using a rolling pin or food processor. This is your ‘dirt’.
- Spoon a layer of the pudding mixture into individual clear cups or small jars.
- Top the pudding layer with a generous layer of crushed cookies.
- Repeat the layers: pudding, then crushed cookies.
- Press a few gummy worms into the top layer of ‘dirt’ so they look like they are emerging.
- Place one candy pumpkin on top of the cookie layer in each cup.
- Chill the cups for at least 30 minutes before serving.
Notes
- You can use vanilla pudding dyed orange for a different look if desired.
- For a richer chocolate flavor, use chocolate milk instead of regular milk when making the pudding.
- Crush the cookies just before assembling for the best texture.
- Prep Time: 15 min
- Cook Time: 0 min
- Category: Dessert
- Method: No Bake
- Cuisine: American
Nutrition
- Serving Size: 1 cup
- Calories: 350
- Sugar: 45
- Sodium: 300
- Fat: 16
- Saturated Fat: 6
- Unsaturated Fat: 10
- Trans Fat: 0
- Carbohydrates: 50
- Fiber: 2
- Protein: 5
- Cholesterol: 15
Keywords: pumpkin patch, dirt cups, chocolate pudding, no-bake dessert, easy dessert, Halloween treat